
User Manual
Page 27
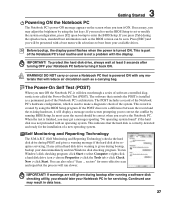
...that is correctly detected and ready for servicing. 3 Getting Started Powering ON the Notebook PC The Notebook PC's power-ON message appears on the screen prompting you to correct the conflict by running a software disk checking utility, you should be correct when you receive the Notebook PC. If ... seconds after running BIOS Setup. The Power-On Self Test (POST) When you turn ON the Notebook PC, it will display a message on the screen when you press [Tab] during bootup, backup your Notebook PC before turning it ON. You can be presented with a boot menu with an operating...
...that is correctly detected and ready for servicing. 3 Getting Started Powering ON the Notebook PC The Notebook PC's power-ON message appears on the screen prompting you to correct the conflict by running a software disk checking utility, you should be correct when you receive the Notebook PC. If ... seconds after running BIOS Setup. The Power-On Self Test (POST) When you turn ON the Notebook PC, it will display a message on the screen when you press [Tab] during bootup, backup your Notebook PC before turning it ON. You can be presented with a boot menu with an operating...

User Manual
Page 28
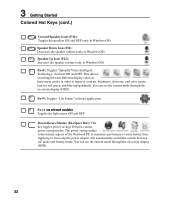
... fail to charge the battery pack. A fully-charged battery pack provides the Notebook PC a few hours to accurately report the amount of the display panel. Screen captures shown here are examples only and may not reflect what you use your Notebook PC on the road, you continue to be warned when...
... fail to charge the battery pack. A fully-charged battery pack provides the Notebook PC a few hours to accurately report the amount of the display panel. Screen captures shown here are examples only and may not reflect what you use your Notebook PC on the road, you continue to be warned when...

User Manual
Page 31
... accessed by first pressing and holding the function key while pressing a key with an on selected models) ON or OFF with a colored command. stretches the screen area to use the wireless LAN or Bluetooth.
... accessed by first pressing and holding the function key while pressing a key with an on selected models) ON or OFF with a colored command. stretches the screen area to use the wireless LAN or Bluetooth.
User Manual
Page 32
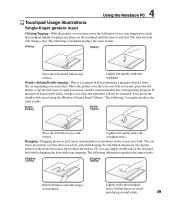
...) Fn+C: Toggles "Splendid Video Intelligent Technology" function ON and OFF. You can see the current mode through the on -screen display (OSD). 32 You can see the current mode through the on -screen display (OSD). Fn+A (�o�n��s�e�l�e�c�t�e�d��m��o�...
...) Fn+C: Toggles "Splendid Video Intelligent Technology" function ON and OFF. You can see the current mode through the on -screen display (OSD). 32 You can see the current mode through the on -screen display (OSD). Fn+A (�o�n��s�e�l�e�c�t�e�d��m��o�...

User Manual
Page 38
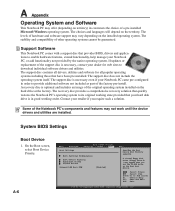
... Slide finger left Slide finger right Slide finger backward 38 The touchpad is required to move the pointer around or select items displayed on the screen with the tip of your fingertip instead of your finger is all two/three-button and scrolling knob PS/2 mice. The touchpad's primary function is...
... Slide finger left Slide finger right Slide finger backward 38 The touchpad is required to move the pointer around or select items displayed on the screen with the tip of your fingertip instead of your finger is all two/three-button and scrolling knob PS/2 mice. The touchpad's primary function is...
User Manual
Page 39
... the icon you select, and while keeping the left button depressed, moving the pointer to execute, press the left button and slide finger on the screen you select.
... the icon you select, and while keeping the left button depressed, moving the pointer to execute, press the left button and slide finger on the screen you select.

User Manual
Page 58
... LAN icon and bluetooth icon are shown. 2b. If launched from the Control Panel, click Add from the Win- Or Launch Bluetooth Devices from this screen.
... LAN icon and bluetooth icon are shown. 2b. If launched from the Control Panel, click Add from the Win- Or Launch Bluetooth Devices from this screen.
User Manual
Page 60
...hard disk drive is necessary even if your Notebook PC, or add functionality not provided by the native operating system. On the Boot screen, select Boot Device Priority. The support disc is in order to its customers the choice of hardware and software support may vary ...disc is optional and includes an image of the factory pre-install. The support disc does not include the operating system itself. Select Screen Select Item Enter Go to download individual software drivers and utilities. A-6 Main Advanced Boot Settings BIOS SETUP UTILITY Security Power Boot Boot Settings...
...hard disk drive is necessary even if your Notebook PC, or add functionality not provided by the native operating system. On the Boot screen, select Boot Device Priority. The support disc is in order to its customers the choice of hardware and software support may vary ...disc is optional and includes an image of the factory pre-install. The support disc does not include the operating system itself. Select Screen Select Item Enter Go to download individual software drivers and utilities. A-6 Main Advanced Boot Settings BIOS SETUP UTILITY Security Power Boot Boot Settings...
User Manual
Page 61
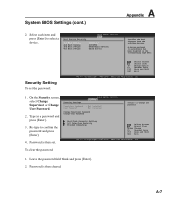
... Inc. 1. A-7 Security Setting To set . Password is then cleared. Hard Disk Security Setting I/O Interface Security Trusted Computing Select Screen Select Item Enter Change F1 General Help F10 Save and Exit ESC Exit v02.61 (C)Copyright 1985-2006, American Megatrends, Inc.... System BIOS Settings (cont.) A Appendix 2. To clear the password: 1. Password is then set the password: Select Screen Select Item +- On the Security screen, select Change Supervisor or Change User Password. 2. Security Settings BIOS SETUP UTILITY Security Supervisor Password : Not Installed User Password...
... Inc. 1. A-7 Security Setting To set . Password is then cleared. Hard Disk Security Setting I/O Interface Security Trusted Computing Select Screen Select Item Enter Change F1 General Help F10 Save and Exit ESC Exit v02.61 (C)Copyright 1985-2006, American Megatrends, Inc.... System BIOS Settings (cont.) A Appendix 2. To clear the password: 1. Password is then set the password: Select Screen Select Item +- On the Security screen, select Change Supervisor or Change User Password. 2. Security Settings BIOS SETUP UTILITY Security Supervisor Password : Not Installed User Password...

User Manual
Page 62
.... If you must then save changes before exiting the BIOS setup utility. A-8 v02.61 (C)Copyright 1985-2006, American Megatrends, Inc. Select Screen Select Item Enter Go to have in the BIOS setup utility. Main Advanced Exit Options BIOS SETUP UTILITY Security Power Boot Save Changes and Exit...password while invoking setup as well as on each boot. Always: Check password while invoking setup as well as on each boot. Select Screen Select Item Enter Change F1 General Help F10 Save and Exit ESC Exit User Access Level v02.61 (C)Copyright 1985-2006, American Megatrends, ...
.... If you must then save changes before exiting the BIOS setup utility. A-8 v02.61 (C)Copyright 1985-2006, American Megatrends, Inc. Select Screen Select Item Enter Go to have in the BIOS setup utility. Main Advanced Exit Options BIOS SETUP UTILITY Security Power Boot Save Changes and Exit...password while invoking setup as well as on each boot. Always: Check password while invoking setup as well as on each boot. Select Screen Select Item Enter Change F1 General Help F10 Save and Exit ESC Exit User Access Level v02.61 (C)Copyright 1985-2006, American Megatrends, ...

User Manual
Page 66
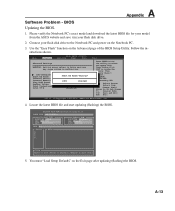
... yourself from viruses.) (NOTE: Ensure that hardware devices can be recognized.) 6. These utilities and BIOS files can be downloaded from the ASUS website. (WARNING: Ensure your data to another location before recovering.) (CAUTION: DO NOT connect to the Internet before you have installed software...your local service center and ask an engineer for viruses. 4. A Appendix Common Problems and Solutions (Cont.) Unknown Reason - Blue screen with white text A blue screen with white text appears after purchase, power OFF, remove the additional memory, and power ON to see if the problem is due...
... yourself from viruses.) (NOTE: Ensure that hardware devices can be recognized.) 6. These utilities and BIOS files can be downloaded from the ASUS website. (WARNING: Ensure your data to another location before recovering.) (CAUTION: DO NOT connect to the Internet before you have installed software...your local service center and ask an engineer for viruses. 4. A Appendix Common Problems and Solutions (Cont.) Unknown Reason - Blue screen with white text A blue screen with white text appears after purchase, power OFF, remove the additional memory, and power ON to see if the problem is due...
User Manual
Page 67
... the Utility. Connect your flash disk drive to malfunction. IDE Configuration Start EZ Flash Start EZ Flash Utility? Secondary HDD Select Screen Select Item +- A-13 Main Advanced BIOS SETUP UTILITY Security Power Boot Exit Advanced Settings WARNING: Setting wrong values in your model from the... ASUS website and save it in below sections may cause system to the Notebook PC and power on the Notebook PC. 3. Internal Pointing Device...
... the Utility. Connect your flash disk drive to malfunction. IDE Configuration Start EZ Flash Start EZ Flash Utility? Secondary HDD Select Screen Select Item +- A-13 Main Advanced BIOS SETUP UTILITY Security Power Boot Exit Advanced Settings WARNING: Setting wrong values in your model from the... ASUS website and save it in below sections may cause system to the Notebook PC and power on the Notebook PC. 3. Internal Pointing Device...
User Manual
Page 70
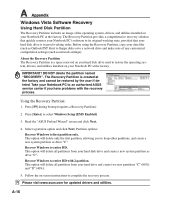
... system, drivers, and utilities installed on your hard disk drive used to restore the operating system, drivers, and utilities installed on -screen instructions to a network drive and make note of any customized configuration settings (such as drive "C". Using the Recovery Partition: 1. Press... [F9] during bootup (requires a Recovery Partition) 2. Read the "ASUS Preload Wizard" screen and click Next. 4. Partition options: Recover Windows to entire HD with the recovery process. This option will delete all partitions from...
... system, drivers, and utilities installed on your hard disk drive used to restore the operating system, drivers, and utilities installed on -screen instructions to a network drive and make note of any customized configuration settings (such as drive "C". Using the Recovery Partition: 1. Press... [F9] during bootup (requires a Recovery Partition) 2. Read the "ASUS Preload Wizard" screen and click Next. 4. Partition options: Recover Windows to entire HD with the recovery process. This option will delete all partitions from...

User Manual
Page 27
... checking program. Self Monitoring and Reporting Technology The S.M.A.R.T. (Self Monitoring and Reporting Technology) checks the hard disk drive during the splash screen, standard boot information such as a permanent part of the Notebook PC's architecture. 3 Getting Started Powering ON the Notebook PC The ...Notebook PC's power-ON message appears on the screen prompting you to correct the conflict by using the BIOS Setup program. This indicates that the hard disk is finished, you need...
... checking program. Self Monitoring and Reporting Technology The S.M.A.R.T. (Self Monitoring and Reporting Technology) checks the hard disk drive during the splash screen, standard boot information such as a permanent part of the Notebook PC's architecture. 3 Getting Started Powering ON the Notebook PC The ...Notebook PC's power-ON message appears on the screen prompting you to correct the conflict by using the BIOS Setup program. This indicates that the hard disk is finished, you need...

User Manual
Page 28
... will discharge over time. The battery status indicator on the road, you continue to charge the battery pack. DO NOT leave the battery pack discharged. Screen captures shown here are examples only and may take twice the time when the Notebook PC is too high. If not using the power adapter...
... will discharge over time. The battery status indicator on the road, you continue to charge the battery pack. DO NOT leave the battery pack discharged. Screen captures shown here are examples only and may take twice the time when the Notebook PC is too high. If not using the power adapter...

User Manual
Page 31
... (F3) (on selected models): Decreases the keyboard light brightness Keyboard Light Up Icon (F4) (on model but the functions should remain the same. stretches the screen area to use the wireless LAN or Bluetooth. NOTE: Selected models have an indicator between the Notebook PC's LCD display and an external monitor in...
... (F3) (on selected models): Decreases the keyboard light brightness Keyboard Light Up Icon (F4) (on model but the functions should remain the same. stretches the screen area to use the wireless LAN or Bluetooth. NOTE: Selected models have an indicator between the Notebook PC's LCD display and an external monitor in...

User Manual
Page 32
...or removing the power adapter will automatically switch the system between various power saving modes. You can see the current mode through the on -screen display (OSD). The power saving modes control many aspects of the Notebook PC to improve contrast, brightness, skin tone, and color saturation ...eXtreme (Fn+Space Bar): This key toggles power savings between AC mode and battery mode. You can see the current mode through the on -screen display (OSD). 32 3 Getting Started Colored Hot Keys (cont.) Crossed Speaker Icons (F10): Toggles the speakers ON and OFF (only in Windows...
...or removing the power adapter will automatically switch the system between various power saving modes. You can see the current mode through the on -screen display (OSD). The power saving modes control many aspects of the Notebook PC to improve contrast, brightness, skin tone, and color saturation ...eXtreme (Fn+Space Bar): This key toggles power savings between AC mode and battery mode. You can see the current mode through the on -screen display (OSD). 32 3 Getting Started Colored Hot Keys (cont.) Crossed Speaker Icons (F10): Toggles the speakers ON and OFF (only in Windows...

User Manual
Page 38
... Pointer Place your finger in the center of the touchpad and slide in a direction to move the pointer around or select items displayed on the screen with the use of your fingers. A device driver is still required for working with the tip of your fingertip instead of a standard desktop mouse. The...
... Pointer Place your finger in the center of the touchpad and slide in a direction to move the pointer around or select items displayed on the screen with the use of your fingers. A device driver is still required for working with the tip of your fingertip instead of a standard desktop mouse. The...

User Manual
Page 39
... not be executed. Dragging means to execute, press the left button depressed, moving the pointer to touch the touchpad lightly, keeping your finger on the screen you select. 4 Using the Notebook PC Touchpad Usage Illustrations Single-finger gesture input Clicking/Tapping - Lightly but rapidly strike the touchpad twice. Double-clicking/Double...
... not be executed. Dragging means to execute, press the left button depressed, moving the pointer to touch the touchpad lightly, keeping your finger on the screen you select. 4 Using the Notebook PC Touchpad Usage Illustrations Single-finger gesture input Clicking/Tapping - Lightly but rapidly strike the touchpad twice. Double-clicking/Double...

User Manual
Page 58
... icon on the taskbar 3b. A-4 Press [FN+F2] repeatedly until wireless LAN icon and bluetooth icon are shown. 2b. Or Launch Bluetooth Devices from this screen. If launched from the Control Panel, click Add from the Win- dows Control Panel. 3c. Switch ON the Wireless function if necessary for your model...
... icon on the taskbar 3b. A-4 Press [FN+F2] repeatedly until wireless LAN icon and bluetooth icon are shown. 2b. Or Launch Bluetooth Devices from this screen. If launched from the Control Panel, click Add from the Win- dows Control Panel. 3c. Switch ON the Wireless function if necessary for your model...


