

SE465SE555SE655 Series User Guide
Page 3
... remote control 6 Battery safety notice 6 Package contents 7 Setting up the display 8 Mounting the display 8 Installing the display on a wall 8 Parts of the display and their functions 9 Rear panel 9 Input/output terminals 10 Remote control 12 Using the remote control 13 Installing remote control batteries 13 Remote control usage tips 13 Connection 14 Connecting audio/video signals 14 Connecting the VGA input 14 Connecting the YPbPr component video input 15 Connecting the DVI-D digital input 16 Connecting the HDMI...
... remote control 6 Battery safety notice 6 Package contents 7 Setting up the display 8 Mounting the display 8 Installing the display on a wall 8 Parts of the display and their functions 9 Rear panel 9 Input/output terminals 10 Remote control 12 Using the remote control 13 Installing remote control batteries 13 Remote control usage tips 13 Connection 14 Connecting audio/video signals 14 Connecting the VGA input 14 Connecting the YPbPr component video input 15 Connecting the DVI-D digital input 16 Connecting the HDMI...
SE465SE555SE655 Series User Guide
Page 4
2 Table of Contents OSD menu overview 32 Operations in the OSD menu 34 Picture menu 35 Sound menu 36 Screen menu 37 Setting menu 39 Viewing multimedia contents 41 Multimedia control buttons on the remote control 41 Viewing files 42 Viewing files in the display's built-in storage 42 Viewing files on an external USB storage device 42 Supported file formats 42 Settings 53 Product information 54 Specifications 54 Dimensions 56 Remote control codes 59 Supported input signal resolution 60 Supported PAP input signal combination 62 Troubleshooting 63
2 Table of Contents OSD menu overview 32 Operations in the OSD menu 34 Picture menu 35 Sound menu 36 Screen menu 37 Setting menu 39 Viewing multimedia contents 41 Multimedia control buttons on the remote control 41 Viewing files 42 Viewing files in the display's built-in storage 42 Viewing files on an external USB storage device 42 Supported file formats 42 Settings 53 Product information 54 Specifications 54 Dimensions 56 Remote control codes 59 Supported input signal resolution 60 Supported PAP input signal combination 62 Troubleshooting 63

SE465SE555SE655 Series User Guide
Page 5
... to sustain the weight of the display. • To reduce the risk of the power supply cord shall remain readily operable. Refer servicing to the presence of important operating and maintenance (servicing) instructions in the literature accompanying the appliance....used with arrowhead symbol, within an equilateral triangle, is intended to alert the user to the presence of uninsulated "dangerous voltage" within an equilateral triangle is intended to alert the user to qualified service personnel. • To prevent personal injuries, mounting the display or installing desktop stands...
... to sustain the weight of the display. • To reduce the risk of the power supply cord shall remain readily operable. Refer servicing to the presence of important operating and maintenance (servicing) instructions in the literature accompanying the appliance....used with arrowhead symbol, within an equilateral triangle, is intended to alert the user to the presence of uninsulated "dangerous voltage" within an equilateral triangle is intended to alert the user to qualified service personnel. • To prevent personal injuries, mounting the display or installing desktop stands...
SE465SE555SE655 Series User Guide
Page 10
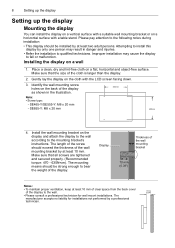
... stand. Place a clean, dry and lint-free cloth on the display and attach the display to the wall according to fall or malfunction. Attempting to install this display by a professional technician. 8 Setting up the display Setting up the display Mounting the display You can install the display on a vertical surface with a suitable wall mounting bracket or on a horizontal surface with the LCD screen facing down. 3. Installing the display on...
... stand. Place a clean, dry and lint-free cloth on the display and attach the display to the wall according to fall or malfunction. Attempting to install this display by a professional technician. 8 Setting up the display Setting up the display Mounting the display You can install the display on a vertical surface with a suitable wall mounting bracket or on a horizontal surface with the LCD screen facing down. 3. Installing the display on...
SE465SE555SE655 Series User Guide
Page 11
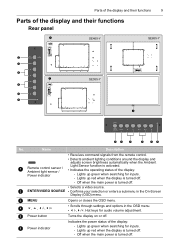
... from the remote control. • Detects ambient lighting conditions around the display and adjusts screen brightness automatically when the Ambient 1 Remote control sensor / Ambient light sensor / Light Sensor function is turned off. - Off when the main power is turned off . Off when the main power is turned off . 6 Power indicator Indicates the power status of the display: - Lights up red when the display is turned off...
... from the remote control. • Detects ambient lighting conditions around the display and adjusts screen brightness automatically when the Ambient 1 Remote control sensor / Ambient light sensor / Light Sensor function is turned off. - Off when the main power is turned off . Off when the main power is turned off . 6 Power indicator Indicates the power status of the display: - Lights up red when the display is turned off...

SE465SE555SE655 Series User Guide
Page 12
...control signals from the VGA IN input to another display. Name Description 1 AC SWITCH ON/OFF Turns on or off the main power. 2 AC power input Connects to a power outlet via the supplied power cord. 3 AUDIO OUT 4 AUDIO IN 5 VGA OUT 6 VGA IN 7 VIDEO IN (YPbPr) 8 RS232C IN/OUT 9 DVI-D 10 HDMI 11 DP 12 IR 13 USB... computer). Receives component video (YPbPr) signals from the remote control. For use with the supplied IR extender cable to a DisplayPort compatible device. Connects to an external device. Connects to ensure better signal reception from an external device (such...
...control signals from the VGA IN input to another display. Name Description 1 AC SWITCH ON/OFF Turns on or off the main power. 2 AC power input Connects to a power outlet via the supplied power cord. 3 AUDIO OUT 4 AUDIO IN 5 VGA OUT 6 VGA IN 7 VIDEO IN (YPbPr) 8 RS232C IN/OUT 9 DVI-D 10 HDMI 11 DP 12 IR 13 USB... computer). Receives component video (YPbPr) signals from the remote control. For use with the supplied IR extender cable to a DisplayPort compatible device. Connects to an external device. Connects to ensure better signal reception from an external device (such...

SE465SE555SE655 Series User Guide
Page 15
... angle of the display or operate the remote control from a location closer to direct sunlight or strong light, the remote control may not operate properly. Open the remote control battery compartment cover. 2. Remote control usage tips • Point and aim the top front of the display and their functions 13 Using the remote control Installing remote control batteries 1. Parts of the remote control directly at the display's remote control sensor window or...
... angle of the display or operate the remote control from a location closer to direct sunlight or strong light, the remote control may not operate properly. Open the remote control battery compartment cover. 2. Remote control usage tips • Point and aim the top front of the display and their functions 13 Using the remote control Installing remote control batteries 1. Parts of the remote control directly at the display's remote control sensor window or...

SE465SE555SE655 Series User Guide
Page 22
... switched, turn on the power cord. • Be aware of the power loading when you intend to turn on the main power. 1 2 Notes: • The supplied power cord is suitable for use with 100-240V AC power only. • The power cord and outlet illustrated may differ from the ones used in this display. There are no user serviceable parts in your region. 20 Connection Connecting power 1.
... switched, turn on the power cord. • Be aware of the power loading when you intend to turn on the main power. 1 2 Notes: • The supplied power cord is suitable for use with 100-240V AC power only. • The power cord and outlet illustrated may differ from the ones used in this display. There are no user serviceable parts in your region. 20 Connection Connecting power 1.

SE465SE555SE655 Series User Guide
Page 23
... Basic operations Turning the display on or off To turn on or off position or disconnect the power cord from the power outlet. • The display follows the VESA approved DPM Power Management function. To completely cut off power supply, set the power switch to select an input signal. Locking/unlocking the controls You can lock/unlock the control panel to any remote control operations...
... Basic operations Turning the display on or off To turn on or off position or disconnect the power cord from the power outlet. • The display follows the VESA approved DPM Power Management function. To completely cut off power supply, set the power switch to select an input signal. Locking/unlocking the controls You can lock/unlock the control panel to any remote control operations...
SE465SE555SE655 Series User Guide
Page 24
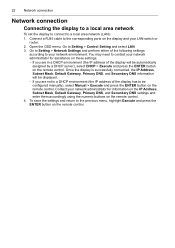
... a DHCP environment (the IP address of the display has to the previous menu, highlight Execute and press the ENTER button on the remote control. 22 Network connection Network connection Connecting the display to a local area network To set the display to connect to Setting > Control Setting and select LAN. 3. To save the settings and return to be configured manually), select Manual > Execute and press the ENTER button on the...
... a DHCP environment (the IP address of the display has to the previous menu, highlight Execute and press the ENTER button on the remote control. 22 Network connection Network connection Connecting the display to a local area network To set the display to connect to Setting > Control Setting and select LAN. 3. To save the settings and return to be configured manually), select Manual > Execute and press the ENTER button on the...

SE465SE555SE655 Series User Guide
Page 26
... the display from a web page. 24 Network connection Picture & Sound The Picture & Sound page provides options for picture and sound adjustments. Screen The Screen page provides options related to turn on page 37. Notes: • The Power ON and OFF buttons will be disabled (grayed out) when the input source is Multi-Media. • Make sure the Setting > Control Setting...
... the display from a web page. 24 Network connection Picture & Sound The Picture & Sound page provides options for picture and sound adjustments. Screen The Screen page provides options related to turn on page 37. Notes: • The Power ON and OFF buttons will be disabled (grayed out) when the input source is Multi-Media. • Make sure the Setting > Control Setting...

SE465SE555SE655 Series User Guide
Page 27
Schedule The Schedule page provides options for configuring current time and date, and up schedules, please refer to "Schedule" on page 39. For more information about how to adjust these settings, please refer to "Setting menu" on and off automatically. Network connection 25 Setting The Setting page provides options for the display to turn on page 39. For more information about how to set up to 7 schedule settings for advanced display adjustments.
Schedule The Schedule page provides options for configuring current time and date, and up schedules, please refer to "Schedule" on page 39. For more information about how to adjust these settings, please refer to "Setting menu" on and off automatically. Network connection 25 Setting The Setting page provides options for the display to turn on page 39. For more information about how to set up to 7 schedule settings for advanced display adjustments.
SE465SE555SE655 Series User Guide
Page 28
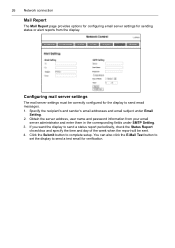
Obtain the server address, user name and password information from the display. Click the Submit button to send email messages. 1. If you want the display to send a status report periodically, check the Status Report chceckbox and specify the time and day of the...'s email addresses and email subject under SMTP Setting. 3. You can also click the E-Mail Test button to set the display to send a test email for the display to complete setup. Configuring mail server settings The mail server settings must be sent. 4. 26 Network connection Mail Report The Mail Report page provides options...
Obtain the server address, user name and password information from the display. Click the Submit button to send email messages. 1. If you want the display to send a status report periodically, check the Status Report chceckbox and specify the time and day of the...'s email addresses and email subject under SMTP Setting. 3. You can also click the E-Mail Test button to set the display to send a test email for the display to complete setup. Configuring mail server settings The mail server settings must be sent. 4. 26 Network connection Mail Report The Mail Report page provides options...
SE465SE555SE655 Series User Guide
Page 29
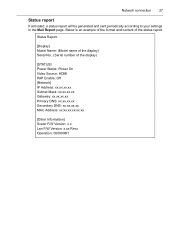
Network connection 27 Status report If activated, a status report will be generated and sent periodically according to your settings in the Mail Report page. Status Report [Display] Model Name: (Model name of the display) Serial No.: (Serial number of the status report. Below is an example of the format and content of the display) [STATUS] Power Status: Power On Video Source: HDMI PAP Enable...
Network connection 27 Status report If activated, a status report will be generated and sent periodically according to your settings in the Mail Report page. Status Report [Display] Model Name: (Model name of the display) Serial No.: (Serial number of the status report. Below is an example of the format and content of the display) [STATUS] Power Status: Power On Video Source: HDMI PAP Enable...

SE465SE555SE655 Series User Guide
Page 31
Voltage Error [Display] Model Name: (Model name of the display) Serial No.: (Serial number of the report. Below is an example of the format and content of the display) [STATUS] Power Status: Power On Video Source: HDMI PAP Enable: Off [Network] IP Address: xx.xx.xx.xx Subnet ... connections between power cables and sockets. • Make sure that the power supply is not accidentally turned off automatically. Network connection 29 Alert report - voltage error If a fluctuation in DC power supply to the display's internal components (scaler IC and backlight) occurs, a voltage error alert...
Voltage Error [Display] Model Name: (Model name of the display) Serial No.: (Serial number of the report. Below is an example of the format and content of the display) [STATUS] Power Status: Power On Video Source: HDMI PAP Enable: Off [Network] IP Address: xx.xx.xx.xx Subnet ... connections between power cables and sockets. • Make sure that the power supply is not accidentally turned off automatically. Network connection 29 Alert report - voltage error If a fluctuation in DC power supply to the display's internal components (scaler IC and backlight) occurs, a voltage error alert...

SE465SE555SE655 Series User Guide
Page 34
... Contrast Brightness Chroma Sharpness Color Temp. See page 35 36 37 39 Noise Reduction Film Mode Reset Sound Mode Treble Bass Balance Surround Speaker Audio Source Reset PAP Setting Display Wall Aspect Adjust Screen Freeze Language Schedule Power Save Control Setting Network Settings Set Monitor ID HDMI Control Advanced Information All Reset Function Auto Search Auto Adjustment Overscan RGB Signal Image Retention OSD Rotation OSD Info Box Adaptive...
... Contrast Brightness Chroma Sharpness Color Temp. See page 35 36 37 39 Noise Reduction Film Mode Reset Sound Mode Treble Bass Balance Surround Speaker Audio Source Reset PAP Setting Display Wall Aspect Adjust Screen Freeze Language Schedule Power Save Control Setting Network Settings Set Monitor ID HDMI Control Advanced Information All Reset Function Auto Search Auto Adjustment Overscan RGB Signal Image Retention OSD Rotation OSD Info Box Adaptive...

SE465SE555SE655 Series User Guide
Page 38
... Exit :Exit Item Sound Mode Treble Bass Balance Surround Speaker Description Adjusts the sound output from the internal speakers. Adjusts the audio bass when Sound Mode is set to Custom. Adjusts the audio balance when Sound Mode is from the multi-media contents via the USB ports. Audio Source Reset DisplayPort HDMI Audio Multi-Media: The audio...
... Exit :Exit Item Sound Mode Treble Bass Balance Surround Speaker Description Adjusts the sound output from the internal speakers. Adjusts the audio bass when Sound Mode is set to Custom. Adjusts the audio balance when Sound Mode is from the multi-media contents via the USB ports. Audio Source Reset DisplayPort HDMI Audio Multi-Media: The audio...
SE465SE555SE655 Series User Guide
Page 39
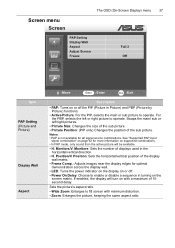
... supported combinations. • In PAP mode, only sound from the active picture will turn on with minimum distortion. • Zoom: Enlarges the picture, keeping the same aspect ratio. Swaps the main/ sub or left or right picture to operate. Monitors: Sets the number of 10second delay. The OSD (On-Screen Display) menu 37 Screen menu Screen PAP Setting Display Wall Aspect Adjust Screen...
... supported combinations. • In PAP mode, only sound from the active picture will turn on with minimum distortion. • Zoom: Enlarges the picture, keeping the same aspect ratio. Swaps the main/ sub or left or right picture to operate. Monitors: Sets the number of 10second delay. The OSD (On-Screen Display) menu 37 Screen menu Screen PAP Setting Display Wall Aspect Adjust Screen...

SE465SE555SE655 Series User Guide
Page 41
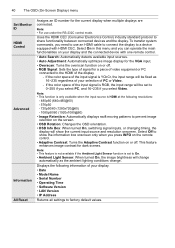
... the display enters Power Save or DC off the display. Secondary: Designate the display as the primary unit for remote control operation. The display can not be operated by the control signal received from the primary display via RS-232C cables. - See "Network connection" on or off mode. • RS-232C/LAN: Sets a terminal to turn on page 22 for details. Notes: • To reset...
... the display enters Power Save or DC off the display. Secondary: Designate the display as the primary unit for remote control operation. The display can not be operated by the control signal received from the primary display via RS-232C cables. - See "Network connection" on or off mode. • RS-232C/LAN: Sets a terminal to turn on page 22 for details. Notes: • To reset...
SE465SE555SE655 Series User Guide
Page 42
... the information box onscreen only when you need to use under the RS-232C control mode. If the color space of your display and the connected device with HDMI CEC. To transfer system commands, you press INFO on the remote control. • Adaptive Contrast: Turns the Adaptive Contrast function on the screen. • OSD Rotation: Changes the OSD orientation. •...
... the information box onscreen only when you need to use under the RS-232C control mode. If the color space of your display and the connected device with HDMI CEC. To transfer system commands, you press INFO on the remote control. • Adaptive Contrast: Turns the Adaptive Contrast function on the screen. • OSD Rotation: Changes the OSD orientation. •...