
User Guide
Page 2
...This product contains copyrighted software that we would be distributed WITHOUT ANY WARRANTY and licensed under various Free Open Source Software licenses. ASUS PROVIDES THIS MANUAL "AS IS" WITHOUT WARRANTY OF ANY KIND, EITHER EXPRESS OR IMPLIED, INCLUDING BUT NOT LIMITED TO THE IMPLIED WARRANTIES OR ... USE ONLY, AND ARE SUBJECT TO CHANGE AT ANY TIME WITHOUT NOTICE, AND SHOULD NOT BE CONSTRUED AS A COMMITMENT BY ASUS. to this manual, including the products and software described in obtaining the full corresponding source code we can coordinate the terms and cost of alteration...
...This product contains copyrighted software that we would be distributed WITHOUT ANY WARRANTY and licensed under various Free Open Source Software licenses. ASUS PROVIDES THIS MANUAL "AS IS" WITHOUT WARRANTY OF ANY KIND, EITHER EXPRESS OR IMPLIED, INCLUDING BUT NOT LIMITED TO THE IMPLIED WARRANTIES OR ... USE ONLY, AND ARE SUBJECT TO CHANGE AT ANY TIME WITHOUT NOTICE, AND SHOULD NOT BE CONSTRUED AS A COMMITMENT BY ASUS. to this manual, including the products and software described in obtaining the full corresponding source code we can coordinate the terms and cost of alteration...
User Guide
Page 5
...Exit menu 3-65 3.11 Updating BIOS 3-66 3.11.1 EZ Update 3-66 3.11.2 ASUS EZ Flash 2 3-67 3.11.3 ASUS CrashFree BIOS 3 3-68 Chapter 4: Software support 4.1 Installing an operating system 4-1 4.2 Support DVD information 4-1 4.2.1 Running the support DVD 4-1 4.2.2 Obtaining the software manuals 4-3 4.3 Software information 4-4 4.4 AI Suite 3...4-4 4.4.1 Ai Charger 4-10 4.4.2 EZ ...5.1.4 Intel® Rapid Storage Technology Option ROM utility 5-3 5.2 Installing the RAID driver during Windows® OS installation 5-7 Appendices Notices ...A-1 ASUS contact information A-5 v
...Exit menu 3-65 3.11 Updating BIOS 3-66 3.11.1 EZ Update 3-66 3.11.2 ASUS EZ Flash 2 3-67 3.11.3 ASUS CrashFree BIOS 3 3-68 Chapter 4: Software support 4.1 Installing an operating system 4-1 4.2 Support DVD information 4-1 4.2.1 Running the support DVD 4-1 4.2.2 Obtaining the software manuals 4-3 4.3 Software information 4-4 4.4 AI Suite 3...4-4 4.4.1 Ai Charger 4-10 4.4.2 EZ ...5.1.4 Intel® Rapid Storage Technology Option ROM utility 5-3 5.2 Installing the RAID driver during Windows® OS installation 5-7 Appendices Notices ...A-1 ASUS contact information A-5 v

User Guide
Page 6
.... These devices could interrupt the grounding circuit. • Ensure that your power supply is broken, do not try to fix it , carefully read all the manuals that came with the product, contact a qualified service technician or your dealer immediately. • To avoid short circuits, keep paper clips, screws, and staples away...
.... These devices could interrupt the grounding circuit. • Ensure that your power supply is broken, do not try to fix it , carefully read all the manuals that came with the product, contact a qualified service technician or your dealer immediately. • To avoid short circuits, keep paper clips, screws, and staples away...
User Guide
Page 8
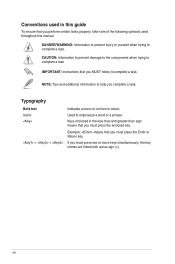
... enclosed in the less-than and greater-than sign means that you perform certain tasks properly, take note of the following symbols used in this manual. Conventions used throughout this guide To ensure that you must press two or more keys simultaneously, the key names are linked with a plus sign (+). Italics...
... enclosed in the less-than and greater-than sign means that you perform certain tasks properly, take note of the following symbols used in this manual. Conventions used throughout this guide To ensure that you must press two or more keys simultaneously, the key names are linked with a plus sign (+). Italics...
User Guide
Page 14
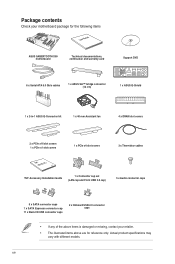
... with different models. xiv Package contents Check your motherboard package for the following items User Manual ASUS SABERTOOTH X99 motherboard Technical documentations, certification and warranty card Support DVD 6 x Serial ATA 6.0 Gb/s cables 1 x ASUS SLI™ bridge connector (12 cm) 1 x ASUS Q-Shield 1 x 2-in-1 ASUS Q-Connector kit 1 x 40 mm Assistant fan 4 x DRAM slot covers 2 x PCIe x16 slot covers 1 x PCIe...
... with different models. xiv Package contents Check your motherboard package for the following items User Manual ASUS SABERTOOTH X99 motherboard Technical documentations, certification and warranty card Support DVD 6 x Serial ATA 6.0 Gb/s cables 1 x ASUS SLI™ bridge connector (12 cm) 1 x ASUS Q-Shield 1 x 2-in-1 ASUS Q-Connector kit 1 x 40 mm Assistant fan 4 x DRAM slot covers 2 x PCIe x16 slot covers 1 x PCIe...
User Guide
Page 28
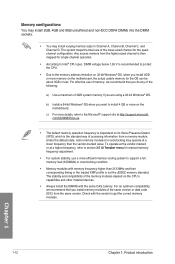
... any of the following: a) Use a maximum of 3GB system memory if you install 4GB or more memory on the motherboard, the actual usable memory for manual memory frequency adjustment. • For system stability, use a more on the CPU's capabilities and other installed devices. • Always install the DIMMS with memory frequency...
... any of the following: a) Use a maximum of 3GB system memory if you install 4GB or more memory on the motherboard, the actual usable memory for manual memory frequency adjustment. • For system stability, use a more on the CPU's capabilities and other installed devices. • Always install the DIMMS with memory frequency...
User Guide
Page 40
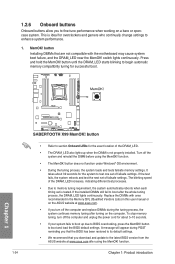
...to its default settings. • We recommend that are not compatible with ones recommended in the Memory QVL (Qualified Vendors Lists) in this user manual or on a bare or opencase system. function. • The MemOK! A message will appear during the tuning process, the system continues memory ...due to boot and load the BIOS default settings. button Installing DIMMs that you to fine-tune performance when working on the ASUS website at www.asus.com after the whole tuning process, the DRAM_LED lights continuously. switch lights continuously. To stop memory tuning, turn off the ...
...to its default settings. • We recommend that are not compatible with ones recommended in the Memory QVL (Qualified Vendors Lists) in this user manual or on a bare or opencase system. function. • The MemOK! A message will appear during the tuning process, the system continues memory ...due to boot and load the BIOS default settings. button Installing DIMMs that you to fine-tune performance when working on the ASUS website at www.asus.com after the whole tuning process, the DRAM_LED lights continuously. switch lights continuously. To stop memory tuning, turn off the ...
User Guide
Page 44
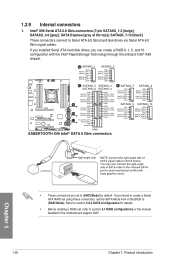
...create a Serial ATA RAID set using these connectors, set the SATA Mode item in the BIOS to section 5.1 RAID configurations or the manual bundled in the motherboard support DVD. 1-28 Chapter 1: Product introduction 1.2.9 Internal connectors 1. Chapter 1 • These connectors are set ,... you can create a RAID 0, 1, 5, and 10 configuration with the Intel® Rapid Storage Technology through the onboard Intel® X99 chipset. Intel® X99 Serial ATA 6.0 Gb/s connectors (7-pin SATA6G_1-2 [beige]; Refer to section 3.6.3 SATA Configuration for details. • Before creating a ...
...create a Serial ATA RAID set using these connectors, set the SATA Mode item in the BIOS to section 5.1 RAID configurations or the manual bundled in the motherboard support DVD. 1-28 Chapter 1: Product introduction 1.2.9 Internal connectors 1. Chapter 1 • These connectors are set ,... you can create a RAID 0, 1, 5, and 10 configuration with the Intel® Rapid Storage Technology through the onboard Intel® X99 chipset. Intel® X99 Serial ATA 6.0 Gb/s connectors (7-pin SATA6G_1-2 [beige]; Refer to section 3.6.3 SATA Configuration for details. • Before creating a ...
User Guide
Page 57
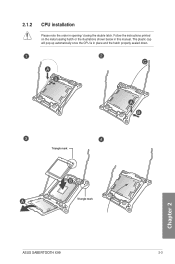
The plastic cap will pop up automatically once the CPU is in this manual. Follow the instructions printed on the metal sealing hatch or the illustrations shown below in place and the hatch properly sealed down. C A B A B Triangle mark B A Triangle mark Chapter 2 ASUS SABERTOOTH X99 2-3 2.1.2 CPU installation Please note the order in opening/ closing the double latch.
The plastic cap will pop up automatically once the CPU is in this manual. Follow the instructions printed on the metal sealing hatch or the illustrations shown below in place and the hatch properly sealed down. C A B A B Triangle mark B A Triangle mark Chapter 2 ASUS SABERTOOTH X99 2-3 2.1.2 CPU installation Please note the order in opening/ closing the double latch.
User Guide
Page 71
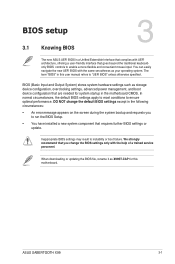
Chapter 3: BIOS setup BIOS setup 3.1 Knowing BIOS 3 The new ASUS UEFI BIOS is a Unified Extensible Interface that complies with the help of a trained service personnel. The term "BIOS" in the following circumstances: •...BIOS settings apply to most conditions to instability or boot failure. We strongly recommend that are needed for this user manual refers to enable a more flexible and convenient mouse input. Chapter 3 ASUS SABERTOOTH X99 3-1 Inappropriate BIOS settings may result to ensure optimal performance. BIOS (Basic Input and Output System) stores system ...
Chapter 3: BIOS setup BIOS setup 3.1 Knowing BIOS 3 The new ASUS UEFI BIOS is a Unified Extensible Interface that complies with the help of a trained service personnel. The term "BIOS" in the following circumstances: •...BIOS settings apply to most conditions to instability or boot failure. We strongly recommend that are needed for this user manual refers to enable a more flexible and convenient mouse input. Chapter 3 ASUS SABERTOOTH X99 3-1 Inappropriate BIOS settings may result to ensure optimal performance. BIOS (Basic Input and Output System) stores system ...
User Guide
Page 73
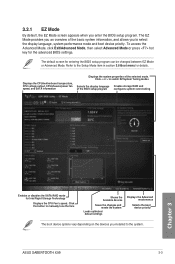
Refer to the Setup Mode item in section 3.8 Boot menu for Intel Rapid Storage Technology Displays the CPU Fan's speed. ASUS SABERTOOTH X99 3-3 Click the button to manually tune the fans Shows the bootable devices Saves the changes and resets the system Loads optimized default settings Displays the Advanced mode menus Selects the ...
Refer to the Setup Mode item in section 3.8 Boot menu for Intel Rapid Storage Technology Displays the CPU Fan's speed. ASUS SABERTOOTH X99 3-3 Click the button to manually tune the fans Shows the bootable devices Saves the changes and resets the system Loads optimized default settings Displays the Advanced mode menus Selects the ...

User Guide
Page 75
.... It also allows you want to section 3.2.4 EZ Tuning Wizard for that you to change the motherboard's SATA mode from AHCI to MyFavorites menu. Chapter 3 ASUS SABERTOOTH X99 3-5 To display the submenu, select the item and press . For changing the basic system configuration For changing the overclocking settings For changing the advanced system..., and changing the fan settings. Use this button to select the language that menu. Refer to display in a Tree Map setup. Click this button to manually tweak the fans to view and tweak the overclocking settings of your BIOS.
.... It also allows you want to section 3.2.4 EZ Tuning Wizard for that you to change the motherboard's SATA mode from AHCI to MyFavorites menu. Chapter 3 ASUS SABERTOOTH X99 3-5 To display the submenu, select the item and press . For changing the basic system configuration For changing the overclocking settings For changing the advanced system..., and changing the fan settings. Use this button to select the language that menu. Refer to display in a Tree Map setup. Click this button to manually tweak the fans to view and tweak the overclocking settings of your BIOS.
User Guide
Page 77
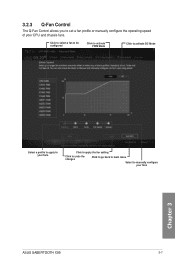
Click to select a fan to be configured Click to activate PWM Mode Click to activate DC Mode Chapter 3 Select a profile to apply to your fans Click to apply the fan setting Click to undo the changes Click to go back to main menu Select to set a fan profile or manually configure the operating speed of your fans ASUS SABERTOOTH X99 3-7 3.2.3 Q-Fan Control The Q-Fan Control allows you to manually configure your CPU and chassis fans.
Click to select a fan to be configured Click to activate PWM Mode Click to activate DC Mode Chapter 3 Select a profile to apply to your fans Click to apply the fan setting Click to undo the changes Click to go back to main menu Select to set a fan profile or manually configure the operating speed of your fans ASUS SABERTOOTH X99 3-7 3.2.3 Q-Fan Control The Q-Fan Control allows you to manually configure your CPU and chassis fans.
User Guide
Page 78
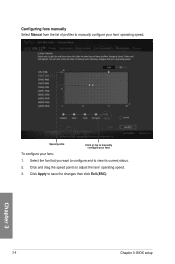
Click Apply to view its current status. 2. Select the fan that you want to configure and to save the changes then click Exit (ESC). 3-8 Chapter 3: BIOS setup Chapter 3 Click and drag the speed points to adjust the fans' operating speed. 3. Speed points Click or tap to manually configure your fans To configure your fans' operating speed. Configuring fans manually Select Manual from the list of profiles to manually configure your fans: 1.
Click Apply to view its current status. 2. Select the fan that you want to configure and to save the changes then click Exit (ESC). 3-8 Chapter 3: BIOS setup Chapter 3 Click and drag the speed points to adjust the fans' operating speed. 3. Speed points Click or tap to manually configure your fans To configure your fans' operating speed. Configuring fans manually Select Manual from the list of profiles to manually configure your fans: 1.
User Guide
Page 86
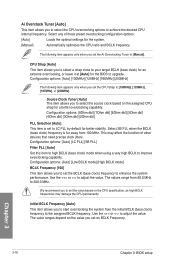
... values range from 100 MHz. Use the or to adjust the value. The following item appears only when you set the Ai Overclocking Tuner to [Manual]. Configuration options: [Auto] [100MHz] [125MHz] [166MHz] [250MHz] The following item appears only when you set the CPU Strap to [100MHz], [125MHz], [167MHz...3-16 Chapter 3: BIOS setup Select SB PLL when the BCLK (base clock) frequency is set to LC PLL by default for the system. [Manual] Automatically optimizes the CPU ratio and BCLK frequency. Ai Overclock Tuner [Auto] This item allows you to set the value based on the CPU ...
... values range from 100 MHz. Use the or to adjust the value. The following item appears only when you set the Ai Overclocking Tuner to [Manual]. Configuration options: [Auto] [100MHz] [125MHz] [166MHz] [250MHz] The following item appears only when you set the CPU Strap to [100MHz], [125MHz], [167MHz...3-16 Chapter 3: BIOS setup Select SB PLL when the BCLK (base clock) frequency is set to LC PLL by default for the system. [Manual] Automatically optimizes the CPU ratio and BCLK frequency. Ai Overclock Tuner [Auto] This item allows you to set the value based on the CPU ...
User Guide
Page 87
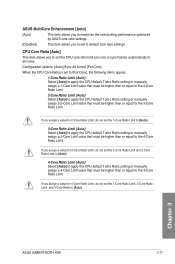
...2-Core Ratio Limit [Auto] Select [Auto] to apply the CPU default Turbo Ratio setting or manually assign a 2-Core Limit value that must be higher than or equal to the 3-Core Ratio Limit. Chapter 3 ASUS SABERTOOTH X99 3-17 Configuration options: [Auto] [Sync All Cores] [Per Core] When the CPU Core... Ratio is set the 1-Core Ratio Limit to [Auto]. 3-Core Ratio Limit [Auto] Select [Auto] to apply the CPU default Turbo Ratio setting or manually assign a 3-Core Limit value...
...2-Core Ratio Limit [Auto] Select [Auto] to apply the CPU default Turbo Ratio setting or manually assign a 2-Core Limit value that must be higher than or equal to the 3-Core Ratio Limit. Chapter 3 ASUS SABERTOOTH X99 3-17 Configuration options: [Auto] [Sync All Cores] [Per Core] When the CPU Core... Ratio is set the 1-Core Ratio Limit to [Auto]. 3-Core Ratio Limit [Auto] Select [Auto] to apply the CPU default Turbo Ratio setting or manually assign a 3-Core Limit value...
User Guide
Page 88
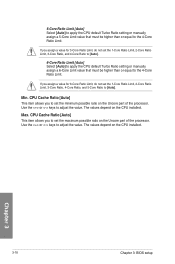
...Core Ratio Limit, 3-Core Ratio, and 4-Core Ratio to [Auto]. 6-Core Ratio Limit [Auto] Select [Auto] to apply the CPU default Turbo Ratio setting or manually assign a 6-Core Limit value that must be higher than or equal to the 4-Core Ratio Limit. CPU Cache Ratio [Auto] This item allows you assign... processor. Min. The values depend on the CPU installed. 5-Core Ratio Limit [Auto] Select [Auto] to apply the CPU default Turbo Ratio setting or manually assign a 5-Core Limit value that must be higher than or equal to the 4-Core Ratio Limit. If you to set the 1-Core Ratio Limit, 2-...
...Core Ratio Limit, 3-Core Ratio, and 4-Core Ratio to [Auto]. 6-Core Ratio Limit [Auto] Select [Auto] to apply the CPU default Turbo Ratio setting or manually assign a 6-Core Limit value that must be higher than or equal to the 4-Core Ratio Limit. CPU Cache Ratio [Auto] This item allows you assign... processor. Min. The values depend on the CPU installed. 5-Core Ratio Limit [Auto] Select [Auto] to apply the CPU default Turbo Ratio setting or manually assign a 5-Core Limit value that must be higher than or equal to the 4-Core Ratio Limit. If you to set the 1-Core Ratio Limit, 2-...
User Guide
Page 96
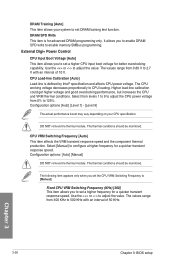
... Use the or to 2.7 V with an interval of 10 V. Configuration options: [Auto] [Manual] DO NOT remove the thermal module. The values range from 0.80 V to adjust the value. Select [Manual] to CPU loading. The CPU working voltage decreases proportionally to configure a higher frequency for a ... 50 KHz. External Digi+ Power Control CPU Input Boot Voltage [Auto] This item allows you to set the CPU VRM Switching Frequency to [Manual]. Chapter 3 3-26 Chapter 3: BIOS setup DRAM Training [Auto] This item allows your CPU specification. Select from levels 1 to 9 to ...
... Use the or to 2.7 V with an interval of 10 V. Configuration options: [Auto] [Manual] DO NOT remove the thermal module. The values range from 0.80 V to adjust the value. Select [Manual] to CPU loading. The CPU working voltage decreases proportionally to configure a higher frequency for a ... 50 KHz. External Digi+ Power Control CPU Input Boot Voltage [Auto] This item allows you to set the CPU VRM Switching Frequency to [Manual]. Chapter 3 3-26 Chapter 3: BIOS setup DRAM Training [Auto] This item allows your CPU specification. Select from levels 1 to 9 to ...
User Guide
Page 98
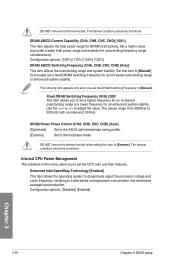
...overclocking. The thermal conditions should be monitored. The thermal conditions should be monitored. Set this item to [Manual] to manually set the DRAM Switching Frequency to [Manual]. The values range from 300 KHz to provide a wider total power range and extends the overclocking frequency ... overclocking range or enhanced system stability. DRAM Power Phase Control (CHA, CHB, CHC, CHD) [Auto] [Optimized] Set to the ASUS optimized phase tuning profile. [Extreme] Set to a decreased average power consumption and decreased average heat production. Internal CPU Power Management The ...
...overclocking. The thermal conditions should be monitored. The thermal conditions should be monitored. Set this item to [Manual] to manually set the DRAM Switching Frequency to [Manual]. The values range from 300 KHz to provide a wider total power range and extends the overclocking frequency ... overclocking range or enhanced system stability. DRAM Power Phase Control (CHA, CHB, CHC, CHD) [Auto] [Optimized] Set to the ASUS optimized phase tuning profile. [Extreme] Set to a decreased average power consumption and decreased average heat production. Internal CPU Power Management The ...
User Guide
Page 100
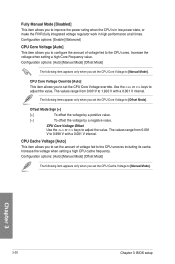
...the or keys to adjust the value, The values range from 0.001 V to 0.999 V with a 0.001 V interval. Configuration options: [Auto] [Manual Mode] [Offset Mode] The following item appears only when you set the CPU Core Voltage to [Offset Mode]. Increase the voltage when setting a high Core...voltage fed to the CPU cores. Offset Mode Sign [+] [+] To offset the voltage by a positive value. [-] To offset the voltage by a negative value. Fully Manual Mode [Disabled] This item allows you to set the CPU Core Voltage override. CPU Core Voltage Override [Auto] This item allows you to...
...the or keys to adjust the value, The values range from 0.001 V to 0.999 V with a 0.001 V interval. Configuration options: [Auto] [Manual Mode] [Offset Mode] The following item appears only when you set the CPU Core Voltage to [Offset Mode]. Increase the voltage when setting a high Core...voltage fed to the CPU cores. Offset Mode Sign [+] [+] To offset the voltage by a positive value. [-] To offset the voltage by a negative value. Fully Manual Mode [Disabled] This item allows you to set the CPU Core Voltage override. CPU Core Voltage Override [Auto] This item allows you to...


