User Guide
Page 6
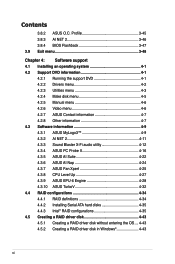
... 3-48 Chapter 4: Software support 4.1 Installing an operating system 4-1 4.2 Support DVD information 4-1 4.2.1 Running the support DVD 4-1 4.2.2 Drivers menu 4-2 4.2.3 Utilities menu 4-3 4.2.4 Make disk menu 4-5 4.2.5 Manual menu 4-6 4.2.6 Video menu 4-6 4.2.7 ASUS Contact information 4-7 4.2.8 Other information 4-7 4.3 Software information 4-9 4.3.1 ASUS MyLogo3 4-9 4.3.2 AI NET 2 4-11 4.3.3 Sound Blaster X-Fi audio utility 4-12 4.3.4 ASUS PC Probe II 4-16 4.3.5 ASUS AI Suite 4-22 4.3.6 ASUS AI Nap 4-24 4.3.7 ASUS Fan Xpert 4-25 4.3.8 CPU...
... 3-48 Chapter 4: Software support 4.1 Installing an operating system 4-1 4.2 Support DVD information 4-1 4.2.1 Running the support DVD 4-1 4.2.2 Drivers menu 4-2 4.2.3 Utilities menu 4-3 4.2.4 Make disk menu 4-5 4.2.5 Manual menu 4-6 4.2.6 Video menu 4-6 4.2.7 ASUS Contact information 4-7 4.2.8 Other information 4-7 4.3 Software information 4-9 4.3.1 ASUS MyLogo3 4-9 4.3.2 AI NET 2 4-11 4.3.3 Sound Blaster X-Fi audio utility 4-12 4.3.4 ASUS PC Probe II 4-16 4.3.5 ASUS AI Suite 4-22 4.3.6 ASUS AI Nap 4-24 4.3.7 ASUS Fan Xpert 4-25 4.3.8 CPU...

User Guide
Page 10
.... Detailed descriptions of the BIOS parameters are not part of the support DVD that may include optional documentation, such as warranty flyers, that comes with the motherboard package and the software. • Chapter 5: Multiple GPU technology support This chapter describes how to the following parts: • Chapter... cards. • Appendix: Debug code table The Appendix lists the debug code table for product and software updates. 1. ASUS websites The ASUS website provides updated information on the motherboard. • Chapter 3: BIOS setup This chapter tells how to the...
.... Detailed descriptions of the BIOS parameters are not part of the support DVD that may include optional documentation, such as warranty flyers, that comes with the motherboard package and the software. • Chapter 5: Multiple GPU technology support This chapter describes how to the following parts: • Chapter... cards. • Appendix: Debug code table The Appendix lists the debug code table for product and software updates. 1. ASUS websites The ASUS website provides updated information on the motherboard. • Chapter 3: BIOS setup This chapter tells how to the...

User Guide
Page 17
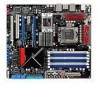
Thank you start installing the motherboard, and hardware devices on it another standout in -1 ASUS Q-Connector Kit EL I /O module Cables Accessories Application DVD Documentation ROG Rampage II Extreme 2-port USB 2.0 + IEEE 1394a module ProbeIt cable 3-Way SLI ...items is damaged or missing, contact your motherboard package for buying an ROG Rampage II Extreme motherboard! 1.1 Welcome! Before you for the following items. Motherboard I /O Shield Cable ties ROG motherboard support DVD User guide If any of ASUS quality motherboards! The motherboard delivers a host of new features and ...
Thank you start installing the motherboard, and hardware devices on it another standout in -1 ASUS Q-Connector Kit EL I /O module Cables Accessories Application DVD Documentation ROG Rampage II Extreme 2-port USB 2.0 + IEEE 1394a module ProbeIt cable 3-Way SLI ...items is damaged or missing, contact your motherboard package for buying an ROG Rampage II Extreme motherboard! 1.1 Welcome! Before you for the following items. Motherboard I /O Shield Cable ties ROG motherboard support DVD User guide If any of ASUS quality motherboards! The motherboard delivers a host of new features and ...

User Guide
Page 60
... create a Serial ATA RAID set using these connectors. See section 3.4.6 Storage Configuration for details. • Before creating a RAID set the Configure SATA as in the motherboard support DVD. • You must install the Windows® XP Service Pack 1 before using hot-plug and NCQ, set to [AHCI]. Or you can create a RAID 0, 1, 5, and...
... create a Serial ATA RAID set using these connectors. See section 3.4.6 Storage Configuration for details. • Before creating a RAID set the Configure SATA as in the motherboard support DVD. • You must install the Windows® XP Service Pack 1 before using hot-plug and NCQ, set to [AHCI]. Or you can create a RAID 0, 1, 5, and...

User Guide
Page 83
... the BIOS in the optical drive. ROG Rampage II Extreme 3-1 Save a copy of the original motherboard BIOS file to a bootable floppy disk or USB flash disk in the support DVD that allows you to manage and update the motherboard Basic Input/Output System (BIOS) setup. 1. Installing ASUS Update To install ASUS Update: 1. ASUS EZ Flash 2 (Updates the BIOS using a bootable...
... the BIOS in the optical drive. ROG Rampage II Extreme 3-1 Save a copy of the original motherboard BIOS file to a bootable floppy disk or USB flash disk in the support DVD that allows you to manage and update the motherboard Basic Input/Output System (BIOS) setup. 1. Installing ASUS Update To install ASUS Update: 1. ASUS EZ Flash 2 (Updates the BIOS using a bootable...

User Guide
Page 88
A:\>afudos /oOLDBIOS1.rom Main filename Extension name 3. Version 1.19(ASUS V2.07(03.11.24BB)) Copyright (C) 2002 American Megatrends, Inc. Save the BIOS file to the DOS prompt after copying the current BIOS file. Copying ... gets corrupted during the updating process. A:\>afudos /oOLDBIOS1.rom AMI Firmware Update Utility - Visit the ASUS website (www.asus.com) and download the latest BIOS file for the motherboard. Copy the AFUDOS utility (afudos.exe) from the motherboard support DVD to the bootable floppy disk you to copy the current BIOS file that the floppy disk...
A:\>afudos /oOLDBIOS1.rom Main filename Extension name 3. Version 1.19(ASUS V2.07(03.11.24BB)) Copyright (C) 2002 American Megatrends, Inc. Save the BIOS file to the DOS prompt after copying the current BIOS file. Copying ... gets corrupted during the updating process. A:\>afudos /oOLDBIOS1.rom AMI Firmware Update Utility - Visit the ASUS website (www.asus.com) and download the latest BIOS file for the motherboard. Copy the AFUDOS utility (afudos.exe) from the motherboard support DVD to the bootable floppy disk you to copy the current BIOS file that the floppy disk...

User Guide
Page 89
... the system from the motherboard support DVD to the DOS prompt after the BIOS update process is the latest or the original BIOS file on a piece of paper. WARNING!! done Advance Check ...... done Please restart your computer A:\> ROG Rampage II Extreme 3-7 Write the BIOS ......... done Verifying flash .... You need to prevent system boot failure! 5. A:\>afudos /iExtremeII.ROM AMI Firmware Update Utility - Version 1.19(ASUS V2.07(03.11.24BB)) Copyright (C) 2002 American Megatrends, Inc. done Reading flash ...... All rights reserved. done Writing flash ...... 0x0008CC00...
... the system from the motherboard support DVD to the DOS prompt after the BIOS update process is the latest or the original BIOS file on a piece of paper. WARNING!! done Advance Check ...... done Please restart your computer A:\> ROG Rampage II Extreme 3-7 Write the BIOS ......... done Verifying flash .... You need to prevent system boot failure! 5. A:\>afudos /iExtremeII.ROM AMI Firmware Update Utility - Version 1.19(ASUS V2.07(03.11.24BB)) Copyright (C) 2002 American Megatrends, Inc. done Reading flash ...... All rights reserved. done Writing flash ...... 0x0008CC00...

User Guide
Page 90
... utility reads the BIOS file and starts flashing the corrupted BIOS file. Reading file "Extreme.ROM". Recovering the BIOS from the USB flash disk To recover the BIOS from the support DVD: 1. The device size should be smaller than 8GB. • DO NOT shut ... so can support ASUS CrashFree BIOS 3. 3.1.5 ASUS CrashFree BIOS 3 utility The ASUS CrashFree BIOS 3 is an auto recovery tool that contains BIOS file to the USB port. 2. Prepare the motherboard support DVD, the floppy disk or the USB flash disk containing the updated motherboard BIOS before using the motherboard support DVD, the floppy...
... utility reads the BIOS file and starts flashing the corrupted BIOS file. Reading file "Extreme.ROM". Recovering the BIOS from the USB flash disk To recover the BIOS from the support DVD: 1. The device size should be smaller than 8GB. • DO NOT shut ... so can support ASUS CrashFree BIOS 3. 3.1.5 ASUS CrashFree BIOS 3 utility The ASUS CrashFree BIOS 3 is an auto recovery tool that contains BIOS file to the USB port. 2. Prepare the motherboard support DVD, the floppy disk or the USB flash disk containing the updated motherboard BIOS before using the motherboard support DVD, the floppy...

User Guide
Page 131
This chapter describes the contents of the support DVD that comes with the motherboard package and the software. 4 Software support
This chapter describes the contents of the support DVD that comes with the motherboard package and the software. 4 Software support
User Guide
Page 132
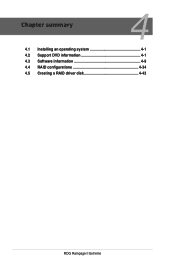
Chapter summary 4 4.1 Installing an operating system 4-1 4.2 Support DVD information 4-1 4.3 Software information 4-9 4.4 RAID configurations 4-34 4.5 Creating a RAID driver disk 4-43 ROG Rampage II Extreme
Chapter summary 4 4.1 Installing an operating system 4-1 4.2 Support DVD information 4-1 4.3 Software information 4-9 4.4 RAID configurations 4-34 4.5 Creating a RAID driver disk 4-43 ROG Rampage II Extreme

User Guide
Page 133
... displays the Drivers menu if Autorun is NOT enabled in your hardware. • Motherboard settings and hardware options vary. ROG Rampage II Extreme 4-1 Visit the ASUS website (www.asus.com) for better compatibility and system stability. 4.2 Support DVD information The support DVD that came with the motherboard package contains the drivers, software applications, and utilities that you can install to the...
... displays the Drivers menu if Autorun is NOT enabled in your hardware. • Motherboard settings and hardware options vary. ROG Rampage II Extreme 4-1 Visit the ASUS website (www.asus.com) for better compatibility and system stability. 4.2 Support DVD information The support DVD that came with the motherboard package contains the drivers, software applications, and utilities that you can install to the...

User Guide
Page 139
ROG Rampage II Extreme 4-7 Motherboard Info Displays the general specifications of the support DVD. 4.2.7 ASUS Contact information Click the Contact tab to display the specified information. Click an icon to display the ASUS contact information. You can also find this information on the inside front cover of this user guide. 4.2.8 Other information The icons on the top right corner of the screen give additional information on the motherboard and the contents of the motherboard.
ROG Rampage II Extreme 4-7 Motherboard Info Displays the general specifications of the support DVD. 4.2.7 ASUS Contact information Click the Contact tab to display the specified information. Click an icon to display the ASUS contact information. You can also find this information on the inside front cover of this user guide. 4.2.8 Other information The icons on the top right corner of the screen give additional information on the motherboard and the contents of the motherboard.

User Guide
Page 140
Filelist Displays the contents of the support DVD and a brief description of each in graphical format. Browse this DVD Displays the support DVD contents in text format. 4-8 Chapter 4: Software support Technical support form Displays the ASUS Technical Support Request Form that you have to fill out when requesting technical support.
Filelist Displays the contents of the support DVD and a brief description of each in graphical format. Browse this DVD Displays the support DVD contents in text format. 4-8 Chapter 4: Software support Technical support form Displays the ASUS Technical Support Request Form that you have to fill out when requesting technical support.

User Guide
Page 141
.... 4. ROG Rampage II Extreme 4-9 The boot logo is the image that the BIOS item Full Screen Logo is automatically installed when you wish to use the AFUDOS utility to use as your own boot logo image in the support DVD have wizards that came with the software application for details. • Before using the ASUS MyLogo3...
.... 4. ROG Rampage II Extreme 4-9 The boot logo is the image that the BIOS item Full Screen Logo is automatically installed when you wish to use the AFUDOS utility to use as your own boot logo image in the support DVD have wizards that came with the software application for details. • Before using the ASUS MyLogo3...
User Guide
Page 144
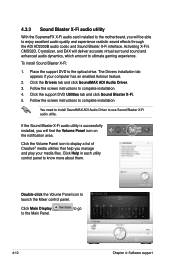
...Sound Blaster X-Fi audio utility With the SupremeFX X-Fi audio card installed to the motherboard, you will find the Volume Panel icon on the notification area. To install Sound Blaster X-Fi: 1. Click the support DVD Utilities tab and click Sound Blaster X-Fi. 5. Click the Volume Panel icon ... Help in each utility control panel to use Sound Blaster X-Fi audio utility. to the optical drive. Place the support DVD to go 4-12 Chapter 4: Software support Activating X-Fi's CMSS3D, Crystalizer, and EAX will deliver accurate virtual surround sound and enhanced audio dynamics, which amount ...
...Sound Blaster X-Fi audio utility With the SupremeFX X-Fi audio card installed to the motherboard, you will find the Volume Panel icon on the notification area. To install Sound Blaster X-Fi: 1. Click the support DVD Utilities tab and click Sound Blaster X-Fi. 5. Click the Volume Panel icon ... Help in each utility control panel to use Sound Blaster X-Fi audio utility. to the optical drive. Place the support DVD to go 4-12 Chapter 4: Software support Activating X-Fi's CMSS3D, Crystalizer, and EAX will deliver accurate virtual surround sound and enhanced audio dynamics, which amount ...
User Guide
Page 148
... or restore the application. Place the support DVD to complete installation. Click this utility, you of the support DVD to close the Preference panel 4-16 Chapter 4: Software support With this icon to locate the setup.exe file from the Windows® desktop, click Start > All Programs > ASUS > PC Probe II > PC Probe II v1.xx.xx. Follow the...
... or restore the application. Place the support DVD to complete installation. Click this utility, you of the support DVD to close the Preference panel 4-16 Chapter 4: Software support With this icon to locate the setup.exe file from the Windows® desktop, click Start > All Programs > ASUS > PC Probe II > PC Probe II v1.xx.xx. Follow the...
User Guide
Page 154
...launch the utility, or click the Normal icon to restore the system to complete installation. Click this icon to launch Fan Xpert Chapter 4: Software support Click to restore to normal Click to launch EPU-6 Engine Click to launch TurboV 4-22 Click to launch AI Nap Click to launch CPU ... icon appears in the Windows® taskbar. The AI Suite main window appears. Place the support DVD to launch EPU-6 Engine, TurboV, Fan Xpert, CPU Level Up, and AI Nap utilities easily. 4.3.5 ASUS AI Suite ASUS AI Suite allows you to the optical drive. Installing AI Suite To install AI Suite on ...
...launch the utility, or click the Normal icon to restore the system to complete installation. Click this icon to launch Fan Xpert Chapter 4: Software support Click to restore to normal Click to launch EPU-6 Engine Click to launch TurboV 4-22 Click to launch AI Nap Click to launch CPU ... icon appears in the Windows® taskbar. The AI Suite main window appears. Place the support DVD to launch EPU-6 Engine, TurboV, Fan Xpert, CPU Level Up, and AI Nap utilities easily. 4.3.5 ASUS AI Suite ASUS AI Suite allows you to the optical drive. Installing AI Suite To install AI Suite on ...

User Guide
Page 156
... press the system power or mouse button then click Yes on the confirmation screen. To switch the power button functions from the bundled support DVD, you can launch the utility by double-clicking the AI Suite icon on the Windows OS taskbar and click the AI Nap button on...Yes on the confirmation screen. Unclick the the item to minimize the power consumption of your computer whenever you are away. 4.3.6 ASUS AI Nap This feature allows you to switch the function back. 4-24 Chapter 4: Software support Enable this feature for minimum power consumption and a more quiet system operation.
... press the system power or mouse button then click Yes on the confirmation screen. To switch the power button functions from the bundled support DVD, you can launch the utility by double-clicking the AI Suite icon on the Windows OS taskbar and click the AI Nap button on...Yes on the confirmation screen. Unclick the the item to minimize the power consumption of your computer whenever you are away. 4.3.6 ASUS AI Nap This feature allows you to switch the function back. 4-24 Chapter 4: Software support Enable this feature for minimum power consumption and a more quiet system operation.

User Guide
Page 157
... the dropdown list button and display the fan types. Select CPU Fan or Chassis Fan. Install AI Suite from the bundled support DVD. To launch the ASUS Fan Xpert utility, double-click the AI Suite icon on the Windows® notification bar and click the Fan Xpert button ...window. 4.3.7 ASUS Fan Xpert Asus Fan Xpert intelligently allows you to adjust both the CPU and chassis fan speeds according to different ambient temperatures caused by different climate conditions in variety of useful profiles offer flexible controls of fan speed to cancel the Fan Xpert utility ROG Rampage II Extreme 4-25
... the dropdown list button and display the fan types. Select CPU Fan or Chassis Fan. Install AI Suite from the bundled support DVD. To launch the ASUS Fan Xpert utility, double-click the AI Suite icon on the Windows® notification bar and click the Fan Xpert button ...window. 4.3.7 ASUS Fan Xpert Asus Fan Xpert intelligently allows you to adjust both the CPU and chassis fan speeds according to different ambient temperatures caused by different climate conditions in variety of useful profiles offer flexible controls of fan speed to cancel the Fan Xpert utility ROG Rampage II Extreme 4-25

User Guide
Page 159
Click to select a CPU level Click to apply the selected CPU level Click to overclock immediately with OC profile presets in WIndows® environment without the hassle of entering BIOS. After installing AI Suite from the bundled Support DVD, launch the utility by doubleclicking the AI Suite icon on the Windows® OS taskbar and click the CPU Level Up button on the AI Suite main window. 4.3.8 CPU Level Up The CPU Level Up allows you to exit the utlity ROG Rampage II Extreme 4-27
Click to select a CPU level Click to apply the selected CPU level Click to overclock immediately with OC profile presets in WIndows® environment without the hassle of entering BIOS. After installing AI Suite from the bundled Support DVD, launch the utility by doubleclicking the AI Suite icon on the Windows® OS taskbar and click the CPU Level Up button on the AI Suite main window. 4.3.8 CPU Level Up The CPU Level Up allows you to exit the utlity ROG Rampage II Extreme 4-27


