
User Guide
Page 4
... shut down function 2-51 2.10.2 Using the dual function power switch 2-51 Chapter 3: BIOS setup 3.1 Managing and updating your BIOS 3-1 3.1.1 ASUS Update utility 3-1 3.1.2 Creating a bootable floppy disk 3-4 3.1.3 ASUS EZ Flash 2 utility 3-5 3.1.4 AFUDOS utility 3-6 3.1.5 ASUS CrashFree BIOS 3 utility 3-8 3.2 BIOS setup program 3-9 3.2.1 BIOS menu screen 3-10 3.2.2 Menu bar 3-10 3.2.3 Navigation keys 3-10 3.2.4 Menu items 3-11...
... shut down function 2-51 2.10.2 Using the dual function power switch 2-51 Chapter 3: BIOS setup 3.1 Managing and updating your BIOS 3-1 3.1.1 ASUS Update utility 3-1 3.1.2 Creating a bootable floppy disk 3-4 3.1.3 ASUS EZ Flash 2 utility 3-5 3.1.4 AFUDOS utility 3-6 3.1.5 ASUS CrashFree BIOS 3 utility 3-8 3.2 BIOS setup program 3-9 3.2.1 BIOS menu screen 3-10 3.2.2 Menu bar 3-10 3.2.3 Navigation keys 3-10 3.2.4 Menu items 3-11...
User Guide
Page 6
... 4-3 4.2.4 Make disk menu 4-5 4.2.5 Manual menu 4-6 4.2.6 Video menu 4-6 4.2.7 ASUS Contact information 4-7 4.2.8 Other information 4-7 4.3 Software information 4-9 4.3.1 ASUS MyLogo3 4-9 4.3.2 AI NET 2 4-11 4.3.3 Sound Blaster X-Fi audio utility 4-12 4.3.4 ASUS PC Probe II 4-16 4.3.5 ASUS AI Suite 4-22 4.3.6 ASUS AI Nap 4-24 4.3.7 ASUS Fan Xpert 4-25 4.3.8 CPU Level Up 4-27 4.3.9 ASUS EPU-6 Engine 4-28 4.3.10 ASUS TurboV 4-32 4.4 RAID configurations 4-34 4.4.1 RAID definitions...
... 4-3 4.2.4 Make disk menu 4-5 4.2.5 Manual menu 4-6 4.2.6 Video menu 4-6 4.2.7 ASUS Contact information 4-7 4.2.8 Other information 4-7 4.3 Software information 4-9 4.3.1 ASUS MyLogo3 4-9 4.3.2 AI NET 2 4-11 4.3.3 Sound Blaster X-Fi audio utility 4-12 4.3.4 ASUS PC Probe II 4-16 4.3.5 ASUS AI Suite 4-22 4.3.6 ASUS AI Nap 4-24 4.3.7 ASUS Fan Xpert 4-25 4.3.8 CPU Level Up 4-27 4.3.9 ASUS EPU-6 Engine 4-28 4.3.10 ASUS TurboV 4-32 4.4 RAID configurations 4-34 4.4.1 RAID definitions...

User Guide
Page 44
... effective use a more efficient memory cooling system to the memory address limitation on 32-bit Windows OS, when you install 4GB or more memory installed on the motherboard. • This motherboard does not support memory modules made up of the lower-sized channel for the dual-channel ...may operate at a higher frequency, see section 3.1 Extreme Tweaker menu for manual memory frequency adjustment. • For system stability, use of memory, we recommend that you install a 64-bit Windows OS when having 4GB or more memory on the motherboard, the actual usable memory for the OS can be ...
... effective use a more efficient memory cooling system to the memory address limitation on 32-bit Windows OS, when you install 4GB or more memory installed on the motherboard. • This motherboard does not support memory modules made up of the lower-sized channel for the dual-channel ...may operate at a higher frequency, see section 3.1 Extreme Tweaker menu for manual memory frequency adjustment. • For system stability, use of memory, we recommend that you install a 64-bit Windows OS when having 4GB or more memory on the motherboard, the actual usable memory for the OS can be ...

User Guide
Page 60
... 3.4.6 Storage Configuration for details. • Before creating a RAID set, refer to section 4.4.3 Intel RAID configurations or the manual bundled in the motherboard support DVD. • You must install the Windows® XP Service Pack 1 before using hot-plug and NCQ, set the Configure SATA as item in the BIOS to [AHCI]. The...
... 3.4.6 Storage Configuration for details. • Before creating a RAID set, refer to section 4.4.3 Intel RAID configurations or the manual bundled in the motherboard support DVD. • You must install the Windows® XP Service Pack 1 before using hot-plug and NCQ, set the Configure SATA as item in the BIOS to [AHCI]. The...

User Guide
Page 79
... Chapter 3 for more than four seconds lets the system enter the soft-off after Windows® shuts down the computer. 3. Click the Start button then select Shut Down. 2. ROG Rampage II Extreme 2-51 The power supply should turn off after Windows® shuts down function If you are using Windows® XP: 1. If you are using...
... Chapter 3 for more than four seconds lets the system enter the soft-off after Windows® shuts down the computer. 3. Click the Start button then select Shut Down. 2. ROG Rampage II Extreme 2-51 The power supply should turn off after Windows® shuts down function If you are using Windows® XP: 1. If you are using...

User Guide
Page 83
... from the Internet, and • View the BIOS version information. The Drivers menu appears. 2. ASUS EZ Flash 2 (Updates the BIOS using a bootable floppy disk) 4. ROG Rampage II Extreme 3-1 ASUS Update (Updates the BIOS in Windows® environment. Save a copy of the original motherboard BIOS file to a bootable floppy disk or USB flash disk in case you need...
... from the Internet, and • View the BIOS version information. The Drivers menu appears. 2. ASUS EZ Flash 2 (Updates the BIOS using a bootable floppy disk) 4. ROG Rampage II Extreme 3-1 ASUS Update (Updates the BIOS in Windows® environment. Save a copy of the original motherboard BIOS file to a bootable floppy disk or USB flash disk in case you need...

User Guide
Page 84
Select Update BIOS from the Windows® desktop by clicking Start > Programs > ASUS > ASUSUpdate > ASUSUpdate. The ASUS Update main window appears. 2. Updating the BIOS through the Internet To update the BIOS through the Internet: 1. Select the ASUS FTP site nearest Internet option from the drop‑down you update the BIOS using this utility. Click Next. 3-2 Chapter 3: BIOS setup Quit all Windows® applications before you to avoid network traffic, or menu, then click Next. Launch the ASUS Update utility from the 3. click Auto Select.
Select Update BIOS from the Windows® desktop by clicking Start > Programs > ASUS > ASUSUpdate > ASUSUpdate. The ASUS Update main window appears. 2. Updating the BIOS through the Internet To update the BIOS through the Internet: 1. Select the ASUS FTP site nearest Internet option from the drop‑down you update the BIOS using this utility. Click Next. 3-2 Chapter 3: BIOS setup Quit all Windows® applications before you to avoid network traffic, or menu, then click Next. Launch the ASUS Update utility from the 3. click Auto Select.

User Guide
Page 85
...the utility to complete the update process. Click Next. 5. Launch the ASUS Update utility from the drop‑down menu, then click Next. 3. The ASUS Update main window appears. 2. The ASUS Update utility is capable of updating itself through a BIOS file: 1. ...from a file option from the Windows® desktop by clicking Start > Programs > ASUS > ASUSUpdate > ASUSUpdate. Follow the screen instructions to avail all its features. Locate the BIOS file from the Open window, then click Open. 4. RAMIIEXT.ROM RAMIIEXT ROG Rampage II Extreme 3-3 4. Updating the BIOS through...
...the utility to complete the update process. Click Next. 5. Launch the ASUS Update utility from the drop‑down menu, then click Next. 3. The ASUS Update main window appears. 2. The ASUS Update utility is capable of updating itself through a BIOS file: 1. ...from a file option from the Windows® desktop by clicking Start > Programs > ASUS > ASUSUpdate > ASUSUpdate. Follow the screen instructions to avail all its features. Locate the BIOS file from the Open window, then click Open. 4. RAMIIEXT.ROM RAMIIEXT ROG Rampage II Extreme 3-3 4. Updating the BIOS through...

User Guide
Page 86
.... 2. DOS environment a. At the DOS prompt, type format A:/S then press . e. e. 3.1.2 Creating a bootable floppy disk 1. Do either one of the following to the floppy disk drive. Windows® XP environment a. Insert a 1.44 MB floppy disk to display the Format 3 1/2 Floppy dialog box . b. c. Right-click Floppy Disk Drive then click Format to the... floppy disk drive. Select the Create an MS-DOS startup disk check box. Copy the original or the latest motherboard BIOS file to the bootable floppy disk. 3-4 Chapter 3: BIOS setup
.... 2. DOS environment a. At the DOS prompt, type format A:/S then press . e. e. 3.1.2 Creating a bootable floppy disk 1. Do either one of the following to the floppy disk drive. Windows® XP environment a. Insert a 1.44 MB floppy disk to display the Format 3 1/2 Floppy dialog box . b. c. Right-click Floppy Disk Drive then click Format to the... floppy disk drive. Select the Create an MS-DOS startup disk check box. Copy the original or the latest motherboard BIOS file to the bootable floppy disk. 3-4 Chapter 3: BIOS setup

User Guide
Page 93
...] [Not Detected] [Not Detected] Main menu items Use [ENTER], [TAB], or [SHIFT-TAB] to configure system. Refer to 3.2.7 Pop-up window. 3.2.7 Pop-up window Select a menu item then press to display a list of the field opposite the item. 3.2.4 Menu items The highlighted item on the menu bar displays... the value of options. configurable, you can change the value of a field, select it then press to display a pop-up window Scroll bar ROG Rampage II Extreme 3-11 You cannot select an item that do not fit on the menu bar have their respective menu items. 3.2.5 Sub-menu items...
...] [Not Detected] [Not Detected] Main menu items Use [ENTER], [TAB], or [SHIFT-TAB] to configure system. Refer to 3.2.7 Pop-up window. 3.2.7 Pop-up window Select a menu item then press to display a list of the field opposite the item. 3.2.4 Menu items The highlighted item on the menu bar displays... the value of options. configurable, you can change the value of a field, select it then press to display a pop-up window Scroll bar ROG Rampage II Extreme 3-11 You cannot select an item that do not fit on the menu bar have their respective menu items. 3.2.5 Sub-menu items...

User Guide
Page 130
... or failsafe default values for this operation. After selecting this menu. Select YES to save changes and exit. When you to the BIOS items. Main Extreme Tweaker BIOS SETUP UTILITY Advanced Power Boot Tools Exit Exit Options Exit & Save Changes Exit & Discard Changes Discard Changes Load Setup Defaults Exit system setup... of the options from this menu or from the Exit menu to ensure the values you made changes to discard the selections you press , a confirmation window appears. 3.9 Exit menu The Exit menu items allow you select this option, a confirmation...
... or failsafe default values for this operation. After selecting this menu. Select YES to save changes and exit. When you to the BIOS items. Main Extreme Tweaker BIOS SETUP UTILITY Advanced Power Boot Tools Exit Exit Options Exit & Save Changes Exit & Discard Changes Discard Changes Load Setup Defaults Exit system setup... of the options from this menu or from the Exit menu to ensure the values you made changes to discard the selections you press , a confirmation window appears. 3.9 Exit menu The Exit menu items allow you select this option, a confirmation...

User Guide
Page 133
... This motherboard supports Windows® XP/64-bit XP/Vista operating systems (OS). Visit the ASUS website (www.asus.com) for updates. 4.2.1 Running the support DVD Place the support DVD to run the DVD. The contents of the support DVD to avail all motherboard features.... The support DVD that came with the motherboard package contains the drivers, software applications, and utilities that you install Windows® XP Service Pack 2 or later versions before installing the drivers for reference only. ROG Rampage II Extreme 4-1 Always install the latest OS version and...
... This motherboard supports Windows® XP/64-bit XP/Vista operating systems (OS). Visit the ASUS website (www.asus.com) for updates. 4.2.1 Running the support DVD Place the support DVD to run the DVD. The contents of the support DVD to avail all motherboard features.... The support DVD that came with the motherboard package contains the drivers, software applications, and utilities that you install Windows® XP Service Pack 2 or later versions before installing the drivers for reference only. ROG Rampage II Extreme 4-1 Always install the latest OS version and...

User Guide
Page 135
4.2.3 Utilities menu The Utilities menu shows the applications and other software that the motherboard supports. Click to display the next screen Click to update the motherboard BIOS in Windows® environment. Installation Wizard for Utilities Installs all of the utilities through a network or an Internet Service Provider (ISP). ASUS Update The ASUS Update utility allows you to display the previous screen ASUS InstAll - ROG Rampage II Extreme 4-3 This utility requires an Internet connection either through the Installation Wizard.
4.2.3 Utilities menu The Utilities menu shows the applications and other software that the motherboard supports. Click to display the next screen Click to update the motherboard BIOS in Windows® environment. Installation Wizard for Utilities Installs all of the utilities through a network or an Internet Service Provider (ISP). ASUS Update The ASUS Update utility allows you to display the previous screen ASUS InstAll - ROG Rampage II Extreme 4-3 This utility requires an Internet connection either through the Installation Wizard.

User Guide
Page 141
... click Next. 5. ROG Rampage II Extreme 4-9 Refer to replace system boot logo before flashing BIOS, then click Next. 4. Select Update BIOS from a file from the support DVD. See section 4.2.3 Utilities menu for details. • Before using the ASUS MyLogo3™, use the ...customize the boot logo. Check the option Launch MyLogo to section "3.1.1 ASUS Update utility" for more information. 4.3.1 ASUS MyLogo3™ The ASUS MyLogo3™ utility lets you through the installation. The ASUS MyLogo window appears. 6. See section 3.1.4 AFUDOS utility. • Make sure ...
... click Next. 5. ROG Rampage II Extreme 4-9 Refer to replace system boot logo before flashing BIOS, then click Next. 4. Select Update BIOS from a file from the support DVD. See section 4.2.3 Utilities menu for details. • Before using the ASUS MyLogo3™, use the ...customize the boot logo. Check the option Launch MyLogo to section "3.1.1 ASUS Update utility" for more information. 4.3.1 ASUS MyLogo3™ The ASUS MyLogo3™ utility lets you through the installation. The ASUS MyLogo window appears. 6. See section 3.1.4 AFUDOS utility. • Make sure ...

User Guide
Page 142
7. Adjust the boot image to enlarge by selecting a value on it. 8. After flashing the BIOS, restart the computer to load the new boot logo. 10. When the screen returns to the ASUS Update utility, flash the original BIOS to display the new boot logo during POST. 4-10 Chapter 4: Software support When the logo images appear on the right window pane, select an image to your desired size by clicking on the Ratio box. 9.
7. Adjust the boot image to enlarge by selecting a value on it. 8. After flashing the BIOS, restart the computer to load the new boot logo. 10. When the screen returns to the ASUS Update utility, flash the original BIOS to display the new boot logo during POST. 4-10 Chapter 4: Software support When the logo images appear on the right window pane, select an image to your desired size by clicking on the Ratio box. 9.

User Guide
Page 143
... the BIOS Setup. ROG Rampage II Extreme 4-11 The VCT feature reduces networking and support costs through a highly manageable and controlled network system. Launch the VCT utility from the menu to 64 ns at one meter accuracy. Click Virtual Cable Tester from the Windows® desktop by clicking ...The VCT utility only tests Ethernet cables connected to Gigabit LAN port(s). • The Run button on the Virtual Cable Tester™ main window is disabled if no problem is a cable diagnostic utility that reports LAN cable faults and shorts using the Time Domain Reflectometry (TDR) ...
... the BIOS Setup. ROG Rampage II Extreme 4-11 The VCT feature reduces networking and support costs through a highly manageable and controlled network system. Launch the VCT utility from the menu to 64 ns at one meter accuracy. Click Virtual Cable Tester from the Windows® desktop by clicking ...The VCT utility only tests Ethernet cables connected to Gigabit LAN port(s). • The Run button on the Virtual Cable Tester™ main window is disabled if no problem is a cable diagnostic utility that reports LAN cable faults and shorts using the Time Domain Reflectometry (TDR) ...
User Guide
Page 148
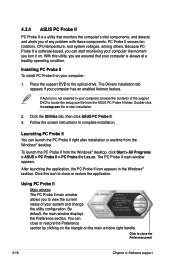
...tab, then click ASUS PC Probe II. 3. By default, the main window displays the Preference section. Installing PC Probe II To install PC Probe II on your computer has an enabled Autorun feature. Using PC Probe II Main window The PC Probe II main window allows you turn it on the main window right handle. ...components, and detects and alerts you can launch the PC Probe II right after installation or anytime from the Windows® desktop, click Start > All Programs > ASUS > PC Probe II > PC Probe II v1.xx.xx. Because PC Probe II is software-based, you of the support DVD to close or ...
...tab, then click ASUS PC Probe II. 3. By default, the main window displays the Preference section. Installing PC Probe II To install PC Probe II on your computer has an enabled Autorun feature. Using PC Probe II Main window The PC Probe II main window allows you turn it on the main window right handle. ...components, and detects and alerts you can launch the PC Probe II right after installation or anytime from the Windows® desktop, click Start > All Programs > ASUS > PC Probe II > PC Probe II v1.xx.xx. Because PC Probe II is software-based, you of the support DVD to close or ...

User Guide
Page 149
... the application Closes the application Sensor alert When a system sensor detects a problem, the main window right handle turns red, as the illustrations below show. ROG Rampage II Extreme 4-17 Preferences You can customize the application using the Preference section in the main window. Refer to activate or deactivate. When displayed, the monitor panel for details.
... the application Closes the application Sensor alert When a system sensor detects a problem, the main window right handle turns red, as the illustrations below show. ROG Rampage II Extreme 4-17 Preferences You can customize the application using the Preference section in the main window. Refer to activate or deactivate. When displayed, the monitor panel for details.

User Guide
Page 150
... rotation, CPU temperature, and voltages. If you check the Enable Monitoring Panel option from the list box. You can now move together using the Config window. Hardware monitor panels The hardware monitor panels display the current value of the monitor panels in the monitor panel by clicking the or buttons. When...
... rotation, CPU temperature, and voltages. If you check the Enable Monitoring Panel option from the list box. You can now move together using the Config window. Hardware monitor panels The hardware monitor panels display the current value of the monitor panels in the monitor panel by clicking the or buttons. When...

User Guide
Page 151
... Monitoring sensor alert The monitor panel turns red when a component value exceeds or is lower than the threshold value. Refer to display the WMI (Windows Management Instrumentation) browser. DMI browser Click to display on the right panel. Click the plus sign (+) before DMI Information to display the available information...This browser displays various desktop and system information. Click the plus sign (+) before WMI Information to display the available information. This browser displays various Windows® management information. ROG Rampage II Extreme 4-19
... Monitoring sensor alert The monitor panel turns red when a component value exceeds or is lower than the threshold value. Refer to display the WMI (Windows Management Instrumentation) browser. DMI browser Click to display on the right panel. Click the plus sign (+) before DMI Information to display the available information...This browser displays various desktop and system information. Click the plus sign (+) before WMI Information to display the available information. This browser displays various Windows® management information. ROG Rampage II Extreme 4-19


