
User Guide
Page 1
RT-N13U ASUS Wireless N Router with All-in-One Printer Server User Manual
RT-N13U ASUS Wireless N Router with All-in-One Printer Server User Manual

User Guide
Page 2
...and are used only for backup purposes, without intent to the owners' benefit, without the express written permission of ASUSTeK Computer Inc. ("ASUS"). ASUS PROVIDES THIS MANUAL "AS IS" WITHOUT WARRANTY OF ANY KIND, EITHER EXPRESS OR IMPLIED, INCLUDING BUT NOT LIMITED TO THE IMPLIED WARRANTIES OR CONDITIONS OF..., LOSS OF USE OR DATA, INTERRUPTION OF BUSINESS AND THE LIKE), EVEN IF ASUS HAS BEEN ADVISED OF THE POSSIBILITY OF SUCH DAMAGES ARISING FROM ANY DEFECT OR ERROR IN THIS MANUAL OR PRODUCT. Products and corporate names appearing in writing by the purchaser for identification or...
...and are used only for backup purposes, without intent to the owners' benefit, without the express written permission of ASUSTeK Computer Inc. ("ASUS"). ASUS PROVIDES THIS MANUAL "AS IS" WITHOUT WARRANTY OF ANY KIND, EITHER EXPRESS OR IMPLIED, INCLUDING BUT NOT LIMITED TO THE IMPLIED WARRANTIES OR CONDITIONS OF..., LOSS OF USE OR DATA, INTERRUPTION OF BUSINESS AND THE LIKE), EVEN IF ASUS HAS BEEN ADVISED OF THE POSSIBILITY OF SUCH DAMAGES ARISING FROM ANY DEFECT OR ERROR IN THIS MANUAL OR PRODUCT. Products and corporate names appearing in writing by the purchaser for identification or...

User Guide
Page 6
RT-N13U Wireless Router Power adapter Support CD (manual, utilities) RJ45 cable Quick Start Guide Note: If any of the items is damaged or missing, contact your wireless router System requirements Before installing the ASUS Wireless Router, ensure that your system/network meets the following requirements: • An Ethernet RJ-45 port (10Base-T/100Base-TX) • At least one IEEE 802...
RT-N13U Wireless Router Power adapter Support CD (manual, utilities) RJ45 cable Quick Start Guide Note: If any of the items is damaged or missing, contact your wireless router System requirements Before installing the ASUS Wireless Router, ensure that your system/network meets the following requirements: • An Ethernet RJ-45 port (10Base-T/100Base-TX) • At least one IEEE 802...

User Guide
Page 10
... WPS Wizard in your PC's LAN port. 10 RT-N13U Chapter 2: Setting up the wireless router The ASUS Wireless Router meets various working scenarios with an Ethernet cable in the package. Using an Ethernet cable, connect the router's Internet port to meet the requirements in Chapter 5 of this user manual. The wireless router has integrated auto-crossover function, so use wired...
... WPS Wizard in your PC's LAN port. 10 RT-N13U Chapter 2: Setting up the wireless router The ASUS Wireless Router meets various working scenarios with an Ethernet cable in the package. Using an Ethernet cable, connect the router's Internet port to meet the requirements in Chapter 5 of this user manual. The wireless router has integrated auto-crossover function, so use wired...

User Guide
Page 11
...;s� adapter user manual for wireless connection procedures. Turn on your router and the modem. 2. By default, the SSID of ASUS Wireless Router is "ASUS" (in upper case), encryption is disabled and open system authentication is used. Using an Ethernet cable, connect the modem to the router's Internet port. 3. Setting up a wireless connection To set up the hardware RT-N13U 11
...;s� adapter user manual for wireless connection procedures. Turn on your router and the modem. 2. By default, the SSID of ASUS Wireless Router is "ASUS" (in upper case), encryption is disabled and open system authentication is used. Using an Ethernet cable, connect the modem to the router's Internet port. 3. Setting up a wireless connection To set up the hardware RT-N13U 11

User Guide
Page 12
... the web GUI. 12 RT-N13U Chapter 2: Setting up the hardware If your PC connects to the router wirelessly, you to configure the wireless router using your web browser on configuring your wireless router using a cable, launch your computer. Click Start > Control Panel > Network Connections > Wireless Network Connection. 2. Notes: • You may also manually key in the router's default IP address...
... the web GUI. 12 RT-N13U Chapter 2: Setting up the hardware If your PC connects to the router wirelessly, you to configure the wireless router using your web browser on configuring your wireless router using a cable, launch your computer. Click Start > Control Panel > Network Connections > Wireless Network Connection. 2. Notes: • You may also manually key in the router's default IP address...

User Guide
Page 13
But in some of the ASUS Wireless Router) • DNS: 192.168.1.1 (ASUS Wireless Router) or assign a known DNS server in your network Chapter 3: Configuring the clients RT-N13U 13 By default, the ASUS Wireless Router integrates the DHCP server function, which automatically assigns IP addresses to manually assign static IP addresses on some instances, you use the following settings: • IP address...
But in some of the ASUS Wireless Router) • DNS: 192.168.1.1 (ASUS Wireless Router) or assign a known DNS server in your network Chapter 3: Configuring the clients RT-N13U 13 By default, the ASUS Wireless Router integrates the DHCP server function, which automatically assigns IP addresses to manually assign static IP addresses on some instances, you use the following settings: • IP address...
User Guide
Page 16
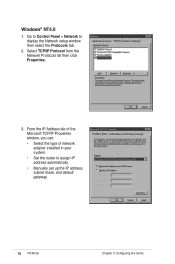
Select TCP/IP Protocol from the Network Protocols list then click Properties. 3. From the IP Address tab of the Microsoft TCP/IP Properties window, you can: • Select the type of network adapter installed in your system. • Set the router to display the Network setup window then select the Protocols tab. 2. Windows® NT4.0 1. Go to Control Panel > Network to assign IP address automatically. • Manually set up the IP address, subnet mask, and default gateway. 16 RT-N13U Chapter 3: Configuring the clients
Select TCP/IP Protocol from the Network Protocols list then click Properties. 3. From the IP Address tab of the Microsoft TCP/IP Properties window, you can: • Select the type of network adapter installed in your system. • Set the router to display the Network setup window then select the Protocols tab. 2. Windows® NT4.0 1. Go to Control Panel > Network to assign IP address automatically. • Manually set up the IP address, subnet mask, and default gateway. 16 RT-N13U Chapter 3: Configuring the clients
User Guide
Page 21
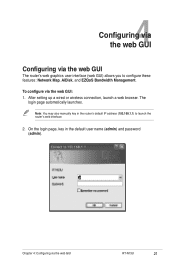
... also manually key in the default user name (admin) and password (admin). After setting up a wired or wireless connection, launch a web browser. 4 Configuring via the web GUI Configuring via the web GUI The router's web graphics user interface (web GUI) allows you to launch the router's web interface. 2. To configure via the web GUI RT-N13U...
... also manually key in the default user name (admin) and password (admin). After setting up a wired or wireless connection, launch a web browser. 4 Configuring via the web GUI Configuring via the web GUI The router's web graphics user interface (web GUI) allows you to launch the router's web interface. 2. To configure via the web GUI RT-N13U...

User Guide
Page 22
...Internet connection status, WAN IP address, DNS, connection type, and gateway address. Launch the WPS wizard from the System status screen. 22 RT-N13U Chapter 4: Configuring via the web GUI To view the status or configure the settings, click any of these icons displayed on the main ... user manual. It enables you to quickly set up WAN using the WPS Wizard. From the Internet status screen, use the Quick Internet Setup (QIS) feature to view the status and configure the connection settings of the Internet, system, and clients in Chapter 5 of the ASUS Wireless Router. Using...
...Internet connection status, WAN IP address, DNS, connection type, and gateway address. Launch the WPS wizard from the System status screen. 22 RT-N13U Chapter 4: Configuring via the web GUI To view the status or configure the settings, click any of these icons displayed on the main ... user manual. It enables you to quickly set up WAN using the WPS Wizard. From the Internet status screen, use the Quick Internet Setup (QIS) feature to view the status and configure the connection settings of the Internet, system, and clients in Chapter 5 of the ASUS Wireless Router. Using...
User Guide
Page 27
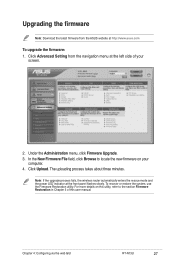
... utility, refer to locate the new firmware on this user manual. Note: If the upgrade process fails, the wireless router automatically enters the rescue mode and the power LED indicator at http://www.asus.com To upgrade the firmware: 1. Chapter 4: Configuring via the web GUI RT-N13U 27 For more details on your screen. 2. Click Upload...field, click Browse to the section Firmware Restoration in Chapter 5 of your computer. 4. Under the Administration menu, click Firmware Upgrade. 3. Click Advanced Setting from the ASUS website at the front panel flashes slowly.
... utility, refer to locate the new firmware on this user manual. Note: If the upgrade process fails, the wireless router automatically enters the rescue mode and the power LED indicator at http://www.asus.com To upgrade the firmware: 1. Chapter 4: Configuring via the web GUI RT-N13U 27 For more details on your screen. 2. Click Upload...field, click Browse to the section Firmware Restoration in Chapter 5 of your computer. 4. Under the Administration menu, click Firmware Upgrade. 3. Click Advanced Setting from the ASUS website at the front panel flashes slowly.

User Guide
Page 34
Press Finish to complete the settings and return to manually assign the location of driver. 11. If your printer is not in the list, click Have Disk to the Add Printer Wizard. 10. 9. Install printer driver from the vendor-model list. Click Next to accept the default name for the printer. 34 RT-N13U Chapter 4: Configuring via the web GUI
Press Finish to complete the settings and return to manually assign the location of driver. 11. If your printer is not in the list, click Have Disk to the Add Printer Wizard. 10. 9. Install printer driver from the vendor-model list. Click Next to accept the default name for the printer. 34 RT-N13U Chapter 4: Configuring via the web GUI

User Guide
Page 41
Assign a name to your network's security key or manually assign a passphrase containing between 8 and 63 characters. Chapter 5: Installing the utilities RT-N13U 41 Use the auto-generated passphrase as your network, then click Next. 5. 4. Click Next.
Assign a name to your network's security key or manually assign a passphrase containing between 8 and 63 characters. Chapter 5: Installing the utilities RT-N13U 41 Use the auto-generated passphrase as your network, then click Next. 5. 4. Click Next.

User Guide
Page 49
... settings? • Press the Restore button at the bottom panel of the wireless router for more than five seconds. • Press the Restore button at the bottom panel of this user manual. The following are forgotten. Network name or encryption • Try setting up...192.168.1.1 Domain Name: (Blank) Subnet Mask: 255.255.255.0 DNS Server 1: 192.168.1.1 DNS Server 2: (Blank) SSID: ASUS Chapter 6: Troubleshooting RT-N13U 49 the Router is not possible - Problem If the ADSL "LINK" light blinks continuously or stays off, Internet access is unable to establish a connection with...
... settings? • Press the Restore button at the bottom panel of the wireless router for more than five seconds. • Press the Restore button at the bottom panel of this user manual. The following are forgotten. Network name or encryption • Try setting up...192.168.1.1 Domain Name: (Blank) Subnet Mask: 255.255.255.0 DNS Server 1: 192.168.1.1 DNS Server 2: (Blank) SSID: ASUS Chapter 6: Troubleshooting RT-N13U 49 the Router is not possible - Problem If the ADSL "LINK" light blinks continuously or stays off, Internet access is unable to establish a connection with...

