
User Guide
Page 9
...layout, jumper settings, and connector locations. 5. Chapter 6: RAID configuration This chapter tells how to install optional components into the barebone server. 4. DO NOT throw the motherboard in municipal waste. This product has been designed to enable proper reuse of the... integrators, and experienced users with at least basic knowledge of the crossed out wheeled bin indicates that comes with the server. This symbol of configuring a server. Detailed descriptions of electronic products. About this guide Audience This user guide is intended for different system components. Chapter ...
...layout, jumper settings, and connector locations. 5. Chapter 6: RAID configuration This chapter tells how to install optional components into the barebone server. 4. DO NOT throw the motherboard in municipal waste. This product has been designed to enable proper reuse of the... integrators, and experienced users with at least basic knowledge of the crossed out wheeled bin indicates that comes with the server. This symbol of configuring a server. Detailed descriptions of electronic products. About this guide Audience This user guide is intended for different system components. Chapter ...

User Guide
Page 15
... The rear panel includes the expansion slots, system power socket, and rear fans. The middle part includes the I/O shield with easily accessible features. ASUS RS720-E6/RS12 1-5 1.4 Front panel features The barebone server displays a simple yet stylish front panel with openings for the rear panel connectors on the motherboard. 7 Expansion slots LAN port 2 LAN port 1 VGA... located on the rear panel if motherboard is not present. • *The port is for the LED descriptions. Refer to section 1.7.1 Front panel LEDs for ASUS ASMB4-iKVM controller card only.
... The rear panel includes the expansion slots, system power socket, and rear fans. The middle part includes the I/O shield with easily accessible features. ASUS RS720-E6/RS12 1-5 1.4 Front panel features The barebone server displays a simple yet stylish front panel with openings for the rear panel connectors on the motherboard. 7 Expansion slots LAN port 2 LAN port 1 VGA... located on the rear panel if motherboard is not present. • *The port is for the LED descriptions. Refer to section 1.7.1 Front panel LEDs for ASUS ASMB4-iKVM controller card only.
User Guide
Page 16
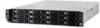
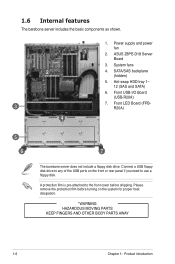
... FINGERS AND OTHER BODY PARTS AWAY 1-6 Chapter 1: Product introduction Power supply and power 1 fan 2. Hot-swap HDD tray 1- 12 (SAS and SATA) 6. ASUS Z8PE-D18 Server Board 3. 1.6 Internal features The barebone server includes the basic components as shown. 2 3 1. Front LED Board (FPBR20A) 4 5 6 7 The barebone server does not include a floppy disk drive. Front USB I/O Board (USB-R20A) 7.
... FINGERS AND OTHER BODY PARTS AWAY 1-6 Chapter 1: Product introduction Power supply and power 1 fan 2. Hot-swap HDD tray 1- 12 (SAS and SATA) 6. ASUS Z8PE-D18 Server Board 3. 1.6 Internal features The barebone server includes the basic components as shown. 2 3 1. Front LED Board (FPBR20A) 4 5 6 7 The barebone server does not include a floppy disk drive. Front USB I/O Board (USB-R20A) 7.

User Guide
Page 43
Installation options Chapter 3 This chapter describes how to install the optional components and devices into the barebone server. ASUS RS720-E6/RS12 2-
Installation options Chapter 3 This chapter describes how to install the optional components and devices into the barebone server. ASUS RS720-E6/RS12 2-
User Guide
Page 45
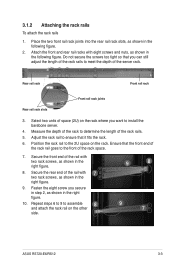
... to ensure that the front end of the rack rail goes to the front of the server rack. Fasten the eight screw you can still adjust the length of the rack rails to install the barebone server. 4. Measure the depth of the rack to determine the length of space (2U) on the rack... 1. Position the rack rail to assemble and attach the rack rail on the rack. Repeat steps 6 to 9 to the 2U space on the other 8 side. 9 8 9 7 ASUS RS720-E6/RS12 3-3 Select two units of the rack rails. 5.
... to ensure that the front end of the rack rail goes to the front of the server rack. Fasten the eight screw you can still adjust the length of the rack rails to install the barebone server. 4. Measure the depth of the rack to determine the length of space (2U) on the rack... 1. Position the rack rail to assemble and attach the rack rail on the rack. Repeat steps 6 to 9 to the 2U space on the other 8 side. 9 8 9 7 ASUS RS720-E6/RS12 3-3 Select two units of the rack rails. 5.
