
User Guide
Page 14
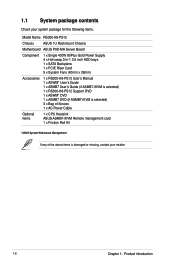
... items. Model Name RS300-H8-PS12 Chassis ASUS 1U Rackmount Chassis Motherboard ASUS P9D-MH Server Board Component 1 x Single 400W 80Plus Gold Power Supply 4 x Hot-swap 3-in-1 3.5 inch HDD trays 1 x SATA Backplane 1 x PCIE Riser Card 5 x System Fans (40mm x 28mm) Accessories 1 x RS300-H8-PS12 User's Manual 1 x ASWM* User's Guide 1 x ASMB7 User's Guide (if ASMB7-iKVM is selected) 1 x RS300-H8-PS12 Support DVD 1 x ASWM...
... items. Model Name RS300-H8-PS12 Chassis ASUS 1U Rackmount Chassis Motherboard ASUS P9D-MH Server Board Component 1 x Single 400W 80Plus Gold Power Supply 4 x Hot-swap 3-in-1 3.5 inch HDD trays 1 x SATA Backplane 1 x PCIE Riser Card 5 x System Fans (40mm x 28mm) Accessories 1 x RS300-H8-PS12 User's Manual 1 x ASWM* User's Guide 1 x ASMB7 User's Guide (if ASMB7-iKVM is selected) 1 x RS300-H8-PS12 Support DVD 1 x ASWM...
User Guide
Page 16
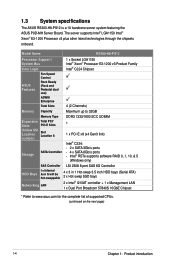
...Refer to www.asus.com for the complete list of supported CPUs. (continued on the next page) 1-4 Chapter 1: Product introduction The server supports Intel® LGA1150 Intel® Xeon® E3-1200 Processor v3 plus other latest technologies through the chipsets onboard. 1.3 System specifications The ASUS RS300-H8-PS12 is a 1U barebone server system... featuring the ASUS P9D-MH Server Board.
...Refer to www.asus.com for the complete list of supported CPUs. (continued on the next page) 1-4 Chapter 1: Product introduction The server supports Intel® LGA1150 Intel® Xeon® E3-1200 Processor v3 plus other latest technologies through the chipsets onboard. 1.3 System specifications The ASUS RS300-H8-PS12 is a 1U barebone server system... featuring the ASUS P9D-MH Server Board.
User Guide
Page 47
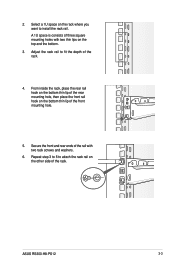
... to install the rack rail. Secure the front and rear ends of the rail with two thin lips on the other side of the rack. 4. ASUS RS300-H8-PS12 3-3 2. A 1U space is consists of the front mounting hole. 5. From inside the rack, place the rear rail hook on the bottom thin lip of the rear... mounting hole, then place the front rail hook on the rack where you want to fit the depth of the rack. Select a 1U space on the bottom thin lip of three square mounting holes with two rack screws and washers. 6.
... to install the rack rail. Secure the front and rear ends of the rail with two thin lips on the other side of the rack. 4. ASUS RS300-H8-PS12 3-3 2. A 1U space is consists of the front mounting hole. 5. From inside the rack, place the rear rail hook on the bottom thin lip of the rear... mounting hole, then place the front rail hook on the rack where you want to fit the depth of the rack. Select a 1U space on the bottom thin lip of three square mounting holes with two rack screws and washers. 6.
