PG258Q Series User Guide for English Edition
Page 3
... 1-2 1.3.1 Front/side view 1-2 1.3.2 Back view 1-3 1.3.3 GamePlus Function 1-4 1.3.4 GameVisual Function 1-5 Chapter 2: Setup 2.1 Assembling the monitor arm/base 2-1 2.2 Cable management 2-2 2.3 Adjusting the monitor 2-3 2.4 Detaching the arm (for VESA wall mount 2-4 2.5 Connecting the cables 2-5 2.6 Turning on the monitor 2-5 Chapter 3: General instructions 3.1 OSD (On-Screen Display) menu 3-1 3.1.1 How to reconfigure 3-1 3.1.2 OSD function introduction 3-1 3.2 Specifications summary 3-5 3.3 Troubleshooting (FAQ...
... 1-2 1.3.1 Front/side view 1-2 1.3.2 Back view 1-3 1.3.3 GamePlus Function 1-4 1.3.4 GameVisual Function 1-5 Chapter 2: Setup 2.1 Assembling the monitor arm/base 2-1 2.2 Cable management 2-2 2.3 Adjusting the monitor 2-3 2.4 Detaching the arm (for VESA wall mount 2-4 2.5 Connecting the cables 2-5 2.6 Turning on the monitor 2-5 Chapter 3: General instructions 3.1 OSD (On-Screen Display) menu 3-1 3.1.1 How to reconfigure 3-1 3.1.2 OSD function introduction 3-1 3.2 Specifications summary 3-5 3.3 Troubleshooting (FAQ...
PG258Q Series User Guide for English Edition
Page 4
...; This device must accept any interference received including interference that interference will not occur in the Radio Interference Regulations of the Canadian Department of the monitor to the graphics card is required to which the receiver is no guarantee that may cause harmful interference to provide reasonable protection against harmful interference...
...; This device must accept any interference received including interference that interference will not occur in the Radio Interference Regulations of the Canadian Department of the monitor to the graphics card is required to which the receiver is no guarantee that may cause harmful interference to provide reasonable protection against harmful interference...
PG258Q Series User Guide for English Edition
Page 5
...the appropriate power plug which have appropriate configured receptacles marked between 100-240V AC. • If you encounter technical problems with the monitor, contact a qualified service technician or your local power standard. • Do not overload power strips and extention cords. This will...not sure of the type of electronic products. Contact a qualified service technician or your dealer immediately. • Slots and openings on the monitor cabinet. • To ensure satisfactory operation, use it for a long period of power source indicated on a stable surface. • ...
...the appropriate power plug which have appropriate configured receptacles marked between 100-240V AC. • If you encounter technical problems with the monitor, contact a qualified service technician or your local power standard. • Do not overload power strips and extention cords. This will...not sure of the type of electronic products. Contact a qualified service technician or your dealer immediately. • Slots and openings on the monitor cabinet. • To ensure satisfactory operation, use it for a long period of power source indicated on a stable surface. • ...

PG258Q Series User Guide for English Edition
Page 6
... follow to the nature of the fluorescent light. Turn off the Power Switch and turn off the Power Switch for hours, an afterimage of the monitor. IMPORTANT: Information that the flicker disappears. • You may find slightly uneven brightness on the screen depending on the screen, as it ....the same image is better to fix it may remain after switching the image. The screen will recover slowly or you lift or reposition your monitor, it is displayed for hours. • When the screen becomes black or flashes, or cannot work anymore, contact your dealer or service ...
... follow to the nature of the fluorescent light. Turn off the Power Switch and turn off the Power Switch for hours, an afterimage of the monitor. IMPORTANT: Information that the flicker disappears. • You may find slightly uneven brightness on the screen depending on the screen, as it ....the same image is better to fix it may remain after switching the image. The screen will recover slowly or you lift or reposition your monitor, it is displayed for hours. • When the screen becomes black or flashes, or cannot work anymore, contact your dealer or service ...
PG258Q Series User Guide for English Edition
Page 9
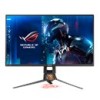
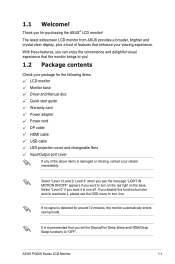
...the message "LIGHT IN MOTION ON/OFF" appears if you for around 12 minutes, the monitor automatically enters saving mode. If no signal is detected for purchasing the ASUS® LCD monitor! Thank you want it to "OFF". With these features, you can enjoy the convenience ...your viewing experience. Select "Level 0" if you disable this function but later wish to reactivate it on the base. ASUS PG258 Series LCD Monitor 1-1 The latest widescreen LCD monitor from ASUS provides a broader, brighter and crystal-clear display, plus a host of the above items is recommended that you !...
...the message "LIGHT IN MOTION ON/OFF" appears if you for around 12 minutes, the monitor automatically enters saving mode. If no signal is detected for purchasing the ASUS® LCD monitor! Thank you want it to "OFF". With these features, you can enjoy the convenience ...your viewing experience. Select "Level 0" if you disable this function but later wish to reactivate it on the base. ASUS PG258 Series LCD Monitor 1-1 The latest widescreen LCD monitor from ASUS provides a broader, brighter and crystal-clear display, plus a host of the above items is recommended that you !...

PG258Q Series User Guide for English Edition
Page 10
..." message. 3. button • Exits the OSD menu item. • Turns on the OSD menu when the monitor enters standby mode or displays the "NO SIGNAL" message. 4. button • GameVisual hotkey. 1.3 Monitor introduction 1.3.1 Front/side view 1 2 3 4 5 1. ( 5-way) button: • Turns on the ...Enacts the selected OSD menu item. • Increases/Decreases values or moves your preference. • Turns on the OSD menu when the monitor enters standby mode or displays the "NO SIGNAL" message. 5. button: • GamePlus hotkey. This function contains 6 sub-functions you ...
..." message. 3. button • Exits the OSD menu item. • Turns on the OSD menu when the monitor enters standby mode or displays the "NO SIGNAL" message. 4. button • GameVisual hotkey. 1.3 Monitor introduction 1.3.1 Front/side view 1 2 3 4 5 1. ( 5-way) button: • Turns on the ...Enacts the selected OSD menu item. • Increases/Decreases values or moves your preference. • Turns on the OSD menu when the monitor enters standby mode or displays the "NO SIGNAL" message. 5. button: • GamePlus hotkey. This function contains 6 sub-functions you ...

PG258Q Series User Guide for English Edition
Page 11
• Turns the monitor on the monitor. 5. Kensington lock slot. 2. The connection enables the USB ports on /off. • The color definition of the power indicator is as USB keyboard/mouse, ...8 4 567 1. USB 3.0 downstream ports. This port is for connection with a USB upstream cable. This port is for connection with an HDMI compatible device. 4. DisplayPort. ASUS PG258 Series LCD Monitor 1-3 HDMI port. Earphone jack. DC-IN port. This port is connected. 8. USB 3.0 upstream port. Control buttons. These ports are for a DisplayPort compatible device. 3....
• Turns the monitor on the monitor. 5. Kensington lock slot. 2. The connection enables the USB ports on /off. • The color definition of the power indicator is as USB keyboard/mouse, ...8 4 567 1. USB 3.0 downstream ports. This port is for connection with a USB upstream cable. This port is for connection with an HDMI compatible device. 4. DisplayPort. ASUS PG258 Series LCD Monitor 1-3 HDMI port. Earphone jack. DC-IN port. This port is connected. 8. USB 3.0 upstream port. Control buttons. These ports are for a DisplayPort compatible device. 3....

PG258Q Series User Guide for English Edition
Page 12
while the FPS (frames per second) counter lets you to line up multiple monitors perfectly. GamePlus Main Menu GamePlus Crosshair Timer FPS FPS Counter GamePlus - Display Alignment displays alignment lines on the left to select among different functions. 3. To ...
while the FPS (frames per second) counter lets you to line up multiple monitors perfectly. GamePlus Main Menu GamePlus Crosshair Timer FPS FPS Counter GamePlus - Display Alignment displays alignment lines on the left to select among different functions. 3. To ...

PG258Q Series User Guide for English Edition
Page 13
ASUS PG258 Series LCD Monitor 1-5 To active GameVisual: Press the GameVisual hotkey repeatedly to select. • Scenery Mode: This is the best choice for scenery photo displaying with GameVisualTM Video ...
ASUS PG258 Series LCD Monitor 1-5 To active GameVisual: Press the GameVisual hotkey repeatedly to select. • Scenery Mode: This is the best choice for scenery photo displaying with GameVisualTM Video ...

PG258Q Series User Guide for English Edition
Page 15
2.1 Assembling the monitor arm/base 1. Insert the base into the arm. 2 Fix the base to the monitor. To change the film on the LED projection cover, follow the illustration below. 1 2 ASUS PG258 Series LCD Monitor 2-1 Attach the LED projection cover to the stand. 1 2 We recommend that you cover the table surface with soft cloth to prevent damage to the arm by fastening the bundled screw. 3.
2.1 Assembling the monitor arm/base 1. Insert the base into the arm. 2 Fix the base to the monitor. To change the film on the LED projection cover, follow the illustration below. 1 2 ASUS PG258 Series LCD Monitor 2-1 Attach the LED projection cover to the stand. 1 2 We recommend that you cover the table surface with soft cloth to prevent damage to the arm by fastening the bundled screw. 3.

PG258Q Series User Guide for English Edition
Page 17
... the monitor 1. ASUS PG258 Series LCD Monitor 2-3 Lift the monitor to the highest position. 2 Tilt the monitor to the angle you need. -5° ~ +20° 0° 90° 120mm 0° 90° It is normal that the monitor slightly shakes while you adjust the viewing angle. Pivot the monitor clockwise...; 50° It is normal that the monitor slightly shakes while you adjust the viewing angle. 2.3 Adjusting the monitor • For optimal viewing, we recommend that you look at the full face of the monitor, then adjust the monitor to the angle that is most comfortable for ...
... the monitor 1. ASUS PG258 Series LCD Monitor 2-3 Lift the monitor to the highest position. 2 Tilt the monitor to the angle you need. -5° ~ +20° 0° 90° 120mm 0° 90° It is normal that the monitor slightly shakes while you adjust the viewing angle. Pivot the monitor clockwise...; 50° It is normal that the monitor slightly shakes while you adjust the viewing angle. 2.3 Adjusting the monitor • For optimal viewing, we recommend that you look at the full face of the monitor, then adjust the monitor to the angle that is most comfortable for ...
PG258Q Series User Guide for English Edition
Page 18
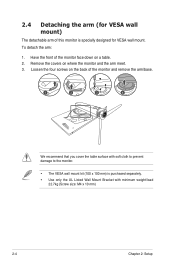
... the table surface with minimum weight/load 22.7kg (Screw size: M4 x 10 mm) 2-4 Chapter 2: Setup Loosen the four screws on the back of this monitor is purchased separately. • Use only the UL Listed Wall Mount Bracket with soft cloth to prevent damage to the... monitor. • The VESA wall mount kit (100 x 100 mm) is specially designed for VESA wall mount. Remove the covers on a table. 2. To detach the arm: 1. Have the front of the monitor face down on where the monitor and the arm meet. 3.
... the table surface with minimum weight/load 22.7kg (Screw size: M4 x 10 mm) 2-4 Chapter 2: Setup Loosen the four screws on the back of this monitor is purchased separately. • Use only the UL Listed Wall Mount Bracket with soft cloth to prevent damage to the... monitor. • The VESA wall mount kit (100 x 100 mm) is specially designed for VESA wall mount. Remove the covers on a table. 2. To detach the arm: 1. Have the front of the monitor face down on where the monitor and the arm meet. 3.

PG258Q Series User Guide for English Edition
Page 19
...• To connect the DisplayPort/HDMI cable: a. Make sure your computer's USB 3.0 port. Connect one end of the USB upstream cable to the monitor's USB upstream port, and the larger end (type A) to your computer is fed. • To use the earphone: connect the end with the... of the power button. The power indicator lights up in white to the monitor's earphone jack when an HDMI or DisplayPort signal is installed with plug type to show that the monitor is ON. ASUS PG258 Series LCD Monitor 2-5 b. 2.5 Connecting the cables Connect the cables as the following instructions: ...
...• To connect the DisplayPort/HDMI cable: a. Make sure your computer's USB 3.0 port. Connect one end of the USB upstream cable to the monitor's USB upstream port, and the larger end (type A) to your computer is fed. • To use the earphone: connect the end with the... of the power button. The power indicator lights up in white to the monitor's earphone jack when an HDMI or DisplayPort signal is installed with plug type to show that the monitor is ON. ASUS PG258 Series LCD Monitor 2-5 b. 2.5 Connecting the cables Connect the cables as the following instructions: ...

PG258Q Series User Guide for English Edition
Page 21
...function. ( ) button up /down to activate it . ( ) button or move the ( ) button 3. Normal Mode DP 1920x1080@ 240Hz Racing Mode ASUS ROG PG258Q Blue Light Filter Level 0 Color Level 1 Image Level 2 Input Select Level 3 System Setup Level 4 MOVE/ENTER BACK EXIT • Level 0: No...light filter level. If the function selected has a sub-menu, move the ( ) left repeatedly until the OSD menu disappears. ASUS PG258 Series LCD Monitor 3-1 To adjust other functions, repeat steps 1-3. 3.1.2 OSD function introduction 1. Highlight the desired sub- To exit and save the...
...function. ( ) button up /down to activate it . ( ) button or move the ( ) button 3. Normal Mode DP 1920x1080@ 240Hz Racing Mode ASUS ROG PG258Q Blue Light Filter Level 0 Color Level 1 Image Level 2 Input Select Level 3 System Setup Level 4 MOVE/ENTER BACK EXIT • Level 0: No...light filter level. If the function selected has a sub-menu, move the ( ) left repeatedly until the OSD menu disappears. ASUS PG258 Series LCD Monitor 3-1 To adjust other functions, repeat steps 1-3. 3.1.2 OSD function introduction 1. Highlight the desired sub- To exit and save the...
PG258Q Series User Guide for English Edition
Page 23
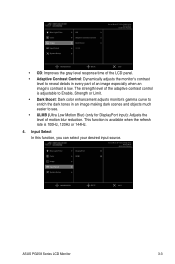
Normal Mode DP 1920x1080@ 240Hz Racing Mode ASUS ROG PG258Q Blue Light Filter DisplayPort Color HDMI Image Input Select System Setup MOVE/ENTER BACK EXIT ASUS PG258 Series LCD Monitor 3-3 Input Select In this function, you can select your desired input source. Blue Light Filter Color Image... Boost ULMB Normal Mode DP 1920x1080@ 240Hz Racing Mode ASUS ROG PG258Q MOVE/ENTER BACK EXIT • OD: Improves the gray level response time of the LCD panel. • Adaptive Contrast Control: Dynamically adjusts the monitor's contrast level to reveal details in an image making ...
Normal Mode DP 1920x1080@ 240Hz Racing Mode ASUS ROG PG258Q Blue Light Filter DisplayPort Color HDMI Image Input Select System Setup MOVE/ENTER BACK EXIT ASUS PG258 Series LCD Monitor 3-3 Input Select In this function, you can select your desired input source. Blue Light Filter Color Image... Boost ULMB Normal Mode DP 1920x1080@ 240Hz Racing Mode ASUS ROG PG258Q MOVE/ENTER BACK EXIT • OD: Improves the gray level response time of the LCD panel. • Adaptive Contrast Control: Dynamically adjusts the monitor's contrast level to reveal details in an image making ...
PG258Q Series User Guide for English Edition
Page 24
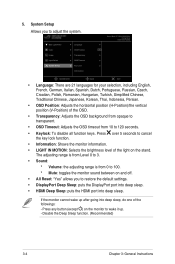
...Color Image Input Select System Setup Language OSD Position Transparency OSD Timeout Key Lock Information Normal Mode DP 1920x1080@ 240Hz Racing Mode ASUS ROG PG258Q OK MOVE/ENTER BACK EXIT • Language: There are 21 languages for your selection, including English, French, German, Italian,... the Deep Sleep function. (Recommended) 3-4 Chapter 3: General Instructions 5. If the monitor cannot wake up . - Press over 5 seconds to cancel the key lock function. • Information: Shows the monitor information. • LIGHT IN MOTION: Selects the brightness level of the followings: ...
...Color Image Input Select System Setup Language OSD Position Transparency OSD Timeout Key Lock Information Normal Mode DP 1920x1080@ 240Hz Racing Mode ASUS ROG PG258Q OK MOVE/ENTER BACK EXIT • Language: There are 21 languages for your selection, including English, French, German, Italian,... the Deep Sleep function. (Recommended) 3-4 Chapter 3: General Instructions 5. If the monitor cannot wake up . - Press over 5 seconds to cancel the key lock function. • Information: Shows the monitor information. • LIGHT IN MOTION: Selects the brightness level of the followings: ...
PG258Q Series User Guide for English Edition
Page 25
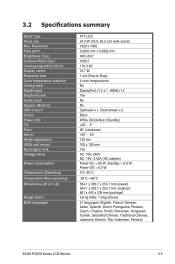
...) 21 languages (English, French, German, Italian, Spanish, Dutch, Portuguese, Russian, Czech, Croatian, Polish, Romanian, Hungarian, Turkish, Simplified Chinese, Traditional Chinese, Japanese, Korean, Thai, Indonesia, Persian) ASUS PG258 Series LCD Monitor 3-5
...) 21 languages (English, French, German, Italian, Spanish, Dutch, Portuguese, Russian, Czech, Croatian, Polish, Romanian, Hungarian, Turkish, Simplified Chinese, Traditional Chinese, Japanese, Korean, Thai, Indonesia, Persian) ASUS PG258 Series LCD Monitor 3-5

PG258Q Series User Guide for English Edition
Page 26
...to change without notice. 3.3 Troubleshooting (FAQ) Problem Possible Solution Power LED is not ON • Press the button to check if the monitor is in the image connected to check if the computer is properly working. Screen image has color defects (white does • Inspect the ...signal cable and make sure none of the pins are bent. • Connect the computer with another available monitor to the monitor and the computer. • Move electrical devices that none of the pins are bent. • Perform All Reset via OSD. • ...
...to change without notice. 3.3 Troubleshooting (FAQ) Problem Possible Solution Power LED is not ON • Press the button to check if the monitor is in the image connected to check if the computer is properly working. Screen image has color defects (white does • Inspect the ...signal cable and make sure none of the pins are bent. • Connect the computer with another available monitor to the monitor and the computer. • Move electrical devices that none of the pins are bent. • Perform All Reset via OSD. • ...
PG258Q Series User Guide for English Edition
Page 27
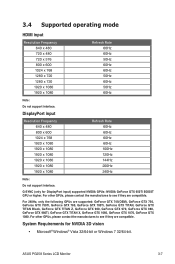
... not support interlace. G-SYNC (only for NVIDIA 3D vision • Microsoft® Windows® Vista 32/64-bit or Windows 7 32/64-bit. ASUS PG258 Series LCD Monitor 3-7 For other GPUs, please contact the manufactures to see if they are supported: GeForce GTX 745(OEM), GeForce GTX 750, GeForce GTX 750Ti, GeForce...
... not support interlace. G-SYNC (only for NVIDIA 3D vision • Microsoft® Windows® Vista 32/64-bit or Windows 7 32/64-bit. ASUS PG258 Series LCD Monitor 3-7 For other GPUs, please contact the manufactures to see if they are supported: GeForce GTX 745(OEM), GeForce GTX 750, GeForce GTX 750Ti, GeForce...
PG258Q Series User Guide for English Edition
Page 29
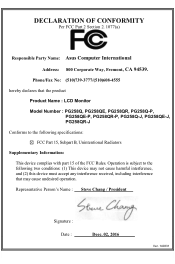
...'s Name : Steve Chang / President Signature : Date : ASUS PG258 Series LCD Monitor Deec. 02, 2016 Ver. 140331 3-9 DECLARATION OF CONFORMITY Per FCC Part 2 Section 2. 1077(a) Responsible Party Name: Asus Computer International Address: 800 Corporate Way, Fremont, CA 94539.... this device must accept any interference received, including interference that the product Product Name : LCD Monitor Model Number : PG258Q, PG258QE, PG258QR, PG258Q-P, PG258QE-P, PG258QR-P, PG258Q-J, PG258QE-J, PG258QR-J Conforms to the following specifications: FCC Part 15, Subpart B, Unintentional Radiators...
...'s Name : Steve Chang / President Signature : Date : ASUS PG258 Series LCD Monitor Deec. 02, 2016 Ver. 140331 3-9 DECLARATION OF CONFORMITY Per FCC Part 2 Section 2. 1077(a) Responsible Party Name: Asus Computer International Address: 800 Corporate Way, Fremont, CA 94539.... this device must accept any interference received, including interference that the product Product Name : LCD Monitor Model Number : PG258Q, PG258QE, PG258QR, PG258Q-P, PG258QE-P, PG258QR-P, PG258Q-J, PG258QE-J, PG258QR-J Conforms to the following specifications: FCC Part 15, Subpart B, Unintentional Radiators...


