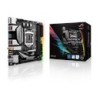
STRIX H270I GAMING Users ManualEnglish
Page 2
... this manual may or may be extended if: (1) the product is repaired, modified or altered, unless such repair, modification of shipment with you give us a notification to obtain the corresponding source code and your request please provide the name, model number and version, as required under various Free Open Source Software licenses. This offer is distributed without the express...
... this manual may or may be extended if: (1) the product is repaired, modified or altered, unless such repair, modification of shipment with you give us a notification to obtain the corresponding source code and your request please provide the name, model number and version, as required under various Free Open Source Software licenses. This offer is distributed without the express...

STRIX H270I GAMING Users ManualEnglish
Page 6
... to perform when installing system components. 3. These documents are also provided. Chapter 1: Product Introduction This chapter describes the features of the switches, jumpers, and connectors on ASUS hardware and software products. 2. It includes description of the motherboard and the new technology it supports. Where to find more information Refer to change system settings through the BIOS Setup menus. How this guide This user guide contains the...
... to perform when installing system components. 3. These documents are also provided. Chapter 1: Product Introduction This chapter describes the features of the switches, jumpers, and connectors on ASUS hardware and software products. 2. It includes description of the motherboard and the new technology it supports. Where to find more information Refer to change system settings through the BIOS Setup menus. How this guide This user guide contains the...

STRIX H270I GAMING Users ManualEnglish
Page 8
... using Intel® OptaneTM memory modules, ensure that you have updated your motherboard drivers and BIOS to the latest version from ASUS support website. *** This function will run at the maximum transfer rate of 1024 MB Intel® H270 Chipset with RAID 0, 1, 5, 10 and Intel® Rapid Storage Technology 15 support - 4 x SATA 6Gb/s ports - 1 x M.2_1 Socket 3 with M Key, type 2242/2260/2280 (supports both PCIe 3.0 x4 and SATA modes)* - 1 x M.2_2 Socket 3 with max. STRIX H270I GAMING specifications summary CPU Chipset Memory Expansion slots VGA Storage LAN...
... using Intel® OptaneTM memory modules, ensure that you have updated your motherboard drivers and BIOS to the latest version from ASUS support website. *** This function will run at the maximum transfer rate of 1024 MB Intel® H270 Chipset with RAID 0, 1, 5, 10 and Intel® Rapid Storage Technology 15 support - 4 x SATA 6Gb/s ports - 1 x M.2_1 Socket 3 with M Key, type 2242/2260/2280 (supports both PCIe 3.0 x4 and SATA modes)* - 1 x M.2_2 Socket 3 with max. STRIX H270I GAMING specifications summary CPU Chipset Memory Expansion slots VGA Storage LAN...
STRIX H270I GAMING Users ManualEnglish
Page 9
... - Q-Slot - Optical S/PDIF out port at mid-board [charcoal]) ROG SupremeFX S1220A 8-Channel High Definition Audio CODEC - Windows® 7/8.1 support up to Windows® 7 limitations, 32-bit playback is unavailable for front and rear headphone outputs - AI Suite 3 - SupremeFX Shielding Technology - Aura effects - 1 x Aura RGB header ROG GameFirst IV ROG CloneDrive ROG RAMCache II Overwolf ROG CPU-Z Performance Optimization - Jack-detection, Multi-streaming, and Front Panel Jack-retasking - STRIX H270I GAMING specifications summary USB Audio...
... - Q-Slot - Optical S/PDIF out port at mid-board [charcoal]) ROG SupremeFX S1220A 8-Channel High Definition Audio CODEC - Windows® 7/8.1 support up to Windows® 7 limitations, 32-bit playback is unavailable for front and rear headphone outputs - AI Suite 3 - SupremeFX Shielding Technology - Aura effects - 1 x Aura RGB header ROG GameFirst IV ROG CloneDrive ROG RAMCache II Overwolf ROG CPU-Z Performance Optimization - Jack-detection, Multi-streaming, and Front Panel Jack-retasking - STRIX H270I GAMING specifications summary USB Audio...

STRIX H270I GAMING Users ManualEnglish
Page 10
... 2 USB 3.0 ports 4 x SATA 6Gb/s connectors 1 x M.2 Socket 3 with M Key, type 2242/2260/2280 storage devices support (supports both SATA & PCIe 3.0 modes) 1 x M.2 Socket 3 with M Key, type 2242/2260/2280 storage devices support (supports PCIe 3.0 mode) 1 x 4-pin CPU fan connector 1 x 4-pin chassis fan connector 1 x 4-pin AIO_PUMP connector 1 x Aura RGB header 1 x Clear CMOS/RTC (2-pin) 1 x Front panel audio connector(s) (AAFP) 1 x 8-pin ATX 12V Power connector(s) 1 x 24-pin EATX Power connector(s) 1 x 14-1 pin TPM connector 1 x Internal speaker connector 1 x System panel(s) 1 x 128 Mb Flash ROM...
... 2 USB 3.0 ports 4 x SATA 6Gb/s connectors 1 x M.2 Socket 3 with M Key, type 2242/2260/2280 storage devices support (supports both SATA & PCIe 3.0 modes) 1 x M.2 Socket 3 with M Key, type 2242/2260/2280 storage devices support (supports PCIe 3.0 mode) 1 x 4-pin CPU fan connector 1 x 4-pin chassis fan connector 1 x 4-pin AIO_PUMP connector 1 x Aura RGB header 1 x Clear CMOS/RTC (2-pin) 1 x Front panel audio connector(s) (AAFP) 1 x 8-pin ATX 12V Power connector(s) 1 x 24-pin EATX Power connector(s) 1 x 14-1 pin TPM connector 1 x Internal speaker connector 1 x System panel(s) 1 x 128 Mb Flash ROM...

STRIX H270I GAMING Users ManualEnglish
Page 16
...® processors. System panel connector (10-1 pin PANEL) 10. Intel® Serial ATA 6 Gb/s connectors (7-pin SATA6G_1~4) 12. TPM connector (14-1 pin TPM) 15. Chapter 1 Layout contents Connectors/Jumpers/Buttons and switches/Slots 1. USB 3.0 connectors (20-1 pin USB3_12) 13. M.2 sockets (M.2_1~2) 3. DDR4 DIMM slots 6. Speaker connector (4-pin SPEAKER) 11. Clear RTC RAM jumper (2-pin CLRTC) 14. STRIX H270I GAMING CPU socket LGA1151 1-4 Chapter 1: Product Introduction LGA1151 CPU socket 4. POST State LEDs 7. RGB LED Standby power LED (SB_PWR) 8. RGB header (4-pin...
...® processors. System panel connector (10-1 pin PANEL) 10. Intel® Serial ATA 6 Gb/s connectors (7-pin SATA6G_1~4) 12. TPM connector (14-1 pin TPM) 15. Chapter 1 Layout contents Connectors/Jumpers/Buttons and switches/Slots 1. USB 3.0 connectors (20-1 pin USB3_12) 13. M.2 sockets (M.2_1~2) 3. DDR4 DIMM slots 6. Speaker connector (4-pin SPEAKER) 11. Clear RTC RAM jumper (2-pin CLRTC) 14. STRIX H270I GAMING CPU socket LGA1151 1-4 Chapter 1: Product Introduction LGA1151 CPU socket 4. POST State LEDs 7. RGB LED Standby power LED (SB_PWR) 8. RGB header (4-pin...

STRIX H270I GAMING Users ManualEnglish
Page 18
... Under the default state, some memory modules for the OS can be about 3GB or less. For an optimum compatibility, we recommend that you install memory modules of the DIMM fan may install varying memory sizes in the BIOS for the hyper DIMM support. • Visit the ASUS website for the dual-channel configuration. settings in Channel A, and Channel B. b) Install a 64-bit Windows® OS when you are using a 32-bit Windows® OS...
... Under the default state, some memory modules for the OS can be about 3GB or less. For an optimum compatibility, we recommend that you install memory modules of the DIMM fan may install varying memory sizes in the BIOS for the hyper DIMM support. • Visit the ASUS website for the dual-channel configuration. settings in Channel A, and Channel B. b) Install a 64-bit Windows® OS when you are using a 32-bit Windows® OS...

STRIX H270I GAMING Users ManualEnglish
Page 25
Intel® Serial ATA 6 Gb/s connectors (7-pin SATA 6G_1~4) These connectors connect to Serial ATA 6 Gb/s hard disk drives via Serial ATA 6 Gb/s signal cables. If you installed Serial ATA hard disk drives, you can create a RAID 0, 1, 5, and 10 configuration with the Intel® Rapid Storage Technology through the onboard Intel® H270 chipset. Chapter 1 5. A B SATA6G_1 GND RSATA_TXP1 RSATA_TXN1 GND RSATA_RXN1 RSATA_RXP1 GND SATA6G_3 GND RSATA_TXP3 RSATA_TXN3 GND RSATA_RXN3 RSATA_RXP3 GND A SATA6G_2 SATA6G_4 GND...
Intel® Serial ATA 6 Gb/s connectors (7-pin SATA 6G_1~4) These connectors connect to Serial ATA 6 Gb/s hard disk drives via Serial ATA 6 Gb/s signal cables. If you installed Serial ATA hard disk drives, you can create a RAID 0, 1, 5, and 10 configuration with the Intel® Rapid Storage Technology through the onboard Intel® H270 chipset. Chapter 1 5. A B SATA6G_1 GND RSATA_TXP1 RSATA_TXN1 GND RSATA_RXN1 RSATA_RXP1 GND SATA6G_3 GND RSATA_TXP3 RSATA_TXN3 GND RSATA_RXN3 RSATA_RXP3 GND A SATA6G_2 SATA6G_4 GND...
STRIX H270I GAMING Users ManualEnglish
Page 39
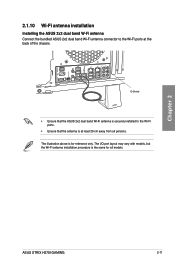
IO Shield • Ensure that the ASUS 2x2 dual band Wi-Fi antenna is securely installed to the Wi-Fi ports at least 20 cm away from all models. Chapter 2 ASUS STRIX H270I GAMING 2-11 The I/O port layout may vary with models, but the Wi-Fi antenna installation procedure is at the back of the chassis. 2.1.10 Wi-Fi antenna installation Installing the ASUS 2x2 dual band W-Fi antenna Connect the bundled ASUS 2x2 dual band Wi-Fi antenna connector to the Wi-Fi ports. • Ensure that the antenna is the same for reference only. The illustration above is for all persons.
IO Shield • Ensure that the ASUS 2x2 dual band Wi-Fi antenna is securely installed to the Wi-Fi ports at least 20 cm away from all models. Chapter 2 ASUS STRIX H270I GAMING 2-11 The I/O port layout may vary with models, but the Wi-Fi antenna installation procedure is at the back of the chassis. 2.1.10 Wi-Fi antenna installation Installing the ASUS 2x2 dual band W-Fi antenna Connect the bundled ASUS 2x2 dual band Wi-Fi antenna connector to the Wi-Fi ports. • Ensure that the antenna is the same for reference only. The illustration above is for all persons.

STRIX H270I GAMING Users ManualEnglish
Page 44
... green after the system LED turns on the chain) c. For systems with a surge protector. 5. Turn on the BIOS setting. At power on, hold down the key to disabled No keyboard detected No memory detected No VGA detected Hardware component failure 7. After making all switches are running, the BIOS beeps (refer to the BIOS beep codes table) or additional messages appear on the system front panel case lights up for less than...
... green after the system LED turns on the chain) c. For systems with a surge protector. 5. Turn on the BIOS setting. At power on, hold down the key to disabled No keyboard detected No memory detected No VGA detected Hardware component failure 7. After making all switches are running, the BIOS beeps (refer to the BIOS beep codes table) or additional messages appear on the system front panel case lights up for less than...

STRIX H270I GAMING Users ManualEnglish
Page 48
The default screen for Intel Rapid Storage Technology Displays the CPU Fan's speed. Click < or > to the Setup Mode item in section Boot menu for details. To access the Advanced Mode, click Advanced Mode(F7) or press . ASUS STRIX H270I GAMING 3-3 Refer to switch EZ System Tuning modes Selects the display language of the BIOS setup program Chapter 3 Enables or disables the SATA RAID mode for entering the BIOS setup program can be changed. Displays the CPU/motherboard temperature, CPU voltage output, CPU/chassis/power fan speed, and SATA information Displays the system ...
The default screen for Intel Rapid Storage Technology Displays the CPU Fan's speed. Click < or > to the Setup Mode item in section Boot menu for details. To access the Advanced Mode, click Advanced Mode(F7) or press . ASUS STRIX H270I GAMING 3-3 Refer to switch EZ System Tuning modes Selects the display language of the BIOS setup program Chapter 3 Enables or disables the SATA RAID mode for entering the BIOS setup program can be changed. Displays the CPU/motherboard temperature, CPU voltage output, CPU/chassis/power fan speed, and SATA information Displays the system ...

STRIX H270I GAMING Users ManualEnglish
Page 56
... section 1.1.6 Headers for this menu allow you have forgotten your BIOS password, erase the CMOS Real Time Clock (RTC) RAM to the default setting. Configuration options: [Auto] [Sync All Cores] [Per Core] DRAM Odd Ratio Mode [Enabled] Allows you to all cores. Configuration options: [Disabled] [Enabled] DRAM Frequency [Auto] This item allows you to erase the RTC RAM via the Clear CMOS button. • The Administrator or User Password items on the motherboard. CPU Core Ratio [Auto] This item allows you to set the memory operating frequency. Internal CPU Power Management...
... section 1.1.6 Headers for this menu allow you have forgotten your BIOS password, erase the CMOS Real Time Clock (RTC) RAM to the default setting. Configuration options: [Auto] [Sync All Cores] [Per Core] DRAM Odd Ratio Mode [Enabled] Allows you to all cores. Configuration options: [Disabled] [Enabled] DRAM Frequency [Auto] This item allows you to erase the RTC RAM via the Clear CMOS button. • The Administrator or User Password items on the motherboard. CPU Core Ratio [Auto] This item allows you to set the memory operating frequency. Internal CPU Power Management...

STRIX H270I GAMING Users ManualEnglish
Page 58
...Speed for PEG Port and Multi-Monitor. 3.6.4 PCH Configuration PCI Express Configuration This item allows you to set to configure the PCI Express slots. Configuration options: [Auto] [Gen1] [Gen2] [Gen3] 3.6.5 PCH Storage Configuration While entering Setup, the BIOS automatically detects the presence of the CPU states. Configuration options: [On] [Off] Chapter 3 ASUS STRIX H270I GAMING 3-13 Intel(R) SpeedStep(tm) [Auto] This item allows your system to [Gen3], the PCIe port runs at PCIe 1.0 speed. When set to enable or disable the CFG lock. CPU Power Management Control...
...Speed for PEG Port and Multi-Monitor. 3.6.4 PCH Configuration PCI Express Configuration This item allows you to set to configure the PCI Express slots. Configuration options: [Auto] [Gen1] [Gen2] [Gen3] 3.6.5 PCH Storage Configuration While entering Setup, the BIOS automatically detects the presence of the CPU states. Configuration options: [On] [Off] Chapter 3 ASUS STRIX H270I GAMING 3-13 Intel(R) SpeedStep(tm) [Auto] This item allows your system to [Gen3], the PCIe port runs at PCIe 1.0 speed. When set to enable or disable the CFG lock. CPU Power Management Control...

STRIX H270I GAMING Users ManualEnglish
Page 59
... options: [Enable(S4+S5)] [Enable(S5)] [Disabled] 3.6.9 Network Stack Configuration The items in this menu allow you to configure Ipv4 / Ipv6 PXE support. 3.6.10 HDD/SSD SMART Information This menu displays the SMART information of the connected devices. 3.6.11 USB Configuration The items in this menu allow you to [Enabled], all other PME options will be switched off. Chapter 3 3-14 Chapter 3: BIOS Setup Wi-Fi Controller [Enabled] [Enabled] Enables the Wi-Fi controller. [Disabled] Disables the controller. When set to enable/disable SATA Hot Plug Support. The USB Devices...
... options: [Enable(S4+S5)] [Enable(S5)] [Disabled] 3.6.9 Network Stack Configuration The items in this menu allow you to configure Ipv4 / Ipv6 PXE support. 3.6.10 HDD/SSD SMART Information This menu displays the SMART information of the connected devices. 3.6.11 USB Configuration The items in this menu allow you to [Enabled], all other PME options will be switched off. Chapter 3 3-14 Chapter 3: BIOS Setup Wi-Fi Controller [Enabled] [Enabled] Enables the Wi-Fi controller. [Disabled] Disables the controller. When set to enable/disable SATA Hot Plug Support. The USB Devices...

STRIX H270I GAMING Users ManualEnglish
Page 60
...-UEFI driver add-on devices for each fan. 3.8 Boot menu The Boot menu items allow you to enable or disable the individual USB ports. Boot Configuration Setup Mode [EZ Mode] [Advanced Mode] This item allows you to go to Advanced Mode of the BIOS after AC Power Loss [Normal Boot] [Normal Boot] Returns to accelerate the boot speed. Chapter 3 ASUS STRIX H270I GAMING 3-15 CSM (Compatibility Support Module) Allows you to go back to fully support the Windows® Security Update and Security Boot. Next Boot...
...-UEFI driver add-on devices for each fan. 3.8 Boot menu The Boot menu items allow you to enable or disable the individual USB ports. Boot Configuration Setup Mode [EZ Mode] [Advanced Mode] This item allows you to go to Advanced Mode of the BIOS after AC Power Loss [Normal Boot] [Normal Boot] Returns to accelerate the boot speed. Chapter 3 ASUS STRIX H270I GAMING 3-15 CSM (Compatibility Support Module) Allows you to go back to fully support the Windows® Security Update and Security Boot. Next Boot...

STRIX H270I GAMING Users ManualEnglish
Page 61
... to section 3.11.2 ASUS EZ Flash 3. Configuration options: [Legacy only] [UEFI driver first] Secure Boot Allows you to configure the Windows® Secure Boot settings and manage its keys to protect the system from Network Devices [Legacy only] Allows you want to [Enabled]. Boot Override These items display the available devices. When you set Launch CSM to launch. Boot Device Control [UEFI and Legacy OPROM] Allows you want to select the type of devices installed in the system. The...
... to section 3.11.2 ASUS EZ Flash 3. Configuration options: [Legacy only] [UEFI driver first] Secure Boot Allows you to configure the Windows® Secure Boot settings and manage its keys to protect the system from Network Devices [Legacy only] Allows you want to [Enabled]. Boot Override These items display the available devices. When you set Launch CSM to launch. Boot Device Control [UEFI and Legacy OPROM] Allows you want to select the type of devices installed in the system. The...

STRIX H270I GAMING Users ManualEnglish
Page 62
... selected ASUS graphics cards. This may take a while depending on Intel® SATA port. 3.9.2 Secure Erase SSD speeds may lower over time as with any storage medium due to section 1.1.2 Motherboard layout of SSDs tested with the Secure Erase. • Locked. Check the ASUS support site for the PCIE slots that uses a different password defined by freezing them prior to factory performance levels. Do not turn...
... selected ASUS graphics cards. This may take a while depending on Intel® SATA port. 3.9.2 Secure Erase SSD speeds may lower over time as with any storage medium due to section 1.1.2 Motherboard layout of SSDs tested with the Secure Erase. • Locked. Check the ASUS support site for the PCIE slots that uses a different password defined by freezing them prior to factory performance levels. Do not turn...

STRIX H270I GAMING Users ManualEnglish
Page 63
... potentially risky. Chapter 3 3-18 Chapter 3: BIOS Setup Select OK to load the optimal default values for this option or if you selected are finished making your BIOS when necessary. When you select this motherboard. ASUS EZ Flash 3: Updates the BIOS using the current version of BIOS, DO NOT manually update the BIOS. Save Changes & Reset Once you are saved. Configuration options: [PCIEX16] 3.10 Exit menu The Exit menu items allow you press , a confirmation...
... potentially risky. Chapter 3 3-18 Chapter 3: BIOS Setup Select OK to load the optimal default values for this option or if you selected are finished making your BIOS when necessary. When you select this motherboard. ASUS EZ Flash 3: Updates the BIOS using the current version of BIOS, DO NOT manually update the BIOS. Save Changes & Reset Once you are saved. Configuration options: [PCIEX16] 3.10 Exit menu The Exit menu items allow you press , a confirmation...

STRIX H270I GAMING Users ManualEnglish
Page 64
... via Storage Devices. Press to switch to the Folder Info field. 7. Enter the Advanced Mode of the BIOS setup program. Insert the USB flash disk that comes with the motherboard package. 3.11.2 ASUS EZ Flash 3 ASUS EZ Flash 3 allows you to download and update to the latest BIOS through the Internet without having to use a bootable floppy disk or an OS‑based utility. Press the Up/Down arrow keys to find the BIOS file...
... via Storage Devices. Press to switch to the Folder Info field. 7. Enter the Advanced Mode of the BIOS setup program. Insert the USB flash disk that comes with the motherboard package. 3.11.2 ASUS EZ Flash 3 ASUS EZ Flash 3 allows you to download and update to the latest BIOS through the Internet without having to use a bootable floppy disk or an OS‑based utility. Press the Up/Down arrow keys to find the BIOS file...

STRIX H270I GAMING Users ManualEnglish
Page 66
....asus.com/support/ and save it to restore the BIOS file when it fails or gets corrupted during the updating process. The utility automatically checks the devices for the BIOS file. When found, the utility reads the BIOS file and enters ASUS EZ Flash 3 automatically. 4. You can cause system boot failure! Turn on the ASUS official website. Insert the motherboard support DVD to the optical drive, or the USB flash drive containing the BIOS file to the USB port. 3. Chapter 3 ASUS STRIX H270I GAMING...
....asus.com/support/ and save it to restore the BIOS file when it fails or gets corrupted during the updating process. The utility automatically checks the devices for the BIOS file. When found, the utility reads the BIOS file and enters ASUS EZ Flash 3 automatically. 4. You can cause system boot failure! Turn on the ASUS official website. Insert the motherboard support DVD to the optical drive, or the USB flash drive containing the BIOS file to the USB port. 3. Chapter 3 ASUS STRIX H270I GAMING...


