

User Guide
Page 3
Contents Safety information...v About this guide...vi STRIX B250H GAMING specifications summary viii Package contents...xii Installation tools and components xiii Chapter 1: Product Introduction 1.1 Motherboard overview 1-1 1.1.1 Before you proceed 1-1 1.1.2 Motherboard layout 1-2 1.1.3 ...13 2.2.1 Rear I/O connection 2-13 2.2.2 Audio I/O connections 2-14 2.3 Starting up for the first time 2-16 2.4 Turning off the computer 2-17 Chapter 3: BIOS Setup 3.1 Knowing BIOS 3-1 3.2 BIOS setup program 3-2 3.2.1 EZ Mode 3-3 3.2.2 Advanced Mode 3-4 3.2.3 QFan Control 3-7 iii
Contents Safety information...v About this guide...vi STRIX B250H GAMING specifications summary viii Package contents...xii Installation tools and components xiii Chapter 1: Product Introduction 1.1 Motherboard overview 1-1 1.1.1 Before you proceed 1-1 1.1.2 Motherboard layout 1-2 1.1.3 ...13 2.2.1 Rear I/O connection 2-13 2.2.2 Audio I/O connections 2-14 2.3 Starting up for the first time 2-16 2.4 Turning off the computer 2-17 Chapter 3: BIOS Setup 3.1 Knowing BIOS 3-1 3.2 BIOS setup program 3-2 3.2.1 EZ Mode 3-3 3.2.2 Advanced Mode 3-4 3.2.3 QFan Control 3-7 iii

User Guide
Page 6
...to change system settings through the BIOS Setup menus. vi It includes description of the motherboard and the new technology it supports. Chapter 1: Product Introduction This chapter describes the features of the switches, jumpers, and connectors on ASUS hardware and software products. 2. ...How this guide This user guide contains the information you have been added by your dealer. Detailed descriptions of the BIOS parameters are not part of the standard package.
...to change system settings through the BIOS Setup menus. vi It includes description of the motherboard and the new technology it supports. Chapter 1: Product Introduction This chapter describes the features of the switches, jumpers, and connectors on ASUS hardware and software products. 2. ...How this guide This user guide contains the information you have been added by your dealer. Detailed descriptions of the BIOS parameters are not part of the standard package.
User Guide
Page 9
... Controller (MAC) and physical layer (PHY) Anti-surge LANGuard ROG GameFirst Technology (continued on the next page) ix Sonic Studio III...BIOS to use a SATA device. Before using 7th Generation Intel® Processors. Supports up to Windows® 7 limitations, 32-bit playback is unavailable for front and rear headphone outputs - Dual Headpone Amplifiers - Intel® I219-V Gigabit LAN- High quality 120dB SNR stereo playback output and 113dB SNR recording input - STRIX B250H GAMING... and PCIe x1_2 slots. Adjust BIOS Settings to the latest version from ASUS support website.
... Controller (MAC) and physical layer (PHY) Anti-surge LANGuard ROG GameFirst Technology (continued on the next page) ix Sonic Studio III...BIOS to use a SATA device. Before using 7th Generation Intel® Processors. Supports up to Windows® 7 limitations, 32-bit playback is unavailable for front and rear headphone outputs - Dual Headpone Amplifiers - Intel® I219-V Gigabit LAN- High quality 120dB SNR stereo playback output and 113dB SNR recording input - STRIX B250H GAMING... and PCIe x1_2 slots. Adjust BIOS Settings to the latest version from ASUS support website.

User Guide
Page 10
... and USB3.0/2.0 ports - Performance Optimization - ESD Guards on the next page) x ASUS CrashFree BIOS 3 - Q-DIMM ASUS Exclusive Features - Ai Charger - AI Suite 3 Gamer's Guardian - Q-Shield - Q-Slot - SafeSlot - DIGI+ VRM - DRAM Overcurrent Protection - Highly Durable Components - STRIX B250H GAMING specifications summary ROG Exclusive Features ROG RAMCache II ROG GameFirst IV* ROG Overwolf ROG CPU-Z ROG CloneDrive ASUS Special Features Internal I /O ASUS EZ DIY - GPU Boost -
... and USB3.0/2.0 ports - Performance Optimization - ESD Guards on the next page) x ASUS CrashFree BIOS 3 - Q-DIMM ASUS Exclusive Features - Ai Charger - AI Suite 3 Gamer's Guardian - Q-Shield - Q-Slot - SafeSlot - DIGI+ VRM - DRAM Overcurrent Protection - Highly Durable Components - STRIX B250H GAMING specifications summary ROG Exclusive Features ROG RAMCache II ROG GameFirst IV* ROG Overwolf ROG CPU-Z ROG CloneDrive ASUS Special Features Internal I /O ASUS EZ DIY - GPU Boost -

User Guide
Page 11
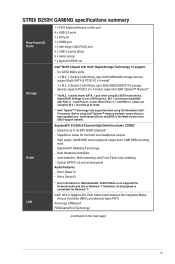
STRIX B250H GAMING specifications summary Internal I/O connectors BIOS Features Manageability Support DVD contents Operating system support Form factor 1 x Front panel connector(s) 1 x Front panel audio connector (AAFP) 1 x TPM connector 1 x Clear CMOS jumper (2-pin) 128 Mb Flash ROM, UEFI AMI BIOS, PnP, DMI 3.0, WfM 2.0, SM BIOS 3.0, ACPI 6.0, Multi-language BIOS, ASUS EZ Flash 3, CrashFree BIOS 3, F6 Qfan Control, F3 My Favorites, F12...
STRIX B250H GAMING specifications summary Internal I/O connectors BIOS Features Manageability Support DVD contents Operating system support Form factor 1 x Front panel connector(s) 1 x Front panel audio connector (AAFP) 1 x TPM connector 1 x Clear CMOS jumper (2-pin) 128 Mb Flash ROM, UEFI AMI BIOS, PnP, DMI 3.0, WfM 2.0, SM BIOS 3.0, ACPI 6.0, Multi-language BIOS, ASUS EZ Flash 3, CrashFree BIOS 3, F6 Qfan Control, F3 My Favorites, F12...

User Guide
Page 16
... 2260 2242 M.2_1(SOCKET3) PCIEX1_1 3 Intel I219V PCIEX16_1 Super I/O PCIEX1_2 BATTERY ASM1480 Intel® B250 ALC 1220 COVER PCIEX16_2 PCIEX1_3 22110 2280 2260 2242 V 7 128Mb BIOS X4 X PCIE SATA IRST M.2_2(SOCKET3) PCIEX1_4 SB_PWR 8 CHA_FAN1 TPM USB1112 USB3_34 CHA_FAN2 AAFP CLRTC PANEL 13 2 12 11 6 10 2 9 Refer to 1.1.8 Internal connectors and...
... 2260 2242 M.2_1(SOCKET3) PCIEX1_1 3 Intel I219V PCIEX16_1 Super I/O PCIEX1_2 BATTERY ASM1480 Intel® B250 ALC 1220 COVER PCIEX16_2 PCIEX1_3 22110 2280 2260 2242 V 7 128Mb BIOS X4 X PCIE SATA IRST M.2_2(SOCKET3) PCIEX1_4 SB_PWR 8 CHA_FAN1 TPM USB1112 USB3_34 CHA_FAN2 AAFP CLRTC PANEL 13 2 12 11 6 10 2 9 Refer to 1.1.8 Internal connectors and...

User Guide
Page 20
...on the CPU's capabilities and other installed devices. • Always install the DIMMS with the vendor to get the correct memory modules. • ASUS exclusively provides hyper DIMM support function. • Hyper DIMM support is not the JEDEC memory standard. c) For more efficient memory cooling system to ...maximum of 3GB system memory if you install memory modules of the DIMM fan may install varying memory sizes in the BIOS for the hyper DIMM support. • Visit the ASUS website for the dual-channel configuration. com/kb/929605/en-us. • The design of the same version or...
...on the CPU's capabilities and other installed devices. • Always install the DIMMS with the vendor to get the correct memory modules. • ASUS exclusively provides hyper DIMM support function. • Hyper DIMM support is not the JEDEC memory standard. c) For more efficient memory cooling system to ...maximum of 3GB system memory if you install memory modules of the DIMM fan may install varying memory sizes in the BIOS for the hyper DIMM support. • Visit the ASUS website for the dual-channel configuration. com/kb/929605/en-us. • The design of the same version or...

User Guide
Page 23
... allows you to clear the CMOS RTC RAM data of the system setup information such as a screwdriver to short the two pins. 3. CLRTC PIN 1 STRIX B250H GAMING Clear RTC RAM To erase the RTC RAM: 1. Use a metal object such as date, time, and system passwords. Hold down the key during the... boot process and enter BIOS setup to clear the CMOS RTC RAM data. If the steps above do not help, remove the onboard battery and short the two pins again to re-enter data. ASUS STRIX B250H GAMING 1-9 After clearing the CMOS, reinstall the battery. +3V_BAT ...
... allows you to clear the CMOS RTC RAM data of the system setup information such as a screwdriver to short the two pins. 3. CLRTC PIN 1 STRIX B250H GAMING Clear RTC RAM To erase the RTC RAM: 1. Use a metal object such as date, time, and system passwords. Hold down the key during the... boot process and enter BIOS setup to clear the CMOS RTC RAM data. If the steps above do not help, remove the onboard battery and short the two pins again to re-enter data. ASUS STRIX B250H GAMING 1-9 After clearing the CMOS, reinstall the battery. +3V_BAT ...

User Guide
Page 43
...'s LEDs may continue to wake up then steady) from S5 mode ACT/LINK SPEED LED LED LAN port You can disable the LAN controllers in BIOS. Intel® LAN port (LAN1)* 5. Chapter 2 2.2 Motherboard rear and audio connections 2.2.1 Rear I /O ports** 6. DVI-D port 4. Optical S/PDIF Out port 7. Audio I /O connection 1 2 3 4 2 8 7 65 Rear panel connectors... Off 10 Mbps connection Orange Linked Orange 100 Mbps connection Orange (Blinking) Data activity Green 1 Gbps connection Orange (Blinking Ready to blink even when disabled. ASUS STRIX B250H GAMING 2-13
...'s LEDs may continue to wake up then steady) from S5 mode ACT/LINK SPEED LED LED LAN port You can disable the LAN controllers in BIOS. Intel® LAN port (LAN1)* 5. Chapter 2 2.2 Motherboard rear and audio connections 2.2.1 Rear I /O ports** 6. DVI-D port 4. Optical S/PDIF Out port 7. Audio I /O connection 1 2 3 4 2 8 7 65 Rear panel connectors... Off 10 Mbps connection Orange Linked Orange 100 Mbps connection Orange (Blinking) Data activity Green 1 Gbps connection Orange (Blinking Ready to blink even when disabled. ASUS STRIX B250H GAMING 2-13

User Guide
Page 46
... power, the system power LED on the screen. The system then runs the power-on test. After making all switches are running, the BIOS beeps (refer to the BIOS beep codes table) or additional messages appear on the system front panel case lights up. If you do not see anything within 30...
... power, the system power LED on the screen. The system then runs the power-on test. After making all switches are running, the BIOS beeps (refer to the BIOS beep codes table) or additional messages appear on the system front panel case lights up. If you do not see anything within 30...

User Guide
Page 47
BIOS Beep One short beep One continuous beep followed by two short beeps then a pause (repeated) One continuous beep followed by three short beeps One continuous ... button for more than four seconds to disabled No keyboard detected No memory detected No VGA detected Hardware component failure 7. At power on the BIOS setting. Chapter 2 ASUS STRIX B250H GAMING 2-17 Press the power switch for less than four seconds to let the system enter the soft-off mode, depending on , hold down the...
BIOS Beep One short beep One continuous beep followed by two short beeps then a pause (repeated) One continuous beep followed by three short beeps One continuous ... button for more than four seconds to disabled No keyboard detected No memory detected No VGA detected Hardware component failure 7. At power on the BIOS setting. Chapter 2 ASUS STRIX B250H GAMING 2-17 Press the power switch for less than four seconds to let the system enter the soft-off mode, depending on , hold down the...

User Guide
Page 49
...conditions to instability or boot failure. DO NOT change the BIOS settings only with the same smoothness as B250HG.CAP for system startup in the motherboard CMOS. Chapter 3 ASUS STRIX B250H GAMING 3-1 The term "BIOS" in the following circumstances: • An error message appears... on the screen during the system bootup and requests you change the default BIOS settings except in this motherboard. We strongly ...
...conditions to instability or boot failure. DO NOT change the BIOS settings only with the same smoothness as B250HG.CAP for system startup in the motherboard CMOS. Chapter 3 ASUS STRIX B250H GAMING 3-1 The term "BIOS" in the following circumstances: • An error message appears... on the screen during the system bootup and requests you change the default BIOS settings except in this motherboard. We strongly ...

User Guide
Page 50
... three options, press key to enter BIOS. • The BIOS setup screens shown in using the first two options. BIOS menu screen The BIOS Setup program can be used under the Exit menu or press hotkey . 3.2 BIOS setup program Use the BIOS Setup to ensure system compatibility and stability. Please visit ASUS website for details. • If...
... three options, press key to enter BIOS. • The BIOS setup screens shown in using the first two options. BIOS menu screen The BIOS Setup program can be used under the Exit menu or press hotkey . 3.2 BIOS setup program Use the BIOS Setup to ensure system compatibility and stability. Please visit ASUS website for details. • If...

User Guide
Page 51
... program can be changed. The default screen for details. Refer to switch EZ System Tuning modes Selects the display language of the BIOS setup program Chapter 3 Displays the CPU Fan's speed. To access the Advanced Mode, click Advanced Mode(F7) or press . Click the button to manually tune ..., CPU voltage output, CPU/chassis/power fan speed, and SATA information Displays the system properties of the basic system information, and allows you enter the BIOS setup program. ASUS STRIX B250H GAMING 3-3 3.2.1 EZ Mode By default, the EZ Mode screen appears when you to the system.
... program can be changed. The default screen for details. Refer to switch EZ System Tuning modes Selects the display language of the BIOS setup program Chapter 3 Displays the CPU Fan's speed. To access the Advanced Mode, click Advanced Mode(F7) or press . Click the button to manually tune ..., CPU voltage output, CPU/chassis/power fan speed, and SATA information Displays the system properties of the basic system information, and allows you enter the BIOS setup program. ASUS STRIX B250H GAMING 3-3 3.2.1 EZ Mode By default, the EZ Mode screen appears when you to the system.

User Guide
Page 52
... provides advanced options for the detailed configurations. Refer to EZ Mode Search on the FAQ Displays the CPU temperature, CPU, and memory voltage output 3-4 Chapter 3: BIOS Setup Configuration fields Pop-up Menu Menu bar Language MyFavorite(F3) Qfan Control(F6) Hot Keys Scroll bar Chapter 3 Menu items General help Last modified...
... provides advanced options for the detailed configurations. Refer to EZ Mode Search on the FAQ Displays the CPU temperature, CPU, and memory voltage output 3-4 Chapter 3: BIOS Setup Configuration fields Pop-up Menu Menu bar Language MyFavorite(F3) Qfan Control(F6) Hot Keys Scroll bar Chapter 3 Menu items General help Last modified...

User Guide
Page 53
... menu. To display the submenu, select the item and press . Refer to section 3.3 My Favorites for that the item has a submenu. Chapter 3 ASUS STRIX B250H GAMING 3-5 For example, selecting Main shows the Main menu items. The other items (My Favorites, Ai Tweaker, Advanced, Monitor, Boot, Tool, and Exit)... items: My Favorites Main Ai Tweaker Advanced Monitor Boot Tool Exit For saving the frequently-used system settings and configuration. Select frequentlyused BIOS settings and save it to your fans. Menu bar The menu bar on top of your desired settings. For changing the basic...
... menu. To display the submenu, select the item and press . Refer to section 3.3 My Favorites for that the item has a submenu. Chapter 3 ASUS STRIX B250H GAMING 3-5 For example, selecting Main shows the Main menu items. The other items (My Favorites, Ai Tweaker, Advanced, Monitor, Boot, Tool, and Exit)... items: My Favorites Main Ai Tweaker Advanced Monitor Boot Tool Exit For saving the frequently-used system settings and configuration. Select frequentlyused BIOS settings and save it to your fans. Menu bar The menu bar on top of your desired settings. For changing the basic...

User Guide
Page 54
Chapter 3 3-6 Chapter 3: BIOS Setup A configurable field is user-configurable, you last modified and saved in the menu and ...These fields show a QR code, scan this QR code on your mouse over this button to show the values for the BIOS setup program. To change the value of a field, select it to display the other items on the screen. You can.... If an item is highlighted when selected. Search on FAQ Move your mobile device to connect to the BIOS FAQ web page of the ASUS support website. Use the navigation keys to display a list of options. Press the Up/Down arrow keys ...
Chapter 3 3-6 Chapter 3: BIOS Setup A configurable field is user-configurable, you last modified and saved in the menu and ...These fields show a QR code, scan this QR code on your mouse over this button to show the values for the BIOS setup program. To change the value of a field, select it to display the other items on the screen. You can.... If an item is highlighted when selected. Search on FAQ Move your mobile device to connect to the BIOS FAQ web page of the ASUS support website. Use the navigation keys to display a list of options. Press the Up/Down arrow keys ...

User Guide
Page 56
Click and drag the speed points to save the changes then click Exit (ESC). 3-8 Chapter 3: BIOS Setup Chapter 3 Speed points To configure your fans: Select to manually configure your fans' operating speed. Click Apply to adjust the fans' operating speed. 3. Configuring fans manually Select Manual from the list of profiles to manually configure your fans 1. Select the fan that you want to configure and to view its current status. 2.
Click and drag the speed points to save the changes then click Exit (ESC). 3-8 Chapter 3: BIOS Setup Chapter 3 Speed points To configure your fans: Select to manually configure your fans' operating speed. Click Apply to adjust the fans' operating speed. 3. Configuring fans manually Select Manual from the list of profiles to manually configure your fans 1. Select the fan that you want to configure and to view its current status. 2.

User Guide
Page 57
3.3 My Favorites My Favorites is your favorite BIOS items. Chapter 3 My Favorites comes with several performance, power saving, and fast boot related items by adding or removing items. ASUS STRIX B250H GAMING 3-9 You can easily save and access your personal space where you can personalize this screen by default.
3.3 My Favorites My Favorites is your favorite BIOS items. Chapter 3 My Favorites comes with several performance, power saving, and fast boot related items by adding or removing items. ASUS STRIX B250H GAMING 3-9 You can easily save and access your personal space where you can personalize this screen by default.

User Guide
Page 58
...Delete all favorite items Recover to open 2. from the BIOS screen to default favorite items 3. Click Exit (ESC) or press key to save as Memory SPD Information, system time and date. 4. On the Setup Tree Map screen, select the BIOS items that you want to My Favorites To add... BIOS items: 1. You cannot add the following items to view the saved BIOS items. Chapter 3 3-10 Chapter 3: BIOS Setup Go to My Favorites menu to My Favorite items: • Items...
...Delete all favorite items Recover to open 2. from the BIOS screen to default favorite items 3. Click Exit (ESC) or press key to save as Memory SPD Information, system time and date. 4. On the Setup Tree Map screen, select the BIOS items that you want to My Favorites To add... BIOS items: 1. You cannot add the following items to view the saved BIOS items. Chapter 3 3-10 Chapter 3: BIOS Setup Go to My Favorites menu to My Favorite items: • Items...


