
User Manual
Page 13
... service technician or your dealer immediately. • To avoid short circuits, keep paper clips, screws, and staples away from connectors, slots, sockets and circuitry. • Avoid dust, humidity, and temperature extremes. Check local regulations for disposal of parts and recycling. xiii Do not place the product in any damage, contact your retailer...
... service technician or your dealer immediately. • To avoid short circuits, keep paper clips, screws, and staples away from connectors, slots, sockets and circuitry. • Avoid dust, humidity, and temperature extremes. Check local regulations for disposal of parts and recycling. xiii Do not place the product in any damage, contact your retailer...
User Manual
Page 16
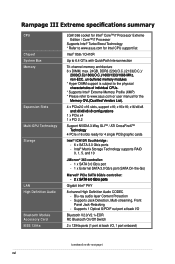
Rampage III Extreme specifications summary CPU Chipset System Bus Memory Expansion Slots Multi-GPU Technology Storage LAN High Definition Audio Bluetooth Module Accessory Card IEEE 1394a LGA1366 socket for Intel® Core™i7 Processor Extreme Edition / Core™i7 Processor Supports Intel® Turbo Boost Technology * Refer to www.asus...65533;u�a�l�C��P�U��s�. * Supports Intel® Extreme Memory Profile (XMP) * Please refer to www.asus.com or user manual for 4 single PCB graphic cards Intel® ICH10R Southbridge: ...
Rampage III Extreme specifications summary CPU Chipset System Bus Memory Expansion Slots Multi-GPU Technology Storage LAN High Definition Audio Bluetooth Module Accessory Card IEEE 1394a LGA1366 socket for Intel® Core™i7 Processor Extreme Edition / Core™i7 Processor Supports Intel® Turbo Boost Technology * Refer to www.asus...65533;u�a�l�C��P�U��s�. * Supports Intel® Extreme Memory Profile (XMP) * Please refer to www.asus.com or user manual for 4 single PCB graphic cards Intel® ICH10R Southbridge: ...

User Manual
Page 31
ROG Rampage III Extreme 2-1 Failure to do so may cause severe damage to avoid touching the ICs on them. • Whenever you uninstall any component, place it on a grounded ... before you install or remove any component, ensure that the ATX power supply is switched off or the power cord is detached from the wall socket before touching any motherboard settings. • Unplug the power cord from the power supply.
ROG Rampage III Extreme 2-1 Failure to do so may cause severe damage to avoid touching the ICs on them. • Whenever you uninstall any component, place it on a grounded ... before you install or remove any component, ensure that the ATX power supply is switched off or the power cord is detached from the wall socket before touching any motherboard settings. • Unplug the power cord from the power supply.

User Manual
Page 37
2.2.2 Layout contents Connectors/Jumpers/Switches/Slots 1. Q reset button 2. LGA1366 CPU Socket 6. GO button 12. ICH10R Serial ATA connectors (7-pin SATA 1-6 [grey]) 14. USB connector (10-1 pin USB78) 19. Thermal sensor cable ... Mode jumper (3-pin LN2) 9. JMicron® JMB363 Serial ATA connector (7-pin SATA_E1 [black]) 15. IEEE 1394a port connector (10-1 pin IE1394_2) 21. ROG Rampage III Extreme 2-7 ATX power connectors (24-pin EATXPWR, 8-pin EATX12V, 4-pin EZ_PLUG1-2) 5. BIOS switch 17. Optical drive audio connector (4-pin CD) 22. DDR3 DIMM slots...
2.2.2 Layout contents Connectors/Jumpers/Switches/Slots 1. Q reset button 2. LGA1366 CPU Socket 6. GO button 12. ICH10R Serial ATA connectors (7-pin SATA 1-6 [grey]) 14. USB connector (10-1 pin USB78) 19. Thermal sensor cable ... Mode jumper (3-pin LN2) 9. JMicron® JMB363 Serial ATA connector (7-pin SATA_E1 [black]) 15. IEEE 1394a port connector (10-1 pin IE1394_2) 21. ROG Rampage III Extreme 2-7 ATX power connectors (24-pin EATXPWR, 8-pin EATX12V, 4-pin EZ_PLUG1-2) 5. BIOS switch 17. Optical drive audio connector (4-pin CD) 22. DDR3 DIMM slots...

User Manual
Page 39
.... Retention tab A B Load lever ROG Rampage III Extreme 2-9 ASUS will process Return Merchandise Authorization (RMA) requests only if the motherboard comes with the cap on the LGA1366 socket. • The product warranty does not cover damage to the PnP cap/socket contacts/motherboard components. Locate the CPU socket on the socket and the socket contacts are not bent. Press...
.... Retention tab A B Load lever ROG Rampage III Extreme 2-9 ASUS will process Return Merchandise Authorization (RMA) requests only if the motherboard comes with the cap on the LGA1366 socket. • The product warranty does not cover damage to the PnP cap/socket contacts/motherboard components. Locate the CPU socket on the socket and the socket contacts are not bent. Press...

User Manual
Page 40
Lift the load plate with your thumb and forefinger to a 135º angle. 4. Load plate 4 3 5. Remove the PnP cap from the CPU socket. Lift the load lever in the direction of the arrow to a 100º angle. PnP cap 2-10 Chapter 2: Hardware information 3.
Lift the load plate with your thumb and forefinger to a 135º angle. 4. Load plate 4 3 5. Remove the PnP cap from the CPU socket. Lift the load lever in the direction of the arrow to a 100º angle. PnP cap 2-10 Chapter 2: Hardware information 3.

User Manual
Page 41
..., ensure that it is spread in only one correct orientation. If so, skip this step. Gold triangle mark The Thermal Interface Material is on the socket and damaging the CPU! To prevent contaminating the Thermal Interface Material, DO NOT spread the Thermal Interface Material with pre-applied Thermal Interface Material. DO... heatsink will be in contact with, ensuring that you wash it gets into the CPU notch. The CPU fits in an even thin layer. ROG Rampage III Extreme 2-11 6. If it off immediately and seek professional medical help.
..., ensure that it is spread in only one correct orientation. If so, skip this step. Gold triangle mark The Thermal Interface Material is on the socket and damaging the CPU! To prevent contaminating the Thermal Interface Material, DO NOT spread the Thermal Interface Material with pre-applied Thermal Interface Material. DO... heatsink will be in contact with, ensuring that you wash it gets into the CPU notch. The CPU fits in an even thin layer. ROG Rampage III Extreme 2-11 6. If it off immediately and seek professional medical help.

User Manual
Page 42
... incompatible with the LGA775 and LGA1366 sockets in place. A A B B A 1 1 Orient the heatsink and fan assembly such that the CPU fan cable is properly applied to secure B the heatsink and fan assembly in ...
... incompatible with the LGA775 and LGA1366 sockets in place. A A B B A 1 1 Orient the heatsink and fan assembly such that the CPU fan cable is properly applied to secure B the heatsink and fan assembly in ...

User Manual
Page 44
2.4 System memory 2.4.1 Overview The motherboard comes with less power consumption. DDR3 modules are developed for better performance with six Double Data Rate 3 (DDR3) Dual Inline Memory Modules (DIMM) sockets. The figure illustrates the location of the DDR3 DIMM sockets: 2-14 Chapter 2: Hardware information A DDR3 module has the same physical dimensions as a DDR2 DIMM but is notched differently to prevent installation on a DDR2 DIMM socket.
2.4 System memory 2.4.1 Overview The motherboard comes with less power consumption. DDR3 modules are developed for better performance with six Double Data Rate 3 (DDR3) Dual Inline Memory Modules (DIMM) sockets. The figure illustrates the location of the DDR3 DIMM sockets: 2-14 Chapter 2: Hardware information A DDR3 module has the same physical dimensions as a DDR2 DIMM but is notched differently to prevent installation on a DDR2 DIMM socket.

User Manual
Page 45
...Channel A, Channel B and Channel C. To operate at the vendor-marked or at a higher frequency, refer to Intel spec definition, X.M.P. ROG Rampage III Extreme 2-15 The system maps the total size of 3GB system memory if you are supported for one DIMM per channel only. • According to ... from a memory module. 2.4.2 Memory configurations You may install 512MB, 1GB, 2GB and 4GB unbuffered and non‑ECC DDR3 DIMMs into the DIMM sockets. • You may install varying memory sizes in Megabit, 8 Megabit/Mb = 1 Megabyte/MB). • The default memory operation frequency is ...
...Channel A, Channel B and Channel C. To operate at the vendor-marked or at a higher frequency, refer to Intel spec definition, X.M.P. ROG Rampage III Extreme 2-15 The system maps the total size of 3GB system memory if you are supported for one DIMM per channel only. • According to ... from a memory module. 2.4.2 Memory configurations You may install 512MB, 1GB, 2GB and 4GB unbuffered and non‑ECC DDR3 DIMMs into the DIMM sockets. • You may install varying memory sizes in Megabit, 8 Megabit/Mb = 1 Megabyte/MB). • The default memory operation frequency is ...

User Manual
Page 47
...8-8-8-24 9-9-9-28 9-9-9-24 9-9-9-24 7-8-7-20 9-9-9-24 9-9-9-28 9-9-9-28 9-9-9-28 8 9 8 9 9 8 9 9-8-8 7-8-7 7-8-7 9-9-9-24 9-9-9-24 8-8-8-24 Voltage DIMM socket support (Optional) 2 DIMM 3 DIMM 4 DIMM 6 DIMM 1.65 • 2 • • 1.65 • • • 1.65 •...1.65 • • - • • • 2 1.65 • • • ROG Rampage III Extreme 2-17 Rampage III Extreme Motherboard Qualified Vendors Lists (QVL) DDR�3�-2��0��0���0��M�H���...
...8-8-8-24 9-9-9-28 9-9-9-24 9-9-9-24 7-8-7-20 9-9-9-24 9-9-9-28 9-9-9-28 9-9-9-28 8 9 8 9 9 8 9 9-8-8 7-8-7 7-8-7 9-9-9-24 9-9-9-24 8-8-8-24 Voltage DIMM socket support (Optional) 2 DIMM 3 DIMM 4 DIMM 6 DIMM 1.65 • 2 • • 1.65 • • • 1.65 •...1.65 • • - • • • 2 1.65 • • • ROG Rampage III Extreme 2-17 Rampage III Extreme Motherboard Qualified Vendors Lists (QVL) DDR�3�-2��0��0���0��M�H���...

User Manual
Page 54
...DIMM by pressing DIMM notch the retaining clip outward. 2. Apply force to both the motherboard and the components. 1. Remove the DIMM from the 2 socket. 1 2-24 Chapter 2: Hardware information 2.4.3 Installing a DIMM Ensure to unplug the power supply before adding or removing DIMMs or other system components. ...Align a DIMM on the socket 1 such that it fits in any further to ensure proper sitting of the DIMM simultaneously until the retaining clip snaps back into place...
...DIMM by pressing DIMM notch the retaining clip outward. 2. Apply force to both the motherboard and the components. 1. Remove the DIMM from the 2 socket. 1 2-24 Chapter 2: Hardware information 2.4.3 Installing a DIMM Ensure to unplug the power supply before adding or removing DIMMs or other system components. ...Align a DIMM on the socket 1 such that it fits in any further to ensure proper sitting of the DIMM simultaneously until the retaining clip snaps back into place...


