User Manual
Page 6
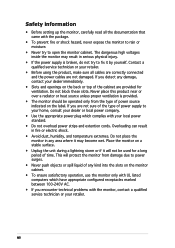
... cabinet are provided for a long period of any damage, contact your local power standard. • Do not overload power strips and extention cords. If you are not sure of the type of power supply to power surges. • Never push objects or spill liquid of time. If you...to open the monitor cabinet. Contact a qualified service technician or your retailer. Overloading can result in serious physical injury. • If the power supply is provided. • The monitor should be used for ventilation. vi Never place this product near or over a radiator or heat source unless...
... cabinet are provided for a long period of any damage, contact your local power standard. • Do not overload power strips and extention cords. If you are not sure of the type of power supply to power surges. • Never push objects or spill liquid of time. If you...to open the monitor cabinet. Contact a qualified service technician or your retailer. Overloading can result in serious physical injury. • If the power supply is provided. • The monitor should be used for ventilation. vi Never place this product near or over a radiator or heat source unless...

User Manual
Page 15
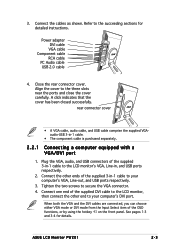
...the power connector from the supplied power adapter. 2. C o m p o n e n t i n p u t p o r t s ( Y P b P r ) . These ports connect the component cable, which usually has red, blue, and green colored plugs. 5. V i d e o p o r t . i n p o r t . This port connects to the USB plug of the 3-in -1 cable. 9. ASUS LCD Monitor PW201 ... DVI-D digital signal connection. 3. L / R A u d i o p o r t s . This port connects a PC audio source using the supplied 3-in -1 cable to an S-video cable. 6. This port connects to activate the webcam. Rear view Kensington lock 1 2 3 4 5 6 789 1....
...the power connector from the supplied power adapter. 2. C o m p o n e n t i n p u t p o r t s ( Y P b P r ) . These ports connect the component cable, which usually has red, blue, and green colored plugs. 5. V i d e o p o r t . i n p o r t . This port connects to the USB plug of the 3-in -1 cable. 9. ASUS LCD Monitor PW201 ... DVI-D digital signal connection. 3. L / R A u d i o p o r t s . This port connects a PC audio source using the supplied 3-in -1 cable to an S-video cable. 6. This port connects to activate the webcam. Rear view Kensington lock 1 2 3 4 5 6 789 1....
User Manual
Page 19
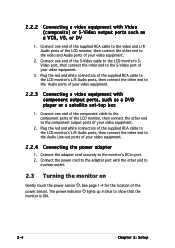
...Tighten the two screws to your computer's DVI port. Connect one end of the supplied 3-in -1 cable. • The component cable is purchased separately. 2.2.1 Connecting a computer equipped with a VGA/DVI port 1. ASUS LCD Monitor PW201 2-3 Plug the VGA, audio, and USB connectors of the OSD functions, or ...by using the hotkey on the front panel. Connect the cables as shown. Power adapter DVI cable VGA cable Component cable RCA cable PC ...
...Tighten the two screws to your computer's DVI port. Connect one end of the supplied 3-in -1 cable. • The component cable is purchased separately. 2.2.1 Connecting a computer equipped with a VGA/DVI port 1. ASUS LCD Monitor PW201 2-3 Plug the VGA, audio, and USB connectors of the OSD functions, or ...by using the hotkey on the front panel. Connect the cables as shown. Power adapter DVI cable VGA cable Component cable RCA cable PC ...
User Manual
Page 20
...the red and white connectors of the supplied RCA cable to the LCD monitor's L/R Audio ports, then connect the other end to the Audio ports of your video equipment. 2. Connect the adapter cord securely to show that the monitor is ON. 2-4 Chapter 2: Setup The power indicator lights up in blue to ... such as a DVD player or a satellite set-top box 1. Plug the red and white connectors of the supplied RCA cable to the LCD monitor's L/R Audio ports, then connect the other end to the Audio Line-out ports of the power sensor. See page 1-4 for the location of your video equipment. 2.
...the red and white connectors of the supplied RCA cable to the LCD monitor's L/R Audio ports, then connect the other end to the Audio ports of your video equipment. 2. Connect the adapter cord securely to show that the monitor is ON. 2-4 Chapter 2: Setup The power indicator lights up in blue to ... such as a DVD player or a satellite set-top box 1. Plug the red and white connectors of the supplied RCA cable to the LCD monitor's L/R Audio ports, then connect the other end to the Audio Line-out ports of the power sensor. See page 1-4 for the location of your video equipment. 2.
User Manual
Page 41
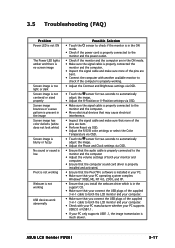
ASUS LCD Monitor PW201 3-17 3.5 Troubleshooting (FAQ) Problem Power LED is not ON The Power LED lights amber and there is no screen image Screen image is too light or ...which is in the support CD. • Make sure that your connect the USB plugs of the supplied 3-in-1 cable to both the LCD monitor and your computer. • Make sure that you connect the USB plugs of the... supplied 3-in-1 cable to both the LCD monitor and your computer. • Check with your PC manufacturer whether your ...
ASUS LCD Monitor PW201 3-17 3.5 Troubleshooting (FAQ) Problem Power LED is not ON The Power LED lights amber and there is no screen image Screen image is too light or ...which is in the support CD. • Make sure that your connect the USB plugs of the supplied 3-in-1 cable to both the LCD monitor and your computer. • Make sure that you connect the USB plugs of the... supplied 3-in-1 cable to both the LCD monitor and your computer. • Check with your PC manufacturer whether your ...


