
Motherboard Pin Definition.English
Page 3
...time, and system setup parameters by erasing the CMOS RTC RAM data. 1 Headers 1. Shut down the key during the boot process and enter BIOS setup to reenter data. • If the steps above do not need to clear the RTC when the system hangs due to default values... highlevel signal to use the CPU Parameter Recall (C.P.R.) feature. The signal is removed or replaced. Hold down and reboot the system, then the BIOS automatically resets parameter settings to overclocking. Use a metal object such as a screwdriver to clear the CMOS RTC RAM data. Remove the jumper caps...
...time, and system setup parameters by erasing the CMOS RTC RAM data. 1 Headers 1. Shut down the key during the boot process and enter BIOS setup to reenter data. • If the steps above do not need to clear the RTC when the system hangs due to default values... highlevel signal to use the CPU Parameter Recall (C.P.R.) feature. The signal is removed or replaced. Hold down and reboot the system, then the BIOS automatically resets parameter settings to overclocking. Use a metal object such as a screwdriver to clear the CMOS RTC RAM data. Remove the jumper caps...
Motherboard Pin Definition.English
Page 4
... 12 23 Normal (Default) Clear RTC 1. Turn OFF the computer and unplug the power cord. 2. Shut down the key during the boot process and enter BIOS setup to disable it . 1-4 Motherboard Pin Definition Set this jumper to pins 1-2 to enable (default) the Intel® ME function and to pins 2-3 to reenter... cell battery powers the RAM data in CMOS. Plug the power cord and turn ON the computer. 4. Hold down and reboot the system so the BIOS can clear the CMOS memory of date, time, and system setup parameters by erasing the CMOS RTC RAM data. Removing the cap will cause system...
... 12 23 Normal (Default) Clear RTC 1. Turn OFF the computer and unplug the power cord. 2. Shut down the key during the boot process and enter BIOS setup to disable it . 1-4 Motherboard Pin Definition Set this jumper to pins 1-2 to enable (default) the Intel® ME function and to pins 2-3 to reenter... cell battery powers the RAM data in CMOS. Plug the power cord and turn ON the computer. 4. Hold down and reboot the system so the BIOS can clear the CMOS memory of date, time, and system setup parameters by erasing the CMOS RTC RAM data. Removing the cap will cause system...

Motherboard Pin Definition.English
Page 5
... (Default) for each USB port; Set to +5VSB to wake 12 23 up from S1 sleep mode (CPU stopped, DRAM refreshed, system running in the BIOS. 12 23 KB_USBPWB +5V +5VSB (Default) 5. This feature requires an ATX power supply that can supply at least 1A on the +5VSB lead for eDP...
... (Default) for each USB port; Set to +5VSB to wake 12 23 up from S1 sleep mode (CPU stopped, DRAM refreshed, system running in the BIOS. 12 23 KB_USBPWB +5V +5VSB (Default) 5. This feature requires an ATX power supply that can supply at least 1A on the +5VSB lead for eDP...
Motherboard Pin Definition.English
Page 9
... Low- ODD_Lane3_P ODD_Lane3_N ODD_Lane2_P ODD_Lane2_N ODD_Lane1_P ODD_Lane1_N ODD_Lane0_P ODD_Lane0_N EVEN_Lane3_P EVEN_Lane3_N EVEN_Lane2_P EVEN_Lane2_N EVEN_Lane1_P EVEN_Lane1_N EVEN_Lane0_P EVEN_Lane0_N EDID_GND LCD_VCC LCD_VCC LCD_VCC Enable LVDS in the BIOS setup if the LVDS output is PIN 1 PIN 20 disabled by default. EDP(Back) PIN 1 14. LVDS voltage Differential Signaling (LVDS) interface. SATA 6.0Gb/s connectors...
... Low- ODD_Lane3_P ODD_Lane3_N ODD_Lane2_P ODD_Lane2_N ODD_Lane1_P ODD_Lane1_N ODD_Lane0_P ODD_Lane0_N EVEN_Lane3_P EVEN_Lane3_N EVEN_Lane2_P EVEN_Lane2_N EVEN_Lane1_P EVEN_Lane1_N EVEN_Lane0_P EVEN_Lane0_N EDID_GND LCD_VCC LCD_VCC LCD_VCC Enable LVDS in the BIOS setup if the LVDS output is PIN 1 PIN 20 disabled by default. EDP(Back) PIN 1 14. LVDS voltage Differential Signaling (LVDS) interface. SATA 6.0Gb/s connectors...
Motherboard Pin Definition.English
Page 10
... button for the HDD Activity LED. PIN 1 • Hard disk drive activity LED (2-pin HDD_LED) SPEAKER HDD_LED+ HDD_LED- The speaker allows you turn on the BIOS settings. Pressing the power button for more than four seconds while the system is ON turns the system OFF. • Reset button (2-pin RESET) This...
... button for the HDD Activity LED. PIN 1 • Hard disk drive activity LED (2-pin HDD_LED) SPEAKER HDD_LED+ HDD_LED- The speaker allows you turn on the BIOS settings. Pressing the power button for more than four seconds while the system is ON turns the system OFF. • Reset button (2-pin RESET) This...

Motherboard Pin Definition.English
Page 16
4 Onboard LEDs 1. USB BIOS Flashback LED (FLBK_LED) This LED flashes when you with a standby power LED that lights up to indicate the hard disk activity. SB_PWR ON OFF Standby ... problem within seconds. 4. KeyBot LED (KEYBOT_LED) This LED lights up when there is solved. Q-Code LED (Q_CODE) The Q-Code LED design provides you press the BIOS Flashback button for...
4 Onboard LEDs 1. USB BIOS Flashback LED (FLBK_LED) This LED flashes when you with a standby power LED that lights up to indicate the hard disk activity. SB_PWR ON OFF Standby ... problem within seconds. 4. KeyBot LED (KEYBOT_LED) This LED lights up when there is solved. Q-Code LED (Q_CODE) The Q-Code LED design provides you press the BIOS Flashback button for...
Motherboard Pin Definition.English
Page 17
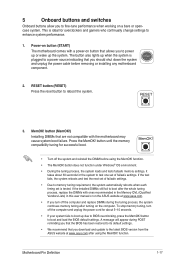
...the power cord for about 30 seconds for successful boot. • Turn off the computer and replace DIMMs during POST reminding you that the BIOS has been restored to its default settings. • We recommend that you to fine-tune performance when working on button that are not compatible... after using the MemOK! function. 5 Onboard buttons and switches Onboard buttons allow you download and update to the latest BIOS version from the ASUS website at www.asus.com. • If you to power up or wake up the system. Power-on button (START) The motherboard comes with a power-on a ...
...the power cord for about 30 seconds for successful boot. • Turn off the computer and replace DIMMs during POST reminding you that the BIOS has been restored to its default settings. • We recommend that you to fine-tune performance when working on button that are not compatible... after using the MemOK! function. 5 Onboard buttons and switches Onboard buttons allow you download and update to the latest BIOS version from the ASUS website at www.asus.com. • If you to power up or wake up the system. Power-on button (START) The motherboard comes with a power-on a ...
Motherboard Pin Definition.English
Page 18
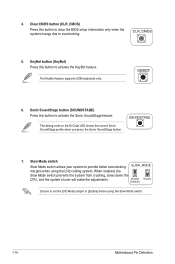
KEBOT 6. Sonic SoundStage button (SOUNDSTAGE) Press this button to clear the BIOS setup information only when the systems hangs due to overclocking. 5. The KeyBot feature supports USB keyboards only. SOUNDSTAGE 7. Ensure to set the LN2 Mode jumper ...
KEBOT 6. Sonic SoundStage button (SOUNDSTAGE) Press this button to clear the BIOS setup information only when the systems hangs due to overclocking. 5. The KeyBot feature supports USB keyboards only. SOUNDSTAGE 7. Ensure to set the LN2 Mode jumper ...

User Guide
Page 3
Contents Safety information iv About this guide iv Package contents vi PRIME H270M-PLUS specifications summary vi Chapter 1: Product introduction 1.1 Before you proceed 1-1 1.2 Motherboard overview 1-1 1.3 Central Processing Unit (CPU 1-10 1.4 System memory 1-11 Chapter 2: BIOS information 2.1 Managing and updating your BIOS 2-1 2.2 BIOS setup program 2-6 2.3 Exit menu 2-11 Appendix Notices...A-1 ASUS contact information A-4 iii
Contents Safety information iv About this guide iv Package contents vi PRIME H270M-PLUS specifications summary vi Chapter 1: Product introduction 1.1 Before you proceed 1-1 1.2 Motherboard overview 1-1 1.3 Central Processing Unit (CPU 1-10 1.4 System memory 1-11 Chapter 2: BIOS information 2.1 Managing and updating your BIOS 2-1 2.2 BIOS setup program 2-6 2.3 Exit menu 2-11 Appendix Notices...A-1 ASUS contact information A-4 iii

User Guide
Page 4
... motherboard and the new technology it may be exposed to moisture. • Place the product on the motherboard. • Chapter 2: BIOS information This chapter discusses changing system settings through the BIOS Setup menus. If possible, disconnect all cables are correctly connected and the power cables are using an adapter or extension cord...
... motherboard and the new technology it may be exposed to moisture. • Place the product on the motherboard. • Chapter 2: BIOS information This chapter discusses changing system settings through the BIOS Setup menus. If possible, disconnect all cables are correctly connected and the power cables are using an adapter or extension cord...

User Guide
Page 7
...when using Intel® Optane memory modules, ensure that you have updated your motherboard drivers and BIOS to the latest version from ASUS support website. Intel® I219-V Gigabit LAN - Premium Japanese audio capacitors: Provide warm, ...Optane Memory*** - ASUS LANGuard: Protects against LAN surges, lightning strikes and static-electricity discharges - ASUS Overvoltage Protection: World-class circuit-protecting power design ASUS unique features - The latest transfer technologies with exceptional clarity and fidelity. - PRIME H270M-PLUS specifications summary Specifications ...
...when using Intel® Optane memory modules, ensure that you have updated your motherboard drivers and BIOS to the latest version from ASUS support website. Intel® I219-V Gigabit LAN - Premium Japanese audio capacitors: Provide warm, ...Optane Memory*** - ASUS LANGuard: Protects against LAN surges, lightning strikes and static-electricity discharges - ASUS Overvoltage Protection: World-class circuit-protecting power design ASUS unique features - The latest transfer technologies with exceptional clarity and fidelity. - PRIME H270M-PLUS specifications summary Specifications ...

User Guide
Page 8
...roars on the next page) viii ASUS Q-DIMM - ASUS CrashFree BIOS 3 - ASUS Q-Slot Quiet Thermal Design - ASUS Fan Xpert 4 Core - Featuring friendly graphics user interface - PRIME H270M-PLUS specifications summary Specifications ASUS EPU - EPU UEFI BIOS - Most advanced options with HD audio...* 2 x 4-pin Chassis Fan connectors for 3-pin (DC mode) and 4-pin (PWM mode) coolers control (continued on the battlefield ASUS unique features ASUS Exclusive Features - Stylish Fanless Design: PCH heatsink and MOS heatsink solution 1 x PS/2 keyboard port(purple) 1 x PS/2 mouse port...
...roars on the next page) viii ASUS Q-DIMM - ASUS CrashFree BIOS 3 - ASUS Q-Slot Quiet Thermal Design - ASUS Fan Xpert 4 Core - Featuring friendly graphics user interface - PRIME H270M-PLUS specifications summary Specifications ASUS EPU - EPU UEFI BIOS - Most advanced options with HD audio...* 2 x 4-pin Chassis Fan connectors for 3-pin (DC mode) and 4-pin (PWM mode) coolers control (continued on the battlefield ASUS unique features ASUS Exclusive Features - Stylish Fanless Design: PCH heatsink and MOS heatsink solution 1 x PS/2 keyboard port(purple) 1 x PS/2 mouse port...
User Guide
Page 9
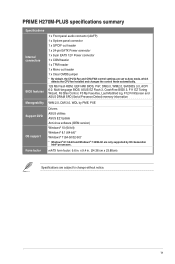
PRIME H270M-PLUS specifications summary Specifications Internal connectors BIOS features Manageability Support DVD OS support Form factor 1 x Front panel audio connector (AAFP) 1 x System panel connector 1 x S/PDIF out header 1 x 24-pin EATX Power connector 1 x ...are subject to Auto mode, which detects the CPU fan installed and changes the control mode automatically. 128 Mb Flash ROM, UEFI AMI BIOS, PnP, DMI3.0, WfM2.0, SM BIOS 3.0, ACPI 6.0, Multi-language BIOS, ASUS EZ Flash 3, CrashFree BIOS 3, F11 EZ Tuning Wizard, F6 Qfan Control, F3 My Favorites, Last Modified log, F12 PrintScreen and...
PRIME H270M-PLUS specifications summary Specifications Internal connectors BIOS features Manageability Support DVD OS support Form factor 1 x Front panel audio connector (AAFP) 1 x System panel connector 1 x S/PDIF out header 1 x 24-pin EATX Power connector 1 x ...are subject to Auto mode, which detects the CPU fan installed and changes the control mode automatically. 128 Mb Flash ROM, UEFI AMI BIOS, PnP, DMI3.0, WfM2.0, SM BIOS 3.0, ACPI 6.0, Multi-language BIOS, ASUS EZ Flash 3, CrashFree BIOS 3, F11 EZ Tuning Wizard, F6 Qfan Control, F3 My Favorites, Last Modified log, F12 PrintScreen and...

User Guide
Page 10
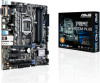
Failure to do so can cause you physical injury and damage motherboard components. 1-1 ASUS PRIME H270M-PLUS Failure to do so may cause severe damage to the motherboard, peripherals, or components. 1.2 Motherboard overview 12 3 2 23.9cm(9.4in) 4 5 ... SATA X4 V IRST V Intel® H270 USB3_12 8 SATA6G_6 ASM1480 6 SATA6G_5 ALC 887 AAFP MONO_OUT CLRTC SPDIF_OUT PCIEX16_2 COM USB1112 USB1314 USB3_34 PANEL 128Mb BIOS SATA6G_3 SATA6G_4 15 14 13 12 11 10 7 9 6 Unplug the power cord before touching any component. • Before handling components, use a grounded...
Failure to do so can cause you physical injury and damage motherboard components. 1-1 ASUS PRIME H270M-PLUS Failure to do so may cause severe damage to the motherboard, peripherals, or components. 1.2 Motherboard overview 12 3 2 23.9cm(9.4in) 4 5 ... SATA X4 V IRST V Intel® H270 USB3_12 8 SATA6G_6 ASM1480 6 SATA6G_5 ALC 887 AAFP MONO_OUT CLRTC SPDIF_OUT PCIEX16_2 COM USB1112 USB1314 USB3_34 PANEL 128Mb BIOS SATA6G_3 SATA6G_4 15 14 13 12 11 10 7 9 6 Unplug the power cord before touching any component. • Before handling components, use a grounded...
User Guide
Page 13
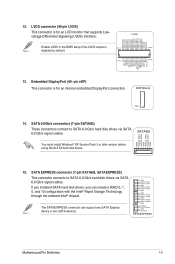
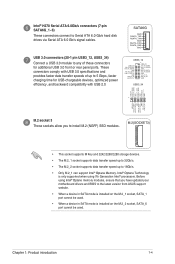
... M.2_1 can support Intel® Optane Memory. Intel® H270 Serial ATA 6.0Gb/s connectors (7-pin SATA6G_1~6) These connectors connect to the latest version from ASUS support website. • When a device in SATA mode is installed on the M.2_1 socket, SATA_1 port cannot be used. • When a device in...+ GND IntA_P1_DIntA_P1_D+ GND PIN 1 USB3+5V IntA_P2_SSRXIntA_P2_SSRX+ GND IntA_P2_SSTXIntA_P2_SSTX+ GND IntA_P2_DIntA_P2_D+ M.2 socket 3 These sockets allow you have updated your motherboard drivers and BIOS to Serial ATA 6.0 Gb/s hard disk drives via Serial ATA 6.0 Gb/s signal cables.
... M.2_1 can support Intel® Optane Memory. Intel® H270 Serial ATA 6.0Gb/s connectors (7-pin SATA6G_1~6) These connectors connect to the latest version from ASUS support website. • When a device in SATA mode is installed on the M.2_1 socket, SATA_1 port cannot be used. • When a device in...+ GND IntA_P1_DIntA_P1_D+ GND PIN 1 USB3+5V IntA_P2_SSRXIntA_P2_SSRX+ GND IntA_P2_SSTXIntA_P2_SSTX+ GND IntA_P2_DIntA_P2_D+ M.2 socket 3 These sockets allow you have updated your motherboard drivers and BIOS to Serial ATA 6.0 Gb/s hard disk drives via Serial ATA 6.0 Gb/s signal cables.

User Guide
Page 15
...) This header allows you to clear the CMOS RTC RAM data of the system chassis. Hold down the key during the boot process and enter BIOS setup to re-enter data. +3V_BAT GND CLRTC PIN 1 If the steps above do not help, remove the onboard battery and short the two pins...
...) This header allows you to clear the CMOS RTC RAM data of the system chassis. Hold down the key during the boot process and enter BIOS setup to re-enter data. +3V_BAT GND CLRTC PIN 1 If the steps above do not help, remove the onboard battery and short the two pins...
User Guide
Page 16
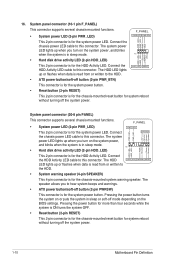
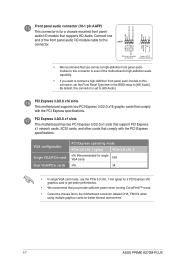
... 3.0 x16_2 x16 (Recommended for single VGA card) N/A x16 x4 • In single VGA card mode, use the PCIe 3.0 x16_1 slot (gray) for better thermal environment. 1-7 ASUS PRIME H270M-PLUS PCI Express 3.0/2.0 x16 slots This motherboard supports two PCI Express 3.0/2.0 x16 graphic cards that you want to connect a high-definition front panel audio module to... NC NC NC AGND NC SENSE1_RETUR SENSE2_RETUR Front panel audio connector (10-1 pin AAFP) This connector is set the Front Panel Type item in the BIOS setup to [HD Audio].
... 3.0 x16_2 x16 (Recommended for single VGA card) N/A x16 x4 • In single VGA card mode, use the PCIe 3.0 x16_1 slot (gray) for better thermal environment. 1-7 ASUS PRIME H270M-PLUS PCI Express 3.0/2.0 x16 slots This motherboard supports two PCI Express 3.0/2.0 x16 graphic cards that you want to connect a high-definition front panel audio module to... NC NC NC AGND NC SENSE1_RETUR SENSE2_RETUR Front panel audio connector (10-1 pin AAFP) This connector is set the Front Panel Type item in the BIOS setup to [HD Audio].

User Guide
Page 22
... USB flash disk in case you need to restore the BIOS in the future. With this utility, you to automatically update your motherboard's softwares, drivers and the BIOS version easily. Copy the original motherboard BIOS using the ASUS Update utility. 2.1.1 EZ Update EZ Update is a utility ... firmware Model Name: Z170-K version: 0302 Release Date: 05/22/2015 Click to find and select the BIOS from file Click to select a boot logo Click to update the BIOS EZ Update requires an Internet connection either through a network or an ISP (Internet Service Provider). 2-1 ASUS PRIME H270M-PLUS
... USB flash disk in case you need to restore the BIOS in the future. With this utility, you to automatically update your motherboard's softwares, drivers and the BIOS version easily. Copy the original motherboard BIOS using the ASUS Update utility. 2.1.1 EZ Update EZ Update is a utility ... firmware Model Name: Z170-K version: 0302 Release Date: 05/22/2015 Click to find and select the BIOS from file Click to select a boot logo Click to update the BIOS EZ Update requires an Internet connection either through a network or an ISP (Internet Service Provider). 2-1 ASUS PRIME H270M-PLUS

User Guide
Page 23
...8226; Ensure to load the BIOS default settings to ensure system compatibility and stability. Follow the steps below to enable it. 2. Go to the Tool menu to select ASUS EZ Flash 3 and press to update the BIOS via USB or Internet. 2.1.2 ASUS EZ Flash 3 The ASUS EZ Flash 3 feature allows ...you to update the BIOS without using EZ Flash 3: 1. See section 2.3 Exit Menu for details. &#...
...8226; Ensure to load the BIOS default settings to ensure system compatibility and stability. Follow the steps below to enable it. 2. Go to the Tool menu to select ASUS EZ Flash 3 and press to update the BIOS via USB or Internet. 2.1.2 ASUS EZ Flash 3 The ASUS EZ Flash 3 feature allows ...you to update the BIOS without using EZ Flash 3: 1. See section 2.3 Exit Menu for details. &#...

User Guide
Page 24
... 32/16 format and single partition only. • DO NOT shut down or reset the system while updating the BIOS! Recovering the BIOS To recover the BIOS: 1. Turn on your USB flash drive. 2-3 ASUS PRIME H270M-PLUS • ASUS EZ Flash 3 supports USB devices, such as actually shown on the system. 2. The screen captures used in this utility...
... 32/16 format and single partition only. • DO NOT shut down or reset the system while updating the BIOS! Recovering the BIOS To recover the BIOS: 1. Turn on your USB flash drive. 2-3 ASUS PRIME H270M-PLUS • ASUS EZ Flash 3 supports USB devices, such as actually shown on the system. 2. The screen captures used in this utility...


