Motherboard Pin Definition.English
Page 4
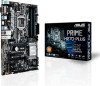
...174; ME function and to pins 2-3 to pins 1-2. 3. DIS_ME 12 23 Normal (Default) Disable ME Disable the Intel® ME function before updating it . You can automatically reset parameter settings to clear the Real Time Clock (RTC) RAM in CMOS, which include system setup information such as ...data. To erase the RTC RAM: CLRTC 12 23 Normal (Default) Clear RTC 1. Shut down the key during the boot process and enter BIOS setup to overclocking, use the CPU Parameter Recall (C.P.R) feature. Clear RTC RAM (3-pin CLRTC) This jumper allows you to overclocking. Turn OFF ...
...174; ME function and to pins 2-3 to pins 1-2. 3. DIS_ME 12 23 Normal (Default) Disable ME Disable the Intel® ME function before updating it . You can automatically reset parameter settings to clear the Real Time Clock (RTC) RAM in CMOS, which include system setup information such as ...data. To erase the RTC RAM: CLRTC 12 23 Normal (Default) Clear RTC 1. Shut down the key during the boot process and enter BIOS setup to overclocking, use the CPU Parameter Recall (C.P.R) feature. Clear RTC RAM (3-pin CLRTC) This jumper allows you to overclocking. Turn OFF ...

Motherboard Pin Definition.English
Page 16
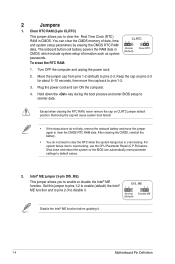
USB BIOS Flashback LED (FLBK_LED) This LED flashes when you with a standby power LED that lights up to indicate that the system is designed to indicate the ... to the motherboard or when the hard disk drive does not function. 3. Q-Code LED (Q_CODE) The Q-Code LED design provides you press the BIOS Flashback button for BIOS update. 6. The illustration below shows the location of the onboard LED. If an error is found, the corresponding LED flashes until the problem is being...
USB BIOS Flashback LED (FLBK_LED) This LED flashes when you with a standby power LED that lights up to indicate that the system is designed to indicate the ... to the motherboard or when the hard disk drive does not function. 3. Q-Code LED (Q_CODE) The Q-Code LED design provides you press the BIOS Flashback button for BIOS update. 6. The illustration below shows the location of the onboard LED. If an error is found, the corresponding LED flashes until the problem is being...
Motherboard Pin Definition.English
Page 17
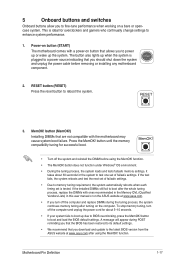
... for about 30 seconds for overclockers and gamers who continually change settings to the latest BIOS version from the ASUS website at www.asus.com after turning on the ASUS website at www.asus.com. • If you download and update to enhance system performance. 1. Power-on button (START) The motherboard comes with ones recommended in...
... for about 30 seconds for overclockers and gamers who continually change settings to the latest BIOS version from the ASUS website at www.asus.com after turning on the ASUS website at www.asus.com. • If you download and update to enhance system performance. 1. Power-on button (START) The motherboard comes with ones recommended in...

BIOSUpdateE-Manual English
Page 1
Motherboard BIOS Update and Management
Motherboard BIOS Update and Management
BIOSUpdateE-Manual English
Page 2
... complete source code as required under the same license as the corresponding binary/object code. IN NO EVENT SHALL ASUS, ITS DIRECTORS, OFFICERS, EMPLOYEES OR AGENTS BE LIABLE FOR ANY INDIRECT, SPECIAL, INCIDENTAL, OR CONSEQUENTIAL DAMAGES (...ASUS PROVIDES THIS MANUAL "AS IS" WITHOUT WARRANTY OF ANY KIND, EITHER EXPRESS OR IMPLIED, INCLUDING BUT NOT LIMITED TO THE IMPLIED WARRANTIES OR CONDITIONS OF MERCHANTABILITY OR FITNESS FOR A PARTICULAR PURPOSE. Where the applicable license entitles you to this information. to the source code of this email address). 2 BIOS Update...
... complete source code as required under the same license as the corresponding binary/object code. IN NO EVENT SHALL ASUS, ITS DIRECTORS, OFFICERS, EMPLOYEES OR AGENTS BE LIABLE FOR ANY INDIRECT, SPECIAL, INCIDENTAL, OR CONSEQUENTIAL DAMAGES (...ASUS PROVIDES THIS MANUAL "AS IS" WITHOUT WARRANTY OF ANY KIND, EITHER EXPRESS OR IMPLIED, INCLUDING BUT NOT LIMITED TO THE IMPLIED WARRANTIES OR CONDITIONS OF MERCHANTABILITY OR FITNESS FOR A PARTICULAR PURPOSE. Where the applicable license entitles you to this information. to the source code of this email address). 2 BIOS Update...
BIOSUpdateE-Manual English
Page 4
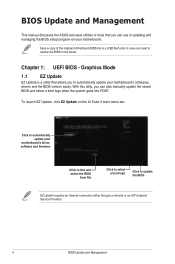
... Click to restore the BIOS in updating and managing the BIOS setup program on the AI Suite 3 main menu bar. Graphics Mode 1.1 EZ Update EZ Update is a utility that you can also manually update the saved BIOS and select a boot logo when the system goes into POST. BIOS Update and Management This manual discusses the ASUS-exclusive utilities or tools...
... Click to restore the BIOS in updating and managing the BIOS setup program on the AI Suite 3 main menu bar. Graphics Mode 1.1 EZ Update EZ Update is a utility that you can also manually update the saved BIOS and select a boot logo when the system goes into POST. BIOS Update and Management This manual discusses the ASUS-exclusive utilities or tools...

BIOSUpdateE-Manual English
Page 5
... the Tool menu to select ASUS EZ Flash 2 Utility and press to the Drive field. 4. Insert the USB flash disk that contains the latest BIOS, and then press . 5. Press the Up/Down arrow keys to find the BIOS file, and then press to update the BIOS without using EZ Flash 2: 1. BIOS Update and Management 5 Press to switch...
... the Tool menu to select ASUS EZ Flash 2 Utility and press to the Drive field. 4. Insert the USB flash disk that contains the latest BIOS, and then press . 5. Press the Up/Down arrow keys to find the BIOS file, and then press to update the BIOS without using EZ Flash 2: 1. BIOS Update and Management 5 Press to switch...
BIOSUpdateE-Manual English
Page 6
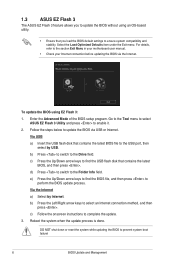
... USB or Internet. DO NOT shut down or reset the system while updating the BIOS to enable it. 2. Go to the Tool menu to select ASUS EZ Flash 3 Utility and press to prevent system boot failure! 6 BIOS Update and Management Select the Load Optimized Defaults item under the Exit menu. Enter the Advanced Mode of...
... USB or Internet. DO NOT shut down or reset the system while updating the BIOS to enable it. 2. Go to the Tool menu to select ASUS EZ Flash 3 Utility and press to prevent system boot failure! 6 BIOS Update and Management Select the Load Optimized Defaults item under the Exit menu. Enter the Advanced Mode of...

BIOSUpdateE-Manual English
Page 7
... the USB flash drive that contains the BIOS file to restore the BIOS file when it fails or gets corrupted during the updating process. When found, the utility reads the BIOS file and enters ASUS EZ Flash 3 utility automatically. 4. DO NOT shut down or reset the system while updating the BIOS! BIOS Update and Management 7 You can cause system...
... the USB flash drive that contains the BIOS file to restore the BIOS file when it fails or gets corrupted during the updating process. When found, the utility reads the BIOS file and enters ASUS EZ Flash 3 utility automatically. 4. DO NOT shut down or reset the system while updating the BIOS! BIOS Update and Management 7 You can cause system...
BIOSUpdateE-Manual English
Page 8
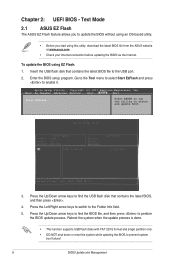
...NOT shut down or reset the system while updating the BIOS to the Folder Info field. 5. To update the BIOS using this utility, download the latest BIOS file from the ASUS website at www.asus.com • Check your Internet connection before updating the BIOS via the Internet. Copyright (C) 2017 American ... disk that contains the latest BIOS file to enable it. Text Mode 2.1 ASUS EZ Flash The ASUS EZ Flash feature allows you to select and update BIOS. 3. Press the Left/Right arrow keys to switch to prevent system boot failure! 8 BIOS Update and Management Go to the...
...NOT shut down or reset the system while updating the BIOS to the Folder Info field. 5. To update the BIOS using this utility, download the latest BIOS file from the ASUS website at www.asus.com • Check your Internet connection before updating the BIOS via the Internet. Copyright (C) 2017 American ... disk that contains the latest BIOS file to enable it. Text Mode 2.1 ASUS EZ Flash The ASUS EZ Flash feature allows you to select and update BIOS. 3. Press the Left/Right arrow keys to switch to prevent system boot failure! 8 BIOS Update and Management Go to the...
BIOSUpdateE-Manual English
Page 9
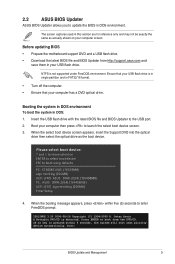
...: and to move selection ENTER to select boot device ESC to update the BIOS in DOS: 1. Before updating BIOS • Prepare the motherboard support DVD and a USB flash drive. • Download the latest BIOS file and BIOS Updater from the DVD/CD. 2.2 ASUS BIOS Updater ASUS BIOS Updater allows you to boot using defaults P2: ST3808110AS (76319MB) aigo miniking (250MB) UEFI...
...: and to move selection ENTER to select boot device ESC to update the BIOS in DOS: 1. Before updating BIOS • Prepare the motherboard support DVD and a USB flash drive. • Download the latest BIOS file and BIOS Updater from the DVD/CD. 2.2 ASUS BIOS Updater ASUS BIOS Updater allows you to boot using defaults P2: ST3808110AS (76319MB) aigo miniking (250MB) UEFI...
BIOSUpdateE-Manual English
Page 10
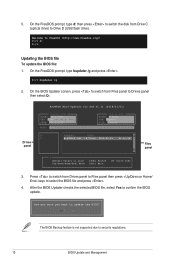
...from Drives panel to Files panel then press keys to select the BIOS file and press . 4. Are you sure you want to Drives panel then select D:. Drives panel ASUSTeK BIOS Updater for DOS V1.31 [2014/01/01] Current ROM BOARD: B150-PLUS VER: 0303 (H :00 B :00) DATE: 09/21/...2015 PATH: C:\ Update ROM BOARD: Unknown VER: Unknown DATE: Unknown C: FORMAN~1 D: B150PLUS.CAP 16779264 2015-...
...from Drives panel to Files panel then press keys to select the BIOS file and press . 4. Are you sure you want to Drives panel then select D:. Drives panel ASUSTeK BIOS Updater for DOS V1.31 [2014/01/01] Current ROM BOARD: B150-PLUS VER: 0303 (H :00 B :00) DATE: 09/21/...2015 PATH: C:\ Update ROM BOARD: Unknown VER: Unknown DATE: Unknown C: FORMAN~1 D: B150PLUS.CAP 16779264 2015-...
BIOSUpdateE-Manual English
Page 11
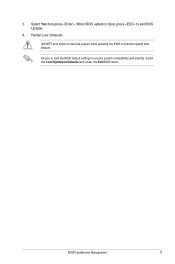
5. Select Yes then press . BIOS Update and Management 11 When BIOS update is done, press to prevent system boot failaure. Select the Load Optimized Defaults item under the Exit BIOS menu. DO NOT shut down or reset the system while updating the BIOS to exit BIOS Updater. 6. Ensure to load the BIOS default settings to ensure system compatibility and stability. Restart your computer.
5. Select Yes then press . BIOS Update and Management 11 When BIOS update is done, press to prevent system boot failaure. Select the Load Optimized Defaults item under the Exit BIOS menu. DO NOT shut down or reset the system while updating the BIOS to exit BIOS Updater. 6. Ensure to load the BIOS default settings to ensure system compatibility and stability. Restart your computer.
Users manual ENGLISH
Page 3
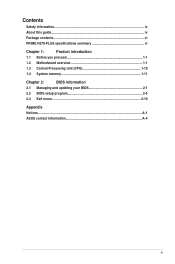
Contents Safety information...iv About this guide...iv Package contents...vi PRIME H270-PLUS specifications summary vi Chapter 1: Product introduction 1.1 Before you proceed 1-1 1.2 Motherboard overview 1-1 1.3 Central Processing Unit (CPU 1-10 1.4 System memory 1-11 Chapter 2: BIOS information 2.1 Managing and updating your BIOS 2-1 2.2 BIOS setup program 2-5 2.3 Exit menu...2-10 Appendix Notices...A-1 ASUS contact information A-4 iii
Contents Safety information...iv About this guide...iv Package contents...vi PRIME H270-PLUS specifications summary vi Chapter 1: Product introduction 1.1 Before you proceed 1-1 1.2 Motherboard overview 1-1 1.3 Central Processing Unit (CPU 1-10 1.4 System memory 1-11 Chapter 2: BIOS information 2.1 Managing and updating your BIOS 2-1 2.2 BIOS setup program 2-5 2.3 Exit menu...2-10 Appendix Notices...A-1 ASUS contact information A-4 iii
Users manual ENGLISH
Page 7
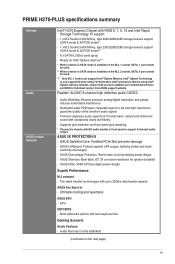
...with M Key, type 2242/2260/2280 storage devices support (SATA mode & X2 PCIE mode)** - 6 x SATA 6.0 Gb/s ports (gray) - PRIME H270-PLUS specifications summary Storage Audio ASUS unique features Intel® H270 Express Chipset with RAID 0, 1, 5, 10 and Intel Rapid Storage Technology 15 support - 1 x M.2 Socket 3 with M Key, type 2242/2260/... Shielding: Ensures precision analog/digital separation and greatly reduces multi-lateral interference - electricity discharges! - Audio that you have updated your motherboard drivers and BIOS to 32Gb/s data transfer speeds ASUS Fan Xpert 2+ -
...with M Key, type 2242/2260/2280 storage devices support (SATA mode & X2 PCIE mode)** - 6 x SATA 6.0 Gb/s ports (gray) - PRIME H270-PLUS specifications summary Storage Audio ASUS unique features Intel® H270 Express Chipset with RAID 0, 1, 5, 10 and Intel Rapid Storage Technology 15 support - 1 x M.2 Socket 3 with M Key, type 2242/2260/... Shielding: Ensures precision analog/digital separation and greatly reduces multi-lateral interference - electricity discharges! - Audio that you have updated your motherboard drivers and BIOS to 32Gb/s data transfer speeds ASUS Fan Xpert 2+ -
Users manual ENGLISH
Page 9
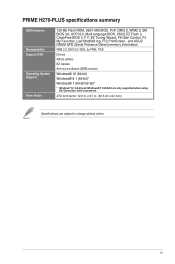
ix PRIME H270-PLUS specifications summary BIOS features Manageability Support DVD Operating System Support Form factor 128 Mb Flash ROM, UEFI AMI BIOS, PnP, DMI3.0, WfM2.0, SM BIOS 3.0, ACPI 6.0, Multi-language BIOS, ASUS EZ Flash 3, CrashFree BIOS 3, F11 EZ Tuning Wizard, F6 Qfan Control, F3 My Favorites, Last Modified log, F12 PrintScreen, and ASUS DRAM SPD (Serial Presence Detect) memory information...
ix PRIME H270-PLUS specifications summary BIOS features Manageability Support DVD Operating System Support Form factor 128 Mb Flash ROM, UEFI AMI BIOS, PnP, DMI3.0, WfM2.0, SM BIOS 3.0, ACPI 6.0, Multi-language BIOS, ASUS EZ Flash 3, CrashFree BIOS 3, F11 EZ Tuning Wizard, F6 Qfan Control, F3 My Favorites, Last Modified log, F12 PrintScreen, and ASUS DRAM SPD (Serial Presence Detect) memory information...

Users manual ENGLISH
Page 13
Intel® H270 Serial ATA 6.0Gb/s connectors (7-pin SATA6G_1~6) These connectors connect to ... RSATA_RXN RSATA_RXP GND Clear RTC RAM (2-pin CLRTC) This header allows you have updated your motherboard drivers and BIOS to the latest version from ASUS support website. To erase the RTC RAM: 1. Hold down the key during ...® Optane Memory. Before using 7th Generation Intel® processors. M.2_1(SOCKET3) 2280 2260 2242 M.2_2(SOCKET3) PRIME Z270-P 2280 2260 2242 PRIME Z270-P M.2(SOCKET3)s • M.2_1/2 Socket 3 support M Key and type 2242/2260/2280 storage devices. •...
Intel® H270 Serial ATA 6.0Gb/s connectors (7-pin SATA6G_1~6) These connectors connect to ... RSATA_RXN RSATA_RXP GND Clear RTC RAM (2-pin CLRTC) This header allows you have updated your motherboard drivers and BIOS to the latest version from ASUS support website. To erase the RTC RAM: 1. Hold down the key during ...® Optane Memory. Before using 7th Generation Intel® processors. M.2_1(SOCKET3) 2280 2260 2242 M.2_2(SOCKET3) PRIME Z270-P 2280 2260 2242 PRIME Z270-P M.2(SOCKET3)s • M.2_1/2 Socket 3 support M Key and type 2242/2260/2280 storage devices. •...

Users manual ENGLISH
Page 23
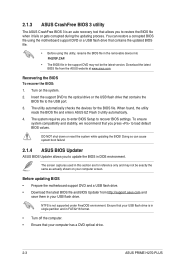
...menu. Enter the Advanced Mode of the BIOS setup program. Follow the steps below to update the BIOS via Internet. c) Press the Up/Down arrow keys to the Drive field. 2.1.2 ASUS EZ Flash 3 The ASUS EZ Flash 3 feature allows you to update the BIOS without using EZ Flash 3: 1. b) ...Follow the onscreen instructions to perform the BIOS update process. Via Storage Device a) Insert the USB flash disk that you load the BIOS default settings to the USB port, then select via the Internet. Reboot the system when the update process is done. • ASUS EZ Flash 3 supports USB devices,...
...menu. Enter the Advanced Mode of the BIOS setup program. Follow the steps below to update the BIOS via Internet. c) Press the Up/Down arrow keys to the Drive field. 2.1.2 ASUS EZ Flash 3 The ASUS EZ Flash 3 feature allows you to update the BIOS without using EZ Flash 3: 1. b) ...Follow the onscreen instructions to perform the BIOS update process. Via Storage Device a) Insert the USB flash disk that you load the BIOS default settings to the USB port, then select via the Internet. Reboot the system when the update process is done. • ASUS EZ Flash 3 supports USB devices,...
Users manual ENGLISH
Page 24
... the computer. • Ensure that your computer has a DVD optical drive. 2-3 ASUS PRIME H270-PLUS Recovering the BIOS To recover the BIOS: 1. Before updating BIOS • Prepare the motherboard support DVD and a USB flash drive. • Download the latest BIOS file and BIOS Updater from the ASUS website at www.asus.com. Ensure that your USB flash drive. DO NOT shut down or...
... the computer. • Ensure that your computer has a DVD optical drive. 2-3 ASUS PRIME H270-PLUS Recovering the BIOS To recover the BIOS: 1. Before updating BIOS • Prepare the motherboard support DVD and a USB flash drive. • Download the latest BIOS file and BIOS Updater from the ASUS website at www.asus.com. Ensure that your USB flash drive. DO NOT shut down or...
Users manual ENGLISH
Page 25
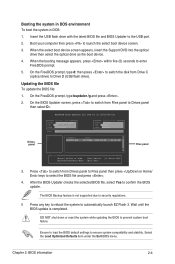
Boot your computer then press to prevent system boot failure. Drives panel ASUSTeK BIOS Updater for DOS V1.31 [2014/01/01] Current ROM BOARD: PRIME H270-PLUS VER: 0207 (H :00 B :00) DATE: 08/25/2016 PATH: C:\ Update ROM BOARD: Unknown VER: Unknown DATE: Unknown C: FORMAN~1 D: PH270P.CAP 16779264 2015-... not supported due to security regulations. 5 Press any key to reboot the system to confirm the BIOS update. Insert the USB flash drive with the latest BIOS file and BIOS Updater to Drive D (USB flash drive). When the select boot device screen appears, insert the Support DVD into ...
Boot your computer then press to prevent system boot failure. Drives panel ASUSTeK BIOS Updater for DOS V1.31 [2014/01/01] Current ROM BOARD: PRIME H270-PLUS VER: 0207 (H :00 B :00) DATE: 08/25/2016 PATH: C:\ Update ROM BOARD: Unknown VER: Unknown DATE: Unknown C: FORMAN~1 D: PH270P.CAP 16779264 2015-... not supported due to security regulations. 5 Press any key to reboot the system to confirm the BIOS update. Insert the USB flash drive with the latest BIOS file and BIOS Updater to Drive D (USB flash drive). When the select boot device screen appears, insert the Support DVD into ...


