
User Guide
Page 3
Contents Safety information iv About this guide iv Package contents vi PRIME B350M-E specifications summary vi Chapter 1 Product introduction 1.1 Before you proceed 1-1 1.2 Motherboard overview 1-1 1.3 Central Processing Unit (CPU 1-10 1.4 System memory 1-12 Chapter 2 BIOS information 2.1 Managing and updating your BIOS 2-1 2.2 BIOS setup program 2-5 2.3 Exit menu 2-10 Appendix Notices...A-1 ASUS contact information A-4 iii
Contents Safety information iv About this guide iv Package contents vi PRIME B350M-E specifications summary vi Chapter 1 Product introduction 1.1 Before you proceed 1-1 1.2 Motherboard overview 1-1 1.3 Central Processing Unit (CPU 1-10 1.4 System memory 1-12 Chapter 2 BIOS information 2.1 Managing and updating your BIOS 2-1 2.2 BIOS setup program 2-5 2.3 Exit menu 2-10 Appendix Notices...A-1 ASUS contact information A-4 iii

User Guide
Page 4
...: • Chapter 1: Product introduction This chapter describes the features of the switches, jumpers, and connectors on the motherboard. • Chapter 2: BIOS information This chapter discusses changing system settings through the BIOS Setup menus. About this guide is broken, do not try to fix it supports. How this guide This user guide contains...
...: • Chapter 1: Product introduction This chapter describes the features of the switches, jumpers, and connectors on the motherboard. • Chapter 2: BIOS information This chapter discusses changing system settings through the BIOS Setup menus. About this guide is broken, do not try to fix it supports. How this guide This user guide contains...
User Guide
Page 7
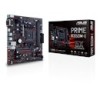
... 8-channel audio output. ASUS SafeSlot Core: Fortified PCIe Slot prevents damage - ASUS Stainless-Steel Back I/O: 3X corrosion-resistance for greater durability! - ASUS Q-DIMM - PRIME B350M-E specifications summary Storage LAN Audio USB ASUS unique features AMD Ryzen&#... USB 2.0/1.1 ports (4 ports at mid-board) Dependable Stability ASUS 5X PROTECTION III - ASUS LANGuard: Protects against LAN surges, lightning strikes and static- ASUS DIGI+ VRM: 6 Phase digital power design Superb performance UEFI BIOS - ASUS Overvoltage Protection: World-class circuit-protecting power design...
... 8-channel audio output. ASUS SafeSlot Core: Fortified PCIe Slot prevents damage - ASUS Stainless-Steel Back I/O: 3X corrosion-resistance for greater durability! - ASUS Q-DIMM - PRIME B350M-E specifications summary Storage LAN Audio USB ASUS unique features AMD Ryzen&#... USB 2.0/1.1 ports (4 ports at mid-board) Dependable Stability ASUS 5X PROTECTION III - ASUS LANGuard: Protects against LAN surges, lightning strikes and static- ASUS DIGI+ VRM: 6 Phase digital power design Superb performance UEFI BIOS - ASUS Overvoltage Protection: World-class circuit-protecting power design...
User Guide
Page 8
viii PRIME B350M-E specifications summary ASUS Quiet Thermal Solution Rear panel I/O ports Internal connectors BIOS features Manageability Support DVD OS support Form factor Quiet Thermal Design: - Stylish Fanless Design: Chipset Heat-sink solution - ASUS Fan Xpert 1 x PS/2 keyboard (purple) 1 x PS/2 mouse port (green) 1 x... System panel connector 128 Mb Flash ROM, UEFI AMI BIOS, PnP, WfM2.0, SM BIOS 3.0, ACPI 6.1, Multi-language BIOS, ASUS EZ Flash 3, ASUS CrashFree BIOS 3, My Favorites, Last Modified log, F12 PrintScreen, ASUS DRAM SPD (Serial Presence Detect) memory information, F6 ...
viii PRIME B350M-E specifications summary ASUS Quiet Thermal Solution Rear panel I/O ports Internal connectors BIOS features Manageability Support DVD OS support Form factor Quiet Thermal Design: - Stylish Fanless Design: Chipset Heat-sink solution - ASUS Fan Xpert 1 x PS/2 keyboard (purple) 1 x PS/2 mouse port (green) 1 x... System panel connector 128 Mb Flash ROM, UEFI AMI BIOS, PnP, WfM2.0, SM BIOS 3.0, ACPI 6.1, Multi-language BIOS, ASUS EZ Flash 3, ASUS CrashFree BIOS 3, My Favorites, Last Modified log, F12 PrintScreen, ASUS DRAM SPD (Serial Presence Detect) memory information, F6 ...
User Guide
Page 9
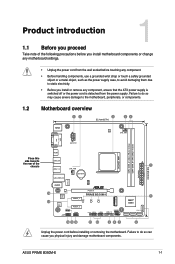
Product introduction 1 1.1 Before you proceed Take note of the chassis 1 USB3.1_12 CHA_FAN LAN_USB3_34 AUDIO LANGuard BATTERY 128Mb BIOS PCIEX16 16 Realtek 8111H Super PRIME B350M-E I/O PCIEX1_1 2280 2260 2242 15 ALC 887 PCIEX1_2 M.2_1(SOCKET3) 15 AMD® A350 SPDIF_OUT COM CLRTC ... the ATX power supply is switched off or the power cord is detached from the wall socket before installing or removing the motherboard. ASUS PRIME B350M-E 1-1 Failure to do so may cause severe damage to do so can cause you install or remove any motherboard settings. 1.2 &#...
Product introduction 1 1.1 Before you proceed Take note of the chassis 1 USB3.1_12 CHA_FAN LAN_USB3_34 AUDIO LANGuard BATTERY 128Mb BIOS PCIEX16 16 Realtek 8111H Super PRIME B350M-E I/O PCIEX1_1 2280 2260 2242 15 ALC 887 PCIEX1_2 M.2_1(SOCKET3) 15 AMD® A350 SPDIF_OUT COM CLRTC ... the ATX power supply is switched off or the power cord is detached from the wall socket before installing or removing the motherboard. ASUS PRIME B350M-E 1-1 Failure to do so may cause severe damage to do so can cause you install or remove any motherboard settings. 1.2 &#...
User Guide
Page 13
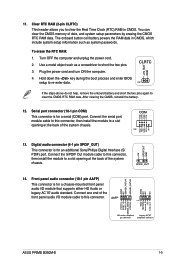
...AGND NC SENSE1_RETUR SENSE2_RETUR 14. Use a metal object such as system passwords. Hold down the key during the boot process and enter BIOS setup to re-enter data. +3V_BAT GND CLRTC PIN 1 If the steps above do not help, remove the onboard battery and ...NC MIC2 MICPWR Line out_R NC Line out_L PORT1 L PORT1 R PORT2 R SENSE_SEND PORT2 L HD-audio-compliant Legacy AC'97 pin definition compliant definition ASUS PRIME B350M-E 1-5 Front panel audio connector (10-1 pin AAFP) This connector is for an additional Sony/Philips Digital Interface (S/ PDIF) port. Clear RTC ...
...AGND NC SENSE1_RETUR SENSE2_RETUR 14. Use a metal object such as system passwords. Hold down the key during the boot process and enter BIOS setup to re-enter data. +3V_BAT GND CLRTC PIN 1 If the steps above do not help, remove the onboard battery and ...NC MIC2 MICPWR Line out_R NC Line out_L PORT1 L PORT1 R PORT2 R SENSE_SEND PORT2 L HD-audio-compliant Legacy AC'97 pin definition compliant definition ASUS PRIME B350M-E 1-5 Front panel audio connector (10-1 pin AAFP) This connector is for an additional Sony/Philips Digital Interface (S/ PDIF) port. Clear RTC ...

User Guide
Page 14
... audio capability. • If you want to connect a high-definition front panel audio module to this connector, set the Front Panel Type item in the BIOS setup to [HD]. 15.
... audio capability. • If you want to connect a high-definition front panel audio module to this connector, set the Front Panel Type item in the BIOS setup to [HD]. 15.
User Guide
Page 23
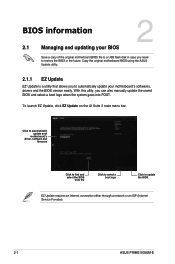
... a boot logo Click to update the BIOS EZ Update requires an Internet connection either through a network or an ISP (Internet Service Provider). 2-1 ASUS PRIME B350M-E Click to automatically update your BIOS 2 Save a copy of the original motherboard BIOS file to a USB flash disk in ...case you need to automatically update your motherboard's softwares, drivers and the BIOS version easily. With this utlity, ...
... a boot logo Click to update the BIOS EZ Update requires an Internet connection either through a network or an ISP (Internet Service Provider). 2-1 ASUS PRIME B350M-E Click to automatically update your BIOS 2 Save a copy of the original motherboard BIOS file to a USB flash disk in ...case you need to automatically update your motherboard's softwares, drivers and the BIOS version easily. With this utlity, ...

User Guide
Page 24
...8226; DO NOT shut down or reset the system while updating the BIOS to find the BIOS file, and then press to enable it. 2. Go to the Tool menu to select ASUS EZ Flash 3 Utility and press to perform the BIOS update process. e) Press the Up/Down arrow keys to find .... b) Press to switch to the Folder Info field. b) Press the Left/Right arrow keys to complete the update. 3. 2.1.2 ASUS EZ Flash 3 The ASUS EZ Flash 3 feature allows you to update the BIOS without using EZ Flash 3: 1. c) Follow the onscreen instructions to select an Internet connection method, and then press .
...8226; DO NOT shut down or reset the system while updating the BIOS to find the BIOS file, and then press to enable it. 2. Go to the Tool menu to select ASUS EZ Flash 3 Utility and press to perform the BIOS update process. e) Press the Up/Down arrow keys to find .... b) Press to switch to the Folder Info field. b) Press the Left/Right arrow keys to complete the update. 3. 2.1.2 ASUS EZ Flash 3 The ASUS EZ Flash 3 feature allows you to update the BIOS without using EZ Flash 3: 1. c) Follow the onscreen instructions to select an Internet connection method, and then press .
User Guide
Page 25
... format. • Turn off the computer. • Ensure that your computer has a DVD optical drive. 2-3 ASUS PRIME B350M-E Insert the support DVD to the optical drive or the USB flash drive that contains the BIOS file to restore the BIOS file when it fails or gets corrupted during the updating process. The system requires you...
... format. • Turn off the computer. • Ensure that your computer has a DVD optical drive. 2-3 ASUS PRIME B350M-E Insert the support DVD to the optical drive or the USB flash drive that contains the BIOS file to restore the BIOS file when it fails or gets corrupted during the updating process. The system requires you...

User Guide
Page 26
On the FreeDOS prompt, type bupdater /g and press . 2. ASUSTeK BIOS Updater for DOS V1.31 [2014/08/01] Current ROM BOARD: PRIME B350M-E VER: 0216 (H :00 B :00) DATE: 03/05/2017 PATH: C:\ Update ROM BOARD: Unknown VER: Unknown DATE: Unknown C: D: Drives panel FORMAN~1 PRB350ME.CAP 8390656 2017-0E-...
On the FreeDOS prompt, type bupdater /g and press . 2. ASUSTeK BIOS Updater for DOS V1.31 [2014/08/01] Current ROM BOARD: PRIME B350M-E VER: 0216 (H :00 B :00) DATE: 03/05/2017 PATH: C:\ Update ROM BOARD: Unknown VER: Unknown DATE: Unknown C: D: Drives panel FORMAN~1 PRB350ME.CAP 8390656 2017-0E-...
User Guide
Page 27
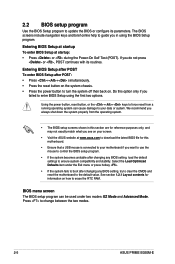
... Use the BIOS Setup program to change between the two modes. 2-5 ASUS PRIME B350M-E We recommend you always shut down the system properly from a running operating system can be used under the Exit menu or press hotkey . • If ... program. Select the Load Optimized Defaults item under two modes: EZ Mode and Advanced Mode. Entering BIOS Setup at startup To enter BIOS Setup at www.asus.com to download the latest BIOS file for information on how to turn the system off then back on the system chassis. • Press the power button...
... Use the BIOS Setup program to change between the two modes. 2-5 ASUS PRIME B350M-E We recommend you always shut down the system properly from a running operating system can be used under the Exit menu or press hotkey . • If ... program. Select the Load Optimized Defaults item under two modes: EZ Mode and Advanced Mode. Entering BIOS Setup at startup To enter BIOS Setup at www.asus.com to download the latest BIOS file for information on how to turn the system off then back on the system chassis. • Press the power button...

User Guide
Page 28
...press . Displays the CPU/motherboard temperature, CPU voltage output, CPU/chassis fan speed, and SATA information Selects the display language of the BIOS setup program Displays the system properties of the basic system information, and allows you installed to the Setup Mode item in the Boot ..., the EZ Mode screen appears when you an overview of the selected mode. Go to the system. The default screen for entering the BIOS setup program can be changed. Chapter 2: Getting started 2-6 Click to select the display language, system performance mode, fan profile and boot device...
...press . Displays the CPU/motherboard temperature, CPU voltage output, CPU/chassis fan speed, and SATA information Selects the display language of the BIOS setup program Displays the system properties of the basic system information, and allows you installed to the Setup Mode item in the Boot ..., the EZ Mode screen appears when you an overview of the selected mode. Go to the system. The default screen for entering the BIOS setup program can be changed. Chapter 2: Getting started 2-6 Click to select the display language, system performance mode, fan profile and boot device...

User Guide
Page 29
2.2.2 Advanced Mode The Advanced Mode provides advanced options for experienced end-users to the following sections for the detailed configurations. Refer to configure the BIOS settings. MyFavorite Language Menu bar Q-Fan control Hot Keys Sub-menu item Menu items General help Configuration fields Pop-up window Scroll bar Searches FAQ Goes back to EZ Mode Last modified settings Displays the CPU temperature, CPU and memory voltage output 2-7 ASUS PRIME B350M-E To access the EZ Mode, click EzMode(F7) or press . The figure below shows an example of the Advanced Mode.
2.2.2 Advanced Mode The Advanced Mode provides advanced options for experienced end-users to the following sections for the detailed configurations. Refer to configure the BIOS settings. MyFavorite Language Menu bar Q-Fan control Hot Keys Sub-menu item Menu items General help Configuration fields Pop-up window Scroll bar Searches FAQ Goes back to EZ Mode Last modified settings Displays the CPU temperature, CPU and memory voltage output 2-7 ASUS PRIME B350M-E To access the EZ Mode, click EzMode(F7) or press . The figure below shows an example of the Advanced Mode.
User Guide
Page 30
... a submenu. Chapter 2: Getting started 2-8 For example, selecting Main shows the Main menu items. The other items on the screen. Select frequentlyused BIOS settings and save it to MyFavorites menu. Q-Fan Control (F6) This button above the menu bar contains the languages that you can select for ... selecting the exit options and loading default settings Menu items The highlighted item on the menu bar displays the specific items for your BIOS. Language This button above the menu bar displays the current settings of the selected item. Use the navigation keys to display the ...
... a submenu. Chapter 2: Getting started 2-8 For example, selecting Main shows the Main menu items. The other items on the screen. Select frequentlyused BIOS settings and save it to MyFavorites menu. Q-Fan Control (F6) This button above the menu bar contains the languages that you can select for ... selecting the exit options and loading default settings Menu items The highlighted item on the menu bar displays the specific items for your BIOS. Language This button above the menu bar displays the current settings of the selected item. Use the navigation keys to display the ...

User Guide
Page 31
Scan this QR code with your mouse over this button to the ASUS BIOS FAQ web page. You can change the value of a field, select it and press to display a list of the field opposite the item. To change ... show the values for the menu items. If an item is highlighted when selected. A configurable field is user-configurable, you last modified and saved in BIOS Setup. You cannot select an item that you can also scan the QR code below. 2-9 ASUS PRIME B350M-E
Scan this QR code with your mouse over this button to the ASUS BIOS FAQ web page. You can change the value of a field, select it and press to display a list of the field opposite the item. To change ... show the values for the menu items. If an item is highlighted when selected. A configurable field is user-configurable, you last modified and saved in BIOS Setup. You cannot select an item that you can also scan the QR code below. 2-9 ASUS PRIME B350M-E

User Guide
Page 32
When you select this option or if you press , a confirmation window appears. Select OK to the BIOS items. You can access the EZ Mode from the Exit menu to load the default values. Chapter 2: Getting started 2-10 2.3 Exit menu The Exit menu ...) from USB drives This option allows you select this option from the Exit menu. When you to attempt to load the default values for the BIOS items, and save changes and exit. Launch EFI Shell from one of the parameters on the Setup menus.
When you select this option or if you press , a confirmation window appears. Select OK to the BIOS items. You can access the EZ Mode from the Exit menu to load the default values. Chapter 2: Getting started 2-10 2.3 Exit menu The Exit menu ...) from USB drives This option allows you select this option from the Exit menu. When you to attempt to load the default values for the BIOS items, and save changes and exit. Launch EFI Shell from one of the parameters on the Setup menus.


