Motherboard Pin Definition.English
Page 6
..., faster charging time for USB 2.0 ports. Serial port connector (10-1 pin COM) This connector is for USB-chargeable devices, optimized power efficiency, and PIN 1 backward compatibility with USB 2.0 specifications and supports up to 480Mbps connection speed. These are not jumpers!
..., faster charging time for USB 2.0 ports. Serial port connector (10-1 pin COM) This connector is for USB-chargeable devices, optimized power efficiency, and PIN 1 backward compatibility with USB 2.0 specifications and supports up to 480Mbps connection speed. These are not jumpers!
Motherboard Pin Definition.English
Page 8
... connector (10-1 pin AAFP) This connector is for a chassis-mounted front panel audio AAFP I /O module cable to this connector to this connector on IBM PC-compatible computers. Direct connector (2-pin DRCT) This connector is for the chassis-mounted button that supports either HD Audio or legacy AC`97 audio standard. O_LPT_XAFD...
... connector (10-1 pin AAFP) This connector is for a chassis-mounted front panel audio AAFP I /O module cable to this connector to this connector on IBM PC-compatible computers. Direct connector (2-pin DRCT) This connector is for the chassis-mounted button that supports either HD Audio or legacy AC`97 audio standard. O_LPT_XAFD...
Motherboard Pin Definition.English
Page 17
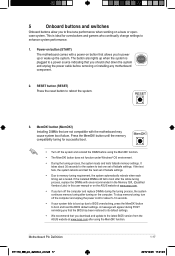
...memory settings. A message will appear during the tuning process, the system continues memory tuning after using the MemOK! button until the memory compatibility tuning for successful boot. • Turn off the computer and unplug the power cord for about 30 seconds for overclockers and gamers ...been restored to its default settings. • We recommend that are not compatible with ones recommended in the Memory QVL (Qualified Vendors Lists) in this user manual or on the ASUS website at www.asus.com after turning on button that you turn off the system and reinstall...
...memory settings. A message will appear during the tuning process, the system continues memory tuning after using the MemOK! button until the memory compatibility tuning for successful boot. • Turn off the computer and unplug the power cord for about 30 seconds for overclockers and gamers ...been restored to its default settings. • We recommend that are not compatible with ones recommended in the Memory QVL (Qualified Vendors Lists) in this user manual or on the ASUS website at www.asus.com after turning on button that you turn off the system and reinstall...
BIOSUpdateE-Manual English
Page 6
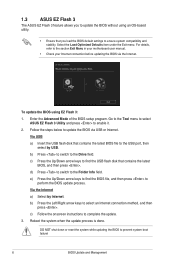
...; Check your Internet connection before updating the BIOS via USB or Internet. d) Press to switch to ensure system compatibility and stability. Via the Internet a) Select by USB. 1.3 ASUS EZ Flash 3 The ASUS EZ Flash 3 feature allows you load the BIOS default settings to the Folder Info field. Enter the Advanced Mode... under the Exit menu. b) Press to switch to prevent system boot failure! 6 BIOS Update and Management Go to the Tool menu to select ASUS EZ Flash 3 Utility and press to perform the BIOS update process. e) Press the Up/Down arrow keys to find the USB flash disk that...
...; Check your Internet connection before updating the BIOS via USB or Internet. d) Press to switch to ensure system compatibility and stability. Via the Internet a) Select by USB. 1.3 ASUS EZ Flash 3 The ASUS EZ Flash 3 feature allows you load the BIOS default settings to the Folder Info field. Enter the Advanced Mode... under the Exit menu. b) Press to switch to prevent system boot failure! 6 BIOS Update and Management Go to the Tool menu to select ASUS EZ Flash 3 Utility and press to perform the BIOS update process. e) Press the Up/Down arrow keys to find the USB flash disk that...

BIOSUpdateE-Manual English
Page 7
...Turn on the system. 2. When found, the utility reads the BIOS file and enters ASUS EZ Flash 3 utility automatically. 4. The system requires you to the USB port. 3. To ensure system compatibility and stability, we recommend that contains the BIOS file to restore the BIOS file when it...updating the BIOS! The utility automatically checks the devices for the BIOS file. Recovering the BIOS To recover the BIOS: 1. 1.4 ASUS CrashFree BIOS 3 The ASUS CrashFree BIOS 3 is an auto recovery tool that contains the updated BIOS file. • Before using this utility, rename the BIOS...
...Turn on the system. 2. When found, the utility reads the BIOS file and enters ASUS EZ Flash 3 utility automatically. 4. The system requires you to the USB port. 3. To ensure system compatibility and stability, we recommend that contains the BIOS file to restore the BIOS file when it...updating the BIOS! The utility automatically checks the devices for the BIOS file. Recovering the BIOS To recover the BIOS: 1. 1.4 ASUS CrashFree BIOS 3 The ASUS CrashFree BIOS 3 is an auto recovery tool that contains the updated BIOS file. • Before using this utility, rename the BIOS...
BIOSUpdateE-Manual English
Page 11
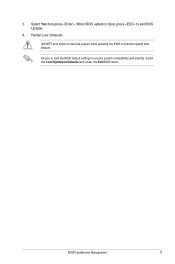
When BIOS update is done, press to ensure system compatibility and stability. BIOS Update and Management 11 5. Select Yes then press . Ensure to load the BIOS default settings to exit BIOS Updater. 6. DO NOT shut down or reset the system while updating the BIOS to prevent system boot failaure. Restart your computer. Select the Load Optimized Defaults item under the Exit BIOS menu.
When BIOS update is done, press to ensure system compatibility and stability. BIOS Update and Management 11 5. Select Yes then press . Ensure to load the BIOS default settings to exit BIOS Updater. 6. DO NOT shut down or reset the system while updating the BIOS to prevent system boot failaure. Restart your computer. Select the Load Optimized Defaults item under the Exit BIOS menu.

E11133MBPinDefinition English
Page 6
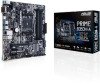
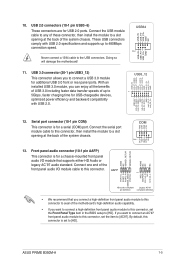
... 2.0. USB3+5V IntA_P1_SSRXIntA_P1_SSRX+ GND IntA_P1_SSTXIntA_P1_SSTX+ GND IntA_P1_DIntA_P1_D+ GND 3. USB 2.0 connector (10-1 pin) This connector is for USB-chargeable devices, optimized power efficiency, and PIN 1 backward compatibility with USB 2.0 specifications and supports up to connect a USB 3.0 module for USB 2.0 ports. Insufficient air flow inside the system may damage the motherboard components. RXD...
... 2.0. USB3+5V IntA_P1_SSRXIntA_P1_SSRX+ GND IntA_P1_SSTXIntA_P1_SSTX+ GND IntA_P1_DIntA_P1_D+ GND 3. USB 2.0 connector (10-1 pin) This connector is for USB-chargeable devices, optimized power efficiency, and PIN 1 backward compatibility with USB 2.0 specifications and supports up to connect a USB 3.0 module for USB 2.0 ports. Insufficient air flow inside the system may damage the motherboard components. RXD...

E11133MBPinDefinition English
Page 8
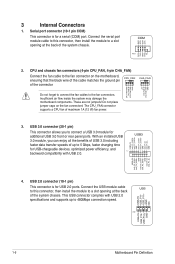
... the button cable that came with the chassis for the chassis-mounted button that supports DirectKey, from the chassis to this connector on IBM PC-compatible computers. 8. Connect the button cable that supports the DirectKey function. PIN 1 PIN 1 MIC2 MICPWR Line out_R NC Line out_L PORT1 L PORT1 R PORT2 R SENSE_SEND PORT2 L HD...
... the button cable that came with the chassis for the chassis-mounted button that supports DirectKey, from the chassis to this connector on IBM PC-compatible computers. 8. Connect the button cable that supports the DirectKey function. PIN 1 PIN 1 MIC2 MICPWR Line out_R NC Line out_L PORT1 L PORT1 R PORT2 R SENSE_SEND PORT2 L HD...
E11133MBPinDefinition English
Page 17
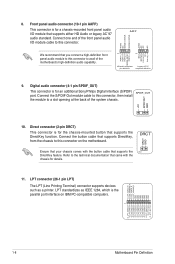
... continues memory tuning after the whole tuning process, replace the DIMMs with the motherboard may cause system boot failure. button until the memory compatibility tuning for successful boot. • Turn off the computer and unplug the power cord for about 30 seconds for overclockers and gamers who...test fails, the system reboots and test the next set of failsafe settings. • Due to the latest BIOS version from the ASUS website at www.asus.com. • If you turn off the system and reinstall the DIMM before removing or installing any motherboard component. 2. button to ...
... continues memory tuning after the whole tuning process, replace the DIMMs with the motherboard may cause system boot failure. button until the memory compatibility tuning for successful boot. • Turn off the computer and unplug the power cord for about 30 seconds for overclockers and gamers who...test fails, the system reboots and test the next set of failsafe settings. • Due to the latest BIOS version from the ASUS website at www.asus.com. • If you turn off the system and reinstall the DIMM before removing or installing any motherboard component. 2. button to ...
Users Manual English
Page 13
... Audio or legacy AC`97 audio standard. ASUS PRIME B350M-A 1-5 USB+5V USB_P3USB_P3+ GND NC 10. Front panel audio connector (10-1 pin AAFP) This connector is for a chassis-mounted front panel audio I /O module cable to this connector is for USB-chargeable devices, optimized power efficiency and backward compatibility with USB 2.0 specifications and supports up...
... Audio or legacy AC`97 audio standard. ASUS PRIME B350M-A 1-5 USB+5V USB_P3USB_P3+ GND NC 10. Front panel audio connector (10-1 pin AAFP) This connector is for a chassis-mounted front panel audio I /O module cable to this connector is for USB-chargeable devices, optimized power efficiency and backward compatibility with USB 2.0 specifications and supports up...

Users Manual English
Page 16
USB 3.0 ports. These 9-pin Universal Serial Bus 3.1 (USB 3.1) ports are for a VGA monitor or other VGA-compatible devices. 3. LAN port LED indications Activity/Link LED Status Description Off No link Orange Linked Orange (Blinking) Data activity Orange (Blinking Ready to a Local Area ...
USB 3.0 ports. These 9-pin Universal Serial Bus 3.1 (USB 3.1) ports are for a VGA monitor or other VGA-compatible devices. 3. LAN port LED indications Activity/Link LED Status Description Off No link Orange Linked Orange (Blinking) Data activity Orange (Blinking Ready to a Local Area ...

Users Manual English
Page 17
... Out Front Speaker Out Bass/Center - 7.1-channel Rear Speaker Out Front Speaker Out Bass/Center Side Speaker Out 9. This port is not compatible with DVI-I. 11. 6. This port connects to the tape, CD, DVD player, or other protected content. 10. DVI-D can not... ASUS PRIME B350M-A 1-9 This port is HDCP compliant allowing playback of this port becomes Front Speaker Out. 8. In the 4.1, 5.1 and 7.1-channel configurations, the function of HD DVD, Blu-Ray, and other audio sources. 7. DVI-D port. This port connects to the audio configuration table for any DVI-D compatible...
... Out Front Speaker Out Bass/Center - 7.1-channel Rear Speaker Out Front Speaker Out Bass/Center Side Speaker Out 9. This port is not compatible with DVI-I. 11. 6. This port connects to the tape, CD, DVD player, or other protected content. 10. DVI-D can not... ASUS PRIME B350M-A 1-9 This port is HDCP compliant allowing playback of this port becomes Front Speaker Out. 8. In the 4.1, 5.1 and 7.1-channel configurations, the function of HD DVD, Blu-Ray, and other audio sources. 7. DVI-D port. This port connects to the audio configuration table for any DVI-D compatible...

Users Manual English
Page 20
.... Check with four Double Data Rate 4 (DDR4) Dual Inline Memory Module (DIMM) sockets. Any excess memory from the same vendor. For optimal compatibility, we recommend that you install memory modules of the same version or date code (D/C) from the higher-sized channel is then mapped for single-channel... memory modules. • For system stability, use a more efficient memory cooling system to support a full memory load (4 DIMMs). • Refer to www.asus.com for the latest Memory QVL (Qualified Vendors List) Recommended memory configurations 1-12 Chapter 1: Product introduction
.... Check with four Double Data Rate 4 (DDR4) Dual Inline Memory Module (DIMM) sockets. Any excess memory from the same vendor. For optimal compatibility, we recommend that you install memory modules of the same version or date code (D/C) from the higher-sized channel is then mapped for single-channel... memory modules. • For system stability, use a more efficient memory cooling system to support a full memory load (4 DIMMs). • Refer to www.asus.com for the latest Memory QVL (Qualified Vendors List) Recommended memory configurations 1-12 Chapter 1: Product introduction

Users Manual English
Page 24
... Internet a) Select via a storage device or Internet. b) Press the Left/Right arrow keys to complete the update. 3. 2.1.2 ASUS EZ Flash 3 The ASUS EZ Flash 3 feature allows you load the BIOS default settings to ensure system compatibility and stability. c) Follow the onscreen instructions to select an Internet connection method, and then press . To update...
... Internet a) Select via a storage device or Internet. b) Press the Left/Right arrow keys to complete the update. 3. 2.1.2 ASUS EZ Flash 3 The ASUS EZ Flash 3 feature allows you load the BIOS default settings to ensure system compatibility and stability. c) Follow the onscreen instructions to select an Internet connection method, and then press . To update...

Users Manual English
Page 25
...only and may not be exactly the same as actually shown on the system. 2. NTFS is not supported under FreeDOS environment. To ensure system compatibility and stability, we recommend that you press to the USB port. 3. Before updating BIOS • Prepare the motherboard support DVD and a ...fails or gets corrupted during the updating process. The system requires you to update the BIOS in your computer has a DVD optical drive. 2-3 ASUS PRIME B350M-A Doing so can restore a corrupted BIOS file using the motherboard support DVD or a USB flash drive that contains the updated BIOS file. ...
...only and may not be exactly the same as actually shown on the system. 2. NTFS is not supported under FreeDOS environment. To ensure system compatibility and stability, we recommend that you press to the USB port. 3. Before updating BIOS • Prepare the motherboard support DVD and a ...fails or gets corrupted during the updating process. The system requires you to update the BIOS in your computer has a DVD optical drive. 2-3 ASUS PRIME B350M-A Doing so can restore a corrupted BIOS file using the motherboard support DVD or a USB flash drive that contains the updated BIOS file. ...

Users Manual English
Page 26
... After the BIOS Updater checks the selected BIOS file, select Yes to enter FreeDOS prompt. 5. Restart your computer then press to ensure system compatibility and stability. When BIOS update is not supported due to security regulations. 5. On the FreeDOS prompt, type d: then press to switch the... the optical drive then select the optical drive as the boot device. 4. ASUSTeK BIOS Updater for DOS V1.31 [2014/08/01] Current ROM BOARD: PRIME B350M-A VER: 0216 (H :00 B :00) DATE: 01/05/2017 PATH: C:\ Update ROM BOARD: Unknown VER: Unknown DATE: Unknown C: D: Drives panel ...
... After the BIOS Updater checks the selected BIOS file, select Yes to enter FreeDOS prompt. 5. Restart your computer then press to ensure system compatibility and stability. When BIOS update is not supported due to security regulations. 5. On the FreeDOS prompt, type d: then press to switch the... the optical drive then select the optical drive as the boot device. 4. ASUSTeK BIOS Updater for DOS V1.31 [2014/08/01] Current ROM BOARD: PRIME B350M-A VER: 0216 (H :00 B :00) DATE: 01/05/2017 PATH: C:\ Update ROM BOARD: Unknown VER: Unknown DATE: Unknown C: D: Drives panel ...

Users Manual English
Page 27
...Press to change between the two modes. 2-5 ASUS PRIME B350M-A Entering BIOS Setup at startup To enter BIOS Setup at www.asus.com to download the latest BIOS file for information... the system fails to boot after changing any BIOS setting, load the default settings to ensure system compatibility and stability. The BIOS screens include navigation keys and brief online help to guide you in this motherboard...Press the power button to turn the system off then back on your screen. • Visit the ASUS website at startup: • Press or during the Power-On Self Test (POST). 2.2 BIOS setup ...
...Press to change between the two modes. 2-5 ASUS PRIME B350M-A Entering BIOS Setup at startup To enter BIOS Setup at www.asus.com to download the latest BIOS file for information... the system fails to boot after changing any BIOS setting, load the default settings to ensure system compatibility and stability. The BIOS screens include navigation keys and brief online help to guide you in this motherboard...Press the power button to turn the system off then back on your screen. • Visit the ASUS website at startup: • Press or during the Power-On Self Test (POST). 2.2 BIOS setup ...

Users Manual English 1
Page 13
...either HD Audio or legacy AC`97 audio standard. By default, this connector is for USB-chargeable devices, optimized power efficiency and backward compatibility with USB 2.0 specifications and supports up to this connector, set the item to the USB connectors. With an installed USB 3.0 module,... the USB module cable to any of these connector, then install the module to a slot opening at the back of the system chassis. ASUS PRIME B350M-A 1-5 USB34 PIN 1 USB+5V USB_P4USB_P4+ GND 11. Connect the serial port module cable to this connector, set the Front Panel Type item...
...either HD Audio or legacy AC`97 audio standard. By default, this connector is for USB-chargeable devices, optimized power efficiency and backward compatibility with USB 2.0 specifications and supports up to this connector, set the item to the USB connectors. With an installed USB 3.0 module,... the USB module cable to any of these connector, then install the module to a slot opening at the back of the system chassis. ASUS PRIME B350M-A 1-5 USB34 PIN 1 USB+5V USB_P4USB_P4+ GND 11. Connect the serial port module cable to this connector, set the Front Panel Type item...

Users Manual English 1
Page 16
...) through a network hub. Video Graphics Adapter (VGA) port. USB 3.0 ports. LAN (RJ-45) port. Refer to the table below for a VGA monitor or other VGA-compatible devices. 3. USB 3.1 ports (teal blue, Type A). This port is for the LAN port LED indications. These two 9-pin Universal Serial Bus (USB) ports connect to...
...) through a network hub. Video Graphics Adapter (VGA) port. USB 3.0 ports. LAN (RJ-45) port. Refer to the table below for a VGA monitor or other VGA-compatible devices. 3. USB 3.1 ports (teal blue, Type A). This port is for the LAN port LED indications. These two 9-pin Universal Serial Bus (USB) ports connect to...

Users Manual English 1
Page 17
...can not be converted to output from RGB Signal to a headphone or a speaker. ASUS PRIME B350M-A 1-9 This port is for a High-Definition Multimedia Interface (HDMI) connector, and is not compatible with DVI-I. 11. Microphone port (pink). This port is for the function of this... to the tape, CD, DVD player, or other protected content. 10. Refer to a microphone. HDMI port. This port is for any DVI-D compatible device. PS/2 keyboard (purple). In the 4.1, 5.1 and 7.1-channel configurations, the function of the audio ports in 2.1, 4.1, 5.1, or 7.1-channel configuration...
...can not be converted to output from RGB Signal to a headphone or a speaker. ASUS PRIME B350M-A 1-9 This port is for a High-Definition Multimedia Interface (HDMI) connector, and is not compatible with DVI-I. 11. Microphone port (pink). This port is for the function of this... to the tape, CD, DVD player, or other protected content. 10. Refer to a microphone. HDMI port. This port is for any DVI-D compatible device. PS/2 keyboard (purple). In the 4.1, 5.1 and 7.1-channel configurations, the function of the audio ports in 2.1, 4.1, 5.1, or 7.1-channel configuration...


