
User Manual
Page 3
Contents Contents...iii About this guide iv PIKE 2008/IMR specifications summary vi Chapter 1: Product introduction 1.1 Welcome 1-2 1.2 Package contents 1-2 1.3 Card layout 1-3 1.4 System requirements 1-3 1.5 Card installation 1-4 Chapter 2: RAID configuration 2.1 Setting up RAID 2-2 2.1.1 RAID definitions 2-2 2.1.2 Installing hard ...
Contents Contents...iii About this guide iv PIKE 2008/IMR specifications summary vi Chapter 1: Product introduction 1.1 Welcome 1-2 1.2 Package contents 1-2 1.3 Card layout 1-3 1.4 System requirements 1-3 1.5 Card installation 1-4 Chapter 2: RAID configuration 2.1 Setting up RAID 2-2 2.1.1 RAID definitions 2-2 2.1.2 Installing hard ...
User Manual
Page 4
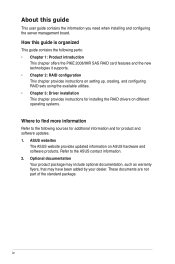
... provides updated information on different operating systems. Where to find more information Refer to the ASUS contact information. 2. Refer to the following parts: • Chapter 1: Product introduction This chapter offers the PIKE 2008/IMR SAS RAID card features and the new technologies it supports. • Chapter 2: RAID configuration This chapter provides instructions on ...added by your dealer. About this guide is organized This guide contains the following sources for additional information and for installing the RAID drivers on ASUS hardware and software products. iv
... provides updated information on different operating systems. Where to find more information Refer to the ASUS contact information. 2. Refer to the following parts: • Chapter 1: Product introduction This chapter offers the PIKE 2008/IMR SAS RAID card features and the new technologies it supports. • Chapter 2: RAID configuration This chapter provides instructions on ...added by your dealer. About this guide is organized This guide contains the following sources for additional information and for installing the RAID drivers on ASUS hardware and software products. iv

User Manual
Page 6
vi PIKE 2008/IMR specifications summary Controller Interface Ports Support device Data transfer rate RAID level OS support* Form factor LSISAS2008 ASUS PIKE interface 8 ports SAS/SAS II devices SATA/SATA II/SATA III devices SATA III and SAS II 6Gb/s per PHY RAID 0/RAID 1/RAID 10/RAID ...5/RAID 50 Windows® XP Professional SP3 Windows® Server 2003 SP2 Enterprise Edition Windows® Server 2003 SP2 Standard Edition Windows® Server 2008...
vi PIKE 2008/IMR specifications summary Controller Interface Ports Support device Data transfer rate RAID level OS support* Form factor LSISAS2008 ASUS PIKE interface 8 ports SAS/SAS II devices SATA/SATA II/SATA III devices SATA III and SAS II 6Gb/s per PHY RAID 0/RAID 1/RAID 10/RAID ...5/RAID 50 Windows® XP Professional SP3 Windows® Server 2003 SP2 Enterprise Edition Windows® Server 2003 SP2 Standard Edition Windows® Server 2008...

User Manual
Page 7
This chapter offers the PIKE 2008/IMR SAS RAID card features and the new technologies it supports. Chapter 1: 1Product introduction
This chapter offers the PIKE 2008/IMR SAS RAID card features and the new technologies it supports. Chapter 1: 1Product introduction
User Manual
Page 8
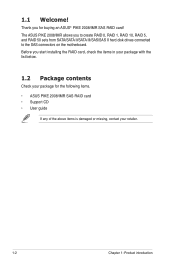
The ASUS PIKE 2008/IMR allows you start installing the RAID card, check the items in your package with the list below. 1.2 Package contents Check your retailer. 1-2 Chapter 1: Product introduction ... II/SATA III/SAS/SAS II hard disk drives connected to the SAS connectors on the motherboard. 1.1 Welcome! Thank you for the following items. • ASUS PIKE 2008/IMR SAS RAID card • Support CD • User guide If any of the above items is damaged or missing, contact your package for buying an...
The ASUS PIKE 2008/IMR allows you start installing the RAID card, check the items in your package with the list below. 1.2 Package contents Check your retailer. 1-2 Chapter 1: Product introduction ... II/SATA III/SAS/SAS II hard disk drives connected to the SAS connectors on the motherboard. 1.1 Welcome! Thank you for the following items. • ASUS PIKE 2008/IMR SAS RAID card • Support CD • User guide If any of the above items is damaged or missing, contact your package for buying an...
User Manual
Page 9
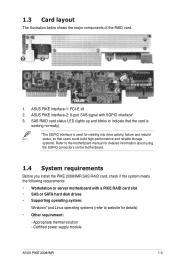
...and reliable storage systems. Refer to website for details) • Other requirement: - Appropriate thermal solution - ASUS PIKE interface-2: 8-port SAS signal with a PIKE RAID card slot • SAS or SATA hard disk drives • Supporting operating system: Windows® and...motherboard. 1.4 System requirements Before you install the PIKE 2008/IMR SAS RAID card, check if the system meets the following requirements: • Workstation or server motherboard with SGPIO interface* 3. Certified power supply module ASUS PIKE 2008/IMR 1-3 1.3 Card layout The illustration below shows ...
...and reliable storage systems. Refer to website for details) • Other requirement: - Appropriate thermal solution - ASUS PIKE interface-2: 8-port SAS signal with a PIKE RAID card slot • SAS or SATA hard disk drives • Supporting operating system: Windows® and...motherboard. 1.4 System requirements Before you install the PIKE 2008/IMR SAS RAID card, check if the system meets the following requirements: • Workstation or server motherboard with SGPIO interface* 3. Certified power supply module ASUS PIKE 2008/IMR 1-3 1.3 Card layout The illustration below shows ...

User Manual
Page 10
1.5 Card installation Follow the below instructions to the edge of the RAID card with the PIKE RAID card slot. 3. Ensure the card is completely inserted into the PIKE RAID card slot. For 2U, 5U, or pedestal server To install ASUS PIKE 2008/IMR SAS RAID card on the motherboard. 2. Align the golden fingers of the card slot. 1-4 Chapter 1: Product introduction Insert the RAID card into the card slot, and the heatsink latch is completely hooked to install the RAID card on your motherboard. Locate the PIKE RAID card slot on a 2U, 5U, or pedestal server 1.
1.5 Card installation Follow the below instructions to the edge of the RAID card with the PIKE RAID card slot. 3. Ensure the card is completely inserted into the PIKE RAID card slot. For 2U, 5U, or pedestal server To install ASUS PIKE 2008/IMR SAS RAID card on the motherboard. 2. Align the golden fingers of the card slot. 1-4 Chapter 1: Product introduction Insert the RAID card into the card slot, and the heatsink latch is completely hooked to install the RAID card on your motherboard. Locate the PIKE RAID card slot on a 2U, 5U, or pedestal server 1.
User Manual
Page 11
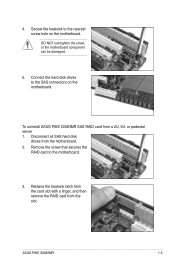
Release the heatsink latch from the card slot with a finger, and then remove the RAID card from a 2U, 5U, or pedestal server 1. Secure the heatsink to the SAS connectors on the motherboard. To uninstall ASUS PIKE 2008/IMR SAS RAID card from the slot. ASUS PIKE 2008/IMR 1-5 Connect the hard disk drives to the nearest screw hole on the motherboard. Disconnect all SAS hard disk drives from the motherboard. 2. 4. DO NOT overtighten the screw, or the motherboard component can be damaged. 5. Remove the screw that secures the RAID card to the motherboard. 3.
Release the heatsink latch from the card slot with a finger, and then remove the RAID card from a 2U, 5U, or pedestal server 1. Secure the heatsink to the SAS connectors on the motherboard. To uninstall ASUS PIKE 2008/IMR SAS RAID card from the slot. ASUS PIKE 2008/IMR 1-5 Connect the hard disk drives to the nearest screw hole on the motherboard. Disconnect all SAS hard disk drives from the motherboard. 2. 4. DO NOT overtighten the screw, or the motherboard component can be damaged. 5. Remove the screw that secures the RAID card to the motherboard. 3.

User Manual
Page 12
Remove the two screws that secure the outer heatsink on a 1U server 1. Locate the PIKE RAID card slot on the back of the SAS RAID card. To install ASUS PIKE 2008/IMR SAS RAID card on the front of ASUS PIKE 2008/IMR SAS RAID card to install the card in a 1U server. Remove the two screws that secure the heatsink bracket on the motherboard. 1-6 Chapter 1: Product introduction DO NOT remove the inner heatsink from the SAS RAID card. 3. Heatsink bracket 2. For 1U server You have to remove the outer heatsink of the SAS RAID card.
Remove the two screws that secure the outer heatsink on a 1U server 1. Locate the PIKE RAID card slot on the back of the SAS RAID card. To install ASUS PIKE 2008/IMR SAS RAID card on the front of ASUS PIKE 2008/IMR SAS RAID card to install the card in a 1U server. Remove the two screws that secure the heatsink bracket on the motherboard. 1-6 Chapter 1: Product introduction DO NOT remove the inner heatsink from the SAS RAID card. 3. Heatsink bracket 2. For 1U server You have to remove the outer heatsink of the SAS RAID card.
User Manual
Page 13
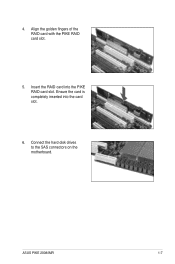
Align the golden fingers of the RAID card with the PIKE RAID card slot. 5. Ensure the card is completely inserted into the PIKE RAID card slot. ASUS PIKE 2008/IMR 1-7 Insert the RAID card into the card slot. 6. 4. Connect the hard disk drives to the SAS connectors on the motherboard.
Align the golden fingers of the RAID card with the PIKE RAID card slot. 5. Ensure the card is completely inserted into the PIKE RAID card slot. ASUS PIKE 2008/IMR 1-7 Insert the RAID card into the card slot. 6. 4. Connect the hard disk drives to the SAS connectors on the motherboard.
User Manual
Page 17
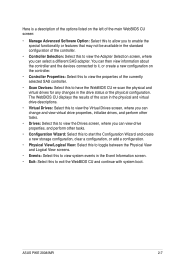
Connect a SAS signal cable to the signal connector at the back of the same model and capacity when creating a disk array. Connect a power cable to the SAS connector on each drive and to the power connector on the motherboard. 3. For optimal performance, install identical drives of each drive. Install the SAS hard disks into the drive bays following the instructions in the system user guide. 2. 2.1.2 Installing hard disk drives The RAID card supports SAS for RAID configuration: 1. To install SAS hard disks for RAID set configuration. ASUS PIKE 2008/IMR 2-3
Connect a SAS signal cable to the signal connector at the back of the same model and capacity when creating a disk array. Connect a power cable to the SAS connector on each drive and to the power connector on the motherboard. 3. For optimal performance, install identical drives of each drive. Install the SAS hard disks into the drive bays following the instructions in the system user guide. 2. 2.1.2 Installing hard disk drives The RAID card supports SAS for RAID configuration: 1. To install SAS hard disks for RAID set configuration. ASUS PIKE 2008/IMR 2-3

User Manual
Page 19
... host adapter. 3 JBOD(s) handled by BIOS Press for WebBIOS or press for advanced debug only! If the system has multiple SAS adapters, select an adapter. 4. ASUS PIKE 2008/IMR 2-5 During POST, press when the following screen appears Press for Preboot CLI: this option is for Preboot CLI 3. LSI MegaRAID SAS-MFI BIOS Version 4.15...
... host adapter. 3 JBOD(s) handled by BIOS Press for WebBIOS or press for advanced debug only! If the system has multiple SAS adapters, select an adapter. 4. ASUS PIKE 2008/IMR 2-5 During POST, press when the following screen appears Press for Preboot CLI: this option is for Preboot CLI 3. LSI MegaRAID SAS-MFI BIOS Version 4.15...
User Manual
Page 21
...: Select this to view system events in the Event Information screen. • Exit: Select this to exit the WebBIOS CU and continue with system boot. ASUS PIKE 2008/IMR 2-7
...: Select this to view system events in the Event Information screen. • Exit: Select this to exit the WebBIOS CU and continue with system boot. ASUS PIKE 2008/IMR 2-7

User Manual
Page 23
... Array to move the drives to a proposed drive group configuration in the Drive Groups panel on the right, as shown in the RAID drive group. ASUS PIKE 2008/IMR 2-9
... Array to move the drives to a proposed drive group configuration in the Drive Groups panel on the right, as shown in the RAID drive group. ASUS PIKE 2008/IMR 2-9

User Manual
Page 25
..., or click Reclaim to return to the previous screens and change the configuration. 12. Click Next when you want to select the Write Through mode. 9. ASUS PIKE 2008/IMR 2-11 Check the information in the right figure. 10. Click Yes to confirm to allow background initializations for RAID 0 shown in the background while you...
..., or click Reclaim to return to the previous screens and change the configuration. 12. Click Next when you want to select the Write Through mode. 9. ASUS PIKE 2008/IMR 2-11 Check the information in the right figure. 10. Click Yes to confirm to allow background initializations for RAID 0 shown in the background while you...

User Manual
Page 27
... the drive cache. • Disable BGI: Specify the background initialization status: ◊ No: Leave background initialization enabled. Click Yes to confirm to the previous settings. 8. ASUS PIKE 2008/IMR 2-13 Click Accept to accept the changes to the virtual drive definition, or click Reclaim to return to select the Write Through mode. 9. The configuration...
... the drive cache. • Disable BGI: Specify the background initialization status: ◊ No: Leave background initialization enabled. Click Yes to confirm to the previous settings. 8. ASUS PIKE 2008/IMR 2-13 Click Accept to accept the changes to the virtual drive definition, or click Reclaim to return to select the Write Through mode. 9. The configuration...

User Manual
Page 29
... drive group. 7. If the same data block is acceptable, click Accept to save the configuration. 13. Click Yes at the prompt to save the configuration. ASUS PIKE 2008/IMR 2-15 It does not affect the read ahead cache. ◊ Direct: In Direct I/O mode, reads are finished defining virtual drives. Normally, this controller. • Select...
... drive group. 7. If the same data block is acceptable, click Accept to save the configuration. 13. Click Yes at the prompt to save the configuration. ASUS PIKE 2008/IMR 2-15 It does not affect the read ahead cache. ◊ Direct: In Direct I/O mode, reads are finished defining virtual drives. Normally, this controller. • Select...

User Manual
Page 31
... of the RAID 10 drive group is allowed for this virtual drive: ◊ RW: Allow read/write access. ◊ Read Only: Allow read-only access. ASUS PIKE 2008/IMR 2-17
... of the RAID 10 drive group is allowed for this virtual drive: ◊ RW: Allow read/write access. ◊ Read Only: Allow read-only access. ASUS PIKE 2008/IMR 2-17

User Manual
Page 33
..., click the Reclaim button. 3. If you need to a span. 9. Click on the icon for each RAID 5 level drive group. Click Next. When finish, click Next. ASUS PIKE 2008/IMR 2-19 Click Add To Array to move the drives to create a second drive group. 6. If you can be tolerated, only one drive failure can select...
..., click the Reclaim button. 3. If you need to a span. 9. Click on the icon for each RAID 5 level drive group. Click Next. When finish, click Next. ASUS PIKE 2008/IMR 2-19 Click Add To Array to move the drives to create a second drive group. 6. If you can be tolerated, only one drive failure can select...

User Manual
Page 35
... initializations for RAID 50 shown in the Configuration Panel on the right. You may specify a smaller size if you want to save the configuration. 20. ASUS PIKE 2008/IMR 2-21 Normally, this would be initialized in the background while you do other virtual drives on this controller. • Select Size: Specify the size of...
... initializations for RAID 50 shown in the Configuration Panel on the right. You may specify a smaller size if you want to save the configuration. 20. ASUS PIKE 2008/IMR 2-21 Normally, this would be initialized in the background while you do other virtual drives on this controller. • Select Size: Specify the size of...