
User Guide
Page 26
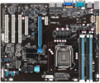
Power LED (+5V_LED) 3. Clear RTC RAM (CLRTC1) 2. LAN controller setting (3-pin LAN_SW1, LAN_SW2,) 4. Power-on Button 7. DDR3 sockets 3. VGA controller setting (3-pin VGA_SW1) 3. PS/2 keyboard/mouse port 2. COM1 port 4. RJ-45 ...
Power LED (+5V_LED) 3. Clear RTC RAM (CLRTC1) 2. LAN controller setting (3-pin LAN_SW1, LAN_SW2,) 4. Power-on Button 7. DDR3 sockets 3. VGA controller setting (3-pin VGA_SW1) 3. PS/2 keyboard/mouse port 2. COM1 port 4. RJ-45 ...
User Guide
Page 42
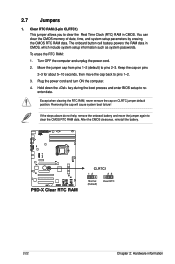
...boot process and enter BIOS setup to pins 2-3. The onboard button cell battery powers the RAM data in CMOS. You can clear the CMOS memory of date, time, and system setup parameters by erasing the... CMOS RTC RAM data. Plug the power cord and turn ON the computer. 4. If the steps above do ... battery and move the cap back to clear the Real Time Clock (RTC) RAM in CMOS, which include system setup information such as system passwords. Clear RTC RAM (3-pin CLRTC1) This jumper allows you to pins 1-2. 3. Turn OFF the...
...boot process and enter BIOS setup to pins 2-3. The onboard button cell battery powers the RAM data in CMOS. You can clear the CMOS memory of date, time, and system setup parameters by erasing the... CMOS RTC RAM data. Plug the power cord and turn ON the computer. 4. If the steps above do ... battery and move the cap back to clear the Real Time Clock (RTC) RAM in CMOS, which include system setup information such as system passwords. Clear RTC RAM (3-pin CLRTC1) This jumper allows you to pins 1-2. 3. Turn OFF the...
User Guide
Page 65
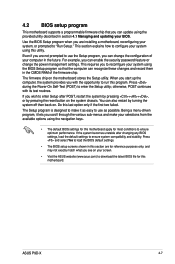
... unstable after POST, restart the system by pressing ++, or by turning the system off then back on the motherboard stores the Setup utility. ASUS P9D-X 4-7 If you can enable the security password feature or change the configuration of the firmware chip. The Setup program is designed to make ...chip that the computer can recognize these changes and record them in the CMOS RAM of your BIOS. The firmware chip on . This section explains how to configure your screen. • Visit the ASUS website (www.asus.com) to download the latest BIOS file for most conditions to enter the...
... unstable after POST, restart the system by pressing ++, or by turning the system off then back on the motherboard stores the Setup utility. ASUS P9D-X 4-7 If you can enable the security password feature or change the configuration of the firmware chip. The Setup program is designed to make ...chip that the computer can recognize these changes and record them in the CMOS RAM of your BIOS. The firmware chip on . This section explains how to configure your screen. • Visit the ASUS website (www.asus.com) to download the latest BIOS file for most conditions to enter the...

User Guide
Page 80
... [Disabled] Allows you to select the USB device reset time-out value. Configuration options: [Suspend Disabled] [S1 only (CPU Stop Clock)] [S3 only (Suspend to RAM)] [Both S1 and S3 available for security devices. Configuration options: [10 sec] [20 sec] [30 sec] [40 sec] Device power-up delay [Auto] This allows...
... [Disabled] Allows you to select the USB device reset time-out value. Configuration options: [Suspend Disabled] [S1 only (CPU Stop Clock)] [S3 only (Suspend to RAM)] [Both S1 and S3 available for security devices. Configuration options: [10 sec] [20 sec] [30 sec] [40 sec] Device power-up delay [Auto] This allows...
