User Guide
Page 6
... accept any interference received including interference that to enable proper reuse of the FCC Rules. Canadian Department of the FCC Rules. This equipment has been tested and found to comply with the limits for a Class B digital device, pursuant to radio communications. Notices Federal Communications Commission Statement This device complies with Part... for radio noise emissions from that may cause undesired operation. If this equipment. This equipment generates, uses and can be placed in our products at ASUS REACH website at http://csr.asus.com/english/REACH.htm.
... accept any interference received including interference that to enable proper reuse of the FCC Rules. Canadian Department of the FCC Rules. This equipment has been tested and found to comply with the limits for a Class B digital device, pursuant to radio communications. Notices Federal Communications Commission Statement This device complies with Part... for radio noise emissions from that may cause undesired operation. If this equipment. This equipment generates, uses and can be placed in our products at ASUS REACH website at http://csr.asus.com/english/REACH.htm.
User Guide
Page 34
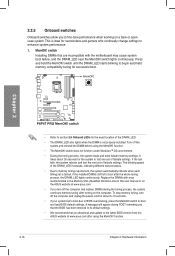
...asus.com. • If you turn off the computer and unplug the power cord for overclockers and gamers who continually change settings to boot after turning on a bare or opencase system. switch does not function under Windows™ OS environment. • During the tuning process, the system loads and tests... that are incompatible with ones recommended in the Memory QVL (Qualified Vendors Lists) in this user manual or on the ASUS website at www.asus.com after using the MemOK! 2.2.5 Onboard switches Onboard switches allow you to BIOS overclocking, press the MemOK! Press and...
...asus.com. • If you turn off the computer and unplug the power cord for overclockers and gamers who continually change settings to boot after turning on a bare or opencase system. switch does not function under Windows™ OS environment. • During the tuning process, the system loads and tests... that are incompatible with ones recommended in the Memory QVL (Qualified Vendors Lists) in this user manual or on the ASUS website at www.asus.com after using the MemOK! 2.2.5 Onboard switches Onboard switches allow you to BIOS overclocking, press the MemOK! Press and...
User Guide
Page 37
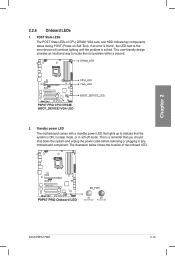
...the system is ON, in sleep mode, or in any motherboard component. POST State LEDs The POST State LEDs of the onboard LED. Chapter 2 ASUS P8P67 PRO 2-19 The illustration below shows the location of CPU, DRAM, VGA card, and HDD indicate key components status during POST (Power-on Self... Test). This user-friendly design provides an intuitional way to indicate that you should shut down the system and unplug the power cable before removing or...
...the system is ON, in sleep mode, or in any motherboard component. POST State LEDs The POST State LEDs of the onboard LED. Chapter 2 ASUS P8P67 PRO 2-19 The illustration below shows the location of CPU, DRAM, VGA card, and HDD indicate key components status during POST (Power-on Self... Test). This user-friendly design provides an intuitional way to indicate that you should shut down the system and unplug the power cable before removing or...
User Guide
Page 65
...with the "green" standards or if it has a "power standby" feature, the monitor LED may have failed a power-on the BIOS setting. ASUS P8P67 PRO 2-47 Connect the power cord to green after the system LED turns on the screen. Follow the instructions in the following order: a. Connect ...detected Hardware component failure 7. If your retailer for more than four seconds puts the system on sleep mode or soft-off mode, depending on test. Check the jumper settings and connections or call your monitor complies with a surge protector. 5. BIOS Beep One short beep One continuous beep ...
...with the "green" standards or if it has a "power standby" feature, the monitor LED may have failed a power-on the BIOS setting. ASUS P8P67 PRO 2-47 Connect the power cord to green after the system LED turns on the screen. Follow the instructions in the following order: a. Connect ...detected Hardware component failure 7. If your retailer for more than four seconds puts the system on sleep mode or soft-off mode, depending on test. Check the jumper settings and connections or call your monitor complies with a surge protector. 5. BIOS Beep One short beep One continuous beep ...
User Guide
Page 67
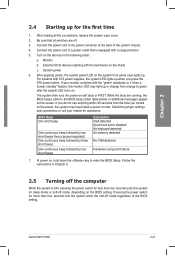
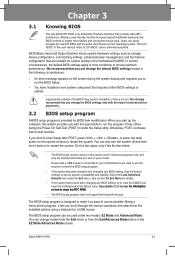
...apply to most conditions to ensure system compatibility and stability. Press during the system bootup and requests you to enter the Setup utility. Chapter 3 ASUS P8P67 PRO 3-1 We strongly recommend that you want to use the mouse to control the BIOS setup program. • If the system becomes unstable ...• If the system fails to boot after POST, press + + , or press the reset button on the screen during the Power-On Self-Test (POST) to run this program. Being a menu-driven program, it lets you not change the BIOS settings only with the opportunity to run the ...
...apply to most conditions to ensure system compatibility and stability. Press during the system bootup and requests you to enter the Setup utility. Chapter 3 ASUS P8P67 PRO 3-1 We strongly recommend that you want to use the mouse to control the BIOS setup program. • If the system becomes unstable ...• If the system fails to boot after POST, press + + , or press the reset button on the screen during the Power-On Self-Test (POST) to run this program. Being a menu-driven program, it lets you not change the BIOS settings only with the opportunity to run the ...
User Guide
Page 97
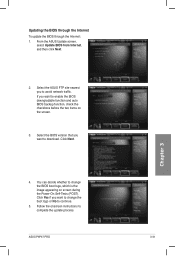
...Tests (POST). Select the BIOS version that you want to download. You can decide whether to change the boot logo or No to avoid network traffic. Follow the onscreen instructions to change the BIOS boot logo, which is the image appearing on the screen. 3. If you to continue. 5. Click Next. Chapter 3 4. ASUS P8P67... PRO 3-31 From the ASUS Update screen, select Update BIOS from Internet, and then click Next. 2. Updating the BIOS through the Internet To...
...Tests (POST). Select the BIOS version that you want to download. You can decide whether to change the boot logo or No to avoid network traffic. Follow the onscreen instructions to change the BIOS boot logo, which is the image appearing on the screen. 3. If you to continue. 5. Click Next. Chapter 3 4. ASUS P8P67... PRO 3-31 From the ASUS Update screen, select Update BIOS from Internet, and then click Next. 2. Updating the BIOS through the Internet To...
User Guide
Page 113
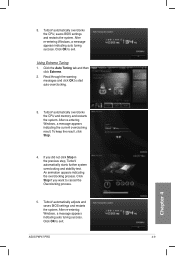
Using Extreme Tuning 1. Click Stop if you did not click Stop in the previous step, TurboV automatically starts further system overclocking and stability test. Click OK to exit. ASUS P8P67 PRO 4-9 Chapter 4 TurboV automatically overclocks the CPU, saves BIOS settings and restarts the system. Click OK to exit. An animation appears indicating the overclocking...
Using Extreme Tuning 1. Click Stop if you did not click Stop in the previous step, TurboV automatically starts further system overclocking and stability test. Click OK to exit. ASUS P8P67 PRO 4-9 Chapter 4 TurboV automatically overclocks the CPU, saves BIOS settings and restarts the system. Click OK to exit. An animation appears indicating the overclocking...

