
P8H61-MX R2.0 User's Manual
Page 9
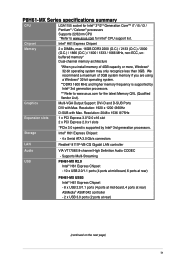
...; / Celeron® processors Supports 22/32nm CPU *Refer to www.asus.com for Intel® CPU support list. Supports Multi-Streaming USB P8H61-MX R2.0 Intel® H61 Express Chipset - 10 x USB 2.0/1.1 ports (4 ports at mid-board, 6 ports at rear) P8H61-MX USB3 Intel® H61 Express Chipset - 8 x USB 2.0/1.1 ports (4 ports at mid-board, 4 ports at rear) ASMedia®...
...; / Celeron® processors Supports 22/32nm CPU *Refer to www.asus.com for Intel® CPU support list. Supports Multi-Streaming USB P8H61-MX R2.0 Intel® H61 Express Chipset - 10 x USB 2.0/1.1 ports (4 ports at mid-board, 6 ports at rear) P8H61-MX USB3 Intel® H61 Express Chipset - 8 x USB 2.0/1.1 ports (4 ports at mid-board, 4 ports at rear) ASMedia®...
P8H61-MX R2.0 User's Manual
Page 10
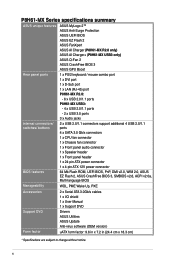
P8H61-MX Series specifications summary ASUS unique features ASUS MyLogo 2™ ASUS Anti-Surge Protection ASUS UEFI BIOS ASUS EZ Flash 2 ASUS FanXpert ASUS AI Charger (P8H61-MX R2.0 only) ASUS AI Charger+ (P8H61-MX USB3 only) ASUS Q-Fan 2 ASUS CrashFree BIOS 3 ASUS GPU Boost Rear panel ports 1 x PS/2 keyboard / mouse combo port 1 x DVI port 1 x D-Sub port 1 x LAN (RJ-45) port P8H61-MX R2.0: - 6 x USB 2.0/1.1 ports P8H61-MX USB3: - 4 x USB 2.0/1.1 ports - 2 x USB 3.0 ports 3 x Audio jacks Internal connectors...
P8H61-MX Series specifications summary ASUS unique features ASUS MyLogo 2™ ASUS Anti-Surge Protection ASUS UEFI BIOS ASUS EZ Flash 2 ASUS FanXpert ASUS AI Charger (P8H61-MX R2.0 only) ASUS AI Charger+ (P8H61-MX USB3 only) ASUS Q-Fan 2 ASUS CrashFree BIOS 3 ASUS GPU Boost Rear panel ports 1 x PS/2 keyboard / mouse combo port 1 x DVI port 1 x D-Sub port 1 x LAN (RJ-45) port P8H61-MX R2.0: - 6 x USB 2.0/1.1 ports P8H61-MX USB3: - 4 x USB 2.0/1.1 ports - 2 x USB 3.0 ports 3 x Audio jacks Internal connectors...
P8H61-MX R2.0 User's Manual
Page 14
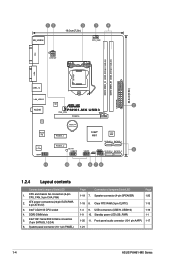
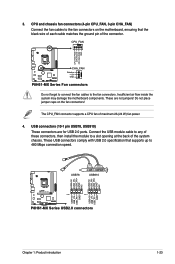
Front panel audio connector (10-1 pin AAFP) 1-17 1-21 1-4 ASUS P8H61-MX Series DDR3 DIMM slots 5. Intel® H61 Serial ATA 3.0Gb/s connectors (7-pin SATA3G_1/2/3/4) 6. Speaker ...DDR3 DIMM_B1 (64bit, 240-pin module) EATXPWR 24.4cm(9.6in) VGA LGA1155 USB3_12 LAN_USB12 ASM 1042 2 AUDIO P8H61-MX USB3 CHA_FAN PCIEX16 RTL 8111F Lithium Cell CMOS Power Super I/O PCIEX1_1 Intel® 64Mb H61 BIOS VIA VT1708S AAFP SATA3G_3...ATX power connectors (24-pin EATXPWR, 4-pin ATX12V) 3. Clear RTC RAM (3-pin CLRTC) 1-15 1-4 9. USB connectors (USB78, USB910) 1-19 1-9 10.
Front panel audio connector (10-1 pin AAFP) 1-17 1-21 1-4 ASUS P8H61-MX Series DDR3 DIMM slots 5. Intel® H61 Serial ATA 3.0Gb/s connectors (7-pin SATA3G_1/2/3/4) 6. Speaker ...DDR3 DIMM_B1 (64bit, 240-pin module) EATXPWR 24.4cm(9.6in) VGA LGA1155 USB3_12 LAN_USB12 ASM 1042 2 AUDIO P8H61-MX USB3 CHA_FAN PCIEX16 RTL 8111F Lithium Cell CMOS Power Super I/O PCIEX1_1 Intel® 64Mb H61 BIOS VIA VT1708S AAFP SATA3G_3...ATX power connectors (24-pin EATXPWR, 4-pin ATX12V) 3. Clear RTC RAM (3-pin CLRTC) 1-15 1-4 9. USB connectors (USB78, USB910) 1-19 1-9 10.
P8H61-MX R2.0 User's Manual
Page 31
... standard. Front panel audio connector (10-1 pin AAFP) This connector is for your USB 3.0 devices. 8. D-Sub port. USB 2.0 ports 1 and 2. USB 3.0 ports 1 and 2 (P8H61-MX USB3 only). These two 9-pin Universal Serial Bus (USB) ports are for USB 2.0 devices. This 15-pin port is for USB 3.0 devices. • DO NOT connect a keyboard / mouse to any DVI-D compatible device. This...
... standard. Front panel audio connector (10-1 pin AAFP) This connector is for your USB 3.0 devices. 8. D-Sub port. USB 2.0 ports 1 and 2. USB 3.0 ports 1 and 2 (P8H61-MX USB3 only). These two 9-pin Universal Serial Bus (USB) ports are for USB 2.0 devices. This 15-pin port is for USB 3.0 devices. • DO NOT connect a keyboard / mouse to any DVI-D compatible device. This...
P8H61-MX R2.0 User's Manual
Page 33
...) These connectors are not jumpers! 3. The CPU_FAN connector supports a CPU fan of the system chassis. USB+5V USB_P6USB_P6+ GND NC USB+5V USB_P8USB_P8+ GND NC USB78 USB910 USB+5V USB_P5USB_P5+ GND USB+5V USB_P7USB_P7+ GND P8H61-MX R2.0 PIN 1 PIN 1 P8H61-MX Series USB2.0 connectors Chapter 1: Product introduction 1-23 Do not place jumper caps on the motherboard, ensuring...
...) These connectors are not jumpers! 3. The CPU_FAN connector supports a CPU fan of the system chassis. USB+5V USB_P6USB_P6+ GND NC USB+5V USB_P8USB_P8+ GND NC USB78 USB910 USB+5V USB_P5USB_P5+ GND USB+5V USB_P7USB_P7+ GND P8H61-MX R2.0 PIN 1 PIN 1 P8H61-MX Series USB2.0 connectors Chapter 1: Product introduction 1-23 Do not place jumper caps on the motherboard, ensuring...
P8H61-MX R2.0 User's Manual
Page 34
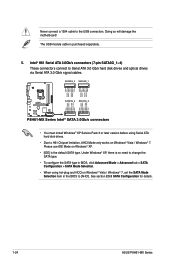
...24 ASUS P8H61-MX Series Never connect a 1394 cable to Serial ATA 3.0 Gb/s hard disk drives and optical drives via Serial ATA 3.0 Gb/s signal cables. Intel® H61 Serial ATA 3.0Gb/s connectors (7-pin SATA3G_1~4) These connectors connect to the USB connectors. The USB module...RSATA_TXN3 GND RSATA_RXN3 RSATA_RXP3 GND GND RSATA_TXP1 RSATA_TXN1 GND RSATA_RXN1 RSATA_RXP1 GND P8H61-MX R2.0 SATA3G_4 SATA3G_2 GND RSATA_RXP4 RSATA_RXN4 GND RSATA_TXN4 RSATA_TXP4 GND GND RSATA_RXP2 RSATA_RXN2 GND RSATA_TXN2 RSATA_TXP2 GND P8H61-MX Series Intel® SATA 3.0Gb/s connectors • You must ...
...24 ASUS P8H61-MX Series Never connect a 1394 cable to Serial ATA 3.0 Gb/s hard disk drives and optical drives via Serial ATA 3.0 Gb/s signal cables. Intel® H61 Serial ATA 3.0Gb/s connectors (7-pin SATA3G_1~4) These connectors connect to the USB connectors. The USB module...RSATA_TXN3 GND RSATA_RXN3 RSATA_RXP3 GND GND RSATA_TXP1 RSATA_TXN1 GND RSATA_RXN1 RSATA_RXP1 GND P8H61-MX R2.0 SATA3G_4 SATA3G_2 GND RSATA_RXP4 RSATA_RXN4 GND RSATA_TXN4 RSATA_TXP4 GND GND RSATA_RXP2 RSATA_RXN2 GND RSATA_TXN2 RSATA_TXP2 GND P8H61-MX Series Intel® SATA 3.0Gb/s connectors • You must ...
P8H61-MX R2.0 User's Manual
Page 37
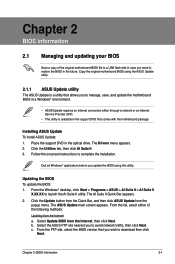
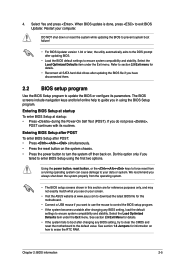
...that you wish to manage, save, and update the motherboard BIOS in a Windows® environment. • ASUS Update requires an Internet connection either of the original motherboard BIOS file to a USB flash disk in case you update the BIOS using this utility. From the Windows® desktop, click Start >... Programs > ASUS > AI Suite II > AI Suite II X.XX.XX to complete the installation. Follow the...
...that you wish to manage, save, and update the motherboard BIOS in a Windows® environment. • ASUS Update requires an Internet connection either of the original motherboard BIOS file to a USB flash disk in case you update the BIOS using this utility. From the Windows® desktop, click Start >... Programs > ASUS > AI Suite II > AI Suite II X.XX.XX to complete the installation. Follow the...

P8H61-MX R2.0 User's Manual
Page 38
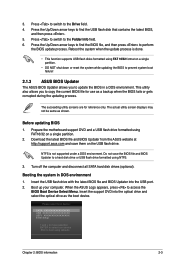
... BIOS using an OS‑based utility. Insert the USB flash disk that contains the latest BIOS file into the USB port. 2. Before you to update the BIOS without using EZ Flash 2: 1. ASUSTek EZ Flash BIOS ROM Utility V01.04 Flash Info MODEL: P8H61-MX R2.0 File Path: fs0:\ Drive fs0:\ VER:... 03/13/12 10:23p 4194304 Exit DATE: 03/14/2012 P8H61-MX-R2-SI-0401.ROM File Info MODEL: Help Info VER: DATE [Enter] Select or Load [Tab] Switch [Up/Down/PageUp/PageDown/Home/End] Move [Esc] Exit 2-2 ASUS P8H61-MX Series Enter the Advanced Mode of updating itself through the Internet.
... BIOS using an OS‑based utility. Insert the USB flash disk that contains the latest BIOS file into the USB port. 2. Before you to update the BIOS without using EZ Flash 2: 1. ASUSTek EZ Flash BIOS ROM Utility V01.04 Flash Info MODEL: P8H61-MX R2.0 File Path: fs0:\ Drive fs0:\ VER:... 03/13/12 10:23p 4194304 Exit DATE: 03/14/2012 P8H61-MX-R2-SI-0401.ROM File Info MODEL: Help Info VER: DATE [Enter] Select or Load [Tab] Switch [Up/Down/PageUp/PageDown/Home/End] Move [Esc] Exit 2-2 ASUS P8H61-MX Series Enter the Advanced Mode of updating itself through the Internet.
P8H61-MX R2.0 User's Manual
Page 39
... The actual utility screen displays may not be same as the boot device. Download the latest BIOS file and BIOS Updater from the ASUS website at http://support.asus.com and save the BIOS file and BIOS Updater to perform the BIOS update process. Booting the system in a DOS environment. This... Updater The ASUS BIOS Updater allows you to copy the current BIOS file for reference only. NTFS is done. • This function supports USB flash disks formatted using FAT16/32 on the USB flash drive. Press the Up/Down arrow keys to find the USB flash disk that contains the latest BIOS, ...
... The actual utility screen displays may not be same as the boot device. Download the latest BIOS file and BIOS Updater from the ASUS website at http://support.asus.com and save the BIOS file and BIOS Updater to perform the BIOS update process. Booting the system in a DOS environment. This... Updater The ASUS BIOS Updater allows you to copy the current BIOS file for reference only. NTFS is done. • This function supports USB flash disks formatted using FAT16/32 on the USB flash drive. Press the Up/Down arrow keys to find the USB flash disk that contains the latest BIOS, ...

P8H61-MX R2.0 User's Manual
Page 40
...(USB flash drive). 3. The BIOS Updater screen appears as below. At the FreeDOS prompt, type d: and press to switch the disk from Drive C (optical drive) to confirm BIOS update. D:\>bupdater /pc /g 2. C:\>d: D:\> Updating the BIOS file To update the BIOS file using BIOS Updater 1. Yes No 2-4 ASUS P8H61-MX ...Series When the Make Disk menu appears, select the FreeDOS command prompt item by pressing the item number. 4. ASUSTek BIOS Updater for DOS V1.18 Current ROM BOARD: P8H61-MX R2.0 VER: 0401 DATE: 02/16/2012 Update...
...(USB flash drive). 3. The BIOS Updater screen appears as below. At the FreeDOS prompt, type d: and press to switch the disk from Drive C (optical drive) to confirm BIOS update. D:\>bupdater /pc /g 2. C:\>d: D:\> Updating the BIOS file To update the BIOS file using BIOS Updater 1. Yes No 2-4 ASUS P8H61-MX ...Series When the Make Disk menu appears, select the FreeDOS command prompt item by pressing the item number. 4. ASUSTek BIOS Updater for DOS V1.18 Current ROM BOARD: P8H61-MX R2.0 VER: 0401 DATE: 02/16/2012 Update...
P8H61-MX R2.0 User's Manual
Page 41
...under the Exit menu. The BIOS screens include navigation keys and brief online help to exit BIOS Updater. Do this motherboard. • Connect a USB mouse if you do not press , POST continues with its parameters. If you want to use the mouse to control the BIOS setup program....BIOS. • Load the BIOS default settings to ensure system compatibility and stability. Select Yes and press . Restart your screen. • Visit the ASUS website at startup: • Press during the Power-On Self Test (POST). Select the Load Optimized Defaults item under the Exit menu. See section ...
...under the Exit menu. The BIOS screens include navigation keys and brief online help to exit BIOS Updater. Do this motherboard. • Connect a USB mouse if you do not press , POST continues with its parameters. If you want to use the mouse to control the BIOS setup program....BIOS. • Load the BIOS default settings to ensure system compatibility and stability. Select Yes and press . Restart your screen. • Visit the ASUS website at startup: • Press during the Power-On Self Test (POST). Select the Load Optimized Defaults item under the Exit menu. See section ...

P8H61-MX R2.0 User's Manual
Page 44
... keys to display a pop-up window Select a menu item and press to select items in the menu and change the value of options. 2-8 ASUS P8H61-MX Series Press or use the USB mouse to click this button to return to display a list of a field, select it and press to the previous menu screen. A configurable...
... keys to display a pop-up window Select a menu item and press to select items in the menu and change the value of options. 2-8 ASUS P8H61-MX Series Press or use the USB mouse to click this button to return to display a list of a field, select it and press to the previous menu screen. A configurable...
P8H61-MX R2.0 User's Manual
Page 55
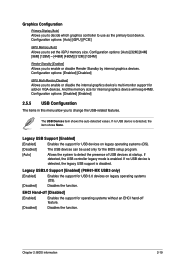
... Primary Display [Auto] Allows you to decide which graphics controller to detect the presence of USB devices at startup. Legacy USB3.0 Support [Enabled] (P8H61-MX USB3 only) [Enabled] Enables the support for USB 3.0 devices on legacy operating systems (OS). [Disabled] The USB devices can be used only for add-on VGA devices. EHCI Hand-off feature. [Disabled...
... Primary Display [Auto] Allows you to decide which graphics controller to detect the presence of USB devices at startup. Legacy USB3.0 Support [Enabled] (P8H61-MX USB3 only) [Enabled] Enables the support for USB 3.0 devices on legacy operating systems (OS). [Disabled] The USB devices can be used only for add-on VGA devices. EHCI Hand-off feature. [Disabled...

P8H61-MX R2.0 User's Manual
Page 56
...Asmedia USB 3.0 Controller [Enabled] (P8H61-MX USB3 only) [Enabled] Enables the onboard USB 3.0 controller. [Disabled] Disables the controller. Front Panel Type [HD] Allows you to legacy AC'97 or highdefinition audio depending on state, whatever the system state was before the AC power loss. 2-20 ASUS P8H61-MX Series... [AC97] Sets the front panel audio connector (AAFP) mode to [Enabled]. Asmedia USB 3.0 Battery Charging Support [Disabled] (P8H61-MX USB3 only) This item appears only when the Asmedia USB 3.0 Controller item is set the HD Audio Controller item to legacy AC'97. ...
...Asmedia USB 3.0 Controller [Enabled] (P8H61-MX USB3 only) [Enabled] Enables the onboard USB 3.0 controller. [Disabled] Disables the controller. Front Panel Type [HD] Allows you to legacy AC'97 or highdefinition audio depending on state, whatever the system state was before the AC power loss. 2-20 ASUS P8H61-MX Series... [AC97] Sets the front panel audio connector (AAFP) mode to [Enabled]. Asmedia USB 3.0 Battery Charging Support [Disabled] (P8H61-MX USB3 only) This item appears only when the Asmedia USB 3.0 Controller item is set the HD Audio Controller item to legacy AC'97. ...


