
P8H61-MX R2.0 User's Manual
Page 35
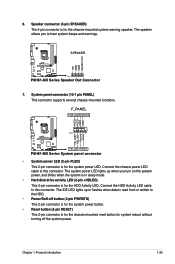
... P8H61-MX Series Speaker Out Connector 7. Connect the chassis power LED cable to this connector. F_PANEL PWR LED PWR BTN PLED+ PLEDPWR GND HD_LED+ HD_LED- The IDE LED lights up when you to the HDD. • Power/Soft-off the system power. The system power LED lights up or flashes ...when data is for the chassis-mounted reset button for the system power LED. Chapter 1: Product introduction 1-25 6. The speaker allows you turn on the system power, and blinks when the system is in sleep mode. • Hard disk drive activity LED (2-pin +HDLED...
... P8H61-MX Series Speaker Out Connector 7. Connect the chassis power LED cable to this connector. F_PANEL PWR LED PWR BTN PLED+ PLEDPWR GND HD_LED+ HD_LED- The IDE LED lights up when you to the HDD. • Power/Soft-off the system power. The system power LED lights up or flashes ...when data is for the chassis-mounted reset button for the system power LED. Chapter 1: Product introduction 1-25 6. The speaker allows you turn on the system power, and blinks when the system is in sleep mode. • Hard disk drive activity LED (2-pin +HDLED...
P8H61-MX R2.0 User's Manual
Page 37
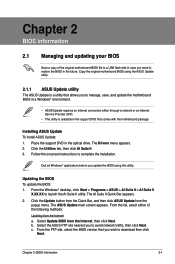
... file to a USB flash disk in case you to manage, save, and update the motherboard BIOS in a Windows® environment. • ASUS Update requires an Internet connection either of the following methods: Updating from the Internet a. Installing ASUS Update To install ASUS Update: 1. Place the support DVD in the optical drive. The ASUS Update main screen...
... file to a USB flash disk in case you to manage, save, and update the motherboard BIOS in a Windows® environment. • ASUS Update requires an Internet connection either of the following methods: Updating from the Internet a. Installing ASUS Update To install ASUS Update: 1. Place the support DVD in the optical drive. The ASUS Update main screen...

P8H61-MX R2.0 User's Manual
Page 38
... the onscreen instructions to complete the update process. 2.1.2 ASUS EZ Flash 2 The ASUS EZ Flash 2 feature allows you start using EZ Flash 2: 1. ASUSTek EZ Flash BIOS ROM Utility V01.04 Flash Info MODEL: P8H61-MX R2.0 File Path: fs0:\ Drive fs0:\ VER: 0303 Folder Info 03/13/12 10...:23p 4194304 Exit DATE: 03/14/2012 P8H61-MX-R2-SI-0401.ROM File Info MODEL: Help Info VER: DATE [Enter] Select or Load [Tab] Switch [Up/Down/PageUp/PageDown/Home/End] Move [Esc] Exit 2-2 ASUS P8H61-MX...
... the onscreen instructions to complete the update process. 2.1.2 ASUS EZ Flash 2 The ASUS EZ Flash 2 feature allows you start using EZ Flash 2: 1. ASUSTek EZ Flash BIOS ROM Utility V01.04 Flash Info MODEL: P8H61-MX R2.0 File Path: fs0:\ Drive fs0:\ VER: 0303 Folder Info 03/13/12 10...:23p 4194304 Exit DATE: 03/14/2012 P8H61-MX-R2-SI-0401.ROM File Info MODEL: Help Info VER: DATE [Enter] Select or Load [Tab] Switch [Up/Down/PageUp/PageDown/Home/End] Move [Esc] Exit 2-2 ASUS P8H61-MX...
P8H61-MX R2.0 User's Manual
Page 39
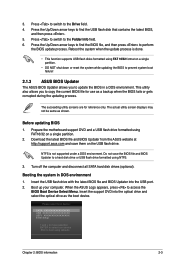
...the latest BIOS file and BIOS Updater from the ASUS website at http://support.asus.com and save the BIOS file and BIOS Updater to a hard disk drive or USB flash drive formatted using defaults Chapter 2: BIOS information 2-3 Insert the USB flash drive with the latest BIOS file and BIOS Updater ... the BIOS to prevent system boot failure! 2.1.3 ASUS BIOS Updater The ASUS BIOS Updater allows you to the Drive field. 4. NTFS is done. • This function supports USB flash disks formatted using FAT16/32 on the USB flash drive. When the ASUS Logo appears, press to perform the BIOS update ...
...the latest BIOS file and BIOS Updater from the ASUS website at http://support.asus.com and save the BIOS file and BIOS Updater to a hard disk drive or USB flash drive formatted using defaults Chapter 2: BIOS information 2-3 Insert the USB flash drive with the latest BIOS file and BIOS Updater ... the BIOS to prevent system boot failure! 2.1.3 ASUS BIOS Updater The ASUS BIOS Updater allows you to the Drive field. 4. NTFS is done. • This function supports USB flash disks formatted using FAT16/32 on the USB flash drive. When the ASUS Logo appears, press to perform the BIOS update ...

P8H61-MX R2.0 User's Manual
Page 40
...BIOS Updater 1. Press to switch between screen fields and use the keys to Drive D (USB flash drive). Yes No 2-4 ASUS P8H61-MX Series At the FreeDOS prompt, type d: and press to switch the disk from Drive C (optical drive) to select the BIOS file and press . The BIOS Updater screen appears as...16/2012 Update ROM BOARD: Unknown VER: Unknown DATE: Unknown PATH: A:\ A: P8H61-MX-R2-SI-0401 4194304 2012-03-12 17:30:48 Note [Enter] Select or Load [Up/Down/Home/End] Move [Tab] Switch [B] Backup [V] Drive Info [Esc] Exit 3. 3. At the FreeDOS prompt, type bupdater /pc /g...
...BIOS Updater 1. Press to switch between screen fields and use the keys to Drive D (USB flash drive). Yes No 2-4 ASUS P8H61-MX Series At the FreeDOS prompt, type d: and press to switch the disk from Drive C (optical drive) to select the BIOS file and press . The BIOS Updater screen appears as...16/2012 Update ROM BOARD: Unknown VER: Unknown DATE: Unknown PATH: A:\ A: P8H61-MX-R2-SI-0401 4194304 2012-03-12 17:30:48 Note [Enter] Select or Load [Up/Down/Home/End] Move [Tab] Switch [B] Backup [V] Drive Info [Esc] Exit 3. 3. At the FreeDOS prompt, type bupdater /pc /g...


