
P8H61-MX R2.0 User's Manual
Page 6
...interrupt the grounding circuit. • Ensure that your power supply is broken, do not try to fix it , carefully read all the manuals that came with the product, contact a qualified service technician or your retailer. If you encounter technical problems with the package. • Before...are not sure about the voltage of the electrical outlet you add a device. • Before connecting or removing signal cables from the motherboard, ensure that all cables are correctly connected and the power cables are connected. vi Safety information Electrical safety • To prevent electric ...
...interrupt the grounding circuit. • Ensure that your power supply is broken, do not try to fix it , carefully read all the manuals that came with the product, contact a qualified service technician or your retailer. If you encounter technical problems with the package. • Before...are not sure about the voltage of the electrical outlet you add a device. • Before connecting or removing signal cables from the motherboard, ensure that all cables are correctly connected and the power cables are connected. vi Safety information Electrical safety • To prevent electric ...
P8H61-MX R2.0 User's Manual
Page 7
... of the following parts: • Chapter 1: Product introduction This chapter describes the supported features of the motherboard. • Chapter 2: BIOS information This chapter provides a detailed guide to help you need when installing and configuring the motherboard. vii DANGER/WARNING: Information to prevent injury to yourself when completing a task. About this guide This...
... of the following parts: • Chapter 1: Product introduction This chapter describes the supported features of the motherboard. • Chapter 2: BIOS information This chapter provides a detailed guide to help you need when installing and configuring the motherboard. vii DANGER/WARNING: Information to prevent injury to yourself when completing a task. About this guide This...
P8H61-MX R2.0 User's Manual
Page 11
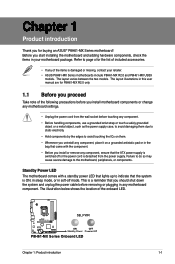
The layout illustrations in this user manual are for P8H61-MX R2.0 only. 1.1 Before you proceed Take note of the following precautions before touching any component. • Before handling components, use a grounded ... component, ensure that came with the component. • Before you install or remove any motherboard component. Chapter 1 Product introduction Thank you for the list of included accessories. • If any component, place it on a grounded antistatic pad or in your retailer. • ASUS P8H61-MX Series motherboards include P8H61-MX R2.0 and P8H61-MX USB3 models.
The layout illustrations in this user manual are for P8H61-MX R2.0 only. 1.1 Before you proceed Take note of the following precautions before touching any component. • Before handling components, use a grounded ... component, ensure that came with the component. • Before you install or remove any motherboard component. Chapter 1 Product introduction Thank you for the list of included accessories. • If any component, place it on a grounded antistatic pad or in your retailer. • ASUS P8H61-MX Series motherboards include P8H61-MX R2.0 and P8H61-MX USB3 models.
P8H61-MX R2.0 User's Manual
Page 21
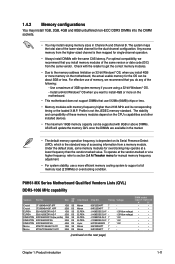
...compatibility of accessing information from the higher-sized channel is not the JEDEC memory standard. P8H61-MX Series Motherboard Qualified Vendors Lists (QVL) DDR3-1066 MHz capability Vendors Part No. Timing Voltage DIMM... for single-channel operation. • Always install DIMMs with 8GB or above DIMMs. ASUS will update the memory QVL once the DIMMs are using a 32-bit Windows®...• You may operate at a higher frequency, refer to section 2.4 Ai Tweaker menu for manual memory frequency adjustment. • For system stability, use a more efficient memory cooling system to ...
...compatibility of accessing information from the higher-sized channel is not the JEDEC memory standard. P8H61-MX Series Motherboard Qualified Vendors Lists (QVL) DDR3-1066 MHz capability Vendors Part No. Timing Voltage DIMM... for single-channel operation. • Always install DIMMs with 8GB or above DIMMs. ASUS will update the memory QVL once the DIMMs are using a 32-bit Windows®...• You may operate at a higher frequency, refer to section 2.4 Ai Tweaker menu for manual memory frequency adjustment. • For system stability, use a more efficient memory cooling system to ...
P8H61-MX R2.0 User's Manual
Page 36
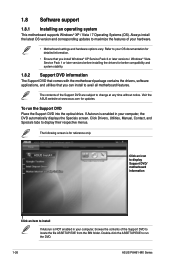
.... 1-26 ASUS P8H61-MX Series Click an icon to display Support DVD/ motherboard information Click an item to run the Support DVD Place the Support DVD into the optical drive. Refer to your computer, browse the contents of the Support DVD to change at www.asus.com for reference only. Click Drivers, Utilities, Manual, Contact, and...
.... 1-26 ASUS P8H61-MX Series Click an icon to display Support DVD/ motherboard information Click an item to run the Support DVD Place the Support DVD into the optical drive. Refer to your computer, browse the contents of the Support DVD to change at www.asus.com for reference only. Click Drivers, Utilities, Manual, Contact, and...

P8H61-MX R2.0 User's Manual
Page 59
.... When the CPU temperature reaches the upper limit, the CPU fan will operate at the maximum duty cycle. The values range from 20% to [Manual]. Chapter 2: BIOS information 2-23 Configuration options: [Ignore] [100 RPM] [200 RPM] [300 RPM] [400 RPM] [500 RPM] CPU ... 12V Voltage The onboard hardware monitor automatically detects the voltage output through the onboard voltage regulators. Select Ignore if you do not wish to the motherboard, the field shows N/A. The values range from 0% to display the detected temperatures. 2.6.2 CPU / Chassis Fan Speed [xxxx RPM] or [Ignore...
.... When the CPU temperature reaches the upper limit, the CPU fan will operate at the maximum duty cycle. The values range from 20% to [Manual]. Chapter 2: BIOS information 2-23 Configuration options: [Ignore] [100 RPM] [200 RPM] [300 RPM] [400 RPM] [500 RPM] CPU ... 12V Voltage The onboard hardware monitor automatically detects the voltage output through the onboard voltage regulators. Select Ignore if you do not wish to the motherboard, the field shows N/A. The values range from 0% to display the detected temperatures. 2.6.2 CPU / Chassis Fan Speed [xxxx RPM] or [Ignore...


