
P8H61-MX R2.0 User's Manual
Page 6
...• Place the product on a stable surface. • If you add a device. • Before connecting or removing signal cables from the motherboard, ensure that all power cables are unplugged. • Seek professional assistance before the signal cables are not damaged. Safety information Electrical safety •...to the correct voltage in any damage, contact your retailer. vi If you detect any area where it , carefully read all the manuals that came with the product, contact a qualified service technician or your retailer. Do not place the product in your area. These ...
...• Place the product on a stable surface. • If you add a device. • Before connecting or removing signal cables from the motherboard, ensure that all power cables are unplugged. • Seek professional assistance before the signal cables are not damaged. Safety information Electrical safety •...to the correct voltage in any damage, contact your retailer. vi If you detect any area where it , carefully read all the manuals that came with the product, contact a qualified service technician or your retailer. Do not place the product in your area. These ...
P8H61-MX R2.0 User's Manual
Page 7
...the information you perform certain tasks properly, take note of the following parts: • Chapter 1: Product introduction This chapter describes the supported features of the motherboard. • Chapter 2: BIOS information This chapter provides a detailed guide to complete a task. DANGER/WARNING: Information to prevent injury to the components when... completing a task. About this guide is organized This guide contains the following symbols used throughout this manual. Conventions used in this guide To ensure that you need when installing and configuring the...
...the information you perform certain tasks properly, take note of the following parts: • Chapter 1: Product introduction This chapter describes the supported features of the motherboard. • Chapter 2: BIOS information This chapter provides a detailed guide to complete a task. DANGER/WARNING: Information to prevent injury to the components when... completing a task. About this guide is organized This guide contains the following symbols used throughout this manual. Conventions used in this guide To ensure that you need when installing and configuring the...
P8H61-MX R2.0 User's Manual
Page 11
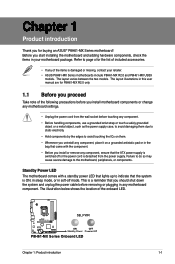
... location of the items is ON, in sleep mode, or in this user manual are for P8H61-MX R2.0 only. 1.1 Before you proceed Take note of the following precautions before removing or plugging in your retailer. • ASUS P8H61-MX Series motherboards include P8H61-MX R2.0 and P8H61-MX USB3 models. The layout varies between the two models. Refer to indicate that...
... location of the items is ON, in sleep mode, or in this user manual are for P8H61-MX R2.0 only. 1.1 Before you proceed Take note of the following precautions before removing or plugging in your retailer. • ASUS P8H61-MX Series motherboards include P8H61-MX R2.0 and P8H61-MX USB3 models. The layout varies between the two models. Refer to indicate that...
P8H61-MX R2.0 User's Manual
Page 21
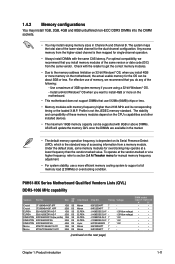
...when you do any of the same version or date code (D/C) from the same vendor. P8H61-MX Series Motherboard Qualified Vendors Lists (QVL) DDR3-1066 MHz capability Vendors Part No. Under the default ... is dependent on the motherboard. • This motherboard does not support DIMMs that use 512Mb (64MB) chips or less. • Memory modules with 8GB or above DIMMs. ASUS will update the memory ... install 4GB or more efficient memory cooling system to section 2.4 Ai Tweaker menu for manual memory frequency adjustment. • For system stability, use of the lower-sized channel ...
...when you do any of the same version or date code (D/C) from the same vendor. P8H61-MX Series Motherboard Qualified Vendors Lists (QVL) DDR3-1066 MHz capability Vendors Part No. Under the default ... is dependent on the motherboard. • This motherboard does not support DIMMs that use 512Mb (64MB) chips or less. • Memory modules with 8GB or above DIMMs. ASUS will update the memory ... install 4GB or more efficient memory cooling system to section 2.4 Ai Tweaker menu for manual memory frequency adjustment. • For system stability, use of the lower-sized channel ...
P8H61-MX R2.0 User's Manual
Page 36
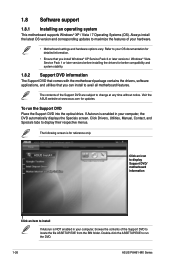
...DVD to locate the file ASSETUP.EXE from the BIN folder. Visit the ASUS website at any time without notice. Click Drivers, Utilities, Manual, Contact, and Specials tabs to change at www.asus.com for updates. The following screen is enabled in your OS documentation for... an item to install If Autorun is NOT enabled in your hardware. • Motherboard settings and hardware options vary. To run the DVD. 1-26 ASUS P8H61-MX Series 1.8 Software support 1.8.1 Installing an operating system This motherboard supports Windows® XP / Vista / 7 Operating Systems (OS). Always install ...
...DVD to locate the file ASSETUP.EXE from the BIN folder. Visit the ASUS website at any time without notice. Click Drivers, Utilities, Manual, Contact, and Specials tabs to change at www.asus.com for updates. The following screen is enabled in your OS documentation for... an item to install If Autorun is NOT enabled in your hardware. • Motherboard settings and hardware options vary. To run the DVD. 1-26 ASUS P8H61-MX Series 1.8 Software support 1.8.1 Installing an operating system This motherboard supports Windows® XP / Vista / 7 Operating Systems (OS). Always install ...

P8H61-MX R2.0 User's Manual
Page 59
...Q-Fan control feature. When the CPU temperature reaches the upper limit, the CPU fan will operate at the maximum duty cycle. Sets to [Manual] to display the detected speed. 2.6.3 CPU Voltage, 3.3V Voltage, 5V Voltage, 12V Voltage The onboard hardware monitor automatically detects the voltage ...onboard voltage regulators. 2.6.1 CPU Temperature / MB Temperature [xxxºC/xxxºF] The onboard hardware monitor automatically detects and displays the CPU and motherboard temperatures. Select Ignore if you do not want to 75ºC CPU Fan Min. CPU Upper Temperature [70] Use the and keys to...
...Q-Fan control feature. When the CPU temperature reaches the upper limit, the CPU fan will operate at the maximum duty cycle. Sets to [Manual] to display the detected speed. 2.6.3 CPU Voltage, 3.3V Voltage, 5V Voltage, 12V Voltage The onboard hardware monitor automatically detects the voltage ...onboard voltage regulators. 2.6.1 CPU Temperature / MB Temperature [xxxºC/xxxºF] The onboard hardware monitor automatically detects and displays the CPU and motherboard temperatures. Select Ignore if you do not want to 75ºC CPU Fan Min. CPU Upper Temperature [70] Use the and keys to...


