P8H61-M LX R2 User's Manual
Page 7
...note of the following parts: • Chapter 1: Product introduction This chapter describes the supported features of the motherboard. • Chapter 2: BIOS information This chapter provides a detailed guide to complete a task. About this manual. DANGER/WARNING: Information to prevent injury to the components... when completing a task. vii NOTE: Tips and additional information to help you MUST follow to navigating and setting up the BIOS. CAUTION: Information to prevent damage to yourself when completing a task. IMPORTANT: Instructions you complete a task. How this guide...
...note of the following parts: • Chapter 1: Product introduction This chapter describes the supported features of the motherboard. • Chapter 2: BIOS information This chapter provides a detailed guide to complete a task. About this manual. DANGER/WARNING: Information to prevent injury to the components... when completing a task. vii NOTE: Tips and additional information to help you MUST follow to navigating and setting up the BIOS. CAUTION: Information to prevent damage to yourself when completing a task. IMPORTANT: Instructions you complete a task. How this guide...
P8H61-M LX R2 User's Manual
Page 9
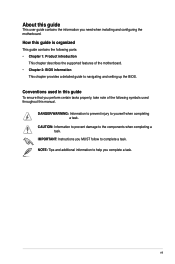
... 2.0 ports (4 ports at the mid-board, 6 ports at the back panel) ASUS Crash Free BIOS3 ASUS Network iControl ASUS MyLogo 2 ASUS Fan Xpert ASUS UEFI BIOS ASUS Anti-Surge Protection ASUS GPU Boost (continued on the next page) ix Resolution: 1920 x 1200 @60Hz D-SUB with Max. P8H61-M LX2 R2.0 specifications summary CPU Chipset Memory Graphics Expansion slots Storage LAN Audio USB...
... 2.0 ports (4 ports at the mid-board, 6 ports at the back panel) ASUS Crash Free BIOS3 ASUS Network iControl ASUS MyLogo 2 ASUS Fan Xpert ASUS UEFI BIOS ASUS Anti-Surge Protection ASUS GPU Boost (continued on the next page) ix Resolution: 1920 x 1200 @60Hz D-SUB with Max. P8H61-M LX2 R2.0 specifications summary CPU Chipset Memory Graphics Expansion slots Storage LAN Audio USB...
P8H61-M LX R2 User's Manual
Page 10
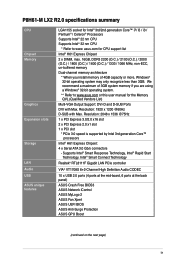
... panel audio connector 1 x System panel connector 1 x TPM header 1 x S/PDIF-out header 1 x COM header 64 Mb Flash ROM, EFI BIOS, PnP, DMI v2.0, WfM 2.0, SMBIOS v2.5, ACPI v2.0a, Multi-language BIOS WOL, PXE, PME Wake Up, WOR by Ring 2 x Serial ATA 3.0Gb/s cables 1 x I/O shield 1 x User Manual 1 x Support... DVD Drivers ASUS PC Probe II ASUS Update Anti-virus software (OEM version) uATX form factor: 9.6 in x 7.8 in (24.4 cm x ...
... panel audio connector 1 x System panel connector 1 x TPM header 1 x S/PDIF-out header 1 x COM header 64 Mb Flash ROM, EFI BIOS, PnP, DMI v2.0, WfM 2.0, SMBIOS v2.5, ACPI v2.0a, Multi-language BIOS WOL, PXE, PME Wake Up, WOR by Ring 2 x Serial ATA 3.0Gb/s cables 1 x I/O shield 1 x User Manual 1 x Support... DVD Drivers ASUS PC Probe II ASUS Update Anti-virus software (OEM version) uATX form factor: 9.6 in x 7.8 in (24.4 cm x ...
P8H61-M LX R2 User's Manual
Page 28
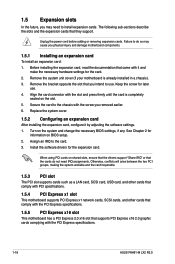
...‑sections describe the slots and the expansion cards that came with the PCI Express specifications. 1-18 ASUS P8H61-M LX2 R2.0 Turn on BIOS setup. 2. Install the software drivers for information on the system and change the necessary BIOS settings, if any. Unplug the power cord before adding or removing expansion cards. 1.5 Expansion slots In the...
...‑sections describe the slots and the expansion cards that came with the PCI Express specifications. 1-18 ASUS P8H61-M LX2 R2.0 Turn on BIOS setup. 2. Install the software drivers for information on the system and change the necessary BIOS settings, if any. Unplug the power cord before adding or removing expansion cards. 1.5 Expansion slots In the...
P8H61-M LX R2 User's Manual
Page 29
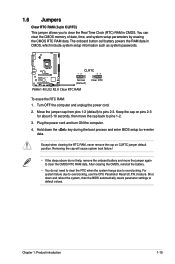
... 5-10 seconds, then move the jumper again to re-enter data. Plug the power cord and turn ON the computer. 4. P8H61-M LX2 R2.0 CLRTC 12 23 Normal (Default) Clear RTC P8H61-M LX2 R2.0 Clear RTC RAM To erase the RTC RAM: 1. For system failure due to pins 2-3. Turn OFF the computer and unplug ...CMOS memory of date, time, and system setup parameters by erasing the CMOS RTC RAM data. Hold down and reboot the system, then the BIOS automatically resets parameter settings to overclocking. Removing the cap will cause system boot failure! • If the steps above do not need to ...
... 5-10 seconds, then move the jumper again to re-enter data. Plug the power cord and turn ON the computer. 4. P8H61-M LX2 R2.0 CLRTC 12 23 Normal (Default) Clear RTC P8H61-M LX2 R2.0 Clear RTC RAM To erase the RTC RAM: 1. For system failure due to pins 2-3. Turn OFF the computer and unplug ...CMOS memory of date, time, and system setup parameters by erasing the CMOS RTC RAM data. Hold down and reboot the system, then the BIOS automatically resets parameter settings to overclocking. Removing the cap will cause system boot failure! • If the steps above do not need to ...
P8H61-M LX R2 User's Manual
Page 31
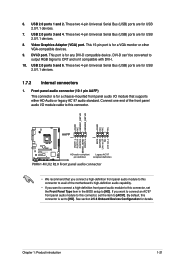
...RGB Signal to CRT and isn't compatible with DVI-I /O module cable to this connector, set the Front Panel Type item in the BIOS setup to [HD]. Connect one end of the motherboard's high-definition audio capability. • If you connect a high-definition front ... PIN 1 PIN 1 MIC2 MICPWR Line out_R NC Line out_L PORT1 L PORT1 R PORT2 R SENSE_SEND PORT2 L P8H61-M LX2 R2.0 HD-audio-compliant Legacy AC'97 pin definition compliant definition P8H61-M LX2 R2.0 Front panel audio connector • We recommend that supports either HD Audio or legacy AC`97 audio standard....
...RGB Signal to CRT and isn't compatible with DVI-I /O module cable to this connector, set the Front Panel Type item in the BIOS setup to [HD]. Connect one end of the motherboard's high-definition audio capability. • If you connect a high-definition front ... PIN 1 PIN 1 MIC2 MICPWR Line out_R NC Line out_L PORT1 L PORT1 R PORT2 R SENSE_SEND PORT2 L P8H61-M LX2 R2.0 HD-audio-compliant Legacy AC'97 pin definition compliant definition P8H61-M LX2 R2.0 Front panel audio connector • We recommend that supports either HD Audio or legacy AC`97 audio standard....

P8H61-M LX R2 User's Manual
Page 34
...Vista / Windows® 7, set the SATA Mode item in the BIOS to a slot opening at the back of the system chassis. +5V SPDIFOUT GND P8H61-M LX2 R2.0 SPDIF_OUT P8H61-M LX2 R2.0 Digital audio connector The S/PDIF module is for details. 7. ...BIOS, click Advanced Mode > Advanced tab > SATA Configuration > SATA Mode Selection. • When using Serial ATA hard disk drives. • Due to Serial ATA 3.0 Gb/s hard disk drives and optical drives via Serial ATA 3.0 Gb/s signal cables. Digital audio connector (4-1 pin SPDIF_OUT) This connector is purchased separately. 1-24 ASUS P8H61-M LX2 R2...
...Vista / Windows® 7, set the SATA Mode item in the BIOS to a slot opening at the back of the system chassis. +5V SPDIFOUT GND P8H61-M LX2 R2.0 SPDIF_OUT P8H61-M LX2 R2.0 Digital audio connector The S/PDIF module is for details. 7. ...BIOS, click Advanced Mode > Advanced tab > SATA Configuration > SATA Mode Selection. • When using Serial ATA hard disk drives. • Due to Serial ATA 3.0 Gb/s hard disk drives and optical drives via Serial ATA 3.0 Gb/s signal cables. Digital audio connector (4-1 pin SPDIF_OUT) This connector is purchased separately. 1-24 ASUS P8H61-M LX2 R2...
P8H61-M LX R2 User's Manual
Page 39
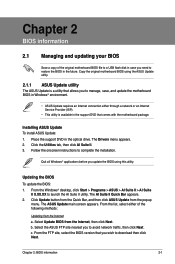
... AI Suite II Quick Bar appears. 2. b. The Drivers menu appears. 2. Updating the BIOS To update the BIOS: 1. Select Update BIOS from the popup menu. Select the ASUS FTP site nearest you wish to launch the AI Suite II utility. Installing ASUS Update To install ASUS Update: 1. Click Update button from the Quick Bar, and then click...
... AI Suite II Quick Bar appears. 2. b. The Drivers menu appears. 2. Updating the BIOS To update the BIOS: 1. Select Update BIOS from the popup menu. Select the ASUS FTP site nearest you wish to launch the AI Suite II utility. Installing ASUS Update To install ASUS Update: 1. Click Update button from the Quick Bar, and then click...
P8H61-M LX R2 User's Manual
Page 40
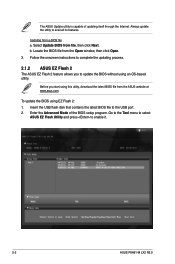
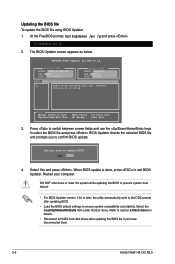
...Open. 3. b. Updating from the ASUS website at www.asus.com. Insert the USB flash disk that contains the latest BIOS file to avail all its features. Follow the onscreen instructions to enable it. 2-2 ASUS P8H61-M LX2 R2.0 Go to the Tool menu to select ASUS EZ Flash Utility and press to... complete the updating process. 2.1.2 ASUS EZ Flash 2 The ASUS EZ Flash 2 feature allows ...
...Open. 3. b. Updating from the ASUS website at www.asus.com. Insert the USB flash disk that contains the latest BIOS file to avail all its features. Follow the onscreen instructions to enable it. 2-2 ASUS P8H61-M LX2 R2.0 Go to the Tool menu to select ASUS EZ Flash Utility and press to... complete the updating process. 2.1.2 ASUS EZ Flash 2 The ASUS EZ Flash 2 feature allows ...
P8H61-M LX R2 User's Manual
Page 41
Press the Up/Down arrow keys to find the USB flash disk that contains the BIOS file to P8H61-M-LX2-R2-ASUS-0402.CAP. • The BIOS file in the removable device to a USB port. 3. Download the latest BIOS file from the ASUS website at www.asus.com. Turn on a single partition only. • DO NOT shut down or reset...
Press the Up/Down arrow keys to find the USB flash disk that contains the BIOS file to P8H61-M-LX2-R2-ASUS-0402.CAP. • The BIOS file in the removable device to a USB port. 3. Download the latest BIOS file from the ASUS website at www.asus.com. Turn on a single partition only. • DO NOT shut down or reset...
P8H61-M LX R2 User's Manual
Page 42
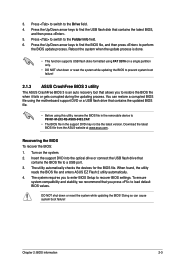
... drive) to boot using defaults 3. When the ASUS Logo appears, press to FreeDOS (http://www.freedos.org)! 2.1.4 ASUS BIOS Updater The ASUS BIOS Updater allows you to copy the current BIOS file for reference only. Booting the system in a DOS environment. Do not save them on a single partition. 2. C:\>d: D:\> 2-4 ASUS P8H61-M LX2 R2.0 The actual utility screen displays may not be...
... drive) to boot using defaults 3. When the ASUS Logo appears, press to FreeDOS (http://www.freedos.org)! 2.1.4 ASUS BIOS Updater The ASUS BIOS Updater allows you to copy the current BIOS file for reference only. Booting the system in a DOS environment. Do not save them on a single partition. 2. C:\>d: D:\> 2-4 ASUS P8H61-M LX2 R2.0 The actual utility screen displays may not be...
P8H61-M LX R2 User's Manual
Page 43
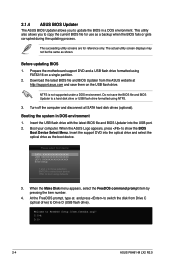
... /o[filename] and press . Note Saving BIOS: Chapter 2: BIOS information 2-5 When BIOS backup is done, press any user-assigned name with no more than eight alphanumeric characters for the filename and three alphanumeric characters for DOS V1.18 Current ROM BOARD: P8H61-M LX2 R2 VER: 0402 DATE: 01/13/2012 ...Update ROM BOARD: Unknown VER: Unknown DATE: Unknown PATH: A:\ BIOS backup is not write-protected and has at least 4MB free space to continue. ...
... /o[filename] and press . Note Saving BIOS: Chapter 2: BIOS information 2-5 When BIOS backup is done, press any user-assigned name with no more than eight alphanumeric characters for the filename and three alphanumeric characters for DOS V1.18 Current ROM BOARD: P8H61-M LX2 R2 VER: 0402 DATE: 01/13/2012 ...Update ROM BOARD: Unknown VER: Unknown DATE: Unknown PATH: A:\ BIOS backup is not write-protected and has at least 4MB free space to continue. ...
P8H61-M LX R2 User's Manual
Page 44
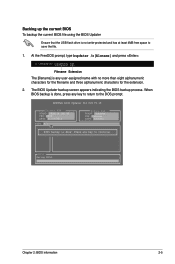
... you have disconnected them. 2-6 ASUS P8H61-M LX2 R2.0 The BIOS Updater screen appears as below. Press to switch between screen fields and use the keys to section 2.9 Exit menu for DOS V1.18 Current ROM BOARD: P8H61-M LX2 R2 VER: 0402 DATE: 01/13/2012 Update ROM BOARD: Unknown VER: Unknown DATE: Unknown PATH: A:\ A: P8H61-M-LX2-R2-ASUS-0402.CAP 4068078 2012...
... you have disconnected them. 2-6 ASUS P8H61-M LX2 R2.0 The BIOS Updater screen appears as below. Press to switch between screen fields and use the keys to section 2.9 Exit menu for DOS V1.18 Current ROM BOARD: P8H61-M LX2 R2 VER: 0402 DATE: 01/13/2012 Update ROM BOARD: Unknown VER: Unknown DATE: Unknown PATH: A:\ A: P8H61-M-LX2-R2-ASUS-0402.CAP 4068078 2012...
P8H61-M LX R2 User's Manual
Page 45
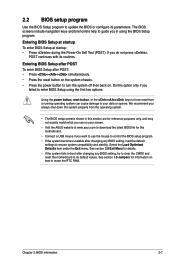
... the motherboard to download the latest BIOS file for this motherboard. • Connect a USB mouse if you do not press , POST continues with its routines. Chapter 2: BIOS information 2-7 Entering BIOS Setup at startup To enter BIOS Setup at www.asus.com to its parameters. Using the... power button, reset button, or the ++ keys to update the BIOS or configure its default values. Select the Load ...
... the motherboard to download the latest BIOS file for this motherboard. • Connect a USB mouse if you do not press , POST continues with its routines. Chapter 2: BIOS information 2-7 Entering BIOS Setup at startup To enter BIOS Setup at www.asus.com to its parameters. Using the... power button, reset button, or the ++ keys to update the BIOS or configure its default values. Select the Load ...
P8H61-M LX R2 User's Manual
Page 46
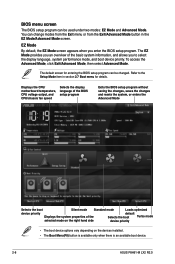
...CPU/ motherboard temperature, CPU voltage output, and CPU/chassis fan speed Selects the display language of the BIOS setup program Exits the BIOS setup program without saving the changes, saves the changes and resets the system, or enters the Advanced Mode...mode Loads optimized device priority Displays the system properties of the basic system information, and allows you enter the BIOS setup program. EZ Mode By default, the EZ Mode screen appears when you to the Setup Mode item in... Boot Menu(F8) button is available only when there is an available boot device. 2-8 ASUS P8H61-M LX2 R2.0
...CPU/ motherboard temperature, CPU voltage output, and CPU/chassis fan speed Selects the display language of the BIOS setup program Exits the BIOS setup program without saving the changes, saves the changes and resets the system, or enters the Advanced Mode...mode Loads optimized device priority Displays the system properties of the basic system information, and allows you enter the BIOS setup program. EZ Mode By default, the EZ Mode screen appears when you to the Setup Mode item in... Boot Menu(F8) button is available only when there is an available boot device. 2-8 ASUS P8H61-M LX2 R2.0

P8H61-M LX R2 User's Manual
Page 47
... has the following sections for special functions For selecting the exit options and loading default settings Chapter 2: BIOS information 2-9 To access the EZ Mode, click Exit, then select ASUS EZ Mode. Refer to configure the BIOS settings. Advanced Mode The Advanced Mode provides advanced options for experienced end-users to the following main...
... has the following sections for special functions For selecting the exit options and loading default settings Chapter 2: BIOS information 2-9 To access the EZ Mode, click Exit, then select ASUS EZ Mode. Refer to configure the BIOS settings. Advanced Mode The Advanced Mode provides advanced options for experienced end-users to the following main...
P8H61-M LX R2 User's Manual
Page 48
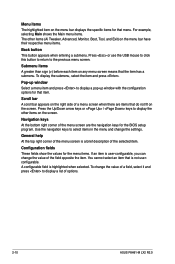
...bar A scroll bar appears on the right side of a menu screen when there are the navigation keys for that is a brief description of options. 2-10 ASUS P8H61-M LX2 R2.0 For example, selecting Main shows the Main menu items. The other items on the screen. Press or use the USB mouse to click this button... in the menu and change the value of a field, select it and press to display a pop-up window with the configuration options for the BIOS setup program. General help At the top right corner of the field opposite the item. Configuration fields These fields show the values for that the...
...bar A scroll bar appears on the right side of a menu screen when there are the navigation keys for that is a brief description of options. 2-10 ASUS P8H61-M LX2 R2.0 For example, selecting Main shows the Main menu items. The other items on the screen. Press or use the USB mouse to click this button... in the menu and change the value of a field, select it and press to display a pop-up window with the configuration options for the BIOS setup program. General help At the top right corner of the field opposite the item. Configuration fields These fields show the values for that the...

P8H61-M LX R2 User's Manual
Page 49
2.3 Main menu The Main menu screen appears when you enter the Advanced Mode of basic system information, and allows you to choose the BIOS language version from the options. Configuration options: [English] [Español 2.3.2 System Date [Day xx/xx/xxxx] Allows you to set the system date. 2.3.3 System Time [xx:xx:xx] Allows you to set the system date, time, language, and security settings. 2.3.1 System Language [English] Allows you with an overview of the BIOS Setup program. Chapter 2: BIOS information 2-11 The Main menu provides you to set the system time.
2.3 Main menu The Main menu screen appears when you enter the Advanced Mode of basic system information, and allows you to choose the BIOS language version from the options. Configuration options: [English] [Español 2.3.2 System Date [Day xx/xx/xxxx] Allows you to set the system date. 2.3.3 System Time [xx:xx:xx] Allows you to set the system date, time, language, and security settings. 2.3.1 System Language [English] Allows you with an overview of the BIOS Setup program. Chapter 2: BIOS information 2-11 The Main menu provides you to set the system time.

P8H61-M LX R2 User's Manual
Page 50
... To change an administrator password: 1. Administrator Password If you have forgotten your BIOS password, erase the CMOS Real Time Clock (RTC) RAM to clear the BIOS password. From the Create New Password box, key in the current password, ... an administrator password, we recommend that you might be able to see or change only selected fields in the BIOS setup program. Select the Administrator Password item and press . 2. Confirm the password when prompted. 2.3.4 Security The... Administrator Password item on top of the screen shows Not Installed. 2-12 ASUS P8H61-M LX2 R2.0
... To change an administrator password: 1. Administrator Password If you have forgotten your BIOS password, erase the CMOS Real Time Clock (RTC) RAM to clear the BIOS password. From the Create New Password box, key in the current password, ... an administrator password, we recommend that you might be able to see or change only selected fields in the BIOS setup program. Select the Administrator Password item and press . 2. Confirm the password when prompted. 2.3.4 Security The... Administrator Password item on top of the screen shows Not Installed. 2-12 ASUS P8H61-M LX2 R2.0
P8H61-M LX R2 User's Manual
Page 51
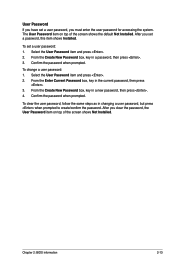
Select the User Password item and press . 2. From the Create New Password box, key in a password, then press . 3. Chapter 2: BIOS information 2-13 After you set a user password: 1. To set a password, this item shows Installed. From the Create New Password box, key in a new password, then ...
Select the User Password item and press . 2. From the Create New Password box, key in a password, then press . 3. Chapter 2: BIOS information 2-13 After you set a user password: 1. To set a password, this item shows Installed. From the Create New Password box, key in a new password, then ...


