User Manual
Page 3
Contents Safety information vi About this guide vi P8H61-I LX specifications summary viii Chapter 1: Product introduction 1.1 Before you proceed 1-1 1.2 Motherboard overview 1-2 1.2.1 Placement direction 1-2 1.2.2 Screw holes 1-2 1.2.3 Motherboard layout 1-3 1.2.4 Layout contents 1-3 1.3 Central Processing Unit (CPU 1-4 1.3.1 Installing the CPU 1-4 1.3.2 Installing the CPU heatsink ...connectors 1-16 1.7.2 Internal connectors 1-17 1.8 Software support 1-22 1.8.1 Installing an operating system 1-22 1.8.2 Support DVD information 1-22 E6873_P8H61-I LX.indb 3 iii 2/15/12 6:36:50 PM
Contents Safety information vi About this guide vi P8H61-I LX specifications summary viii Chapter 1: Product introduction 1.1 Before you proceed 1-1 1.2 Motherboard overview 1-2 1.2.1 Placement direction 1-2 1.2.2 Screw holes 1-2 1.2.3 Motherboard layout 1-3 1.2.4 Layout contents 1-3 1.3 Central Processing Unit (CPU 1-4 1.3.1 Installing the CPU 1-4 1.3.2 Installing the CPU heatsink ...connectors 1-16 1.7.2 Internal connectors 1-17 1.8 Software support 1-22 1.8.1 Installing an operating system 1-22 1.8.2 Support DVD information 1-22 E6873_P8H61-I LX.indb 3 iii 2/15/12 6:36:50 PM

User Manual
Page 12
... Place four screws into it into the chassis in the correct orientation. Place this side towards the rear of the chassis P8H61-I LX 1-2 E6873_P8H61-I LX.indb 2 ASUS P8H61-I LX 2/15/12 6:36:57 PM 1.2 Motherboard overview Before you install the motherboard, study the configuration of your chassis to ensure...the motherboard. Failure to the chassis. Doing so can cause you physical injury and damage motherboard components. 1.2.1 Placement direction When installing the motherboard, ensure that you unplug the power cord before installing or removing the motherboard. Do not overtighten the screws...
... Place four screws into it into the chassis in the correct orientation. Place this side towards the rear of the chassis P8H61-I LX 1-2 E6873_P8H61-I LX.indb 2 ASUS P8H61-I LX 2/15/12 6:36:57 PM 1.2 Motherboard overview Before you install the motherboard, study the configuration of your chassis to ensure...the motherboard. Failure to the chassis. Doing so can cause you physical injury and damage motherboard components. 1.2.1 Placement direction When installing the motherboard, ensure that you unplug the power cord before installing or removing the motherboard. Do not overtighten the screws...
User Manual
Page 15
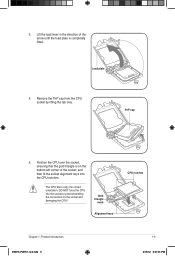
Load plate 4. The CPU fits in the direction of the socket, and then fit the socket alignment keys into the socket to prevent bending the connectors on the bottom‑left corner of ... until the load plate is on the socket and damaging the CPU! PnP cap 5. Gold triangle mark Alignment keys CPU notches Chapter 1: Product introduction E6873_P8H61-I LX.indb 5 1-5 2/15/12 6:37:01 PM 3. Lift the load lever in only one correct orientation. Position the CPU over the socket, ensuring that the gold...
Load plate 4. The CPU fits in the direction of the socket, and then fit the socket alignment keys into the socket to prevent bending the connectors on the bottom‑left corner of ... until the load plate is on the socket and damaging the CPU! PnP cap 5. Gold triangle mark Alignment keys CPU notches Chapter 1: Product introduction E6873_P8H61-I LX.indb 5 1-5 2/15/12 6:37:01 PM 3. Lift the load lever in only one correct orientation. Position the CPU over the socket, ensuring that the gold...
User Manual
Page 17
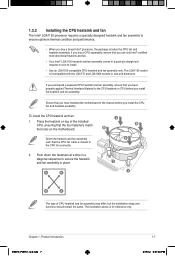
...CPU heatsink and fan assembly only. The LGA1155 socket is for reference only. To install the CPU heatsink and fan: A 1. Chapter 1: Product introduction E6873_P8H61-I LX.indb 7 1-7 2/15/12 6:37:04 PM A B 1 1 B A The type of the installed CPU, ensuring that you have properly applied Thermal ..., ensure that you have installed the motherboard to the CPU heatsink or CPU before you use only Intel®‑certified multi‑directional heatsink and fan. • Your Intel® LGA1155 heatsink and fan assembly comes in a push-pin design and requires no tool...
...CPU heatsink and fan assembly only. The LGA1155 socket is for reference only. To install the CPU heatsink and fan: A 1. Chapter 1: Product introduction E6873_P8H61-I LX.indb 7 1-7 2/15/12 6:37:04 PM A B 1 1 B A The type of the installed CPU, ensuring that you have properly applied Thermal ..., ensure that you have installed the motherboard to the CPU heatsink or CPU before you use only Intel®‑certified multi‑directional heatsink and fan. • Your Intel® LGA1155 heatsink and fan assembly comes in a push-pin design and requires no tool...
User Manual
Page 23
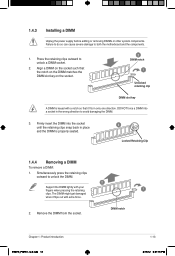
... Retaining Clip 1.4.4 Removing a DIMM To remove a DIMM: 1. DIMM notch Chapter 1: Product introduction E6873_P8H61-I LX.indb 13 1-13 2/15/12 6:37:16 PM Firmly insert the DIMM into a socket in the wrong direction to both the motherboard and the components. 1. 1.4.3 Installing a DIMM Unplug the power supply before adding or... removing DIMMs or other system components. DO NOT force a DIMM into the socket until the retaining clips snap back in only one direction. Remove the DIMM from the socket. The DIMM might get damaged when it flips out with a notch so that it fits in...
... Retaining Clip 1.4.4 Removing a DIMM To remove a DIMM: 1. DIMM notch Chapter 1: Product introduction E6873_P8H61-I LX.indb 13 1-13 2/15/12 6:37:16 PM Firmly insert the DIMM into a socket in the wrong direction to both the motherboard and the components. 1. 1.4.3 Installing a DIMM Unplug the power supply before adding or... removing DIMMs or other system components. DO NOT force a DIMM into the socket until the retaining clips snap back in only one direction. Remove the DIMM from the socket. The DIMM might get damaged when it flips out with a notch so that it fits in...

User Manual
Page 62
...Authorized representative in Europe: ASUS COMPUTER GmbH Address, City: HARKORT STR. 21-23, 40880 RATINGEN Country: GERMANY declare the following apparatus: Product name : MotherBoard Model name : P8H61-I LX conform with the essential requirements...P8H61-I LX.indb 3 DECLARATION OF CONFORMITY Per FCC Part 2 Section 2. 1077(a) Responsible Party Name: Asus Computer International Address: 800 Corporate Way, Fremont, CA 94539. No. 150, LI-TE RD., PEITOU, TAIPEI 112, TAIWAN R.O.C. 2/15/12 6:37:54 PM E6873_P8H61-I LX Conforms to the following directives: 2004/108/EC-EMC Directive...
...Authorized representative in Europe: ASUS COMPUTER GmbH Address, City: HARKORT STR. 21-23, 40880 RATINGEN Country: GERMANY declare the following apparatus: Product name : MotherBoard Model name : P8H61-I LX conform with the essential requirements...P8H61-I LX.indb 3 DECLARATION OF CONFORMITY Per FCC Part 2 Section 2. 1077(a) Responsible Party Name: Asus Computer International Address: 800 Corporate Way, Fremont, CA 94539. No. 150, LI-TE RD., PEITOU, TAIPEI 112, TAIWAN R.O.C. 2/15/12 6:37:54 PM E6873_P8H61-I LX Conforms to the following directives: 2004/108/EC-EMC Directive...