
User Manual
Page 4
... 2-42 2.9 Onboard LEDs 2-43 2.10 Starting up for the first time 2-44 2.11 Turning off the computer 2-44 Chapter 3: BIOS setup 3.1 Knowing BIOS 3-1 3.2 Updating BIOS 3-1 3.2.1 ASUS Update utility 3-2 3.2.2 ASUS EZ Flash 2 utility 3-4 3.2.3 ASUS CrashFree BIOS 3 utility 3-5 3.2.4 ASUS BIOS Updater 3-6 3.3 BIOS setup program 3-9 3.3.1 BIOS menu screen 3-9 3.3.2 Menu bar 3-9 3.3.3 Navigation keys 3-10 3.3.4 Menu items 3-10 3.3.5 Submenu items 3-10 3.3.6 Configuration fields 3-10 3.3.7 Pop-up...
... 2-42 2.9 Onboard LEDs 2-43 2.10 Starting up for the first time 2-44 2.11 Turning off the computer 2-44 Chapter 3: BIOS setup 3.1 Knowing BIOS 3-1 3.2 Updating BIOS 3-1 3.2.1 ASUS Update utility 3-2 3.2.2 ASUS EZ Flash 2 utility 3-4 3.2.3 ASUS CrashFree BIOS 3 utility 3-5 3.2.4 ASUS BIOS Updater 3-6 3.3 BIOS setup program 3-9 3.3.1 BIOS menu screen 3-9 3.3.2 Menu bar 3-9 3.3.3 Navigation keys 3-10 3.3.4 Menu items 3-10 3.3.5 Submenu items 3-10 3.3.6 Configuration fields 3-10 3.3.7 Pop-up...

User Manual
Page 9
...How this guide This user guide contains the information you have been added by your dealer. Detailed descriptions of the BIOS parameters are not part of the switches, jumpers, and connectors on ASUS hardware and software products. Optional documentation Your product package may have to the following parts: • Chapter 1:... package. Where to find more information Refer to perform when installing system components. ix Refer to change system settings through the BIOS Setup menus. ASUS websites The ASUS website provides updated information on the motherboard. • Chapter...
...How this guide This user guide contains the information you have been added by your dealer. Detailed descriptions of the BIOS parameters are not part of the switches, jumpers, and connectors on ASUS hardware and software products. Optional documentation Your product package may have to the following parts: • Chapter 1:... package. Where to find more information Refer to perform when installing system components. ix Refer to change system settings through the BIOS Setup menus. ASUS websites The ASUS website provides updated information on the motherboard. • Chapter...

User Manual
Page 12
...0.00625V increment - ASUS CrashFree BIOS 3 - ASUS Fan Xpert ASUS EZ DIY - ASUS EZ Flash 2 - Multi-language BIOS Precision Tweaker 2 - vIMC: Adjustable IMC voltage at 0.0125V increment SFS (Stepless Frequency Selection) - TurboV - ASUS MyLogo 2™ - Turbo Key - ASUS EPU ASUS Quiet Thermal Solutions - ASUS C.P.R. (CPU Parameter... - vDRAM Bus: Adjustable DRAM voltage at 0.01V increment - P7H55D-M EVO specifications summary ASUS unique features ASUS exclusive overclocking features ASUS Exclusive Overclocking Features - vPCH: Adjustable PCH voltage at 0.02V increment -
...0.00625V increment - ASUS CrashFree BIOS 3 - ASUS Fan Xpert ASUS EZ DIY - ASUS EZ Flash 2 - Multi-language BIOS Precision Tweaker 2 - vIMC: Adjustable IMC voltage at 0.0125V increment SFS (Stepless Frequency Selection) - TurboV - ASUS MyLogo 2™ - Turbo Key - ASUS EPU ASUS Quiet Thermal Solutions - ASUS C.P.R. (CPU Parameter... - vDRAM Bus: Adjustable DRAM voltage at 0.01V increment - P7H55D-M EVO specifications summary ASUS unique features ASUS exclusive overclocking features ASUS Exclusive Overclocking Features - vPCH: Adjustable PCH voltage at 0.02V increment -

User Manual
Page 13
x 9.6 in . xiii P7H55D-M EVO specifications summary Back panel I/O ports Internal I/O connectors BIOS features Manageability Support DVD contents Form factor 1 x PS/2 keyboard port (purple) 1 x Optical S/PDIF Out port 1 x External SATA port 1 x HDMI out port 1 ... 12V Power connector System Panel (Q-Connector) 64 Mb Flash ROM, SPI, AMI BIOS, PnP, DMI 2.0, WfM 2.0, SM BIOS 2.5, ACPI 2.0a, Multi-language BIOS, ASUS EZ Flash 2, ASUS CrashFree BIOS 3 WfM 2.0, DMI 2.0, WOL by PME, WOR by PME, PXE Drivers ASUS Utilities ASUS Update Anti-virus software (OEM version) uATX form factor: 9.6 in . (...
x 9.6 in . xiii P7H55D-M EVO specifications summary Back panel I/O ports Internal I/O connectors BIOS features Manageability Support DVD contents Form factor 1 x PS/2 keyboard port (purple) 1 x Optical S/PDIF Out port 1 x External SATA port 1 x HDMI out port 1 ... 12V Power connector System Panel (Q-Connector) 64 Mb Flash ROM, SPI, AMI BIOS, PnP, DMI 2.0, WfM 2.0, SM BIOS 2.5, ACPI 2.0a, Multi-language BIOS, ASUS EZ Flash 2, ASUS CrashFree BIOS 3 WfM 2.0, DMI 2.0, WOL by PME, WOR by PME, PXE Drivers ASUS Utilities ASUS Update Anti-virus software (OEM version) uATX form factor: 9.6 in . (...
User Manual
Page 18
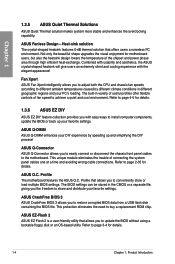
... to different ambient temperatures caused by speeding up your favorite settings. Fan Xpert ASUS Fan Xpert intelligently allows you to the motherboard. ASUS CrashFree BIOS 3 ASUS CrashFree BIOS 3 allows you to easily connect or disconnect the chassis front panel cables to update the BIOS without using a bootable floppy disk or an OS-based utility. Combined with...
... to different ambient temperatures caused by speeding up your favorite settings. Fan Xpert ASUS Fan Xpert intelligently allows you to the motherboard. ASUS CrashFree BIOS 3 ASUS CrashFree BIOS 3 allows you to easily connect or disconnect the chassis front panel cables to update the BIOS without using a bootable floppy disk or an OS-based utility. Combined with...

User Manual
Page 29
... mapped for manual memory frequency adjustment. • For system stability, use DIMMs of the lower-sized channel for overclocking may install varying memory sizes in BIOS. Use a maximum of the following: - To operate at the vendor-marked or at a higher frequency, refer to section 3.5 Ai Tweaker menu for single-channel operation... the dual-channel configuration. Any excess memory from the same vendor. • Due to install 4GB or more efficient memory cooling system to DDR3-1333. ASUS P7H55D-M EVO 2-11
... mapped for manual memory frequency adjustment. • For system stability, use DIMMs of the lower-sized channel for overclocking may install varying memory sizes in BIOS. Use a maximum of the following: - To operate at the vendor-marked or at a higher frequency, refer to section 3.5 Ai Tweaker menu for single-channel operation... the dual-channel configuration. Any excess memory from the same vendor. • Due to install 4GB or more efficient memory cooling system to DDR3-1333. ASUS P7H55D-M EVO 2-11

User Manual
Page 40
... the black slots as one X.M.P. Refer to Intel CPU spec, CPUs with a 2.66G CPU, enable the DRAM O.C. Chapter 2 P7H55D-M EVO Motherboard Qualified Vendors Lists (QVL) DDR3-1067MHz capability for the latest QVL. 2-22 Chapter 2: Hardware information To use DIMMs of a...1333. Single-sided DS - DIMM per channel. • According to section 3.5.1 Ai Overclock Tuner for details. • Visit the ASUS website for Clarkdale CPU Vendor Part No. Profile feature in BIOS. DIMM socket support (Optional) 1 DIMM 2 DIMM 4 DIMM • • • • • • &#...
... the black slots as one X.M.P. Refer to Intel CPU spec, CPUs with a 2.66G CPU, enable the DRAM O.C. Chapter 2 P7H55D-M EVO Motherboard Qualified Vendors Lists (QVL) DDR3-1067MHz capability for the latest QVL. 2-22 Chapter 2: Hardware information To use DIMMs of a...1333. Single-sided DS - DIMM per channel. • According to section 3.5.1 Ai Overclock Tuner for details. • Visit the ASUS website for Clarkdale CPU Vendor Part No. Profile feature in BIOS. DIMM socket support (Optional) 1 DIMM 2 DIMM 4 DIMM • • • • • • &#...
User Manual
Page 42
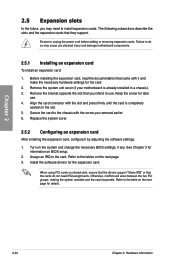
... injury and damage motherboard components. 2.5.1 Installing an expansion card To install an expansion card: 1. Failure to do not need to the tables on BIOS setup. 2. Align the card connector with it by adjusting the software settings. 1. Turn on shared slots, ensure that the drivers support "Share ...for the card. 2. See Chapter 3 for details. 2-24 Chapter 2: Hardware information When using PCI cards on the system and change the necessary BIOS settings, if any. Ensure to the card. Install the software drivers for later use . Remove the bracket opposite the slot that the cards ...
... injury and damage motherboard components. 2.5.1 Installing an expansion card To install an expansion card: 1. Failure to do not need to the tables on BIOS setup. 2. Align the card connector with it by adjusting the software settings. 1. Turn on shared slots, ensure that the drivers support "Share ...for the card. 2. See Chapter 3 for details. 2-24 Chapter 2: Hardware information When using PCI cards on the system and change the necessary BIOS settings, if any. Ensure to the card. Install the software drivers for later use . Remove the bracket opposite the slot that the cards ...

User Manual
Page 45
... to the chipset behavior, AC power off and on CLRTC jumper default position. ASUS P7H55D-M EVO 2-27 Turn OFF the computer and unplug the power cord. 2. You must turn ON the computer. 4. Hold down and reboot the system so the BIOS can clear the CMOS memory of date, time, and system setup parameters by.... • Due to pins 1-2. 3. Move the jumper cap from pins 1-2 (default) to re-enter data. Shut down the key during the boot process and enter BIOS setup to pins 2-3. function.
... to the chipset behavior, AC power off and on CLRTC jumper default position. ASUS P7H55D-M EVO 2-27 Turn OFF the computer and unplug the power cord. 2. You must turn ON the computer. 4. Hold down and reboot the system so the BIOS can clear the CMOS memory of date, time, and system setup parameters by.... • Due to pins 1-2. 3. Move the jumper cap from pins 1-2 (default) to re-enter data. Shut down the key during the boot process and enter BIOS setup to pins 2-3. function.

User Manual
Page 46
...each timing set is tested. This is not properly installed. switch Installing DIMMs that you download and update to the latest BIOS version from the ASUS website at www.asus.com. • If you turn off the system and reinstall the DIMM before using the MemOK! switch to boot ...after the whole tuning process, the DRAM_LED lights continuously. MemOK! If the installed DIMMs still fail to boot and load BIOS default settings. function. ...
...each timing set is tested. This is not properly installed. switch Installing DIMMs that you download and update to the latest BIOS version from the ASUS website at www.asus.com. • If you turn off the system and reinstall the DIMM before using the MemOK! switch to boot ...after the whole tuning process, the DRAM_LED lights continuously. MemOK! If the installed DIMMs still fail to boot and load BIOS default settings. function. ...

User Manual
Page 48
... the monitor resolution from the Windows® Display Settings menu. • Due to the Intel® driver issue, some resolution options that during POST or BIOS setup, only DVI-D output is valid. • Due to enter Safe Mode. Refer to use an HDCP compliant monitor. • You can connect two monitors...
... the monitor resolution from the Windows® Display Settings menu. • Due to the Intel® driver issue, some resolution options that during POST or BIOS setup, only DVI-D output is valid. • Due to enter Safe Mode. Refer to use an HDCP compliant monitor. • You can connect two monitors...

User Manual
Page 57
... Digital Interface (S/PDIF) port. Digital audio connector (4-1 pin SPDIF_OUT) This connector is purchased separately. 8. By default, this connector, then install the module to [HD Audio]. ASUS P7H55D-M EVO 2-39 Front panel audio connector (10-1 pin AAFP) This connector is set the item to [HD Audio]; 7. Chapter 2 The S/PDIF module is for a chassis-mounted... audio standard. if you want to connect an AC'97 front panel audio module to this connector, set the Front Panel Type item in the BIOS setup to [AC97]. Connect one end of the system chassis.
... Digital Interface (S/PDIF) port. Digital audio connector (4-1 pin SPDIF_OUT) This connector is purchased separately. 8. By default, this connector, then install the module to [HD Audio]. ASUS P7H55D-M EVO 2-39 Front panel audio connector (10-1 pin AAFP) This connector is set the item to [HD Audio]; 7. Chapter 2 The S/PDIF module is for a chassis-mounted... audio standard. if you want to connect an AC'97 front panel audio module to this connector, set the Front Panel Type item in the BIOS setup to [AC97]. Connect one end of the system chassis.

User Manual
Page 59
... power, and blinks when the system is in sleep or soft-off button (2-pin PWRSW) This connector is for the chassis-mounted system warning speaker. ASUS P7H55D-M EVO 2-41 10. Pressing the power button turns the system on or puts the system in sleep mode. • Hard disk drive activity LED (2-pin IDE_LED...
... power, and blinks when the system is in sleep or soft-off button (2-pin PWRSW) This connector is for the chassis-mounted system warning speaker. ASUS P7H55D-M EVO 2-41 10. Pressing the power button turns the system on or puts the system in sleep mode. • Hard disk drive activity LED (2-pin IDE_LED...

User Manual
Page 62
...to section 3.7 Power menu in Chapter 3. 2.11 Turning off mode regardless of the system chassis. 4. If you do not see the BIOS beep codes table below) or additional messages appear on the system front panel case lights up. Follow the instructions in Chapter 3 for ... External SCSI devices (starting with a surge protector. 5. Chapter 2 2.10 Starting up for assistance. After making all switches are running, the BIOS beeps (see anything within 30 seconds from orange to disabled No keyboard detected No memory detected No VGA detected Hardware component failure 7. Pressing the...
...to section 3.7 Power menu in Chapter 3. 2.11 Turning off mode regardless of the system chassis. 4. If you do not see the BIOS beep codes table below) or additional messages appear on the system front panel case lights up. Follow the instructions in Chapter 3 for ... External SCSI devices (starting with a surge protector. 5. Chapter 2 2.10 Starting up for assistance. After making all switches are running, the BIOS beeps (see anything within 30 seconds from orange to disabled No keyboard detected No memory detected No VGA detected Hardware component failure 7. Pressing the...

User Manual
Page 63
... flash disk drive. We strongly recommend that are needed for details on these utilities. However, BIOS updating is no problem using the motherboard support DVD or a USB flash drive when the BIOS file fails or gets corrupted. 4. Chapter 3 ASUS P7H55D-M EVO 3-1 Refer to ensure optimum performance. We recommend that you need to manage and update...
... flash disk drive. We strongly recommend that are needed for details on these utilities. However, BIOS updating is no problem using the motherboard support DVD or a USB flash drive when the BIOS file fails or gets corrupted. 4. Chapter 3 ASUS P7H55D-M EVO 3-1 Refer to ensure optimum performance. We recommend that you need to manage and update...

User Manual
Page 64
...update the motherboard BIOS in the optical drive. 2. Start > Programs > ASUS > ASUSUpdate > ASUSUpdate. 3.2.1 ASUS Update utility The ASUS Update is a utility that comes with the motherboard package. The ASUS Update utility allows you to: • Save the current BIOS file • Download the latest BIOS file from ...the Internet • Update the BIOS from an updated BIOS file • Update the BIOS directly from the drop‑down ...
...update the motherboard BIOS in the optical drive. 2. Start > Programs > ASUS > ASUSUpdate > ASUSUpdate. 3.2.1 ASUS Update utility The ASUS Update is a utility that comes with the motherboard package. The ASUS Update utility allows you to: • Save the current BIOS file • Download the latest BIOS file from ...the Internet • Update the BIOS from an updated BIOS file • Update the BIOS directly from the drop‑down ...

User Manual
Page 65
... the onscreen instructions to ensure system compatibility and stability. Click Next. The ASUS Update utility is capable of updating itself through a BIOS file: 1. Locate the BIOS file from the dropdown menu, then click Next. 3. P7H55DME.ROM ASUS P7H55D-M EVO P7H55DME Ensure to load the BIOS default settings to complete the update process. Click Next. 4. From the FTP...
... the onscreen instructions to ensure system compatibility and stability. Click Next. The ASUS Update utility is capable of updating itself through a BIOS file: 1. Locate the BIOS file from the dropdown menu, then click Next. 3. P7H55DME.ROM ASUS P7H55D-M EVO P7H55DME Ensure to load the BIOS default settings to complete the update process. Click Next. 4. From the FTP...

User Manual
Page 66
... system while updating the BIOS to switch between drives until the correct BIOS file is found . To update the BIOS using this utility, download the latest BIOS from the ASUS website at www.asus.com. Chapter 3 3-4 Chapter 3: BIOS setup ASUSTek EZ Flash 2 BIOS ROM Utility V4.10 FLASH TYPE: MXIC 25L1605A Current ROM BOARD: P7H55D-M EVO VER: 0115 DATE: 10...
... system while updating the BIOS to switch between drives until the correct BIOS file is found . To update the BIOS using this utility, download the latest BIOS from the ASUS website at www.asus.com. Chapter 3 3-4 Chapter 3: BIOS setup ASUSTek EZ Flash 2 BIOS ROM Utility V4.10 FLASH TYPE: MXIC 25L1605A Current ROM BOARD: P7H55D-M EVO VER: 0115 DATE: 10...

User Manual
Page 67
... updating process. Insert the motherboard support DVD to the optical drive, or the USB flash drive containing the BIOS file to the USB port. 3. Chapter 3 ASUS P7H55D-M EVO 3-5 You can cause system boot failure! Turn on the ASUS official website. Turn off the system after the utility completes the updating process and power on again...
... updating process. Insert the motherboard support DVD to the optical drive, or the USB flash drive containing the BIOS file to the USB port. 3. Chapter 3 ASUS P7H55D-M EVO 3-5 You can cause system boot failure! Turn on the ASUS official website. Turn off the system after the utility completes the updating process and power on again...

User Manual
Page 68
... select the optical drive as the boot device. At the FreeDOS prompt, type d: and press to switch the disk from the ASUS website at http:// support.asus.com and save the BIOS file to a floppy disk due to Drive D (USB flash drive). Turn off the computer and disconnect all SATA hard disk drives...
... select the optical drive as the boot device. At the FreeDOS prompt, type d: and press to switch the disk from the ASUS website at http:// support.asus.com and save the BIOS file to a floppy disk due to Drive D (USB flash drive). Turn off the computer and disconnect all SATA hard disk drives...


