
User Manual
Page 17
... users an extremely silent and cooling experience with easy ways to install computer components, update the BIOS, or back up your favorite settings. ASUS P5QD Turbo 1-3 What's more stable and enhance the overclocking capability. ASUS EPU The ASUS EPU (Energy Processing Unit) provides total system power management by detecting current PC loadings and intelligently moderating power usage for critical PC components in variety of useful...
... users an extremely silent and cooling experience with easy ways to install computer components, update the BIOS, or back up your favorite settings. ASUS P5QD Turbo 1-3 What's more stable and enhance the overclocking capability. ASUS EPU The ASUS EPU (Energy Processing Unit) provides total system power management by detecting current PC loadings and intelligently moderating power usage for critical PC components in variety of useful...
User Manual
Page 40
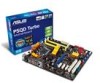
Set to pins 1-2 to work stably under the highest BIOS voltage setting before you install a new CPU and have not booted for the first time. CPU overvoltage setting (3-pin OV_CPU) This jumper allows you change the setting of the OV_CPU jumper, shut down the computer and move the cap back to pins 2-3. • The system may cause the system to halt. Chapter 2 Pins 2-3 (Default) Pins 1-2 (OV Enabled) OV_CPU up to 1.70V up...
Set to pins 1-2 to work stably under the highest BIOS voltage setting before you install a new CPU and have not booted for the first time. CPU overvoltage setting (3-pin OV_CPU) This jumper allows you change the setting of the OV_CPU jumper, shut down the computer and move the cap back to pins 2-3. • The system may cause the system to halt. Chapter 2 Pins 2-3 (Default) Pins 1-2 (OV Enabled) OV_CPU up to 1.70V up...
User Manual
Page 48
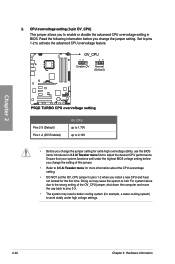
..., port 1) connector on the motherboard. Chapter 2 Before using the Drive Xpert function, ensure that you can be detected. • Clear all original data/partitions in both the status of the hard disks connected to the SATA_E1 connector (orange, port 0) can create an EZ Backup or a Super Speed configuration with any mode changes. 3. If you installed Serial ATA hard disk drives, you have connected the SATA signal cables and installed SATA hard disk drives. • Drive Xpert function is not supported...
..., port 1) connector on the motherboard. Chapter 2 Before using the Drive Xpert function, ensure that you can be detected. • Clear all original data/partitions in both the status of the hard disks connected to the SATA_E1 connector (orange, port 0) can create an EZ Backup or a Super Speed configuration with any mode changes. 3. If you installed Serial ATA hard disk drives, you have connected the SATA signal cables and installed SATA hard disk drives. • Drive Xpert function is not supported...

User Manual
Page 59
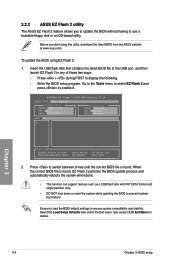
... error message appears on the screen during the system bootup and requests you need to manage and update the motherboard BIOS setup program. 1. ASUS CrashFree BIOS utility: Restores the BIOS using the ASUS Update utility. In normal circumstances, the default BIOS settings apply to most conditions to provide enhancements on these utilities. Copy the original motherboard BIOS using the motherboard support DVD or a USB flash drive when the BIOS file fails or gets corrupted. Carefully follow the instructions of a trained service...
... error message appears on the screen during the system bootup and requests you need to manage and update the motherboard BIOS setup program. 1. ASUS CrashFree BIOS utility: Restores the BIOS using the ASUS Update utility. In normal circumstances, the default BIOS settings apply to most conditions to provide enhancements on these utilities. Copy the original motherboard BIOS using the motherboard support DVD or a USB flash drive when the BIOS file fails or gets corrupted. Carefully follow the instructions of a trained service...

User Manual
Page 60
... motherboard BIOS in the optical drive. 2. Quit all Windows® applications before you to your system. Updating the BIOS through the Internet To update the BIOS through a network or an Internet Service Provider (ISP). ASUS Update requires an Internet connection either through the Internet: 1. Place the support DVD in Windows® environment. From the Main menu, click the Utilities tab, then click Install ASUS Update VX.XX.XX. 3. The ASUS Update utility allows you update the BIOS using...
... motherboard BIOS in the optical drive. 2. Quit all Windows® applications before you to your system. Updating the BIOS through the Internet To update the BIOS through a network or an Internet Service Provider (ISP). ASUS Update requires an Internet connection either through the Internet: 1. Place the support DVD in Windows® environment. From the Main menu, click the Utilities tab, then click Install ASUS Update VX.XX.XX. 3. The ASUS Update utility allows you update the BIOS using...
User Manual
Page 62
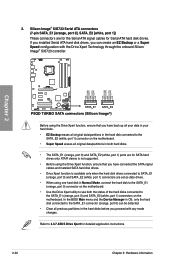
... Flash 2 BIOS ROM Utility V3.34 FLASH TYPE: MXIC 25L8005 Current ROM BOARD: P5QD Turbo VER: 0206 DATE: 02/13/2009 Update ROM BOARD: Unknown VER: Unknown DATE: Unknown PATH: A:\ A: Note [Enter] Select or Load [Tab] Switch [V] Drive Info [Up/Down/Home/End] Move [B] Backup [Esc] Exit 2. 3.2.2 ASUS EZ Flash 2 utility The ASUS EZ Flash 2 feature allows you start using EZ Flash 2: 1. Ensure to load the BIOS default settings to display the following. • Enter the BIOS setup program. Press to prevent system boot failure...
... Flash 2 BIOS ROM Utility V3.34 FLASH TYPE: MXIC 25L8005 Current ROM BOARD: P5QD Turbo VER: 0206 DATE: 02/13/2009 Update ROM BOARD: Unknown VER: Unknown DATE: Unknown PATH: A:\ A: Note [Enter] Select or Load [Tab] Switch [V] Drive Info [Up/Down/Home/End] Move [B] Backup [Esc] Exit 2. 3.2.2 ASUS EZ Flash 2 utility The ASUS EZ Flash 2 feature allows you start using EZ Flash 2: 1. Ensure to load the BIOS default settings to display the following. • Enter the BIOS setup program. Press to prevent system boot failure...
User Manual
Page 66
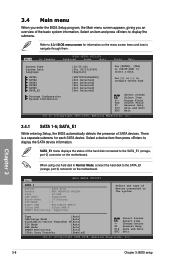
...) M[Auto] PIO Mode [Auto] DMA Mode [Auto] SMART Monitoring [Auto] 32Bit Data Transfer [Enabled] Select Screen Select Item +- Select an item and press to the SATA_E1 (ornage, port 0) connector on the motherboard. There is a separate submenu for information on the motherboard. SATA_E1 menu displays the status of device connected to configure System Time. SATA_E1 While entering Setup, the BIOS automatically detects the presence of the basic system information. BIOS SETUP UTILITY Main Ai Tweaker Advanced Power Boot Tools...
...) M[Auto] PIO Mode [Auto] DMA Mode [Auto] SMART Monitoring [Auto] 32Bit Data Transfer [Enabled] Select Screen Select Item +- Select an item and press to the SATA_E1 (ornage, port 0) connector on the motherboard. There is a separate submenu for information on the motherboard. SATA_E1 menu displays the status of device connected to configure System Time. SATA_E1 While entering Setup, the BIOS automatically detects the presence of the basic system information. BIOS SETUP UTILITY Main Ai Tweaker Advanced Power Boot Tools...
User Manual
Page 68
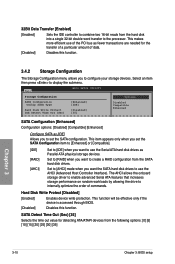
... accessed through BIOS. [Disabled] Disables this function. 3.4.2 Storage Configuration The Storage Configuration menu allows you want to set the SATA Configuration item to [Enhanced] or [Compatible]. [IDE] [RAID] [AHCI] Set to [IDE] when you want to use the AHCI (Advanced Host Controller Interface). 32Bit Data Transfer [Enabled] [Enabled] Sets the IDE controller to combine two 16-bit reads from the hard disk into a single 32-bit double word transfer to internally optimize the order of data. [Disabled] Disables this function. The AHCI allows the onboard storage driver...
... accessed through BIOS. [Disabled] Disables this function. 3.4.2 Storage Configuration The Storage Configuration menu allows you want to set the SATA Configuration item to [Enhanced] or [Compatible]. [IDE] [RAID] [AHCI] Set to [IDE] when you want to use the AHCI (Advanced Host Controller Interface). 32Bit Data Transfer [Enabled] [Enabled] Sets the IDE controller to combine two 16-bit reads from the hard disk into a single 32-bit double word transfer to internally optimize the order of data. [Disabled] Disables this function. The AHCI allows the onboard storage driver...
User Manual
Page 69
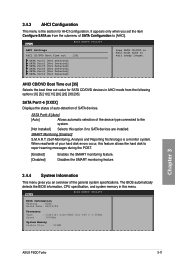
.../13/09 Processor Type : Intel(R) Core(TM)2 Duo CPU @ 3.00GHz Speed : 3000MHz System Memory Usable Size : 512MB Chapter 3 ASUS P5QD Turbo 3-11 Main BIOS SETUP UTILITY AHCI Settings AHCI CD/DVD Boot Time out [35] Some SATA CD/DVD in AHCI mode from the submenu of SATA Configuration to wait ready longer. Disables the SMART monitoring feature. 3.4.4 System Information This menu gives you set the item Configure SATA as from the following options: [0] [5] [10] [15] [20] [25] [30] [35] SATA Port1-6 [XXXX] Displays the status...
.../13/09 Processor Type : Intel(R) Core(TM)2 Duo CPU @ 3.00GHz Speed : 3000MHz System Memory Usable Size : 512MB Chapter 3 ASUS P5QD Turbo 3-11 Main BIOS SETUP UTILITY AHCI Settings AHCI CD/DVD Boot Time out [35] Some SATA CD/DVD in AHCI mode from the submenu of SATA Configuration to wait ready longer. Disables the SMART monitoring feature. 3.4.4 System Information This menu gives you set the item Configure SATA as from the following options: [0] [5] [10] [15] [20] [25] [30] [35] SATA Port1-6 [XXXX] Displays the status...

User Manual
Page 70
BIOS SETUP UTILITY Main Ai Tweaker Advanced Power Boot Tools Exit Configure System Performance Settings Ai Overclock Tuner [Auto] CPU Ratio Setting [Auto] FSB Strap to display the following items: CPU GTL Reference CPU PLL Voltage FSB Termination Voltage DRAM Voltage NB Voltage SB Voltage PCIE SATA Voltage [Auto] [Auto] [Auto] [Auto] [Auto] [Auto] [Auto] Load-Line Calibration [Auto] CPU Spread Spectrum [Auto] PCIE Spread Spectrum [Auto] CPU Clock Skew [Auto] NB Clock Skew [Auto] CPU Margin Enhancement [Optimized] Select Screen Select Item +- ...
BIOS SETUP UTILITY Main Ai Tweaker Advanced Power Boot Tools Exit Configure System Performance Settings Ai Overclock Tuner [Auto] CPU Ratio Setting [Auto] FSB Strap to display the following items: CPU GTL Reference CPU PLL Voltage FSB Termination Voltage DRAM Voltage NB Voltage SB Voltage PCIE SATA Voltage [Auto] [Auto] [Auto] [Auto] [Auto] [Auto] [Auto] Load-Line Calibration [Auto] CPU Spread Spectrum [Auto] PCIE Spread Spectrum [Auto] CPU Clock Skew [Auto] NB Clock Skew [Auto] CPU Margin Enhancement [Optimized] Select Screen Select Item +- ...
User Manual
Page 76
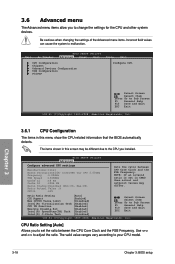
... Ratio Setting [Auto] C1E Support [Enabled] Max CPUID Value Limit [Disabled] Intel(R) Virtualization Tech [Enabled] CPU TM Function [Enabled] Execute Disable Bit [Enabled] Intel(R) SpeedStep(TM) Tech [Enabled] Intel(R) C-State Tech [Disabled] Select Screen Select Item Enter Go to change the settings for the CPU and other system devices. Be cautious when changing the settings of the Advanced menu items. Incorrect field values can cause the system to adjust the ratio. BIOS SETUP UTILITY Main Ai Tweaker Advanced Power Boot...
... Ratio Setting [Auto] C1E Support [Enabled] Max CPUID Value Limit [Disabled] Intel(R) Virtualization Tech [Enabled] CPU TM Function [Enabled] Execute Disable Bit [Enabled] Intel(R) SpeedStep(TM) Tech [Enabled] Intel(R) C-State Tech [Disabled] Select Screen Select Item Enter Go to change the settings for the CPU and other system devices. Be cautious when changing the settings of the Advanced menu items. Incorrect field values can cause the system to adjust the ratio. BIOS SETUP UTILITY Main Ai Tweaker Advanced Power Boot...
User Manual
Page 79
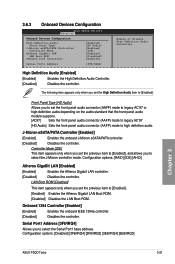
... LAN Boot ROM. [Disabled] Disables the LAN Boot ROM. Configuration options: [RAID] [IDE] [AHCI] Atheros GigaBit LAN [Enabled] [Enabled] Enables the Atheros Gigabit LAN controller. [Disabled] Disables the controller. Configuration options: [Disabled] [3F8/IRQ4] [2F8/IRQ3] [3E8/IRQ4] [2E8/IRQ3] Chapter 3 ASUS P5QD Turbo 3-21 3.6.3 Onboard Devices Configuration BIOS SETUP UTILITY Advanced Onboard Devices Configuration High Definition Audio Front Panel Type J-Micron eSATA/PATA Controller Controller Mode Atheros GigaBit LAN LAN Boot ROM Onboard 1394 Controller [Enabled...
... LAN Boot ROM. [Disabled] Disables the LAN Boot ROM. Configuration options: [RAID] [IDE] [AHCI] Atheros GigaBit LAN [Enabled] [Enabled] Enables the Atheros Gigabit LAN controller. [Disabled] Disables the controller. Configuration options: [Disabled] [3F8/IRQ4] [2F8/IRQ3] [3E8/IRQ4] [2E8/IRQ3] Chapter 3 ASUS P5QD Turbo 3-21 3.6.3 Onboard Devices Configuration BIOS SETUP UTILITY Advanced Onboard Devices Configuration High Definition Audio Front Panel Type J-Micron eSATA/PATA Controller Controller Mode Atheros GigaBit LAN LAN Boot ROM Onboard 1394 Controller [Enabled...
User Manual
Page 85
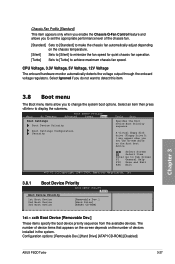
... available devices. Boot Settings Configuration Security A virtual floppy disk drive (Floppy Drive B: ) may appear when you to change the system boot options. Select Screen Select Item Enter Go to display the submenu. Chassis Fan Profile [Standard] This item appears only when you enable the Chassis Q-Fan Control feature and allows you do not want to detect this item. Configuration options: [Removable Dev.] [Hard Drive] [ATAPI CD-ROM] [Disabled] ASUS P5QD Turbo 3-27 Select Ignored if you to set the CD-ROM drive as the first boot device. BIOS SETUP UTILITY Main...
... available devices. Boot Settings Configuration Security A virtual floppy disk drive (Floppy Drive B: ) may appear when you to change the system boot options. Select Screen Select Item Enter Go to display the submenu. Chassis Fan Profile [Standard] This item appears only when you enable the Chassis Q-Fan Control feature and allows you do not want to detect this item. Configuration options: [Removable Dev.] [Hard Drive] [ATAPI CD-ROM] [Disabled] ASUS P5QD Turbo 3-27 Select Ignored if you to set the CD-ROM drive as the first boot device. BIOS SETUP UTILITY Main...
User Manual
Page 87
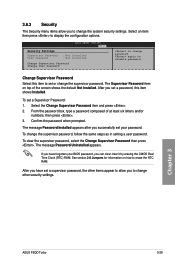
... password box, type a password composed of the screen shows the default Not Installed. To clear the supervisor password, select the Change Supervisor Password then press . See section 2.6 Jumpers for information on top of at least six letters and/or numbers, then press . 3. After you have forgotten your BIOS password, you successfully set your password. Chapter 3 ASUS P5QD Turbo 3-29 BIOS SETUP UTILITY Boot Security Settings Supervisor Password : Not Installed User Password : Not Installed Change Supervisor Password Change User Password to disable password. The...
... password box, type a password composed of the screen shows the default Not Installed. To clear the supervisor password, select the Change Supervisor Password then press . See section 2.6 Jumpers for information on top of at least six letters and/or numbers, then press . 3. After you have forgotten your BIOS password, you successfully set your password. Chapter 3 ASUS P5QD Turbo 3-29 BIOS SETUP UTILITY Boot Security Settings Supervisor Password : Not Installed User Password : Not Installed Change Supervisor Password Change User Password to disable password. The...

User Manual
Page 89
.... BIOS SETUP UTILITY Main Ai Tweaker Advanced Power Boot Tools Exit ASUS EZ Flash 2 Drive Xpert Mode Update Express Gate Enter OS Timer Reset User Data [Last Setting] [Enabled] [10 Seconds] [No] Press ENTER to run ASUS EZ Flash 2. For more details, refer to select and update BIOS. ASUSTek EZ Flash 2 BIOS ROM Utility V3.34 FLASH TYPE: MXIC 25L8005 Current ROM BOARD: P5QD Turbo VER: 0206 DATE: 02/13/2009 Update ROM BOARD: Unknown VER: Unknown DATE: Unknown PATH: A:\ A: Note [Enter] Select or Load [Tab] Switch [V] Drive Info...
.... BIOS SETUP UTILITY Main Ai Tweaker Advanced Power Boot Tools Exit ASUS EZ Flash 2 Drive Xpert Mode Update Express Gate Enter OS Timer Reset User Data [Last Setting] [Enabled] [10 Seconds] [No] Press ENTER to run ASUS EZ Flash 2. For more details, refer to select and update BIOS. ASUSTek EZ Flash 2 BIOS ROM Utility V3.34 FLASH TYPE: MXIC 25L8005 Current ROM BOARD: P5QD Turbo VER: 0206 DATE: 02/13/2009 Update ROM BOARD: Unknown VER: Unknown DATE: Unknown PATH: A:\ A: Note [Enter] Select or Load [Tab] Switch [V] Drive Info...
User Manual
Page 95
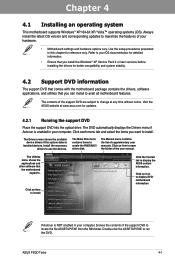
... system stability. 4.2 Support DVD information The support DVD that comes with the motherboard package contains the drivers, software applications, and utilities that the motherboard supports. Refer to your hardware. • Motherboard settings and hardware options vary. Chapter 4: Chapter 4 Software support 4.1 Installing an operating system This motherboard supports Windows® XP/ 64-bit XP/ Vista™ operating systems (OS). Always install the latest OS version and corresponding updates to create the RAID/AHCI driver disk. Use the setup procedures presented...
... system stability. 4.2 Support DVD information The support DVD that comes with the motherboard package contains the drivers, software applications, and utilities that the motherboard supports. Refer to your hardware. • Motherboard settings and hardware options vary. Chapter 4: Chapter 4 Software support 4.1 Installing an operating system This motherboard supports Windows® XP/ 64-bit XP/ Vista™ operating systems (OS). Always install the latest OS version and corresponding updates to create the RAID/AHCI driver disk. Use the setup procedures presented...
User Manual
Page 103
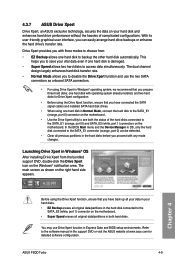
... main screen as onboard SATA connectors. • For using the Drive Xpert function, ensure that you prepare three hard disks: one hard disk to choose from the bundled support DVD, double-click the Drive Xpert icon on the right hand side appears. ASUS P5QD Turbo 4-9 Drive Xpert provides you to save your hard disks. • EZ Backup erases all original data/partitions in the hard disk connected to the SATA_E2 (white, port 1) connector on the motherboard...
... main screen as onboard SATA connectors. • For using the Drive Xpert function, ensure that you prepare three hard disks: one hard disk to choose from the bundled support DVD, double-click the Drive Xpert icon on the right hand side appears. ASUS P5QD Turbo 4-9 Drive Xpert provides you to save your hard disks. • EZ Backup erases all original data/partitions in the hard disk connected to the SATA_E2 (white, port 1) connector on the motherboard...

User Manual
Page 104
... the motherboard USB port before use. • ASUS Express Gate supports SATA devices in the support DVD or click environment for detailed software instructions. Refer to the Internet, Skype, and viewing your computer, you will be at the Express Gate menu where you power on SATA HDDs, USB HDDs and Flash drives with the OpenGL standard. See chapter 2 for the exact location of onboard SATA ports. • ASUS Express Gate supports file uploading from the motherboard support DVD before turning on USB HDDs and Flash drives, connect the drives to...
... the motherboard USB port before use. • ASUS Express Gate supports SATA devices in the support DVD or click environment for detailed software instructions. Refer to the Internet, Skype, and viewing your computer, you will be at the Express Gate menu where you power on SATA HDDs, USB HDDs and Flash drives with the OpenGL standard. See chapter 2 for the exact location of onboard SATA ports. • ASUS Express Gate supports file uploading from the motherboard support DVD before turning on USB HDDs and Flash drives, connect the drives to...

User Manual
Page 106
... cables. 3. Refer to section 4.5 Creating a RAID driver disk for six independent Serial ATA channels. 4.4.1 RAID definitions RAID 0 (Data striping) optimizes two identical hard disk drives to a hard disk drive included in parallel, interleaved stacks. Install the SATA hard disks into the drive bays. 2. Intel® Matrix Storage. RAID 1 (Data mirroring) copies and maintains an identical image of data from the support DVD to a USB floppy disk before installing the operating system. To install the SATA hard disks for a RAID configuration: 1. Chapter 4 4-12 Chapter 4: Software...
... cables. 3. Refer to section 4.5 Creating a RAID driver disk for six independent Serial ATA channels. 4.4.1 RAID definitions RAID 0 (Data striping) optimizes two identical hard disk drives to a hard disk drive included in parallel, interleaved stacks. Install the SATA hard disks into the drive bays. 2. Intel® Matrix Storage. RAID 1 (Data mirroring) copies and maintains an identical image of data from the support DVD to a USB floppy disk before installing the operating system. To install the SATA hard disks for a RAID configuration: 1. Chapter 4 4-12 Chapter 4: Software...
User Manual
Page 112
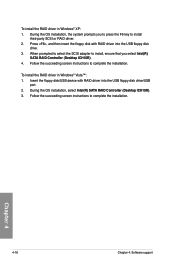
...SATA RAID Controller (Desktop ICH10R). 4. Follow the succeeding screen instructions to install third-party SCSI or RAID driver. 2. Follow the succeeding screen instructions to install, ensure that you to press the F6 key to complete the installation. Insert the floppy disk/USB device with RAID driver into the USB floppy disk drive/USB port. 2. Chapter 4 4-18 Chapter 4: Software support When prompted to select the SCSI adapter to complete the installation. During the OS installation, select Intel(R) SATA RAID Controller (Desktop ICH10R). 3. To install the RAID driver in Windows...
...SATA RAID Controller (Desktop ICH10R). 4. Follow the succeeding screen instructions to install third-party SCSI or RAID driver. 2. Follow the succeeding screen instructions to install, ensure that you to press the F6 key to complete the installation. Insert the floppy disk/USB device with RAID driver into the USB floppy disk drive/USB port. 2. Chapter 4 4-18 Chapter 4: Software support When prompted to select the SCSI adapter to complete the installation. During the OS installation, select Intel(R) SATA RAID Controller (Desktop ICH10R). 3. To install the RAID driver in Windows...


