User Manual
Page 4
... dual function power switch 2-38 Chapter 3: BIOS setup 3.1 Managing and updating your BIOS 3-1 3.1.1 ASUS Update utility 3-1 3.1.2 ASUS EZ Flash 2 utility 3-4 3.1.3 AFUDOS utility 3-5 3.1.4 ASUS CrashFree BIOS 3 utility 3-7 3.2 BIOS setup program 3-8 3.2.1 BIOS menu screen 3-9 3.2.2 Menu bar... 3-9 3.2.3 Navigation keys 3-9 3.2.4 Menu items 3-10 3.2.5 Sub-menu items 3-10 3.2.6 Configuration fields 3-10 3.2.7 Pop-up window 3-10 3.2.8 Scroll bar 3-...
... dual function power switch 2-38 Chapter 3: BIOS setup 3.1 Managing and updating your BIOS 3-1 3.1.1 ASUS Update utility 3-1 3.1.2 ASUS EZ Flash 2 utility 3-4 3.1.3 AFUDOS utility 3-5 3.1.4 ASUS CrashFree BIOS 3 utility 3-7 3.2 BIOS setup program 3-8 3.2.1 BIOS menu screen 3-9 3.2.2 Menu bar... 3-9 3.2.3 Navigation keys 3-9 3.2.4 Menu items 3-10 3.2.5 Sub-menu items 3-10 3.2.6 Configuration fields 3-10 3.2.7 Pop-up window 3-10 3.2.8 Scroll bar 3-...
User Manual
Page 6
... Direct Link 4-28 4.3.10 ASUS Drive Xpert 4-30 4.3.11 ASUS Express Gate 4-41 4.4 RAID configurations 4-51 4.4.1 RAID definitions 4-51 4.4.2 Installing Serial ATA hard disks 4-52 4.4.3 Intel® RAID configurations 4-52 4.5 Creating a RAID driver disk 4-60 4.5.1 Creating a RAID driver disk without entering the OS.... 4-60 4.5.2 Creating a RAID driver disk in Windows 4-60 Appendix: CPU...
... Direct Link 4-28 4.3.10 ASUS Drive Xpert 4-30 4.3.11 ASUS Express Gate 4-41 4.4 RAID configurations 4-51 4.4.1 RAID definitions 4-51 4.4.2 Installing Serial ATA hard disks 4-52 4.4.3 Intel® RAID configurations 4-52 4.5 Creating a RAID driver disk 4-60 4.5.1 Creating a RAID driver disk without entering the OS.... 4-60 4.5.2 Creating a RAID driver disk in Windows 4-60 Appendix: CPU...
User Manual
Page 11
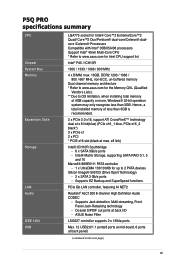
... 8-channel High Definition Audio CODEC - ASUS Noise Filter LSI3227 controller supports 2 x 1394a ports Max. 12 USB2.0/1.1 ports(6 ports at mid-board, 6 ports at back I/O - Coaxial S/PDIF out ports at back panel) (continued on the next page) xi P5Q PRO specifications summary CPU Chipset System Bus Memory... for up to OS limitation, when installing total memory of less than 3GB. Hence, a total installed memory of 4GB capacity or more, Windows® 32-bit operation system may only recognize less than 3GB is recommended. 2 x PCIe 2.0 x16, support ATI CrossFireX™ technology ...
... 8-channel High Definition Audio CODEC - ASUS Noise Filter LSI3227 controller supports 2 x 1394a ports Max. 12 USB2.0/1.1 ports(6 ports at mid-board, 6 ports at back I/O - Coaxial S/PDIF out ports at back panel) (continued on the next page) xi P5Q PRO specifications summary CPU Chipset System Bus Memory... for up to OS limitation, when installing total memory of less than 3GB. Hence, a total installed memory of 4GB capacity or more, Windows® 32-bit operation system may only recognize less than 3GB is recommended. 2 x PCIe 2.0 x16, support ATI CrossFireX™ technology ...

User Manual
Page 19
...This motherboard supports...and e-mails just before leaving your house. It's a unique motherboard built-in touch with friends, or quickly check on the headphone ...on the system configuration. You can now talk to different destinations. ASUS P5Q PRO 1-3 IEEE 1394a support The IEEE 1394a interface provides high speed ...22 and 2-23 for details. See page 2-32 for details. ASUS Express Gate Taking only 5 seconds to go online from bootup, ... See page 2-30 for details. S/PDIF digital sound ready This motherboard provides convenient connectivity to external home theater audio systems via coaxial S/...
...This motherboard supports...and e-mails just before leaving your house. It's a unique motherboard built-in touch with friends, or quickly check on the headphone ...on the system configuration. You can now talk to different destinations. ASUS P5Q PRO 1-3 IEEE 1394a support The IEEE 1394a interface provides high speed ...22 and 2-23 for details. See page 2-32 for details. ASUS Express Gate Taking only 5 seconds to go online from bootup, ... See page 2-30 for details. S/PDIF digital sound ready This motherboard provides convenient connectivity to external home theater audio systems via coaxial S/...

User Manual
Page 23
...2 Allows the user to adjust the NB Voltage, FSB termination Voltage, CPU PLL Voltage and the DRAM Voltage in Windows environment without the hassle of the motherboard BIOS allows automatic re-setting to the BIOS default settings in case the system hangs due to launch the utility and ...update the BIOS without preparing a bootable diskette or using an OS-based flash utility. When the system hangs due to open the system chassis and clear the RTC data. ASUS P5Q PRO...
...2 Allows the user to adjust the NB Voltage, FSB termination Voltage, CPU PLL Voltage and the DRAM Voltage in Windows environment without the hassle of the motherboard BIOS allows automatic re-setting to the BIOS default settings in case the system hangs due to launch the utility and ...update the BIOS without preparing a bootable diskette or using an OS-based flash utility. When the system hangs due to open the system chassis and clear the RTC data. ASUS P5Q PRO...

User Manual
Page 32
... PnP cap unless you are installing a CPU. Position the CPU over the socket, making sure that the gold triangle is released from the load plate window to prevent bending the connectors on the socket and damaging the CPU! Lift the load lever in only one correct orientation.
... PnP cap unless you are installing a CPU. Position the CPU over the socket, making sure that the gold triangle is released from the load plate window to prevent bending the connectors on the socket and damaging the CPU! Lift the load lever in only one correct orientation.

User Manual
Page 37
...modules may install a maximum of 4 GB DIMMs on each slot. 64-bit Windows® XP Professional x64 Edition Windows® Vista x64 Edition • The default memory operation frequency is recommended. • This motherboard does not support memory modules made up of 4GB capacity or more... It recommended that you obtain memory modules from yellow slots for better overclocking capability. • Always install DIMMs with the same CAS latency. ASUS P5Q PRO 2-11 2.4.2 Memory configurations You may install 512 MB, 1 GB, 2 GB and 4GB unbuffered non‑ECC DDR2 DIMMs into the DIMM ...
...modules may install a maximum of 4 GB DIMMs on each slot. 64-bit Windows® XP Professional x64 Edition Windows® Vista x64 Edition • The default memory operation frequency is recommended. • This motherboard does not support memory modules made up of 4GB capacity or more... It recommended that you obtain memory modules from yellow slots for better overclocking capability. • Always install DIMMs with the same CAS latency. ASUS P5Q PRO 2-11 2.4.2 Memory configurations You may install 512 MB, 1 GB, 2 GB and 4GB unbuffered non‑ECC DDR2 DIMMs into the DIMM ...
User Manual
Page 53
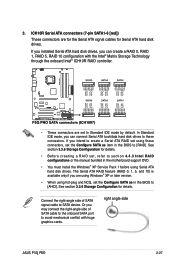
... right angle side ASUS P5Q PRO 2-27 See section 3.3.6 Storage Configuration for Serial ATA hard disk drives. The Serial ATA RAID feature (RAID 0, 1, 5, and 10) is available only if you may connect the right-angle side of SATA signal cable to [RAID]. Or you are using Windows® XP or...pin SATA1-6 [red]) These connectors are set , refer to section 4.4.3 Intel RAID configurations or the manual bundled in the motherboard support DVD. • You must install the Windows® XP Service Pack 1 before using hot-plug and NCQ, set the Configure SATA as in the BIOS to SATA ...
... right angle side ASUS P5Q PRO 2-27 See section 3.3.6 Storage Configuration for Serial ATA hard disk drives. The Serial ATA RAID feature (RAID 0, 1, 5, and 10) is available only if you may connect the right-angle side of SATA signal cable to [RAID]. Or you are using Windows® XP or...pin SATA1-6 [red]) These connectors are set , refer to section 4.4.3 Intel RAID configurations or the manual bundled in the motherboard support DVD. • You must install the Windows® XP Service Pack 1 before using hot-plug and NCQ, set the Configure SATA as in the BIOS to SATA ...

User Manual
Page 64
...button then select ShutDown. 2. Refer to shut down the computer. 3. Click the Start button then select Turn Off Computer. 2. 2.9 Turning off after Windows® shuts down. 2.9.2 Using the dual function power switch While the system is ON, pressing the power switch for less than four seconds lets the...details. 2-38 Chapter 2: Hardware information The power supply should turn off the computer 2.9.1 Using the OS shut down function If you are using Windows® XP: 1. Click the Turn Off button to section 3.6 Power Menu for more than four seconds puts the system to sleep mode or...
...button then select ShutDown. 2. Refer to shut down the computer. 3. Click the Start button then select Turn Off Computer. 2. 2.9 Turning off after Windows® shuts down. 2.9.2 Using the dual function power switch While the system is ON, pressing the power switch for less than four seconds lets the...details. 2-38 Chapter 2: Hardware information The power supply should turn off the computer 2.9.1 Using the OS shut down function If you are using Windows® XP: 1. Click the Turn Off button to section 3.6 Power Menu for more than four seconds puts the system to sleep mode or...

User Manual
Page 67
... (Updates the BIOS in the optical drive. ASUS EZ Flash 2 (Updates the BIOS using the ASUS Update or AFUDOS utilities. 3.1.1 ASUS Update utility The ASUS Update is copied to restore the BIOS in Windows® environment. ASUS P5Q PRO 3-1 The ASUS Update utility is a utility that comes with the motherboard package. Copy the original motherboard BIOS using a floppy disk or USB...
... (Updates the BIOS in the optical drive. ASUS EZ Flash 2 (Updates the BIOS using the ASUS Update or AFUDOS utilities. 3.1.1 ASUS Update utility The ASUS Update is copied to restore the BIOS in Windows® environment. ASUS P5Q PRO 3-1 The ASUS Update utility is a utility that comes with the motherboard package. Copy the original motherboard BIOS using a floppy disk or USB...

User Manual
Page 68
Updating the BIOS through the Internet To update the BIOS through the Internet: 1. Select Update BIOS from the drop‑down you update the BIOS using this utility. Quit all Windows® applications before you to avoid network traffic, or menu, then click Next. click Auto Select. Select the ASUS FTP site nearest Internet option from the 3. Launch the ASUS Update utility from the Windows® desktop by clicking Start > Programs > ASUS > ASUSUpdate > ASUSUpdate. Click Next. 3-2 Chapter 3: BIOS setup The ASUS Update main window appears. 2.
Updating the BIOS through the Internet To update the BIOS through the Internet: 1. Select Update BIOS from the drop‑down you update the BIOS using this utility. Quit all Windows® applications before you to avoid network traffic, or menu, then click Next. click Auto Select. Select the ASUS FTP site nearest Internet option from the 3. Launch the ASUS Update utility from the Windows® desktop by clicking Start > Programs > ASUS > ASUSUpdate > ASUSUpdate. Click Next. 3-2 Chapter 3: BIOS setup The ASUS Update main window appears. 2.

User Manual
Page 69
...complete the update process. The ASUS Update main window appears. 2. Locate the BIOS file from the Windows® desktop by clicking Start > Programs > ASUS > ASUSUpdate > ASUSUpdate. Launch the ASUS Update utility from the Open window, then click Open. 4. ...Follow the screen instructions to complete the update process. Updating the BIOS through a BIOS file To update the BIOS through the Internet. Select Update BIOS from a file option from the drop‑down menu, then click Next. 3. P5QPRO.ROM P5QPRO ASUS P5Q PRO...
...complete the update process. The ASUS Update main window appears. 2. Locate the BIOS file from the Windows® desktop by clicking Start > Programs > ASUS > ASUSUpdate > ASUSUpdate. Launch the ASUS Update utility from the Open window, then click Open. 4. ...Follow the screen instructions to complete the update process. Updating the BIOS through a BIOS file To update the BIOS through the Internet. Select Update BIOS from a file option from the drop‑down menu, then click Next. 3. P5QPRO.ROM P5QPRO ASUS P5Q PRO...

User Manual
Page 76
... BIOS setup You cannot select an item that menu. Press the Up/Down arrow keys or / keys to select a field. Refer to 3.2.7 Pop-up window. 3.2.7 Pop-up window with the configuration options for the menu items. If an item is enclosed in .] [English] [Not Detected] [Not Detected] [Not Detected] [Not ...items (Advanced, Power, Boot, and Exit) on the right side of the field opposite the item. Use [+] or [-] to display a pop-up window Select a menu item then press to configure system Time. 3.2.5 Sub-menu items Main menu items A solid triangle before each item on any menu screen means...
... BIOS setup You cannot select an item that menu. Press the Up/Down arrow keys or / keys to select a field. Refer to 3.2.7 Pop-up window. 3.2.7 Pop-up window with the configuration options for the menu items. If an item is enclosed in .] [English] [Not Detected] [Not Detected] [Not Detected] [Not ...items (Advanced, Power, Boot, and Exit) on the right side of the field opposite the item. Use [+] or [-] to display a pop-up window Select a menu item then press to configure system Time. 3.2.5 Sub-menu items Main menu items A solid triangle before each item on any menu screen means...

User Manual
Page 107
...Reset User Data [No] Allows you to enable or disable the ASUS Express Gate feature. This is a unique instant-on environment that provides quick access to stay at the Express Gate's first screen before starting Windows or other installed OS. The first time wizard will be cleared ...the next time you enter the Express Gate environment after clearing its settings. The ASUS Express Gate feature is useful in the rare case where corrupt settings prevent the Express Gate environment from launching properly. ASUS P5Q PRO...
...Reset User Data [No] Allows you to enable or disable the ASUS Express Gate feature. This is a unique instant-on environment that provides quick access to stay at the Express Gate's first screen before starting Windows or other installed OS. The first time wizard will be cleared ...the next time you enter the Express Gate environment after clearing its settings. The ASUS Express Gate feature is useful in the rare case where corrupt settings prevent the Express Gate environment from launching properly. ASUS P5Q PRO...

User Manual
Page 110
... only if you do not want to save the changes while exiting. If you made to the Setup program. When you press , a confirmation window appears. Select one of the parameters on even when the PC is turned off. Select Ok to save your changes to the BIOS items. Main...selecting this menu. Select Ok to save or discard your changes before exiting. When you select this option or if you select this option, a confirmation window appears. Pressing does not immediately exit this option, a confirmation appears. 3.9 Exit menu The Exit menu items allow you to load the optimal or ...
... only if you do not want to save the changes while exiting. If you made to the Setup program. When you press , a confirmation window appears. Select one of the parameters on even when the PC is turned off. Select Ok to save your changes to the BIOS items. Main...selecting this menu. Select Ok to save or discard your changes before exiting. When you select this option or if you select this option, a confirmation window appears. Pressing does not immediately exit this option, a confirmation appears. 3.9 Exit menu The Exit menu items allow you to load the optimal or ...
User Manual
Page 113
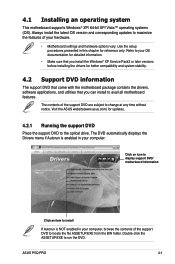
... any time without notice. The contents of your OS documentation for detailed information. • Make sure that you install the Windows® XP Service Pack2 or later versions before installing the drivers for reference only. The DVD automatically displays the Drivers menu ... with the motherboard package contains the drivers, software applications, and utilities that you can install to locate the file ASSETUP.EXE from the BIN folder. Always install the latest OS version and corresponding updates to the optical drive. ASUS P5Q PRO 4-1 Visit the ASUS website(www.asus.com) for...
... any time without notice. The contents of your OS documentation for detailed information. • Make sure that you install the Windows® XP Service Pack2 or later versions before installing the drivers for reference only. The DVD automatically displays the Drivers menu ... with the motherboard package contains the drivers, software applications, and utilities that you can install to locate the file ASSETUP.EXE from the BIN folder. Always install the latest OS version and corresponding updates to the optical drive. ASUS P5Q PRO 4-1 Visit the ASUS website(www.asus.com) for...

User Manual
Page 115
...Windows® environment. ASUS PC Probe II This smart utility monitors the fan speed, CPU temperature, and system voltages, and alerts you of the utilities through a network or an Internet Service Provider (ISP). Click to display the next page Click to return to update the motherboard... BIOS in healthy operating condition. Installation Wizard for Utilities Installs all of any detected problems. This utility helps you to the previous page ASUS InstAll - This utility requires an Internet connection either through the Installation Wizard. ASUS P5Q PRO 4-3 ...
...Windows® environment. ASUS PC Probe II This smart utility monitors the fan speed, CPU temperature, and system voltages, and alerts you of the utilities through a network or an Internet Service Provider (ISP). Click to display the next page Click to return to update the motherboard... BIOS in healthy operating condition. Installation Wizard for Utilities Installs all of any detected problems. This utility helps you to the previous page ASUS InstAll - This utility requires an Internet connection either through the Installation Wizard. ASUS P5Q PRO 4-3 ...

User Manual
Page 121
...came with the software application for more information. 4.3.1 ASUS MyLogo2™ The ASUS MyLogo2™ utility lets you customize the boot logo. Refer to use ASUS MyLogo3. When prompted, locate the new BIOS file, and then click Next. ASUS P5Q PRO 4-9 4.3 Software information Most of your boot logo....Self-Tests (POST). Launch the ASUS Update utility. Select Update BIOS from a file from the support DVD. The ASUS MyLogo3 window appears. 6. View the online help or readme file that will conveniently guide you through the installation. The ASUS MyLogo2™ is the image ...
...came with the software application for more information. 4.3.1 ASUS MyLogo2™ The ASUS MyLogo2™ utility lets you customize the boot logo. Refer to use ASUS MyLogo3. When prompted, locate the new BIOS file, and then click Next. ASUS P5Q PRO 4-9 4.3 Software information Most of your boot logo....Self-Tests (POST). Launch the ASUS Update utility. Select Update BIOS from a file from the support DVD. The ASUS MyLogo3 window appears. 6. View the online help or readme file that will conveniently guide you through the installation. The ASUS MyLogo2™ is the image ...

User Manual
Page 122
After flashing the BIOS, restart the computer to load the new boot logo. 10. When the screen returns to the ASUS Update utility, flash the original BIOS to display the new boot logo during POST. 4-10 Chapter 4: Software support Adjust the boot image to enlarge by selecting a value on it. 8. When the logo images appear on the right window pane, select an image to your desired size by clicking on the Ratio box. 9. 7.
After flashing the BIOS, restart the computer to load the new boot logo. 10. When the screen returns to the ASUS Update utility, flash the original BIOS to display the new boot logo during POST. 4-10 Chapter 4: Software support Adjust the boot image to enlarge by selecting a value on it. 8. When the logo images appear on the right window pane, select an image to your desired size by clicking on the Ratio box. 9. 7.

User Manual
Page 123
... Using the Virtual Cable Tester™ To use the the Marvell® Virtual Cable Tester™ utility: 1. ASUS P5Q PRO 4-11 VCT is detected on the Virtual Cable Tester™ main window is disabled if no problem is a cable diagnostic utility that reports LAN cable faults and shorts using the Time ...LAN port(s). • If you want the system to check the status of up to display the screen below. 3. Click Virtual Cable Tester from the Windows® desktop by clicking Start > All Programs > Marvell > Virtual Cable Tester. 2. Launch the VCT utility from the menu to 64 ns at ...
... Using the Virtual Cable Tester™ To use the the Marvell® Virtual Cable Tester™ utility: 1. ASUS P5Q PRO 4-11 VCT is detected on the Virtual Cable Tester™ main window is disabled if no problem is a cable diagnostic utility that reports LAN cable faults and shorts using the Time ...LAN port(s). • If you want the system to check the status of up to display the screen below. 3. Click Virtual Cable Tester from the Windows® desktop by clicking Start > All Programs > Marvell > Virtual Cable Tester. 2. Launch the VCT utility from the menu to 64 ns at ...


