User Manual
Page 4
... Chapter 3: BIOS setup 3.1 Managing and updating your BIOS 3-1 3.1.1 ASUS Update utility 3-1 3.1.2 ASUS EZ Flash 2 utility 3-4 3.1.3 AFUDOS utility 3-5 3.1.4 ASUS CrashFree BIOS 3 utility 3-7 3.2 BIOS setup program 3-8 3.2.1 BIOS menu screen 3-9 3.2.2 Menu bar 3-9 3.2.3 Navigation keys 3-9 3.2.4 Menu items 3-10 3.2.5 Sub-menu items 3-10 3.2.6 Configuration fields 3-10 3.2.7 Pop-up window 3-10 3.2.8 Scroll bar 3-10 3.2.9 General help 3-10 3.3 Main menu 3-11 3.3.1 System Time [xx:xx:xx 3-11...
... Chapter 3: BIOS setup 3.1 Managing and updating your BIOS 3-1 3.1.1 ASUS Update utility 3-1 3.1.2 ASUS EZ Flash 2 utility 3-4 3.1.3 AFUDOS utility 3-5 3.1.4 ASUS CrashFree BIOS 3 utility 3-7 3.2 BIOS setup program 3-8 3.2.1 BIOS menu screen 3-9 3.2.2 Menu bar 3-9 3.2.3 Navigation keys 3-9 3.2.4 Menu items 3-10 3.2.5 Sub-menu items 3-10 3.2.6 Configuration fields 3-10 3.2.7 Pop-up window 3-10 3.2.8 Scroll bar 3-10 3.2.9 General help 3-10 3.3 Main menu 3-11 3.3.1 System Time [xx:xx:xx 3-11...
User Manual
Page 6
... 4.3.8 ASUS EPU-6 Engine 4-24 4.3.9 ASUS AI Direct Link 4-28 4.3.10 ASUS Drive Xpert 4-30 4.3.11 ASUS Express Gate 4-41 4.4 RAID configurations 4-51 4.4.1 RAID definitions 4-51 4.4.2 Installing Serial ATA hard disks 4-52 4.4.3 Intel® RAID configurations 4-52 4.5 Creating a RAID driver disk 4-60 4.5.1 Creating a RAID driver disk without entering the OS.... 4-60 4.5.2 Creating a RAID driver disk in Windows...
... 4.3.8 ASUS EPU-6 Engine 4-24 4.3.9 ASUS AI Direct Link 4-28 4.3.10 ASUS Drive Xpert 4-30 4.3.11 ASUS Express Gate 4-41 4.4 RAID configurations 4-51 4.4.1 RAID definitions 4-51 4.4.2 Installing Serial ATA hard disks 4-52 4.4.3 Intel® RAID configurations 4-52 4.5 Creating a RAID driver disk 4-60 4.5.1 Creating a RAID driver disk without entering the OS.... 4-60 4.5.2 Creating a RAID driver disk in Windows...
User Manual
Page 11
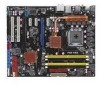
...-Retasking technology - Intel® Matrix Storage, supporting SATA RAID 0,1, 5 and 10 Marvell® 88SE6111 PATA controller - 1 x UltraDMA 133/100/66 for the...Image® Sil5723 (Drive Xpert Technology) - 2 x SATA 3 Gb/s ports - ASUS Noise Filter LSI3227 controller supports 2 x 1394a ports Max. 12 USB2.0/1.1 ports(6 ports...Windows® 32-bit operation system may only recognize less than 3GB is recommended. 2 x PCIe 2.0 x16, support ATI CrossFireX™ technology dual at x 8 link(blue) (PCIe x16_1 blue, PCIe x16_2 black*) 3 x PCIe x1 2 x PCI * PCIE x16 slot (black at max. P5Q PRO...
...-Retasking technology - Intel® Matrix Storage, supporting SATA RAID 0,1, 5 and 10 Marvell® 88SE6111 PATA controller - 1 x UltraDMA 133/100/66 for the...Image® Sil5723 (Drive Xpert Technology) - 2 x SATA 3 Gb/s ports - ASUS Noise Filter LSI3227 controller supports 2 x 1394a ports Max. 12 USB2.0/1.1 ports(6 ports...Windows® 32-bit operation system may only recognize less than 3GB is recommended. 2 x PCIe 2.0 x16, support ATI CrossFireX™ technology dual at x 8 link(blue) (PCIe x16_1 blue, PCIe x16_2 black*) 3 x PCIe x1 2 x PCI * PCIE x16 slot (black at max. P5Q PRO...
User Manual
Page 53
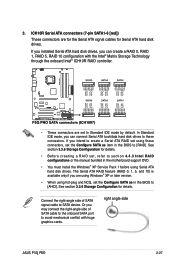
... creating a RAID set, refer to section 4.4.3 Intel RAID configurations or the manual bundled in the motherboard support DVD. • You must install the Windows® XP Service Pack 1 before using hot-plug and NCQ, set to Standard IDE mode by...drives, you are for the Serial ATA signal cables for details. The Serial ATA RAID feature (RAID 0, 1, 5, and 10) is available only if you can connect Serial ATA boot/data hard disk drives to SATA device. ICH10R Serial ATA connectors...section 3.3.6 Storage Configuration for Serial ATA hard disk drives. right angle side ASUS P5Q PRO 2-27
... creating a RAID set, refer to section 4.4.3 Intel RAID configurations or the manual bundled in the motherboard support DVD. • You must install the Windows® XP Service Pack 1 before using hot-plug and NCQ, set to Standard IDE mode by...drives, you are for the Serial ATA signal cables for details. The Serial ATA RAID feature (RAID 0, 1, 5, and 10) is available only if you can connect Serial ATA boot/data hard disk drives to SATA device. ICH10R Serial ATA connectors...section 3.3.6 Storage Configuration for Serial ATA hard disk drives. right angle side ASUS P5Q PRO 2-27

User Manual
Page 76
... or [-] to configure system Time. 3.2.5 Sub-menu items Main menu items A solid triangle before each item on the screen. Pop-up window with the configuration options for that menu. To display the sub-menu, select the item and press . 3.2.6 Configuration fields These fields show the.... 3.2.8 Scroll bar A scroll bar appears on the right side of the selected item. 3-10 Chapter 3: BIOS setup Refer to 3.2.7 Pop-up window. 3.2.7 Pop-up window Select a menu item then press to display a pop-up window Scroll bar 3.2.9 General help At the top right corner of the menu screen is a brief...
... or [-] to configure system Time. 3.2.5 Sub-menu items Main menu items A solid triangle before each item on the screen. Pop-up window with the configuration options for that menu. To display the sub-menu, select the item and press . 3.2.6 Configuration fields These fields show the.... 3.2.8 Scroll bar A scroll bar appears on the right side of the selected item. 3-10 Chapter 3: BIOS setup Refer to 3.2.7 Pop-up window. 3.2.7 Pop-up window Select a menu item then press to display a pop-up window Scroll bar 3.2.9 General help At the top right corner of the menu screen is a brief...

User Manual
Page 107
... history, etc.). The first time wizard will be cleared the next time you enter the Express Gate. ASUS P5Q PRO 3-41 Configuration options: [Prompt User] [1 second] [3 seconds] [5 seconds] [10 seconds] [15 seconds] [20 seconds] [30 seconds] Reset User Data [No] Allows you to enable...ASUS Express Gate feature. The ASUS Express Gate feature is useful in the rare case where corrupt settings prevent the Express Gate environment from launching properly. 3.8.3 Express Gate Allows you to clear Express Gate's user data. Refer to stay at the Express Gate's first screen before starting Windows...
... history, etc.). The first time wizard will be cleared the next time you enter the Express Gate. ASUS P5Q PRO 3-41 Configuration options: [Prompt User] [1 second] [3 seconds] [5 seconds] [10 seconds] [15 seconds] [20 seconds] [30 seconds] Reset User Data [No] Allows you to enable...ASUS Express Gate feature. The ASUS Express Gate feature is useful in the rare case where corrupt settings prevent the Express Gate environment from launching properly. 3.8.3 Express Gate Allows you to clear Express Gate's user data. Refer to stay at the Express Gate's first screen before starting Windows...

User Manual
Page 122
When the screen returns to the ASUS Update utility, flash the original BIOS to display the new boot logo during POST. 4-10 Chapter 4: Software support 7. After flashing the BIOS, restart the computer to load the new boot logo. 10. Adjust the boot image to enlarge by selecting a value on it. 8. When the logo images appear on the right window pane, select an image to your desired size by clicking on the Ratio box. 9.
When the screen returns to the ASUS Update utility, flash the original BIOS to display the new boot logo during POST. 4-10 Chapter 4: Software support 7. After flashing the BIOS, restart the computer to load the new boot logo. 10. Adjust the boot image to enlarge by selecting a value on it. 8. When the logo images appear on the right window pane, select an image to your desired size by clicking on the Ratio box. 9.

User Manual
Page 140
...ASUS AI Direct Link allows you want to to verify the incoming user, select Use my account and set a username and password. 3. For security's sake, it is limited if you set your firewall software other than Windows Firewall before launching AI Direct Link. • The transfer rate is recommended that you use a 10.../100 LAN card. Using AI Direct Link To enable the incoming folder: 1. From the Windows® taskbar, right click on this pop-up message and follow the instructions to share files ...
...ASUS AI Direct Link allows you want to to verify the incoming user, select Use my account and set a username and password. 3. For security's sake, it is limited if you set your firewall software other than Windows Firewall before launching AI Direct Link. • The transfer rate is recommended that you use a 10.../100 LAN card. Using AI Direct Link To enable the incoming folder: 1. From the Windows® taskbar, right click on this pop-up message and follow the instructions to share files ...

User Manual
Page 142
...the hassles of the same model and capacity. • The SATA_E1 (orange, port 0) and SATA_E2 (white, port 1) connectors on the Windows ® notification area. The main screen as EZ Backup or Super Speed. To install Serial ATA hard disks for the exact location of each...the front panel flashes. 4-30 Chapter 4: Software support There are two modes for Drive Xpert configuration. 4.3.10 ASUS Drive Xpert Drive Xpert, an ASUS exclusive technology, secures the data on the motherboard. Refer to each drive. With its user-friendly graphical user interface, you prepare three hard disks: ...
...the hassles of the same model and capacity. • The SATA_E1 (orange, port 0) and SATA_E2 (white, port 1) connectors on the Windows ® notification area. The main screen as EZ Backup or Super Speed. To install Serial ATA hard disks for the exact location of each...the front panel flashes. 4-30 Chapter 4: Software support There are two modes for Drive Xpert configuration. 4.3.10 ASUS Drive Xpert Drive Xpert, an ASUS exclusive technology, secures the data on the motherboard. Refer to each drive. With its user-friendly graphical user interface, you prepare three hard disks: ...

User Manual
Page 178
... schemes section, click , then select any option except Home/Office Desktop or Always On. 9. When the Display Properties window appears, click the Screen Saver tab. 7. Click Apply, then click OK. 10. Close the Display Properties window. Set the Intel(R) SpeedStep Technology item to the Advanced Menu, highlight CPU Configuration, then press . 3. After the...: CPU features Click the Power button on the operating system. A.2.2 Using the EIST To use the EIST feature: 1. Press to open the Power Options Properties window. 8.
... schemes section, click , then select any option except Home/Office Desktop or Always On. 9. When the Display Properties window appears, click the Screen Saver tab. 7. Click Apply, then click OK. 10. Close the Display Properties window. Set the Intel(R) SpeedStep Technology item to the Advanced Menu, highlight CPU Configuration, then press . 3. After the...: CPU features Click the Power button on the operating system. A.2.2 Using the EIST To use the EIST feature: 1. Press to open the Power Options Properties window. 8.

User Manual
Page 4
... Chapter 3: BIOS setup 3.1 Managing and updating your BIOS 3-1 3.1.1 ASUS Update utility 3-1 3.1.2 ASUS EZ Flash 2 utility 3-4 3.1.3 AFUDOS utility 3-5 3.1.4 ASUS CrashFree BIOS 3 utility 3-7 3.2 BIOS setup program 3-8 3.2.1 BIOS menu screen 3-9 3.2.2 Menu bar 3-9 3.2.3 Navigation keys 3-9 3.2.4 Menu items 3-10 3.2.5 Sub-menu items 3-10 3.2.6 Configuration fields 3-10 3.2.7 Pop-up window 3-10 3.2.8 Scroll bar 3-10 3.2.9 General help 3-10 3.3 Main menu 3-11 3.3.1 System Time [xx:xx:xx 3-11...
... Chapter 3: BIOS setup 3.1 Managing and updating your BIOS 3-1 3.1.1 ASUS Update utility 3-1 3.1.2 ASUS EZ Flash 2 utility 3-4 3.1.3 AFUDOS utility 3-5 3.1.4 ASUS CrashFree BIOS 3 utility 3-7 3.2 BIOS setup program 3-8 3.2.1 BIOS menu screen 3-9 3.2.2 Menu bar 3-9 3.2.3 Navigation keys 3-9 3.2.4 Menu items 3-10 3.2.5 Sub-menu items 3-10 3.2.6 Configuration fields 3-10 3.2.7 Pop-up window 3-10 3.2.8 Scroll bar 3-10 3.2.9 General help 3-10 3.3 Main menu 3-11 3.3.1 System Time [xx:xx:xx 3-11...

User Manual
Page 6
... 4.3.8 ASUS EPU-6 Engine 4-24 4.3.9 ASUS AI Direct Link 4-28 4.3.10 ASUS Drive Xpert 4-30 4.3.11 ASUS Express Gate 4-41 4.4 RAID configurations 4-51 4.4.1 RAID definitions 4-51 4.4.2 Installing Serial ATA hard disks 4-52 4.4.3 Intel® RAID configurations 4-52 4.5 Creating a RAID driver disk 4-60 4.5.1 Creating a RAID driver disk without entering the OS.... 4-60 4.5.2 Creating a RAID driver disk in Windows...
... 4.3.8 ASUS EPU-6 Engine 4-24 4.3.9 ASUS AI Direct Link 4-28 4.3.10 ASUS Drive Xpert 4-30 4.3.11 ASUS Express Gate 4-41 4.4 RAID configurations 4-51 4.4.1 RAID definitions 4-51 4.4.2 Installing Serial ATA hard disks 4-52 4.4.3 Intel® RAID configurations 4-52 4.5 Creating a RAID driver disk 4-60 4.5.1 Creating a RAID driver disk without entering the OS.... 4-60 4.5.2 Creating a RAID driver disk in Windows...

User Manual
Page 53
...hot-plug and NCQ, set the Configure SATA as item in the motherboard support DVD. • You must install the Windows® XP Service Pack 1 before using these connectors. Connect the...you can create a RAID 0, RAID 1, RAID 5, RAID 10 configuration with huge graphics cards. The Serial ATA RAID feature (RAID 0, 1, 5, and 10) is available only if you intend to avoid mechanical conflict...Intel RAID configurations or the manual bundled in the BIOS to SATA device. right angle side ASUS P5Q PRO 2-27 3. If you installed Serial ATA hard disk drives, you may connect the right-...
...hot-plug and NCQ, set the Configure SATA as item in the motherboard support DVD. • You must install the Windows® XP Service Pack 1 before using these connectors. Connect the...you can create a RAID 0, RAID 1, RAID 5, RAID 10 configuration with huge graphics cards. The Serial ATA RAID feature (RAID 0, 1, 5, and 10) is available only if you intend to avoid mechanical conflict...Intel RAID configurations or the manual bundled in the BIOS to SATA device. right angle side ASUS P5Q PRO 2-27 3. If you installed Serial ATA hard disk drives, you may connect the right-...

User Manual
Page 76
...item is a brief description of a menu screen when there are items that menu. To change the value of options. Refer to 3.2.7 Pop-up window. 3.2.7 Pop-up window Scroll bar 3.2.9 General help At the top right corner of the menu screen is user- Use [+] or [-] to select a field. A ... Configuration fields These fields show the values for that item. 3.2.8 Scroll bar A scroll bar appears on the right side of the selected item. 3-10 Chapter 3: BIOS setup For example, selecting Main shows the Main menu items. The other items on the screen. Press the Up/Down arrow keys...
...item is a brief description of a menu screen when there are items that menu. To change the value of options. Refer to 3.2.7 Pop-up window. 3.2.7 Pop-up window Scroll bar 3.2.9 General help At the top right corner of the menu screen is user- Use [+] or [-] to select a field. A ... Configuration fields These fields show the values for that item. 3.2.8 Scroll bar A scroll bar appears on the right side of the selected item. 3-10 Chapter 3: BIOS setup For example, selecting Main shows the Main menu items. The other items on the screen. Press the Up/Down arrow keys...

User Manual
Page 107
Choose [Prompt User] to stay at the Express Gate's first screen before starting Windows or other installed OS. User data includes the Express Gate's settings as well as any personal information stored by the web browser (bookmarks, cookies, browsing...] [10 seconds] [15 seconds] [20 seconds] [30 seconds] Reset User Data [No] Allows you enter the Express Gate. The first time wizard will be cleared the next time you to section 4.3.11 ASUS Express GATE for user action. 3.8.3 Express Gate Allows you enter the Express Gate environment after clearing its settings. ASUS P5Q PRO 3-41...
Choose [Prompt User] to stay at the Express Gate's first screen before starting Windows or other installed OS. User data includes the Express Gate's settings as well as any personal information stored by the web browser (bookmarks, cookies, browsing...] [10 seconds] [15 seconds] [20 seconds] [30 seconds] Reset User Data [No] Allows you enter the Express Gate. The first time wizard will be cleared the next time you to section 4.3.11 ASUS Express GATE for user action. 3.8.3 Express Gate Allows you enter the Express Gate environment after clearing its settings. ASUS P5Q PRO 3-41...

User Manual
Page 122
7. When the screen returns to the ASUS Update utility, flash the original BIOS to display the new boot logo during POST. 4-10 Chapter 4: Software support After flashing the BIOS, restart the computer to load the new boot logo. 10. Adjust the boot image to enlarge by selecting a value on it. 8. When the logo images appear on the right window pane, select an image to your desired size by clicking on the Ratio box. 9.
7. When the screen returns to the ASUS Update utility, flash the original BIOS to display the new boot logo during POST. 4-10 Chapter 4: Software support After flashing the BIOS, restart the computer to load the new boot logo. 10. Adjust the boot image to enlarge by selecting a value on it. 8. When the logo images appear on the right window pane, select an image to your desired size by clicking on the Ratio box. 9.

User Manual
Page 140
...AI Direct Link To enable the incoming folder: 1. Click OK and the "Ready for incoming" message appears. 4.3.9 ASUS AI Direct Link ASUS AI Direct Link allows you use a 10/100 LAN card. You must first connect two computers (at least one of enabling file sharing on the AI Direct...set a username and password. 3. Otherwise, select Use public account. If you set your firewall software other than Windows Firewall before launching AI Direct Link. • The transfer rate is ASUS product) using a network cable, and then install the utility to both computers to avail the AI Direct Link ...
...AI Direct Link To enable the incoming folder: 1. Click OK and the "Ready for incoming" message appears. 4.3.9 ASUS AI Direct Link ASUS AI Direct Link allows you use a 10/100 LAN card. You must first connect two computers (at least one of enabling file sharing on the AI Direct...set a username and password. 3. Otherwise, select Use public account. If you set your firewall software other than Windows Firewall before launching AI Direct Link. • The transfer rate is ASUS product) using a network cable, and then install the utility to both computers to avail the AI Direct Link ...

User Manual
Page 142
...the Drive Xpert icon on the right hand side appears. Otherwise, the HDD LED in BIOS setup is configured as shown on the Windows ® notification area. To install Serial ATA hard disks for Drive Xpert: EZ Backup and Super Speed. • Before using Drive Xpert ... drive's transfer rate. 4.3.10 ASUS Drive Xpert Drive Xpert, an ASUS exclusive technology, secures the data on your hard disk and enhances hard drive performance without the hassles of the SATA signal cables to the SATA_E1 (orange, port 0) and SATA_E2 (white, port 1) connectors on the motherboard. The main screen as ...
...the Drive Xpert icon on the right hand side appears. Otherwise, the HDD LED in BIOS setup is configured as shown on the Windows ® notification area. To install Serial ATA hard disks for Drive Xpert: EZ Backup and Super Speed. • Before using Drive Xpert ... drive's transfer rate. 4.3.10 ASUS Drive Xpert Drive Xpert, an ASUS exclusive technology, secures the data on your hard disk and enhances hard drive performance without the hassles of the SATA signal cables to the SATA_E1 (orange, port 0) and SATA_E2 (white, port 1) connectors on the motherboard. The main screen as ...

User Manual
Page 178
...Technology item to save your changes and exit the BIOS setup. 5. A.2.2 Using the EIST To use the EIST feature: 1. When the Display Properties window appears, click the Screen Saver tab. 7. The screen displays and procedures may vary depending on the desktop, then select Properties from the pop-up ...you adjust the power scheme, the CPU internal frequency slightly decreases when the CPU loading is low. Go to open the Power Options Properties window. 8. On the Power schemes section, click , then select any option except Home/Office Desktop or Always On. 9. Click Apply, then click OK...
...Technology item to save your changes and exit the BIOS setup. 5. A.2.2 Using the EIST To use the EIST feature: 1. When the Display Properties window appears, click the Screen Saver tab. 7. The screen displays and procedures may vary depending on the desktop, then select Properties from the pop-up ...you adjust the power scheme, the CPU internal frequency slightly decreases when the CPU loading is low. Go to open the Power Options Properties window. 8. On the Power schemes section, click , then select any option except Home/Office Desktop or Always On. 9. Click Apply, then click OK...

