
User Manual
Page 6
... Probe II 4-3 4.3.2 ASUS AI Suite 4-4 4.3.3 ASUS EPU 4-5 4.3.4 ASUS Fan Xpert 4-6 4.3.5 ASUS TurboV 4-7 4.3.6 ASUS Turbo Key 4-8 4.3.7 ASUS Drive Xpert 4-9 4.3.8 ASUS Express Gate 4-10 4.3.9 Audio configurations 4-11 4.4 RAID configurations 4-12 4.4.1 RAID definitions 4-12 4.4.2 Installing Serial ATA hard disks 4-12 4.4.3 Setting the RAID item in BIOS 4-13 4.4.4 Intel® Matrix Storage Manager option ROM utility 4-13 4.5 Creating a RAID driver disk 4-17 4.5.1 Creating...
... Probe II 4-3 4.3.2 ASUS AI Suite 4-4 4.3.3 ASUS EPU 4-5 4.3.4 ASUS Fan Xpert 4-6 4.3.5 ASUS TurboV 4-7 4.3.6 ASUS Turbo Key 4-8 4.3.7 ASUS Drive Xpert 4-9 4.3.8 ASUS Express Gate 4-10 4.3.9 Audio configurations 4-11 4.4 RAID configurations 4-12 4.4.1 RAID definitions 4-12 4.4.2 Installing Serial ATA hard disks 4-12 4.4.3 Setting the RAID item in BIOS 4-13 4.4.4 Intel® Matrix Storage Manager option ROM utility 4-13 4.5 Creating a RAID driver disk 4-17 4.5.1 Creating...

User Manual
Page 62
... the motherboard BIOS in the optical drive. Installing ASUS Update To install ASUS Update: 1. Updating the BIOS through the Internet To update the BIOS through a network or an Internet Service Provider (ISP). 3.2.1 ASUS Update utility The ASUS Update is a utility that comes with the motherboard package. Place the support DVD in Windows® environment. From the Windows®...
... the motherboard BIOS in the optical drive. Installing ASUS Update To install ASUS Update: 1. Updating the BIOS through the Internet To update the BIOS through a network or an Internet Service Provider (ISP). 3.2.1 ASUS Update utility The ASUS Update is a utility that comes with the motherboard package. Place the support DVD in Windows® environment. From the Windows®...

User Manual
Page 99
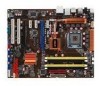
...ASUS P5Q PRO Turbo 4-1 Refer to locate the file ASSETUP.EXE from the BIN folder. The Utilities menu shows the applications and other software that you want to avail all motherboard features. Double-click the ASSETUP.EXE to use the devices. Visit the ASUS website at any time without notice. Install the necessary drivers... to run the DVD. Chapter 4: Chapter 4 Software support 4.1 Installing an operating system This motherboard supports Windows® XP/ 64-bit XP...
...ASUS P5Q PRO Turbo 4-1 Refer to locate the file ASSETUP.EXE from the BIN folder. The Utilities menu shows the applications and other software that you want to avail all motherboard features. Double-click the ASSETUP.EXE to use the devices. Visit the ASUS website at any time without notice. Install the necessary drivers... to run the DVD. Chapter 4: Chapter 4 Software support 4.1 Installing an operating system This motherboard supports Windows® XP/ 64-bit XP...
User Manual
Page 109
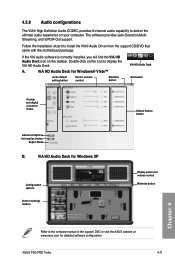
...The VIA® High Definition Audio CODEC provides 8-channel audio capability to install the VIA® Audio Driver from the support CD/DVD that came with the motherboard package. If the VIA audio software is correctly installed, you will find the VIA HD Audio Deck ...B. VIA HD Audio Deck for Windows XP Configuration options Control settings window Display panel and volume control Minimize button Chapter 4 Refer to display the VIA HD Audio Deck. The software provides Jack-Detection,MultiStreaming, and S/PDIF Out support. Double-click on the taskbar. ASUS P5Q PRO Turbo 4-11
...The VIA® High Definition Audio CODEC provides 8-channel audio capability to install the VIA® Audio Driver from the support CD/DVD that came with the motherboard package. If the VIA audio software is correctly installed, you will find the VIA HD Audio Deck ...B. VIA HD Audio Deck for Windows XP Configuration options Control settings window Display panel and volume control Minimize button Chapter 4 Refer to display the VIA HD Audio Deck. The software provides Jack-Detection,MultiStreaming, and S/PDIF Out support. Double-click on the taskbar. ASUS P5Q PRO Turbo 4-11

User Manual
Page 110
... SATA hard disks for details. 4.4.2 Installing Serial ATA hard disks The motherboard supports Serial ATA hard disk drives. Install the SATA hard disks into the drive bays. 2. If one drive to section 4.5 Creating a RAID driver disk for a RAID configuration: 1. Among the advantages of a single ...planning, and other drive. The RAID 5 configuration is required for this setup. Intel® Matrix Storage. You can be calculated and written. For Windows XP, if you to create a RAID 0, RAID 1, RAID 5, and RAID 10* function to a USB floppy disk before installing the operating system...
... SATA hard disks for details. 4.4.2 Installing Serial ATA hard disks The motherboard supports Serial ATA hard disk drives. Install the SATA hard disks into the drive bays. 2. If one drive to section 4.5 Creating a RAID driver disk for a RAID configuration: 1. Among the advantages of a single ...planning, and other drive. The RAID 5 configuration is required for this setup. Intel® Matrix Storage. You can be calculated and written. For Windows XP, if you to create a RAID 0, RAID 1, RAID 5, and RAID 10* function to a USB floppy disk before installing the operating system...

User Manual
Page 115
...Place the motherboard support DVD into the USB floppy disk drive then press . 8. Write-protect the floppy disk to create a 32/64bit Intel ICH10R RAID driver disk. 7. Follow the succeeding screen instructions to create an Intel® ICH10R RAID driver disk. 4. Chapter 4 ASUS P5Q PRO Turbo 4-17 ...Insert a formatted floppy disk into the optical drive. 3. Go to the Make disk menu, and then click Intel ICH10R 32/64 bit RAID Driver Disk to complete the process. 4.5.2 Creating a RAID driver disk in Windows® To create a RAID driver ...
...Place the motherboard support DVD into the USB floppy disk drive then press . 8. Write-protect the floppy disk to create a 32/64bit Intel ICH10R RAID driver disk. 7. Follow the succeeding screen instructions to create an Intel® ICH10R RAID driver disk. 4. Chapter 4 ASUS P5Q PRO Turbo 4-17 ...Insert a formatted floppy disk into the optical drive. 3. Go to the Make disk menu, and then click Intel ICH10R 32/64 bit RAID Driver Disk to complete the process. 4.5.2 Creating a RAID driver disk in Windows® To create a RAID driver ...
User Manual
Page 116
To install the RAID driver in Windows® Vista™: 1. Press , and then insert the floppy disk with RAID driver into the USB floppy disk drive. 3. Follow the succeeding screen instructions to complete the installation. During the OS installation, ...select Intel(R) SATA RAID Controller (Desktop ICH10R). 4. Insert the floppy disk/USB device with RAID driver into the USB floppy disk drive/USB port. 2. Chapter 4 4-18 Chapter 4: Software support Follow the succeeding screen instructions to complete the installation. To install the RAID driver in Windows® XP: 1.
To install the RAID driver in Windows® Vista™: 1. Press , and then insert the floppy disk with RAID driver into the USB floppy disk drive. 3. Follow the succeeding screen instructions to complete the installation. During the OS installation, ...select Intel(R) SATA RAID Controller (Desktop ICH10R). 4. Insert the floppy disk/USB device with RAID driver into the USB floppy disk drive/USB port. 2. Chapter 4 4-18 Chapter 4: Software support Follow the succeeding screen instructions to complete the installation. To install the RAID driver in Windows® XP: 1.

User Manual
Page 117
..., and insert the floppy disk containing the RAID driver. 2. Chapter 4 ASUS P5Q PRO Turbo 4-19 Browse the contents of the USB floppy disk drive varies with different vendors. 4. From the Universal Serial Bus controllers, right-click xxxxxx USB Floppy, and then select Properties from the pop-up window. Click Details tab. Right-click My Computer on...
..., and insert the floppy disk containing the RAID driver. 2. Chapter 4 ASUS P5Q PRO Turbo 4-19 Browse the contents of the USB floppy disk drive varies with different vendors. 4. From the Universal Serial Bus controllers, right-click xxxxxx USB Floppy, and then select Properties from the pop-up window. Click Details tab. Right-click My Computer on...
User Manual
Page 119
...drivers 1. Select your computer. Close all existing graphics card drivers before installing ATI CrossFireX graphics cards to your system. For Windows XP, go to Control Panel > Add/Remove Programs. For Windows Vista, go to Control Panel > Programs and Features. 3. ASUS P5Q PRO Turbo 5-1 For Windows...cards. Turn off your current graphics card driver/s. 4. For Windows Vista, select Uninstall. 5. Chapter 5 Chapter 5: 5.1 Chapter 5 ATI® CrossFireX™ technology support ATI® CrossFireX™ technology The motherboard supports the ATI® CrossFireX™ ...
...drivers 1. Select your computer. Close all existing graphics card drivers before installing ATI CrossFireX graphics cards to your system. For Windows XP, go to Control Panel > Add/Remove Programs. For Windows Vista, go to Control Panel > Programs and Features. 3. ASUS P5Q PRO Turbo 5-1 For Windows...cards. Turn off your current graphics card driver/s. 4. For Windows Vista, select Uninstall. 5. Chapter 5 Chapter 5: 5.1 Chapter 5 ATI® CrossFireX™ technology support ATI® CrossFireX™ technology The motherboard supports the ATI® CrossFireX™ ...

User Manual
Page 122
...cards. The ATI Triple or Quad CrossFireX technology is currently supported by Windows® Vista™ only. 5.3.2 Enabling the ATI® CrossFireX™ technology After installing your graphics cards and the device drivers, enable the CrossFireX™ feature through the ATI Catalyst™ ... can also rightclick the ATI icon in Windows environment. Right-click on the Windows® desktop and select Catalyst(TM) Control Center. Click Go to continue to install the device drivers. • Ensure that your PCI Express graphics card driver supports the ATI® CrossFireX™ ...
...cards. The ATI Triple or Quad CrossFireX technology is currently supported by Windows® Vista™ only. 5.3.2 Enabling the ATI® CrossFireX™ technology After installing your graphics cards and the device drivers, enable the CrossFireX™ feature through the ATI Catalyst™ ... can also rightclick the ATI icon in Windows environment. Right-click on the Windows® desktop and select Catalyst(TM) Control Center. Click Go to continue to install the device drivers. • Ensure that your PCI Express graphics card driver supports the ATI® CrossFireX™ ...


