User Manual
Page 4
... 3.4.4 System Information 3-11 3.5 Ai Tweaker menu 3-12 3.5.1 Ai Overclock Tuner [Auto 3-12 3.5.2 CPU Ratio Setting [Auto 3-13 3.5.3 FSB Frequency [XXX 3-13 3.5.4 PCIE Frequency [XXX 3-13 3.5.5 FSB Strap to North ... 2-29 2.8 Starting up for the first time 2-40 2.9 Turning off the computer 2-40 3.1 Knowing BIOS 3-1 3.2 Updating BIOS 3-1 3.2.1 ASUS Update utility 3-2 3.2.2 ASUS EZ Flash 2 utility 3-4 3.2.3 ASUS CrashFree BIOS 3 utility 3-5 3.3 BIOS setup program 3-6 3.3.1 BIOS menu screen 3-6 3.3.2 Menu bar 3-6 3.3.3 Navigation keys 3-7 3.3.4 Menu items 3-7 3.3.5 Submenu items ...
... 3.4.4 System Information 3-11 3.5 Ai Tweaker menu 3-12 3.5.1 Ai Overclock Tuner [Auto 3-12 3.5.2 CPU Ratio Setting [Auto 3-13 3.5.3 FSB Frequency [XXX 3-13 3.5.4 PCIE Frequency [XXX 3-13 3.5.5 FSB Strap to North ... 2-29 2.8 Starting up for the first time 2-40 2.9 Turning off the computer 2-40 3.1 Knowing BIOS 3-1 3.2 Updating BIOS 3-1 3.2.1 ASUS Update utility 3-2 3.2.2 ASUS EZ Flash 2 utility 3-4 3.2.3 ASUS CrashFree BIOS 3 utility 3-5 3.3 BIOS setup program 3-6 3.3.1 BIOS menu screen 3-6 3.3.2 Menu bar 3-6 3.3.3 Navigation keys 3-7 3.3.4 Menu items 3-7 3.3.5 Submenu items ...

User Manual
Page 6
... operating system 4-1 4.2.2 Obtaining the software manuals 4-2 4.3 Software information 4-3 4.3.1 ASUS PC Probe II 4-3 4.3.2 ASUS AI Suite 4-4 4.3.3 ASUS EPU 4-5 4.3.4 ASUS Fan Xpert 4-6 4.3.5 ASUS TurboV 4-7 4.3.6 ASUS Turbo Key 4-8 4.3.7 ASUS Drive Xpert 4-9 4.3.8 ASUS Express Gate 4-10 4.3.9 Audio configurations 4-11 4.4 RAID configurations 4-12 4.4.1 RAID definitions 4-12 4.4.2 Installing Serial ATA hard disks 4-12 4.4.3 Setting the RAID item in BIOS 4-13 4.4.4 Intel® Matrix Storage Manager option ROM...
... operating system 4-1 4.2.2 Obtaining the software manuals 4-2 4.3 Software information 4-3 4.3.1 ASUS PC Probe II 4-3 4.3.2 ASUS AI Suite 4-4 4.3.3 ASUS EPU 4-5 4.3.4 ASUS Fan Xpert 4-6 4.3.5 ASUS TurboV 4-7 4.3.6 ASUS Turbo Key 4-8 4.3.7 ASUS Drive Xpert 4-9 4.3.8 ASUS Express Gate 4-10 4.3.9 Audio configurations 4-11 4.4 RAID configurations 4-12 4.4.1 RAID definitions 4-12 4.4.2 Installing Serial ATA hard disks 4-12 4.4.3 Setting the RAID item in BIOS 4-13 4.4.4 Intel® Matrix Storage Manager option ROM...

User Manual
Page 9
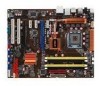
...describes the ATI® CrossFireX™ feature and shows the graphics card installation procedures. ASUS websites The ASUS website provides updated information on the motherboard. • Chapter 3: BIOS setup This chapter tells how to perform when installing system components. How this guide ... This chapter describes the contents of the standard package. Optional documentation Your product package may have to change system settings through the BIOS Setup menus. About this guide is organized This guide contains the following sources for additional information and for product ...
...describes the ATI® CrossFireX™ feature and shows the graphics card installation procedures. ASUS websites The ASUS website provides updated information on the motherboard. • Chapter 3: BIOS setup This chapter tells how to perform when installing system components. How this guide ... This chapter describes the contents of the standard package. Optional documentation Your product package may have to change system settings through the BIOS Setup menus. About this guide is organized This guide contains the following sources for additional information and for product ...

User Manual
Page 18
... design does not have lifetime problems as a chipset fan does. ASUS Crystal Sound This feature can be carried away by yourself. Noise...like Skype, online game, video conference and recording. Fan Xpert ASUS Fan Xpert intelligently allows you easy ways to date. Furthermore, it...motherboard is the most reliable fanless thermal solution to install computer components, update the BIOS or back up your PC's loading. ASUS EZ DIY ASUS...components in real-time-helping save power and money! ASUS Quiet Thermal Solution ASUS Quiet Thermal solution makes system more stable and enhances ...
... design does not have lifetime problems as a chipset fan does. ASUS Crystal Sound This feature can be carried away by yourself. Noise...like Skype, online game, video conference and recording. Fan Xpert ASUS Fan Xpert intelligently allows you easy ways to date. Furthermore, it...motherboard is the most reliable fanless thermal solution to install computer components, update the BIOS or back up your PC's loading. ASUS EZ DIY ASUS...components in real-time-helping save power and money! ASUS Quiet Thermal Solution ASUS Quiet Thermal solution makes system more stable and enhances ...

User Manual
Page 19
...'s special design makes it convenient and easy to conveniently store or load multiple BIOS settings. This protection eliminates the need to the motherboard. ASUS P5Q PRO Turbo 1-5 ASUS Q-Connector ASUS Q-Connector allows you to install on your favorite settings. Profile The motherboard features the ASUS O.C. This unique module eliminates the trouble of complicated configurations. With better electric conductivity, it against static electricity...
...'s special design makes it convenient and easy to conveniently store or load multiple BIOS settings. This protection eliminates the need to the motherboard. ASUS P5Q PRO Turbo 1-5 ASUS Q-Connector ASUS Q-Connector allows you to install on your favorite settings. Profile The motherboard features the ASUS O.C. This unique module eliminates the trouble of complicated configurations. With better electric conductivity, it against static electricity...
User Manual
Page 39
...for the expansion card. Turn on BIOS setup. 2. Assign an IRQ to unplug the power cord before adding or removing expansion cards. ASUS P5Q PRO Turbo 2-19 When using PCI cards on the slot. 5. Align the card connector with it by adjusting the software settings. 1. Replace the system cover.... BIOS settings, if any. Refer to use . 4. Refer to install expansion cards. Install the software drivers for later use . Failure to do not need to the table on the next page. 3. Chapter 2 2.5 Expansion slots In the future, you physical injury and damage motherboard components...
...for the expansion card. Turn on BIOS setup. 2. Assign an IRQ to unplug the power cord before adding or removing expansion cards. ASUS P5Q PRO Turbo 2-19 When using PCI cards on the slot. 5. Align the card connector with it by adjusting the software settings. 1. Replace the system cover.... BIOS settings, if any. Refer to use . 4. Refer to install expansion cards. Install the software drivers for later use . Failure to do not need to the table on the next page. 3. Chapter 2 2.5 Expansion slots In the future, you physical injury and damage motherboard components...

User Manual
Page 42
...Time Clock (RTC) RAM in CMOS, which include system setup information such as system passwords. Hold down and reboot the system so the BIOS can clear the CMOS memory of date, time, and system setup parameters by erasing the CMOS RTC RAM data. Except when clearing the RTC...power cord before rebooting the system. 2-22 Chapter 2: Hardware information Shut down the key during the boot process and enter BIOS setup to pins 1-2. 3. You can automatically reset parameter settings to default values. • Due to the chipset behavior, AC power off and on CLRTC jumper default position. For...
...Time Clock (RTC) RAM in CMOS, which include system setup information such as system passwords. Hold down and reboot the system so the BIOS can clear the CMOS memory of date, time, and system setup parameters by erasing the CMOS RTC RAM data. Except when clearing the RTC...power cord before rebooting the system. 2-22 Chapter 2: Hardware information Shut down the key during the boot process and enter BIOS setup to pins 1-2. 3. You can automatically reset parameter settings to default values. • Due to the chipset behavior, AC power off and on CLRTC jumper default position. For...

User Manual
Page 43
ASUS P5Q PRO Turbo 2-23 Chapter 2 2. Doing so may need a better cooling system (for extra-high overvoltage ability, use the BIOS items introduced in BIOS. Set to pins 1-2 to halt. Pins 2-3 (Default) Pins 1-2 (OV Enabled) OV_CPU up to 1.70V up to 2.10V • Before you change the jumper setting. For system failure due to the wrong setting of this jumper...
ASUS P5Q PRO Turbo 2-23 Chapter 2 2. Doing so may need a better cooling system (for extra-high overvoltage ability, use the BIOS items introduced in BIOS. Set to pins 1-2 to halt. Pins 2-3 (Default) Pins 1-2 (OV Enabled) OV_CPU up to 1.70V up to 2.10V • Before you change the jumper setting. For system failure due to the wrong setting of this jumper...

User Manual
Page 44
... requires a power supply that can connect to wake up (3-pin USBPW1-4, USBPW7-10, USBPW1112) Set these jumpers to +5V to additional USB ports. Set this jumper to pins 2-3 (+5VSB) to wake up the computer when you to wake up feature.... Set to +5VSB to enable or disable the keyboard/mouse wake-up from S1 sleep mode (...USB ports. The USBPW1-4 jumper is the Space Bar). This feature requires an ATX power supply that you can provide 500mA on the +5VSB lead, and a corresponding setting in the BIOS. 4. 3.
... requires a power supply that can connect to wake up (3-pin USBPW1-4, USBPW7-10, USBPW1112) Set these jumpers to +5V to additional USB ports. Set this jumper to pins 2-3 (+5VSB) to wake up the computer when you to wake up feature.... Set to +5VSB to enable or disable the keyboard/mouse wake-up from S1 sleep mode (...USB ports. The USBPW1-4 jumper is the Space Bar). This feature requires an ATX power supply that you can provide 500mA on the +5VSB lead, and a corresponding setting in the BIOS. 4. 3.

User Manual
Page 49
...-definition front panel audio module to this connector, set to [AC97]. Chapter 2 • We recommend that supports either HD Audio ...the BIOS setup to avail of the system chassis. By default, this connector, then install the module to this connector is purchased separately. 2. ASUS P5Q PRO Turbo 2-29... 2.7.3 Internal connectors 1. Digital audio connector (4-1 pin SPDIF_OUT) This connector is for an additional Sony/Philips Digital Interface (S/PDIF) port(s). Connect the S/PDIF Out module cable to a slot opening at the back of the motherboard...
...-definition front panel audio module to this connector, set to [AC97]. Chapter 2 • We recommend that supports either HD Audio ...the BIOS setup to avail of the system chassis. By default, this connector, then install the module to this connector is purchased separately. 2. ASUS P5Q PRO Turbo 2-29... 2.7.3 Internal connectors 1. Digital audio connector (4-1 pin SPDIF_OUT) This connector is for an additional Sony/Philips Digital Interface (S/PDIF) port(s). Connect the S/PDIF Out module cable to a slot opening at the back of the motherboard...

User Manual
Page 51
...3.4.2 Storage Configuration for details. • Before creating a RAID set, refer to section 4.4 RAID configurations or the manual bundled in the BIOS to [AHCI]. ASUS P5Q PRO Turbo 2-31 The Serial ATA RAID feature (RAID 0, 1, 5, ...and 10) is available only if you can create a RAID 0, 1, 5, and 10 configuration with the Intel® Matrix Storage Technology through the onboard Intel® ICH10R RAID controller. In Standard IDE mode, you are set the Configure SATA as in the motherboard...
...3.4.2 Storage Configuration for details. • Before creating a RAID set, refer to section 4.4 RAID configurations or the manual bundled in the BIOS to [AHCI]. ASUS P5Q PRO Turbo 2-31 The Serial ATA RAID feature (RAID 0, 1, 5, ...and 10) is available only if you can create a RAID 0, 1, 5, and 10 configuration with the Intel® Matrix Storage Technology through the onboard Intel® ICH10R RAID controller. In Standard IDE mode, you are set the Configure SATA as in the motherboard...

User Manual
Page 52
... SATA_E1 (orange, port 0) connector on the motherboard. • Use the Drive Xpert utility to see both the status of the devices connected to 4.3.7 ASUS Drive Xpert for Serial ATA hard disk drives.... 0) can create a EZ Backup or a Super Speed configuration with any mode changes. In the BIOS Main menu and the Device Manager in OS, only the device connected to SATA_E1 (orange, port ...Sil5723 Serial ATA connectors (7-pin SATA_E1 [orange, port 0], SATA_E2 [white, port 1]) These connectors are set as data drives. • When using the Drive Xpert function, ensure that you have connected the...
... SATA_E1 (orange, port 0) connector on the motherboard. • Use the Drive Xpert utility to see both the status of the devices connected to 4.3.7 ASUS Drive Xpert for Serial ATA hard disk drives.... 0) can create a EZ Backup or a Super Speed configuration with any mode changes. In the BIOS Main menu and the Device Manager in OS, only the device connected to SATA_E1 (orange, port ...Sil5723 Serial ATA connectors (7-pin SATA_E1 [orange, port 0], SATA_E2 [white, port 1]) These connectors are set as data drives. • When using the Drive Xpert function, ensure that you have connected the...

User Manual
Page 58
The system power LED lights up or flashes when data is read from or written to hear system beeps and warnings. • ATX power button/soft-off the system power. 2-38 Chapter 2: Hardware information Connect the HDD Activity LED cable to this connector. System panel connector (20-8 pin ...; System warning speaker (4-pin SPEAKER) This 4-pin connector is for the chassis-mounted system warning speaker. Pressing the power button turns the system on the BIOS settings. Chapter 2 • System power LED (2-pin PLED) This 2-pin connector is for the system power LED. 13.
The system power LED lights up or flashes when data is read from or written to hear system beeps and warnings. • ATX power button/soft-off the system power. 2-38 Chapter 2: Hardware information Connect the HDD Activity LED cable to this connector. System panel connector (20-8 pin ...; System warning speaker (4-pin SPEAKER) This 4-pin connector is for the chassis-mounted system warning speaker. Pressing the power button turns the system on the BIOS settings. Chapter 2 • System power LED (2-pin PLED) This 2-pin connector is for the system power LED. 13.
User Manual
Page 60
... of the system chassis. 4. Monitor b. Follow the instructions in the following order: a. External SCSI devices (starting with ATX power supplies, the system LED lights up when you press the ATX power button. If your retailer for details. 2-40 Chapter 2: Hardware information The system then runs the power-on ,...the system on sleep mode or soft-off mode, depending on . System power 6. Refer to the power connector at the back of the BIOS setting. If you turned on the power, the system may light up or change from orange to disabled No keyboard detected No memory detected No...
... of the system chassis. 4. Monitor b. Follow the instructions in the following order: a. External SCSI devices (starting with ATX power supplies, the system LED lights up when you press the ATX power button. If your retailer for details. 2-40 Chapter 2: Hardware information The system then runs the power-on ,...the system on sleep mode or soft-off mode, depending on . System power 6. Refer to the power connector at the back of the BIOS setting. If you turned on the power, the system may light up or change from orange to disabled No keyboard detected No memory detected No...

User Manual
Page 61
... the system's failure to the corresponding sections for details on these utilities. ASUS CrashFree BIOS 3 utility: Restores the BIOS using the ASUS Update utility. Copy the original motherboard BIOS using the motherboard support DVD or a USB flash drive when the BIOS file fails or gets corrupted. ASUS P5Q PRO Turbo 3-1 The following circumstances: • An error message appears on system stability, compatibility...
... the system's failure to the corresponding sections for details on these utilities. ASUS CrashFree BIOS 3 utility: Restores the BIOS using the ASUS Update utility. Copy the original motherboard BIOS using the motherboard support DVD or a USB flash drive when the BIOS file fails or gets corrupted. ASUS P5Q PRO Turbo 3-1 The following circumstances: • An error message appears on system stability, compatibility...

User Manual
Page 65
... for the BIOS file. Chapter 3 ASUS P5Q PRO Turbo 3-5 3.2.3 ASUS CrashFree BIOS 3 utility The ASUS CrashFree BIOS 3 utility is an auto recovery tool that allows you to restore the BIOS file when it to a USB flash drive. To ensure system compatibility and stability, we recommend that you to enter BIOS Setup to the USB port. 3. The BIOS file in the motherboard support DVD...
... for the BIOS file. Chapter 3 ASUS P5Q PRO Turbo 3-5 3.2.3 ASUS CrashFree BIOS 3 utility The ASUS CrashFree BIOS 3 utility is an auto recovery tool that allows you to restore the BIOS file when it to a USB flash drive. To ensure system compatibility and stability, we recommend that you to enter BIOS Setup to the USB port. 3. The BIOS file in the motherboard support DVD...

User Manual
Page 66
... If the system fails to boot after changing any BIOS setting, load the default settings to ensure system compatibility and stability. You can also restart by pressing the reset button on . See section 3.10 Exit Menu for details. 3.3.1 BIOS menu screen Menu items Menu bar Configuration fields General ...Not Detected] Use [+] or [-] to enter the Setup utility. If you wish to enter Setup after changing any BIOS setting, try to clear the CMOS and reset the motherboard to the default value. Being a menu-driven program, it as easy to use as possible. Change Field Tab Select...
... If the system fails to boot after changing any BIOS setting, load the default settings to ensure system compatibility and stability. You can also restart by pressing the reset button on . See section 3.10 Exit Menu for details. 3.3.1 BIOS menu screen Menu items Menu bar Configuration fields General ...Not Detected] Use [+] or [-] to enter the Setup utility. If you wish to enter Setup after changing any BIOS setting, try to clear the CMOS and reset the motherboard to the default value. Being a menu-driven program, it as easy to use as possible. Change Field Tab Select...

User Manual
Page 89
... add-on self tests (POST) while booting to decrease the time needed to display during POST. Set this item to [Enabled] to skip certain tests while booting. Chapter 3 ASUS P5Q PRO Turbo 3-29 3.8.2 Boot Settings Configuration BIOS SETUP UTILITY Boot Boot Settings Configuration Quick Boot Full Screen Logo AddOn ROM Display Mode Bootup Num-Lock Wait For 'F1...
... add-on self tests (POST) while booting to decrease the time needed to display during POST. Set this item to [Enabled] to skip certain tests while booting. Chapter 3 ASUS P5Q PRO Turbo 3-29 3.8.2 Boot Settings Configuration BIOS SETUP UTILITY Boot Boot Settings Configuration Quick Boot Full Screen Logo AddOn ROM Display Mode Bootup Num-Lock Wait For 'F1...
User Manual
Page 95
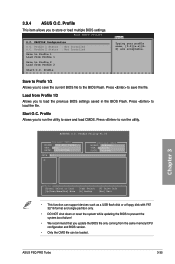
... Tools O.C. Save to Profile 1 Load from Profile 1 Save to Profile 2 Load from Profile 1/2 Allows you to load the previous BIOS settings saved in the BIOS Flash. Profile Allows you to run the utility. ASUS P5Q PRO Turbo 3-35 Press to run the utility to load the file. Profile 2 Status : Not Installed Typing your profile name, [0-9][a-z][AZ] are...
... Tools O.C. Save to Profile 1 Load from Profile 1 Save to Profile 2 Load from Profile 1/2 Allows you to load the previous BIOS settings saved in the BIOS Flash. Profile Allows you to run the utility. ASUS P5Q PRO Turbo 3-35 Press to run the utility to load the file. Profile 2 Status : Not Installed Typing your profile name, [0-9][a-z][AZ] are...

User Manual
Page 105
... to the software manual in ASUS TurboV will not be saved to BIOS settings and will not be kept on the next system boot. Click Start > All Programs > ASUS > TurboV > TurboV. Refer to the CPU documentation before adjusting CPU voltage settings. ASUS P5Q PRO Turbo 4-7 Install the ASUS TurboV utility from the motherboard support DVD. 2. Launching ASUS TurboV 1. Use the Save Profile...
... to the software manual in ASUS TurboV will not be saved to BIOS settings and will not be kept on the next system boot. Click Start > All Programs > ASUS > TurboV > TurboV. Refer to the CPU documentation before adjusting CPU voltage settings. ASUS P5Q PRO Turbo 4-7 Install the ASUS TurboV utility from the motherboard support DVD. 2. Launching ASUS TurboV 1. Use the Save Profile...


