
User Manual
Page 31
exe 2 DOS afudos /o[filename filename A:\>afudos /oOLDBIOS1.rom 3. 按下 afudos /oOLDBIOS1.rom AMI Firmware Update Utility - Version 1.19(ASUS V2.07(03.11.24BB)) Copyright (C) 2002 American Megatrends, Inc. All rights reserved. ok A:\> 當 BIOS DOS 31 Reading flash ..... BIOS 2.1 使用 AFUDOS BIOS AFUDOS DOS BIOS BIOS 程式。AFUDOS BIOS BIOS BIOS 程式 BIOS 程式。 1.2MB BIOS 1 AFUDOS 程式(afudos. done Write to file......
exe 2 DOS afudos /o[filename filename A:\>afudos /oOLDBIOS1.rom 3. 按下 afudos /oOLDBIOS1.rom AMI Firmware Update Utility - Version 1.19(ASUS V2.07(03.11.24BB)) Copyright (C) 2002 American Megatrends, Inc. All rights reserved. ok A:\> 當 BIOS DOS 31 Reading flash ..... BIOS 2.1 使用 AFUDOS BIOS AFUDOS DOS BIOS BIOS 程式。AFUDOS BIOS BIOS BIOS 程式 BIOS 程式。 1.2MB BIOS 1 AFUDOS 程式(afudos. done Write to file......

User Manual
Page 32
... A:\>afudos /iP5B-VM DO.ROM AMI Firmware Update Utility - Erasing flash ...... done Verifying flash .... 更新 BIOS 程式 AFUDOS BIOS 程式。 1 tw.asus.com BIOS 片中。 BIOS BIOS 2. 將 AFUDOS.EXE BIOS 3 DOS afudos /i[filename filename BIOS 程式。 A:\>afudos /iP5B-VM DO.ROM 4. done Reading flash ...... done Advance Check ...... WARNING!! Erasing...
... A:\>afudos /iP5B-VM DO.ROM AMI Firmware Update Utility - Erasing flash ...... done Verifying flash .... 更新 BIOS 程式 AFUDOS BIOS 程式。 1 tw.asus.com BIOS 片中。 BIOS BIOS 2. 將 AFUDOS.EXE BIOS 3 DOS afudos /i[filename filename BIOS 程式。 A:\>afudos /iP5B-VM DO.ROM 4. done Reading flash ...... done Advance Check ...... WARNING!! Erasing...

User Manual
Page 33
.../13/2006 Flash Type - 2.2 使用 AwardBIOS Flash BIOS AwardBIOS Flash AwardBIOS Flash 程式(AWDFLASH.EXE BIOS AwardBIOS Flash BIOS 程式。 1 http://tw.asus.com BIOS M2N-VM HDMI.bin FAT 32/16 格式的 USB BIOS 2 CD/DVD AwardBIOS Flash BIOS 3 DOS 4. 當 A BIOS 檔案與 AwardBIOS Flash 5 A awdflash 並按...
.../13/2006 Flash Type - 2.2 使用 AwardBIOS Flash BIOS AwardBIOS Flash AwardBIOS Flash 程式(AWDFLASH.EXE BIOS AwardBIOS Flash BIOS 程式。 1 http://tw.asus.com BIOS M2N-VM HDMI.bin FAT 32/16 格式的 USB BIOS 2 CD/DVD AwardBIOS Flash BIOS 3 DOS 4. 當 A BIOS 檔案與 AwardBIOS Flash 5 A awdflash 並按...

User Manual
Page 34
...! 在更新 BIOS 9 Flash Complete BIOS F1 AwardBIOS Flash Utility for ASUS V1.14 (C) Phoenix Technologies Ltd. All Rights Reserved For C51PV-MCP51-M2A-VM HDMI-00 DATE:04/13/2006 Flash Type - 7 BIOS N BIOS 8 BIOS BIOS AwardBIOS Flash Utility for ASUS V1.14 (C) Phoenix Technologies... Ltd. PMC Pm49FL004T LPC/FWH File Name to Continue Write OK F1 Reset No Update Write Fail 34 BIOS PMC Pm49FL004T LPC/FWH File Name to ...
...! 在更新 BIOS 9 Flash Complete BIOS F1 AwardBIOS Flash Utility for ASUS V1.14 (C) Phoenix Technologies Ltd. All Rights Reserved For C51PV-MCP51-M2A-VM HDMI-00 DATE:04/13/2006 Flash Type - 7 BIOS N BIOS 8 BIOS BIOS AwardBIOS Flash Utility for ASUS V1.14 (C) Phoenix Technologies... Ltd. PMC Pm49FL004T LPC/FWH File Name to Continue Write OK F1 Reset No Update Write Fail 34 BIOS PMC Pm49FL004T LPC/FWH File Name to ...
User Manual
Page 4
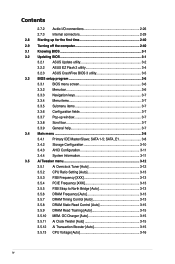
... 1-5; Contents 2.7.2 Audio I/O connections 2-26 2.7.3 Internal connectors 2-29 2.8 Starting up for the first time 2-40 2.9 Turning off the computer 2-40 3.1 Knowing BIOS 3-1 3.2 Updating BIOS 3-1 3.2.1 ASUS Update utility 3-2 3.2.2 ASUS EZ Flash 2 utility 3-4 3.2.3 ASUS CrashFree BIOS 3 utility 3-5 3.3 BIOS setup program 3-6 3.3.1 BIOS menu screen 3-6 3.3.2 Menu bar 3-6 3.3.3 Navigation keys 3-7 3.3.4 Menu items 3-7 3.3.5 Submenu items 3-7 3.3.6 Configuration fields 3-7 3.3.7 Pop-up window 3-7 3.3.8 Scroll bar 3-7 3.3.9 General help 3-7 3.4 Main...
... 1-5; Contents 2.7.2 Audio I/O connections 2-26 2.7.3 Internal connectors 2-29 2.8 Starting up for the first time 2-40 2.9 Turning off the computer 2-40 3.1 Knowing BIOS 3-1 3.2 Updating BIOS 3-1 3.2.1 ASUS Update utility 3-2 3.2.2 ASUS EZ Flash 2 utility 3-4 3.2.3 ASUS CrashFree BIOS 3 utility 3-5 3.3 BIOS setup program 3-6 3.3.1 BIOS menu screen 3-6 3.3.2 Menu bar 3-6 3.3.3 Navigation keys 3-7 3.3.4 Menu items 3-7 3.3.5 Submenu items 3-7 3.3.6 Configuration fields 3-7 3.3.7 Pop-up window 3-7 3.3.8 Scroll bar 3-7 3.3.9 General help 3-7 3.4 Main...

User Manual
Page 6
... Probe II 4-3 4.3.2 ASUS AI Suite 4-4 4.3.3 ASUS EPU 4-5 4.3.4 ASUS Fan Xpert 4-6 4.3.5 ASUS TurboV 4-7 4.3.6 ASUS Turbo Key 4-8 4.3.7 ASUS Drive Xpert 4-9 4.3.8 ASUS Express Gate 4-10 4.3.9 Audio configurations 4-11 4.4 RAID configurations 4-12 4.4.1 RAID definitions 4-12 4.4.2 Installing Serial ATA hard disks 4-12 4.4.3 Setting the RAID item in BIOS 4-13 4.4.4 Intel® Matrix Storage Manager option ROM utility 4-13 4.5 Creating a RAID driver disk 4-17 4.5.1 Creating...
... Probe II 4-3 4.3.2 ASUS AI Suite 4-4 4.3.3 ASUS EPU 4-5 4.3.4 ASUS Fan Xpert 4-6 4.3.5 ASUS TurboV 4-7 4.3.6 ASUS Turbo Key 4-8 4.3.7 ASUS Drive Xpert 4-9 4.3.8 ASUS Express Gate 4-10 4.3.9 Audio configurations 4-11 4.4 RAID configurations 4-12 4.4.1 RAID definitions 4-12 4.4.2 Installing Serial ATA hard disks 4-12 4.4.3 Setting the RAID item in BIOS 4-13 4.4.4 Intel® Matrix Storage Manager option ROM utility 4-13 4.5 Creating a RAID driver disk 4-17 4.5.1 Creating...

User Manual
Page 9
...software updates. 1. These documents are also provided. • Chapter 4: Software support This chapter describes the contents of the motherboard and the new technology it supports. • Chapter 2: Hardware information This chapter lists the hardware setup procedures that you... installing and configuring the motherboard. Detailed descriptions of the BIOS parameters are not part of the switches, jumpers, and connectors on ASUS hardware and software products. ASUS websites The ASUS website provides updated information on the motherboard. • Chapter 3: BIOS setup This chapter tells...
...software updates. 1. These documents are also provided. • Chapter 4: Software support This chapter describes the contents of the motherboard and the new technology it supports. • Chapter 2: Hardware information This chapter lists the hardware setup procedures that you... installing and configuring the motherboard. Detailed descriptions of the BIOS parameters are not part of the switches, jumpers, and connectors on ASUS hardware and software products. ASUS websites The ASUS website provides updated information on the motherboard. • Chapter 3: BIOS setup This chapter tells...

User Manual
Page 12
... 2.0/1.1 8-channel Audio I /O Ports ASUS Exclusive Features: - ASUS CrashFree BIOS 3 - ASUS Q-Shield - Turbo Key Precision Tweaker 2: - ASUS 8-Phase Power Design - vCPU PLL: 64-step CPU PLL voltage control - ASUS EZ Flash 2 100% All High-quality Conductive Polymer Capacitors! FSB tuning from 100MHz up to 800MHz at 0.00625V increment - P5Q PRO Turbo specifications summary ASUS Unique Features Other Features ASUS Exclusive Overclocking Features Back...
... 2.0/1.1 8-channel Audio I /O Ports ASUS Exclusive Features: - ASUS CrashFree BIOS 3 - ASUS Q-Shield - Turbo Key Precision Tweaker 2: - ASUS 8-Phase Power Design - vCPU PLL: 64-step CPU PLL voltage control - ASUS EZ Flash 2 100% All High-quality Conductive Polymer Capacitors! FSB tuning from 100MHz up to 800MHz at 0.00625V increment - P5Q PRO Turbo specifications summary ASUS Unique Features Other Features ASUS Exclusive Overclocking Features Back...

User Manual
Page 13
P5Q PRO Turbo specifications summary Internal I/O Connectors BIOS Features Manageability Support DVD Contents Form Factor 3 x USB connectors support additional 6 USB ports 1 x IDE connector 1 x COM connector 5 x SATA connectors 2 x Drive Xpert SATA ...panel audio connector 1 x S/PDIF Out Header Chassis Intrusion connector CD audio in 24-pin ATX Power connector 8-pin EATX 12V Power connectors System Panel (Q-Connector) 8 Mb AMI BIOS, PnP, DMI 2.0, WfM 2.0, SM BIOS 2.5, ACPI 3.0, ASUS EZ Flash 2, ASUS CrashFree BIOS 3 WOL by PME, WOR by PME, WOR by Ring, Chassis Intrusion, PXE Drivers...
P5Q PRO Turbo specifications summary Internal I/O Connectors BIOS Features Manageability Support DVD Contents Form Factor 3 x USB connectors support additional 6 USB ports 1 x IDE connector 1 x COM connector 5 x SATA connectors 2 x Drive Xpert SATA ...panel audio connector 1 x S/PDIF Out Header Chassis Intrusion connector CD audio in 24-pin ATX Power connector 8-pin EATX 12V Power connectors System Panel (Q-Connector) 8 Mb AMI BIOS, PnP, DMI 2.0, WfM 2.0, SM BIOS 2.5, ACPI 3.0, ASUS EZ Flash 2, ASUS CrashFree BIOS 3 WOL by PME, WOR by PME, WOR by Ring, Chassis Intrusion, PXE Drivers...

User Manual
Page 18
...ASUS EPU The ASUS...in real-time-helping save power and money! ASUS Crystal Sound This feature can be carried away by...controls of the innovative heat pipe design on this motherboard is the most reliable fanless thermal solution to achieve... favorite settings. 1-4 Chapter 1: Product Introduction ASUS Quiet Thermal Solution ASUS Quiet Thermal solution makes system more stable and...and affect the heat dissipation performance. Fan Xpert ASUS Fan Xpert intelligently allows you easy ways to...the incoming audio stream while recording. ASUS EZ DIY ASUS EZ DIY feature collection provides you to adjust...
...ASUS EPU The ASUS...in real-time-helping save power and money! ASUS Crystal Sound This feature can be carried away by...controls of the innovative heat pipe design on this motherboard is the most reliable fanless thermal solution to achieve... favorite settings. 1-4 Chapter 1: Product Introduction ASUS Quiet Thermal Solution ASUS Quiet Thermal solution makes system more stable and...and affect the heat dissipation performance. Fan Xpert ASUS Fan Xpert intelligently allows you easy ways to...the incoming audio stream while recording. ASUS EZ DIY ASUS EZ DIY feature collection provides you to adjust...

User Manual
Page 19
... convenient and easy to install on your screen. ASUS O.C. Profile The motherboard features the ASUS O.C. ASUS CrashFree BIOS 3 ASUS CrashFree BIOS 3 allows you to update the BIOS without the hassles of connecting the system panel cables one at a time and avoiding wrong cable connections. This protection eliminates the need to the motherboard. ASUS P5Q PRO Turbo 1-5 With better electric conductivity, it ideally protects...
... convenient and easy to install on your screen. ASUS O.C. Profile The motherboard features the ASUS O.C. ASUS CrashFree BIOS 3 ASUS CrashFree BIOS 3 allows you to update the BIOS without the hassles of connecting the system panel cables one at a time and avoiding wrong cable connections. This protection eliminates the need to the motherboard. ASUS P5Q PRO Turbo 1-5 With better electric conductivity, it ideally protects...

User Manual
Page 32
... Heat-Sink Package 5-5-5 (667-5-5-5-15) 2.1 P5Q PRO Turbo Motherboard Qualified Vendors Lists (QVL) DDR2-1150MHz capability Vendor Part No. P5Q PRO Turbo Motherboard Qualified Vendors Lists (QVL) DDR2-1200MHz capability Vendor Part No. Size SS/DS Chip Brand Chip NO. Timing Dimm (Bios) Apacer BoxP/N:CH.02GAG.C0KK2 (78.0AGA7.9K4... OCZ OCZ2FX12002GK 2048MB(Kit of 2) DS N/A Heat-Sink Package Heat-Sink Package Heat-Sink Package 5 DIMM socket support (Optional) A* B* C* V V V VV P5Q PRO Turbo Motherboard Qualified Vendors Lists (QVL) DDR2-1100MHz capability Vendor Part No.
... Heat-Sink Package 5-5-5 (667-5-5-5-15) 2.1 P5Q PRO Turbo Motherboard Qualified Vendors Lists (QVL) DDR2-1150MHz capability Vendor Part No. P5Q PRO Turbo Motherboard Qualified Vendors Lists (QVL) DDR2-1200MHz capability Vendor Part No. Size SS/DS Chip Brand Chip NO. Timing Dimm (Bios) Apacer BoxP/N:CH.02GAG.C0KK2 (78.0AGA7.9K4... OCZ OCZ2FX12002GK 2048MB(Kit of 2) DS N/A Heat-Sink Package Heat-Sink Package Heat-Sink Package 5 DIMM socket support (Optional) A* B* C* V V V VV P5Q PRO Turbo Motherboard Qualified Vendors Lists (QVL) DDR2-1100MHz capability Vendor Part No.
User Manual
Page 39
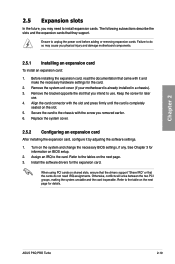
... until the card is already installed in a chassis). 3. Secure the card to the card. When using PCI cards on BIOS setup. 2. ASUS P5Q PRO Turbo 2-19 Replace the system cover. 2.5.2 Configuring an expansion card After installing the expansion card, configure it and make the necessary... opposite the slot that they support. Chapter 2 2.5 Expansion slots In the future, you may cause you physical injury and damage motherboard components. 2.5.1 Installing an expansion card To install an expansion card: 1. The following subsections describe the slots and the expansion cards ...
... until the card is already installed in a chassis). 3. Secure the card to the card. When using PCI cards on BIOS setup. 2. ASUS P5Q PRO Turbo 2-19 Replace the system cover. 2.5.2 Configuring an expansion card After installing the expansion card, configure it and make the necessary... opposite the slot that they support. Chapter 2 2.5 Expansion slots In the future, you may cause you physical injury and damage motherboard components. 2.5.1 Installing an expansion card To install an expansion card: 1. The following subsections describe the slots and the expansion cards ...

User Manual
Page 42
The onboard button cell battery powers the RAM data in CMOS. Hold down and reboot the system so the BIOS can clear the CMOS memory of date, time, and system setup parameters by erasing the CMOS RTC RAM data. For system failure due to re-... power cord and turn off is required to pins 1-2. 3. You must turn ON the computer. 4. Shut down the key during the boot process and enter BIOS setup to overclocking, use the C.P.R. (CPU Parameter Recall) feature. Keep the cap on pins 2-3 for about 5-10 seconds, then move the jumper again to clear...
The onboard button cell battery powers the RAM data in CMOS. Hold down and reboot the system so the BIOS can clear the CMOS memory of date, time, and system setup parameters by erasing the CMOS RTC RAM data. For system failure due to re-... power cord and turn off is required to pins 1-2. 3. You must turn ON the computer. 4. Shut down the key during the boot process and enter BIOS setup to overclocking, use the C.P.R. (CPU Parameter Recall) feature. Keep the cap on pins 2-3 for about 5-10 seconds, then move the jumper again to clear...

User Manual
Page 43
...to halt. For system failure due to the wrong setting of this jumper. • Refer to 3.5 Ai Tweaker menu for the first time. ASUS P5Q PRO Turbo 2-23 CPU overvoltage setting (3-pin OV_CPU) This jumper allows you change the jumper setting. Chapter 2 2. Read the following information before you install ... CPU performance. Doing so may need a better cooling system (for example, a water-cooling system) to work stably under the highest BIOS voltage setting before you to enable or disable the advanced CPU overvoltage setting in 3.5 Ai Tweaker menu first to pins 1-2 when you ...
...to halt. For system failure due to the wrong setting of this jumper. • Refer to 3.5 Ai Tweaker menu for the first time. ASUS P5Q PRO Turbo 2-23 CPU overvoltage setting (3-pin OV_CPU) This jumper allows you change the jumper setting. Chapter 2 2. Read the following information before you install ... CPU performance. Doing so may need a better cooling system (for example, a water-cooling system) to work stably under the highest BIOS voltage setting before you to enable or disable the advanced CPU overvoltage setting in 3.5 Ai Tweaker menu first to pins 1-2 when you ...

User Manual
Page 44
...-up the computer when you to wake up feature requires a power supply that can provide 500mA on the +5VSB lead, and a corresponding setting in the BIOS. 4. The USBPW1-4 jumper is the Space Bar). Chapter 2 • The USB device wake-up the computer from S3 and S4 sleep modes. 3. Keyboard/Mouse ...will not power up from S1 sleep mode (CPU stopped, DRAM refreshed, system running in sleep mode. 2-24 Chapter 2: Hardware information This feature requires an ATX power supply that can supply at least 500 mA on the +5VSB lead for the rear USB ports. Set to +5VSB to wake up . •...
...-up the computer when you to wake up feature requires a power supply that can provide 500mA on the +5VSB lead, and a corresponding setting in the BIOS. 4. The USBPW1-4 jumper is the Space Bar). Chapter 2 • The USB device wake-up the computer from S3 and S4 sleep modes. 3. Keyboard/Mouse ...will not power up from S1 sleep mode (CPU stopped, DRAM refreshed, system running in sleep mode. 2-24 Chapter 2: Hardware information This feature requires an ATX power supply that can supply at least 500 mA on the +5VSB lead for the rear USB ports. Set to +5VSB to wake up . •...

User Manual
Page 49
...65533;e��c�to��r,�s��e�t the Front Panel Type item in the BIOS setup to a slot opening at the back of the motherboard's high-definition audio capability. Connect one end of the front panel audio I /O module that you ... module cable to this connector, set to [AC97]. By default, this connector is for an additional Sony/Philips Digital Interface (S/PDIF) port(s). ASUS P5Q PRO Turbo 2-29 Front panel audio connector (10-1 pin AAFP) This connector is set the item to [HD Audio]. if you connect a high-definition ...
...65533;e��c�to��r,�s��e�t the Front Panel Type item in the BIOS setup to a slot opening at the back of the motherboard's high-definition audio capability. Connect one end of the front panel audio I /O module that you ... module cable to this connector, set to [AC97]. By default, this connector is for an additional Sony/Philips Digital Interface (S/PDIF) port(s). ASUS P5Q PRO Turbo 2-29 Front panel audio connector (10-1 pin AAFP) This connector is set the item to [HD Audio]. if you connect a high-definition ...

User Manual
Page 51
... Serial ATA hard disk drives. 4. See section 3.4.2 Storage Configuration for details. • Before creating a RAID set the Configure SATA as item in the motherboard support DVD. • You must install Windows® XP Service Pack 1 or later version before using these connectors. The Serial ATA RAID feature (RAID... version. • When using hot-plug and NCQ, set , refer to section 4.4 RAID configurations or the manual bundled in the BIOS to Standard IDE mode by default. ASUS P5Q PRO Turbo 2-31 If you installed Serial ATA hard disk drives, you intend to [AHCI].
... Serial ATA hard disk drives. 4. See section 3.4.2 Storage Configuration for details. • Before creating a RAID set the Configure SATA as item in the motherboard support DVD. • You must install Windows® XP Service Pack 1 or later version before using these connectors. The Serial ATA RAID feature (RAID... version. • When using hot-plug and NCQ, set , refer to section 4.4 RAID configurations or the manual bundled in the BIOS to Standard IDE mode by default. ASUS P5Q PRO Turbo 2-31 If you installed Serial ATA hard disk drives, you intend to [AHCI].

User Manual
Page 52
...Normal Mode, connect the hard disk to the SATA_E1 (orange, port 0) connector on the motherboard. • Use the Drive Xpert utility to 4.3.7 ASUS Drive Xpert for Serial ATA hard disk drives. In the BIOS Main menu and the Device Manager in OS, only the device connected to the SATA_E1 ...(orange, port 0) and SATA_E2 (white, port 1) connectors on the motherboard. 5. If you installed Serial ATA hard...
...Normal Mode, connect the hard disk to the SATA_E1 (orange, port 0) connector on the motherboard. • Use the Drive Xpert utility to 4.3.7 ASUS Drive Xpert for Serial ATA hard disk drives. In the BIOS Main menu and the Device Manager in OS, only the device connected to the SATA_E1 ...(orange, port 0) and SATA_E2 (white, port 1) connectors on the motherboard. 5. If you installed Serial ATA hard...

User Manual
Page 58
...pin PWRSW) This connector is for the system power LED. Connect the chassis power LED cable to hear system beeps and warnings. • ATX power button/soft-off mode depending on the system power, and blinks when the system is in sleep mode. • Hard disk drive activity...written to this connector. System panel connector (20-8 pin PANEL) This connector supports several chassis-mounted functions. The speaker allows you turn on the BIOS settings. Connect the HDD Activity LED cable to the HDD. • System warning speaker (4-pin SPEAKER) This 4-pin connector is for the ...
...pin PWRSW) This connector is for the system power LED. Connect the chassis power LED cable to hear system beeps and warnings. • ATX power button/soft-off mode depending on the system power, and blinks when the system is in sleep mode. • Hard disk drive activity...written to this connector. System panel connector (20-8 pin PANEL) This connector supports several chassis-mounted functions. The speaker allows you turn on the BIOS settings. Connect the HDD Activity LED cable to the HDD. • System warning speaker (4-pin SPEAKER) This 4-pin connector is for the ...


