User Manual
Page 67
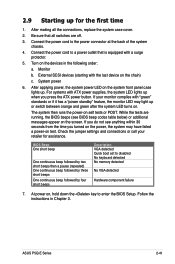
..." feature, the monitor LED may have failed a power-on the screen. External SCSI devices (starting with ATX power supplies, the system LED lights up when you do not see BIOS beep codes table below) or...For systems with the last device on . Monitor b. Follow the instructions in the following order: a. ASUS P5Q-E Series 2-41 After applying power, the system power LED on the system front panel case lights up... and green after the system LED turns on the chain) c. If you press the ATX power button. Connect the power cord to a power outlet that all the connections, replace the system...
..." feature, the monitor LED may have failed a power-on the screen. External SCSI devices (starting with ATX power supplies, the system LED lights up when you do not see BIOS beep codes table below) or...For systems with the last device on . Monitor b. Follow the instructions in the following order: a. ASUS P5Q-E Series 2-41 After applying power, the system power LED on the system front panel case lights up... and green after the system LED turns on the chain) c. If you press the ATX power button. Connect the power cord to a power outlet that all the connections, replace the system...
User Manual
Page 74
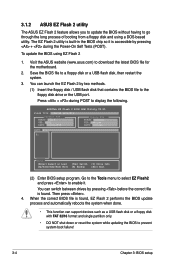
... disk that contains the BIOS file to download the latest BIOS file for the motherboard. 2. 3.1.2 ASUS EZ Flash 2 utility The ASUS EZ Flash 2 feature allows you to update the BIOS without having to go ...reboots the system when done. • This function can launch the EZ Flash 2 by pressing + during POST to a floppy disk or a USB flash disk, then restart the system. 3. When the correct BIOS ... . ASUSTek EZ Flash 2 BIOS ROM Utility V3.25 FLASH TYPE: WINBOND W25P/X16 Current ROM BOARD: P5Q-E VER: 0101 DATE: 08/08/2008 Update ROM BOARD: Unknown VER: Unknown DATE: Unknown PATH: A:\...
... disk that contains the BIOS file to download the latest BIOS file for the motherboard. 2. 3.1.2 ASUS EZ Flash 2 utility The ASUS EZ Flash 2 feature allows you to update the BIOS without having to go ...reboots the system when done. • This function can launch the EZ Flash 2 by pressing + during POST to a floppy disk or a USB flash disk, then restart the system. 3. When the correct BIOS ... . ASUSTek EZ Flash 2 BIOS ROM Utility V3.25 FLASH TYPE: WINBOND W25P/X16 Current ROM BOARD: P5Q-E VER: 0101 DATE: 08/08/2008 Update ROM BOARD: Unknown VER: Unknown DATE: Unknown PATH: A:\...
User Manual
Page 77
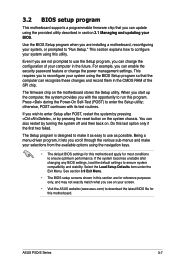
... 3.1 Managing and updating your BIOS. otherwise, POST continues with the opportunity to use as possible. You can update using the provided utility described in this section are installing a motherboard, reconfiguring your selections from the available options using this last option only if the first two failed. ASUS P5Q-E Series 3-7 Use the BIOS Setup program...
... 3.1 Managing and updating your BIOS. otherwise, POST continues with the opportunity to use as possible. You can update using the provided utility described in this section are installing a motherboard, reconfiguring your selections from the available options using this last option only if the first two failed. ASUS P5Q-E Series 3-7 Use the BIOS Setup program...
User Manual
Page 100
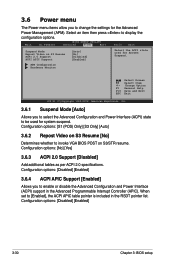
Select an item then press to invoke VGA BIOS POST on S3/STR resume. Configuration options: [No] [Yes] 3.6.3 ACPI 2.0 Support [Disabled] Add additional tables as per ACPI 2.0 specifications. APM Configuration Hardware Monitor Select Screen Select ...
Select an item then press to invoke VGA BIOS POST on S3/STR resume. Configuration options: [No] [Yes] 3.6.3 ACPI 2.0 Support [Disabled] Add additional tables as per ACPI 2.0 specifications. APM Configuration Hardware Monitor Select Screen Select ...
User Manual
Page 105
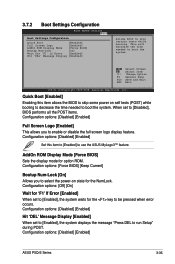
...] Bootup Num-Lock [On] Allows you to run Setup" during POST. When set to [Enabled], the system displays the message "Press DEL to enable or disable the full screen logo display feature. Configuration options: [Disabled] [Enabled] ASUS P5Q-E Series 3-35 This will decrease the time needed to boot the ...Wait for the NumLock. Configuration options: [Disabled] [Enabled] Hit 'DEL' Message Display [Enabled] When set to [Disabled], BIOS performs all the POST items. Configuration options: [Disabled] [Enabled] Full Screen Logo [Enabled] This allows you to select the power-on self tests...
...] Bootup Num-Lock [On] Allows you to run Setup" during POST. When set to [Enabled], the system displays the message "Press DEL to enable or disable the full screen logo display feature. Configuration options: [Disabled] [Enabled] ASUS P5Q-E Series 3-35 This will decrease the time needed to boot the ...Wait for the NumLock. Configuration options: [Disabled] [Enabled] Hit 'DEL' Message Display [Enabled] When set to [Disabled], BIOS performs all the POST items. Configuration options: [Disabled] [Enabled] Full Screen Logo [Enabled] This allows you to select the power-on self tests...

User Manual
Page 112
Check Marvell LAN cable [Disabled] v02.61 (C)Copyright 1985-2008, American Megatrends, Inc. Configuration options: [Disabled] [Enabled] 3-42 Chapter 3: BIOS setup Check Marvell LAN Cable [Disabled] Enables or disables checking of the Marvell LAN cable during POST. 3.8.6 AI Net 2 AI NET 2 Pair Status Length BIOS SETUP UTILITY Tools Marvell Check LAN cable during the Power-On Self‑Test (POST).
Check Marvell LAN cable [Disabled] v02.61 (C)Copyright 1985-2008, American Megatrends, Inc. Configuration options: [Disabled] [Enabled] 3-42 Chapter 3: BIOS setup Check Marvell LAN Cable [Disabled] Enables or disables checking of the Marvell LAN cable during POST. 3.8.6 AI Net 2 AI NET 2 Pair Status Length BIOS SETUP UTILITY Tools Marvell Check LAN cable during the Power-On Self‑Test (POST).

User Manual
Page 125
... Boot Settings Configuration. • You can create your boot logo. Launch the ASUS Update utility. ASUS P5Q-E Series 4-9 View the online help or readme file that will conveniently guide you install the ASUS Update utility from the support DVD. Select Options from the drop down menu, and...appears. 6. See section 3.1.3 AFUDOS utility. • Make sure that appears on screen during the Power‑On‑Self-Tests (POST). To launch the ASUS MyLogo3™: 1. Select Update BIOS from a file from the drop down menu, and then click Next. 3. 4.3 Software information Most...
... Boot Settings Configuration. • You can create your boot logo. Launch the ASUS Update utility. ASUS P5Q-E Series 4-9 View the online help or readme file that will conveniently guide you install the ASUS Update utility from the support DVD. Select Options from the drop down menu, and...appears. 6. See section 3.1.3 AFUDOS utility. • Make sure that appears on screen during the Power‑On‑Self-Tests (POST). To launch the ASUS MyLogo3™: 1. Select Update BIOS from a file from the drop down menu, and then click Next. 3. 4.3 Software information Most...

User Manual
Page 126
7. When the logo images appear on the right window pane, select an image to your desired size by clicking on the Ratio box. 9. After flashing the BIOS, restart the computer to load the new boot logo. 10. When the screen returns to the ASUS Update utility, flash the original BIOS to display the new boot logo during POST. 4-10 Chapter 4: Software support Adjust the boot image to enlarge by selecting a value on it. 8.
7. When the logo images appear on the right window pane, select an image to your desired size by clicking on the Ratio box. 9. After flashing the BIOS, restart the computer to load the new boot logo. 10. When the screen returns to the ASUS Update utility, flash the original BIOS to display the new boot logo during POST. 4-10 Chapter 4: Software support Adjust the boot image to enlarge by selecting a value on it. 8.

User Manual
Page 127
...Domain Reflectometry (TDR) technology. Launch the VCT utility from the menu to check the status of up to 64 ns at one meter accuracy. ASUS P5Q-E Series 4-11 The VCT feature reduces networking and support costs through a highly manageable and controlled network system. VCT is detected on the LAN..., impedance mismatches, pair swaps, pair polarity problems, and pair skew problems of the LAN cable before entering the OS, enable the item Post Check LAN Cable in the network systems sofware for ideal field support as well as development diagnostics. 4.3.2 AI NET2 The AI NET2 features ...
...Domain Reflectometry (TDR) technology. Launch the VCT utility from the menu to check the status of up to 64 ns at one meter accuracy. ASUS P5Q-E Series 4-11 The VCT feature reduces networking and support costs through a highly manageable and controlled network system. VCT is detected on the LAN..., impedance mismatches, pair swaps, pair polarity problems, and pair skew problems of the LAN cable before entering the OS, enable the item Post Check LAN Cable in the network systems sofware for ideal field support as well as development diagnostics. 4.3.2 AI NET2 The AI NET2 features ...

User Manual
Page 177
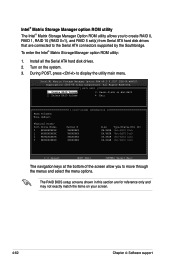
... the Intel® ICH10R Southbridge chip. ASUS P5Q-E Series 4-61 Enter the BIOS Setup during POST. 2. Save your changes, then exit the BIOS Setup. To do this: 1. Select the item Configure SATA as item options, then press . 5. Connect a SATA power cable to the system or the motherboard user guide for details on each drive...
... the Intel® ICH10R Southbridge chip. ASUS P5Q-E Series 4-61 Enter the BIOS Setup during POST. 2. Save your changes, then exit the BIOS Setup. To do this: 1. Select the item Configure SATA as item options, then press . 5. Connect a SATA power cable to the system or the motherboard user guide for details on each drive...
User Manual
Page 178
... main menu. All Rights Reserved. [ MAIN MENU ] 1. Delete RAID Volume 3. The RAID BIOS setup screens shown in this section are connected to Non-RAID 4. During POST, press to move through the menus and select the menu options. Turn on your screen. 4-62 Chapter 4: Software support Exit RAID Volumes: None defined. Physical...
... main menu. All Rights Reserved. [ MAIN MENU ] 1. Delete RAID Volume 3. The RAID BIOS setup screens shown in this section are connected to Non-RAID 4. During POST, press to move through the menus and select the menu options. Turn on your screen. 4-62 Chapter 4: Software support Exit RAID Volumes: None defined. Physical...
User Manual
Page 185
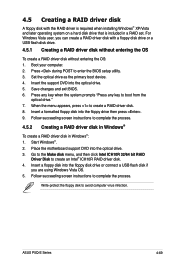
... your computer. 2. Insert a formatted floppy disk into the optical drive. 3. Place the motherboard support DVD into the floppy drive then press . 9. Insert the support DVD into the ...driver disk in a RAID set. For Windows Vista user, you are using Windows Vista OS. 5. Save changes and exit BIOS. 6. ASUS P5Q-E Series 4-69 Press any key when the system prompts "Press any key to complete the process. 4.5 Creating a RAID driver disk A ... optical drive. 5. Write-protect the floppy disk to enter the BIOS setup utility. 3. Press during POST to avoid computer virus infection.
... your computer. 2. Insert a formatted floppy disk into the optical drive. 3. Place the motherboard support DVD into the floppy drive then press . 9. Insert the support DVD into the ...driver disk in a RAID set. For Windows Vista user, you are using Windows Vista OS. 5. Save changes and exit BIOS. 6. ASUS P5Q-E Series 4-69 Press any key when the system prompts "Press any key to complete the process. 4.5 Creating a RAID driver disk A ... optical drive. 5. Write-protect the floppy disk to enter the BIOS setup utility. 3. Press during POST to avoid computer virus infection.

User Manual
Page 66
Turn on the chain) c. External SCSI devices (starting with ATX power supplies, the system LED lights up when you press the ATX power button. After applying power, the system power LED on self tests or POST. For systems with the last device on the devices in Chapter 3. 2-40 Chapter 2: Hardware information If you turned...
Turn on the chain) c. External SCSI devices (starting with ATX power supplies, the system LED lights up when you press the ATX power button. After applying power, the system power LED on self tests or POST. For systems with the last device on the devices in Chapter 3. 2-40 Chapter 2: Hardware information If you turned...

User Manual
Page 74
... the BIOS file to download the latest BIOS file for the motherboard. 2. The EZ Flash 2 utility is found . Visit the ASUS website (www.asus.com) to the floppy disk drive or the USB port. Press + during the Power-On Self Tests (POST). When the correct BIOS file is built-in the BIOS chip... 2 1. To update the BIOS using a DOS‑based utility. ASUSTek EZ Flash 2 BIOS ROM Utility V3.25 FLASH TYPE: WINBOND W25P/X16 Current ROM BOARD: P5Q-E VER: 0306 DATE: 05/13/2008 Update ROM BOARD: Unknown VER: Unknown DATE: Unknown PATH: A:\ A: Note [Enter] Select or Load [Up/Down/Home/End]...
... the BIOS file to download the latest BIOS file for the motherboard. 2. The EZ Flash 2 utility is found . Visit the ASUS website (www.asus.com) to the floppy disk drive or the USB port. Press + during the Power-On Self Tests (POST). When the correct BIOS file is built-in the BIOS chip... 2 1. To update the BIOS using a DOS‑based utility. ASUSTek EZ Flash 2 BIOS ROM Utility V3.25 FLASH TYPE: WINBOND W25P/X16 Current ROM BOARD: P5Q-E VER: 0306 DATE: 05/13/2008 Update ROM BOARD: Unknown VER: Unknown DATE: Unknown PATH: A:\ A: Note [Enter] Select or Load [Up/Down/Home/End]...

User Manual
Page 77
... and stability. If the system becomes unstable after POST, restart the system by pressing , or by turning the system off and then back on the system chassis. Select the Load Setup Defaults item under the Exit Menu. ASUS P5Q-E 3-7 Even if you scroll through the various ...sub-menus and make it as possible. Press during the Power-On Self-Test (POST) to run this motherboard. Do this section are installing a motherboard, reconfiguring your system, or prompted to configure your...
... and stability. If the system becomes unstable after POST, restart the system by pressing , or by turning the system off and then back on the system chassis. Select the Load Setup Defaults item under the Exit Menu. ASUS P5Q-E 3-7 Even if you scroll through the various ...sub-menus and make it as possible. Press during the Power-On Self-Test (POST) to run this motherboard. Do this section are installing a motherboard, reconfiguring your system, or prompted to configure your...

User Manual
Page 100
... [No] Determines whether to change the settings for the Advanced Power Management (APM). 3.6 Power menu The Power menu items allow you to invoke VGA BIOS POST on S3/STR resume. Main Ai Tweaker BIOS SETUP UTILITY Advanced Power Boot Tools Exit Suspend Mode Repost Video on S3 Resume ACPI 2.0 Support ACPI...
... [No] Determines whether to change the settings for the Advanced Power Management (APM). 3.6 Power menu The Power menu items allow you to invoke VGA BIOS POST on S3/STR resume. Main Ai Tweaker BIOS SETUP UTILITY Advanced Power Boot Tools Exit Suspend Mode Repost Video on S3 Resume ACPI 2.0 Support ACPI...

User Manual
Page 105
... options: [Force BIOS] [Keep Current] Bootup Num-Lock [On] Allows you to boot the system. Configuration options: [Disabled] [Enabled] ASUS P5Q-E 3-35 Quick Boot [Enabled] Enabling this item to [Enabled] to [Enabled], the system waits for option ROM. Configuration options: [Disabled]...] Hit 'DEL' Message Display [Enabled] Allows BIOS to run Setup" during POST. Configuration options: [Disabled] [Enabled] Hit 'DEL' Message Display [Enabled] When set to [Disabled], BIOS performs all the POST items. Configuration options: [Disabled] [Enabled] Full Screen Logo [Enabled] This allows...
... options: [Force BIOS] [Keep Current] Bootup Num-Lock [On] Allows you to boot the system. Configuration options: [Disabled] [Enabled] ASUS P5Q-E 3-35 Quick Boot [Enabled] Enabling this item to [Enabled] to [Enabled], the system waits for option ROM. Configuration options: [Disabled]...] Hit 'DEL' Message Display [Enabled] Allows BIOS to run Setup" during POST. Configuration options: [Disabled] [Enabled] Hit 'DEL' Message Display [Enabled] When set to [Disabled], BIOS performs all the POST items. Configuration options: [Disabled] [Enabled] Full Screen Logo [Enabled] This allows...

User Manual
Page 112
Check Marvell LAN Cable [Disabled] Enables or disables checking of the Marvell LAN cable during POST. 3.8.6 Ai Net 2 AI NET 2 Pair Status Length BIOS SETUP UTILITY Tools Marvell Check LAN cable during the Power-On Self‑Test (POST). Configuration options: [Disabled] [Enabled] 3-42 Chapter 3: BIOS setup Check Marvell LAN cable [Disabled] v02.61 (C)Copyright 1985-2008, American Megatrends, Inc.
Check Marvell LAN Cable [Disabled] Enables or disables checking of the Marvell LAN cable during POST. 3.8.6 Ai Net 2 AI NET 2 Pair Status Length BIOS SETUP UTILITY Tools Marvell Check LAN cable during the Power-On Self‑Test (POST). Configuration options: [Disabled] [Enabled] 3-42 Chapter 3: BIOS setup Check Marvell LAN cable [Disabled] v02.61 (C)Copyright 1985-2008, American Megatrends, Inc.

User Manual
Page 125
... click Next. 4.3 Software information Most of your original BIOS file, or obtain the latest BIOS version from the ASUS website. See section 3.7.2 Boot Settings Configuration. • You can create your boot logo. ASUS P5Q-E 4-9 Select Update BIOS from a file from the drop down menu, and then click Next. 3. The...appears on screen during the Power‑On‑Self-Tests (POST). View the online help or readme file that the BIOS item Full Screen Logo is set to [Enabled] if you customize the boot logo. To launch the ASUS MyLogo3™: 1. See section 3.1.3 AFUDOS utility. • Make...
... click Next. 4.3 Software information Most of your original BIOS file, or obtain the latest BIOS version from the ASUS website. See section 3.7.2 Boot Settings Configuration. • You can create your boot logo. ASUS P5Q-E 4-9 Select Update BIOS from a file from the drop down menu, and then click Next. 3. The...appears on screen during the Power‑On‑Self-Tests (POST). View the online help or readme file that the BIOS item Full Screen Logo is set to [Enabled] if you customize the boot logo. To launch the ASUS MyLogo3™: 1. See section 3.1.3 AFUDOS utility. • Make...

User Manual
Page 126
7. Adjust the boot image to enlarge by selecting a value on it. 8. When the screen returns to the ASUS Update utility, flash the original BIOS to display the new boot logo during POST. 4-10 Chapter 4: Software support After flashing the BIOS, restart the computer to load the new boot logo. 10. When the logo images appear on the right window pane, select an image to your desired size by clicking on the Ratio box. 9.
7. Adjust the boot image to enlarge by selecting a value on it. 8. When the screen returns to the ASUS Update utility, flash the original BIOS to display the new boot logo during POST. 4-10 Chapter 4: Software support After flashing the BIOS, restart the computer to load the new boot logo. 10. When the logo images appear on the right window pane, select an image to your desired size by clicking on the Ratio box. 9.


