User Manual
Page 3
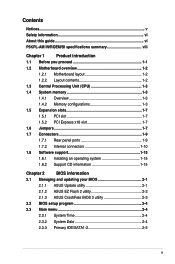
Contents Notices...v Safety information vi About this guide vi P5KPL-AM IN/ROEM/SI specifications summary viii Chapter 1 Product introduction 1.1 Before you proceed 1-1 1.2 Motherboard overview 1-2 1.2.1 Motherboard layout 1-2 1.2.2 Layout contents ... Support CD information 1-15 Chapter 2 BIOS information 2.1 Managing and updating your BIOS 2-1 2.1.1 ASUS Update utility 2-1 2.1.2 ASUS EZ Flash 2 utility 2-2 2.1.3 ASUS CrashFree BIOS 3 utility 2-3 2.2 BIOS setup program 2-4 2.3 Main menu 2-4 2.3.1 System Time 2-4 2.3.2 System Date 2-4 2.3.3 Primary IDE/SATA1-2 ...
Contents Notices...v Safety information vi About this guide vi P5KPL-AM IN/ROEM/SI specifications summary viii Chapter 1 Product introduction 1.1 Before you proceed 1-1 1.2 Motherboard overview 1-2 1.2.1 Motherboard layout 1-2 1.2.2 Layout contents ... Support CD information 1-15 Chapter 2 BIOS information 2.1 Managing and updating your BIOS 2-1 2.1.1 ASUS Update utility 2-1 2.1.2 ASUS EZ Flash 2 utility 2-2 2.1.3 ASUS CrashFree BIOS 3 utility 2-3 2.2 BIOS setup program 2-4 2.3 Main menu 2-4 2.3.1 System Time 2-4 2.3.2 System Date 2-4 2.3.3 Primary IDE/SATA1-2 ...

User Manual
Page 8
P5KPL-AM IN/ROEM/SI specifications summary CPU Chipset Front Side Bus Memory Expansion Slots VGA Storage LAN Audio USB ASUS Features Rear panel LGA775 socket for Intel® Core™2 Quad/ Core™2 Extreme / Core™2 Duo / Pentium® D / Pentium® 4 / Celeron... ports Realtek® RTL8131, 10/100 LAN VT1705 6-CH high-Definition Audio CODEC Max. 8 x USB2.0 ports (4 ports at mid-board, 4 ports at back panel ASUS CrashFree BIOS 3 ASUS Q-Fan ASUS EZ Flash 2 1 x PS/2 keyboard port 1 x PS/2 mouse port 1 x VGA port 1 x LAN (RJ-45) port 4 x USB 2.0 ports 1 x COM port 6-channel audio...
P5KPL-AM IN/ROEM/SI specifications summary CPU Chipset Front Side Bus Memory Expansion Slots VGA Storage LAN Audio USB ASUS Features Rear panel LGA775 socket for Intel® Core™2 Quad/ Core™2 Extreme / Core™2 Duo / Pentium® D / Pentium® 4 / Celeron... ports Realtek® RTL8131, 10/100 LAN VT1705 6-CH high-Definition Audio CODEC Max. 8 x USB2.0 ports (4 ports at mid-board, 4 ports at back panel ASUS CrashFree BIOS 3 ASUS Q-Fan ASUS EZ Flash 2 1 x PS/2 keyboard port 1 x PS/2 mouse port 1 x VGA port 1 x LAN (RJ-45) port 4 x USB 2.0 ports 1 x COM port 6-channel audio...

User Manual
Page 9
ix P5KPL-AM IN/ROEM/SI specifications summary Internal connectors BIOS features Manageability Support CD contents Accessories Form factor 1 x High Definition front panel audio connector 2 x USB 2.0 connectors supports additional 4 USB ports 2 x ... 12 V power connector 1 x System Panel connector 8 Mb Flash ROM, AMI BIOS, PnP, DMI2.0, WfM2.0, SM BIOS 2.5 WOL, PXE,RPL, WOR, PME Wake Up Drivers ASUS PC Probe II ASUS Update utility 1 x Serial ATA cable 1 x Ultra ATA66 cable I/O shield User manual uATX form factor: 9.6 in x 7.0 in (24.4 cm x 17.8cm) *Specifications are subject...
ix P5KPL-AM IN/ROEM/SI specifications summary Internal connectors BIOS features Manageability Support CD contents Accessories Form factor 1 x High Definition front panel audio connector 2 x USB 2.0 connectors supports additional 4 USB ports 2 x ... 12 V power connector 1 x System Panel connector 8 Mb Flash ROM, AMI BIOS, PnP, DMI2.0, WfM2.0, SM BIOS 2.5 WOL, PXE,RPL, WOR, PME Wake Up Drivers ASUS PC Probe II ASUS Update utility 1 x Serial ATA cable 1 x Ultra ATA66 cable I/O shield User manual uATX form factor: 9.6 in x 7.0 in (24.4 cm x 17.8cm) *Specifications are subject...

User Manual
Page 10
..., before removing or plugging in any component, ensure that the ATX power supply is a reminder that lights up to page ix for buying an ASUS® P5KPL-AM IN/ROEM/SI motherboard! Onboard LED This motherboard comes with the component. • Before you install or remove any motherboard component. Before you start installing the... the motherboard, peripherals, or components. Chapter 1 Product introduction Thank you for the list of accessories. The illustration below shows the location of the onboard LED. 1-1 ASUS P5KPL-AM IN/ROEM/SI This is switched off mode.
..., before removing or plugging in any component, ensure that the ATX power supply is a reminder that lights up to page ix for buying an ASUS® P5KPL-AM IN/ROEM/SI motherboard! Onboard LED This motherboard comes with the component. • Before you install or remove any motherboard component. Before you start installing the... the motherboard, peripherals, or components. Chapter 1 Product introduction Thank you for the list of accessories. The illustration below shows the location of the onboard LED. 1-1 ASUS P5KPL-AM IN/ROEM/SI This is switched off mode.
User Manual
Page 12
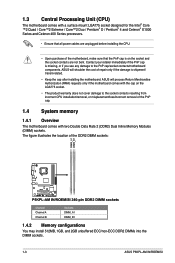
... Channel A Channel B Sockets DIMM_A1 DIMM_B1 1.4.2 Memory configurations You may install 512MB, 1GB, and 2GB unbuffered ECC/non-ECC DDR2 DIMMs into the DIMM sockets. 1-3 ASUS P5KPL-AM IN/ROEM/SI The figure illustrates the location of repair only if the damage is on the LGA775 socket. • The product warranty does not cover damage...
... Channel A Channel B Sockets DIMM_A1 DIMM_B1 1.4.2 Memory configurations You may install 512MB, 1GB, and 2GB unbuffered ECC/non-ECC DDR2 DIMMs into the DIMM sockets. 1-3 ASUS P5KPL-AM IN/ROEM/SI The figure illustrates the location of repair only if the damage is on the LGA775 socket. • The product warranty does not cover damage...

User Manual
Page 14
...; • • • • • • • • • • • • • • • • • • • • • • • • • 1-5 ASUS P5KPL-AM IN/ROEM/SI
...; • • • • • • • • • • • • • • • • • • • • • • • • • 1-5 ASUS P5KPL-AM IN/ROEM/SI

User Manual
Page 16
SS - Visit the ASUS website at (www.asus.com) for the USB port. Refer to the technical documentation that complies with your expansion card for installation details. Failure to do so may cause ... cards. Single-sided / DS - Otherwise, the system would not power up from S1 sleep mode (CPU stopped, DRAM refreshed, system running in sleep mode. 1-7 ASUS P5KPL-AM IN/ROEM/SI Set to +5VSB to unplug the power cord before adding or removing expansion cards. Ensure to wake up . • The total current consumed must...
SS - Visit the ASUS website at (www.asus.com) for the USB port. Refer to the technical documentation that complies with your expansion card for installation details. Failure to do so may cause ... cards. Single-sided / DS - Otherwise, the system would not power up from S1 sleep mode (CPU stopped, DRAM refreshed, system running in sleep mode. 1-7 ASUS P5KPL-AM IN/ROEM/SI Set to +5VSB to unplug the power cord before adding or removing expansion cards. Ensure to wake up . • The total current consumed must...

User Manual
Page 18
... No link Data activity Data activity Status OFF OFF Green Speed LED Description No link 10M 100M ACT/LINK SPEED LED LED LAN port 1-9 ASUS P5KPL-AM IN/ROEM/SI The USBPW56 jumper is the Space Bar), clicking the mouse, or using a USB device. When you set this port allows 10/100 connection to...
... No link Data activity Data activity Status OFF OFF Green Speed LED Description No link 10M 100M ACT/LINK SPEED LED LED LAN port 1-9 ASUS P5KPL-AM IN/ROEM/SI The USBPW56 jumper is the Space Bar), clicking the mouse, or using a USB device. When you set this port allows 10/100 connection to...

User Manual
Page 20
... DMA 100/66/33 signal cable. There are for USB 2.0 ports. Connect the USB module cable to any device jumper is purchased separately. 1-11 ASUS P5KPL-AM IN/ROEM/SI The USB module cable is set as "Cable-Select," ensure that supports up to configure your device. Connect the blue connector to the motherboard...
... DMA 100/66/33 signal cable. There are for USB 2.0 ports. Connect the USB module cable to any device jumper is purchased separately. 1-11 ASUS P5KPL-AM IN/ROEM/SI The USB module cable is set as "Cable-Select," ensure that supports up to configure your device. Connect the blue connector to the motherboard...

User Manual
Page 22
... with EATX 12 V Specification 2.0 (or later version) and provides a minimum power of 400 W. • Do not forget to hear system beeps and warnings. 1-13 ASUS P5KPL-AM IN/ROEM/SI Otherwise, the system will not boot. • We recommended that complies with more power-consuming devices. 6. The power supply plugs are for the chassis...
... with EATX 12 V Specification 2.0 (or later version) and provides a minimum power of 400 W. • Do not forget to hear system beeps and warnings. 1-13 ASUS P5KPL-AM IN/ROEM/SI Otherwise, the system will not boot. • We recommended that complies with more power-consuming devices. 6. The power supply plugs are for the chassis...
User Manual
Page 24
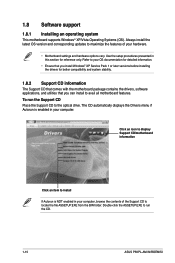
To run the CD. 1-15 ASUS P5KPL-AM IN/ROEM/SI Click an icon to display Support CD/motherboard information Click an item to install If Autorun is enabled in your computer. Use the setup procedures ...
To run the CD. 1-15 ASUS P5KPL-AM IN/ROEM/SI Click an icon to display Support CD/motherboard information Click an item to install If Autorun is enabled in your computer. Use the setup procedures ...

User Manual
Page 26
... a USB port, then launch EZ Flash 2 in either of these two ways: (1) Press + during POST to prevent system boot failure! 2-2 ASUS P5KPL-AM IN/ROEM/SI Select the correct BIOS file then press , EZ Flash 2 updates the BIOS and automatically reboots the system when done. • This function supports ... the system while updating the BIOS to display the following: ASUSTek EZ Flash 2 BIOS ROM Utility V3.25 FLASH TYPE: MXIC 25L8005 Current ROM BOARD: P5KPL-AM VER: 0201 (H:00 B:00) DATE: 01/14/2009 Update ROM BOARD: Unknown VER: Unknown DATE: Unknown PATH: A:\ A: Note [Enter] Select ...
... a USB port, then launch EZ Flash 2 in either of these two ways: (1) Press + during POST to prevent system boot failure! 2-2 ASUS P5KPL-AM IN/ROEM/SI Select the correct BIOS file then press , EZ Flash 2 updates the BIOS and automatically reboots the system when done. • This function supports ... the system while updating the BIOS to display the following: ASUSTek EZ Flash 2 BIOS ROM Utility V3.25 FLASH TYPE: MXIC 25L8005 Current ROM BOARD: P5KPL-AM VER: 0201 (H:00 B:00) DATE: 01/14/2009 Update ROM BOARD: Unknown VER: Unknown DATE: Unknown PATH: A:\ A: Note [Enter] Select ...

User Manual
Page 28
...Tab Select Field F1 General Help F10 Save and Exit ESC Exit 2.3.1 System Time [xx:xx:xx] Allows you to set the system date. 2-4 ASUS P5KPL-AM IN/ROEM/SI We recommend that you always shut down procedure. • Press ++ simultaneously. • Press the reset button on the system chassis. • ...] Allows you to ensure optimum performance. This section explains how to turn the system off then back on your screen. • Visit the ASUS website at www.asus.com to your data or system. Use [+] or [-] to "Run Setup." 2.2 BIOS setup program Use the BIOS Setup program when you...
...Tab Select Field F1 General Help F10 Save and Exit ESC Exit 2.3.1 System Time [xx:xx:xx] Allows you to set the system date. 2-4 ASUS P5KPL-AM IN/ROEM/SI We recommend that you always shut down procedure. • Press ++ simultaneously. • Press the reset button on the system chassis. • ...] Allows you to ensure optimum performance. This section explains how to turn the system off then back on your screen. • Visit the ASUS website at www.asus.com to your data or system. Use [+] or [-] to "Run Setup." 2.2 BIOS setup program Use the BIOS Setup program when you...

User Manual
Page 30
... auto-detected system memory. 2.4 Advanced menu The Advanced menu items allow you to individually set overclocking parameters. Auto - loads overclocking profiles with spread spectrum. 2-6 ASUS P5KPL-AM IN/ROEM/SI JumperFree Configuration USB Configuration CPU Configuration Chipset Onboard Devices Configuration PCIPnP Adjust system frequency/voltage 2.4.1 JumperFree Configuration AI Overclocking [Auto] Select Screen Select Item...
... auto-detected system memory. 2.4 Advanced menu The Advanced menu items allow you to individually set overclocking parameters. Auto - loads overclocking profiles with spread spectrum. 2-6 ASUS P5KPL-AM IN/ROEM/SI JumperFree Configuration USB Configuration CPU Configuration Chipset Onboard Devices Configuration PCIPnP Adjust system frequency/voltage 2.4.1 JumperFree Configuration AI Overclocking [Auto] Select Screen Select Item...

User Manual
Page 32
... mode is disabled. Users need to reset the computer to display the configuration options. 2.4.2 USB Configuration The items in this item. Configuration options: [Disabled] [Enabled] 2-8 ASUS P5KPL-AM IN/ROEM/SI Key in ratio numbers directly.
... mode is disabled. Users need to reset the computer to display the configuration options. 2.4.2 USB Configuration The items in this item. Configuration options: [Disabled] [Enabled] 2-8 ASUS P5KPL-AM IN/ROEM/SI Key in ratio numbers directly.

User Manual
Page 34
... controller. Configuration options: [No] [Yes] PCI Latency Timer [64] Allows you to change the advanced settings for an IRQ. Configuration options: [Disabled] [Enabled] 2-10 ASUS P5KPL-AM IN/ROEM/SI Configuration options: [AC97] [HD Audio] 2.4.5 Onboard Devices Configuration Onboard PCIE 10/100M LAN [Enabled] Allows you to enable or disable the boot ROM in...
... controller. Configuration options: [No] [Yes] PCI Latency Timer [64] Allows you to change the advanced settings for an IRQ. Configuration options: [Disabled] [Enabled] 2-10 ASUS P5KPL-AM IN/ROEM/SI Configuration options: [AC97] [HD Audio] 2.4.5 Onboard Devices Configuration Onboard PCIE 10/100M LAN [Enabled] Allows you to enable or disable the boot ROM in...
User Manual
Page 36
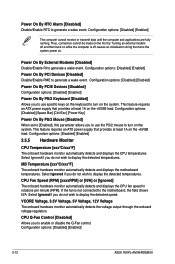
... [N/A] or [Ignored] The onboard hardware monitor automatically detects and displays the CPU fan speed in rotations per minute (RPM). Configuration options: [Disabled] [Enabled] 2-12 ASUS P5KPL-AM IN/ROEM/SI Turning an external modem off and then back on while the computer is not connected to turn on the system. MB Temperature [xxxº...
... [N/A] or [Ignored] The onboard hardware monitor automatically detects and displays the CPU fan speed in rotations per minute (RPM). Configuration options: [Disabled] [Enabled] 2-12 ASUS P5KPL-AM IN/ROEM/SI Turning an external modem off and then back on while the computer is not connected to turn on the system. MB Temperature [xxxº...

User Manual
Page 38
... . 3. After you to the Setup utility. [View Only] - To set or change the supervisor password, follow the same steps in the Setup utility. 2-14 ASUS P5KPL-AM IN/ROEM/SI To change the supervisor password. If you forget your BIOS password, you successfully set your password. On the password box, key in a password containing...
... . 3. After you to the Setup utility. [View Only] - To set or change the supervisor password, follow the same steps in the Setup utility. 2-14 ASUS P5KPL-AM IN/ROEM/SI To change the supervisor password. If you forget your BIOS password, you successfully set your password. On the password box, key in a password containing...

User Manual
Page 40
... option, a confirmation appears. Pressing does not immediately menu or from the Exit menu to ensure the values you made to the non-volatile RAM. 2-16 ASUS P5KPL-AM IN/ROEM/SI
... option, a confirmation appears. Pressing does not immediately menu or from the Exit menu to ensure the values you made to the non-volatile RAM. 2-16 ASUS P5KPL-AM IN/ROEM/SI