

User Manual
Page 12
... multimedia experience with an ACPI management function to provide efficient power management for advanced operating systems. 1.3.2 Innovative ASUS features ASUS EPU ASUS EPU (Energy Processing Unit) provides total system power management by detecting the current PC loading and intelligently moderating power... in real-time. It automatically provides the most appropriate power usage to meet the changing display requirements of 1066 (O.C.)/...
... multimedia experience with an ACPI management function to provide efficient power management for advanced operating systems. 1.3.2 Innovative ASUS features ASUS EPU ASUS EPU (Energy Processing Unit) provides total system power management by detecting the current PC loading and intelligently moderating power... in real-time. It automatically provides the most appropriate power usage to meet the changing display requirements of 1066 (O.C.)/...

User Manual
Page 38
...only. Double-click the ASSETUP.EXE to avail all motherboard features. To run the DVD. 1-28 Chapter 1: Product introduction The DVD automatically displays the Drivers menu if Autorun is for better compatibility and system stability. 1.11.2 Support DVD information The Support DVD that comes with the ... OS version and corresponding updates to maximize the features of the Support DVD are subject to change at www.asus.com for reference only. Click an icon to display Support DVD/ motherboard information Click an item to install If Autorun is NOT enabled in this section for updates...
...only. Double-click the ASSETUP.EXE to avail all motherboard features. To run the DVD. 1-28 Chapter 1: Product introduction The DVD automatically displays the Drivers menu if Autorun is for better compatibility and system stability. 1.11.2 Support DVD information The Support DVD that comes with the ... OS version and corresponding updates to maximize the features of the Support DVD are subject to change at www.asus.com for reference only. Click an icon to display Support DVD/ motherboard information Click an item to install If Autorun is NOT enabled in this section for updates...
User Manual
Page 40
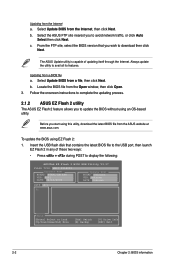
...Follow the onscreen instructions to complete the updating process. 2.1.2 ASUS EZ Flash 2 utility The ASUS EZ Flash 2 feature allows you to display the following: ASUSTek EZ Flash 2 BIOS ROM Utility V3.37 FLASH TYPE: MXIC 25L8005 Current ROM BOARD: P5KPL-AM EPU VER: 0201 DATE: 04/13/2009 Update ROM BOARD...click Next. Updating from the Internet, then click Next. Select Update BIOS from the Internet a. Select Update BIOS from the ASUS website at www.asus.com. Select the ASUS FTP site nearest you to download then click Next. Insert the USB flash disk that you start using EZ Flash 2: ...
...Follow the onscreen instructions to complete the updating process. 2.1.2 ASUS EZ Flash 2 utility The ASUS EZ Flash 2 feature allows you to display the following: ASUSTek EZ Flash 2 BIOS ROM Utility V3.37 FLASH TYPE: MXIC 25L8005 Current ROM BOARD: P5KPL-AM EPU VER: 0201 DATE: 04/13/2009 Update ROM BOARD...click Next. Updating from the Internet, then click Next. Select Update BIOS from the Internet a. Select Update BIOS from the ASUS website at www.asus.com. Select the ASUS FTP site nearest you to download then click Next. Insert the USB flash disk that you start using EZ Flash 2: ...
User Manual
Page 41
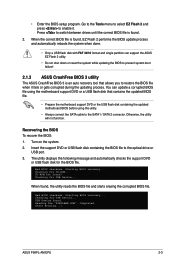
...shut down or reset the system while updating the BIOS to prevent system boot failure! 2.1.3 ASUS CrashFree BIOS 3 utility The ASUS CrashFree BIOS 3 is found ! Turn on the system. 2. The utility displays the following message and automatically checks the support DVD or USB flash disk for CD-ROM......to the Tools menu to select EZ Flash 2 and press to the optical drive or USB port. 3. Checking for USB Device... Start Erasing...\ ASUS P5KPL-AM EPU 2-3 Recovering the BIOS To recover the BIOS: 1. Bad BIOS checksum. CD-ROM not found . 2. Completed. Otherwise, the utility will not ...
...shut down or reset the system while updating the BIOS to prevent system boot failure! 2.1.3 ASUS CrashFree BIOS 3 utility The ASUS CrashFree BIOS 3 is found ! Turn on the system. 2. The utility displays the following message and automatically checks the support DVD or USB flash disk for CD-ROM......to the Tools menu to select EZ Flash 2 and press to the optical drive or USB port. 3. Checking for USB Device... Start Erasing...\ ASUS P5KPL-AM EPU 2-3 Recovering the BIOS To recover the BIOS: 1. Bad BIOS checksum. CD-ROM not found . 2. Completed. Otherwise, the utility will not ...
User Manual
Page 44
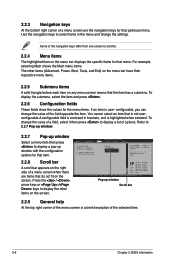
...to select a field. To change the value of a field, select it then press to another. 2.2.4 Menu items The highlighted item on the menu bar displays the specific items for the menu items. If an item is highlighted when selected. Refer to 2.2.7 Pop-up window. 2.2.7 Pop-up window Select a ...F10 Save and Exit ESC Exit v02.58 (C)Copyright 1985-2009, American, American Megatrends, Inc. Select Screen Select Item +- Use the navigation keys to display the other items (Advanced, Power, Boot, Tools, and Exit) on the menu bar have their respective menu items. 2.2.5 Submenu items A solid ...
...to select a field. To change the value of a field, select it then press to another. 2.2.4 Menu items The highlighted item on the menu bar displays the specific items for the menu items. If an item is highlighted when selected. Refer to 2.2.7 Pop-up window. 2.2.7 Pop-up window Select a ...F10 Save and Exit ESC Exit v02.58 (C)Copyright 1985-2009, American, American Megatrends, Inc. Select Screen Select Item +- Use the navigation keys to display the other items (Advanced, Power, Boot, Tools, and Exit) on the menu bar have their respective menu items. 2.2.5 Submenu items A solid ...
User Manual
Page 45
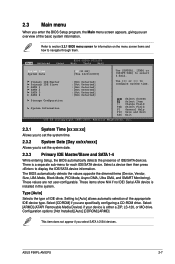
... UTILITY Boot Tools Exit System Time [00:31:48] System Date [Tue 04/21/2009] Use [ENTER], [TAB] or [SHIFT-TAB] to display the IDE/SATA device information. ASUS P5KPL-AM EPU 2-7 Select a device item then press to select a field. Configuration options: [Not Installed] [Auto] [CDROM] [ARMD] This item does not appear if you...
... UTILITY Boot Tools Exit System Time [00:31:48] System Date [Tue 04/21/2009] Use [ENTER], [TAB] or [SHIFT-TAB] to display the IDE/SATA device information. ASUS P5KPL-AM EPU 2-7 Select a device item then press to select a field. Configuration options: [Not Installed] [Auto] [CDROM] [ARMD] This item does not appear if you...
User Manual
Page 47
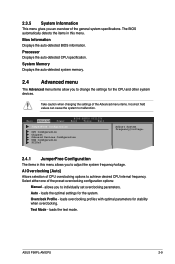
... auto-detected CPU specification. loads the optimal settings for stability when overclocking. Bios Information Displays the auto-detected BIOS information. System Memory Displays the auto-detected system memory. 2.4 Advanced menu The Advanced menu items allow you to individually...this menu. Take caution when changing the settings of CPU overclocking options to adjust the system frequency/voltage. Overclock Profile - ASUS P5KPL-AM EPU 2-9 2.3.5 System Information This menu gives you an overview of the preset overclocking configuration options: Manual - Auto - Select ...
... auto-detected CPU specification. loads the optimal settings for stability when overclocking. Bios Information Displays the auto-detected BIOS information. System Memory Displays the auto-detected system memory. 2.4 Advanced menu The Advanced menu items allow you to individually...this menu. Take caution when changing the settings of CPU overclocking options to adjust the system frequency/voltage. Overclock Profile - ASUS P5KPL-AM EPU 2-9 2.3.5 System Information This menu gives you an overview of the preset overclocking configuration options: Manual - Auto - Select ...

User Manual
Page 48
... [Manual]. If this item is from 133 to the table below for the correct Front Side Bus and CPU External Frequency settings. CPU Frequency [xxx] Displays the frequency sent by the BIOS. Configuration options: [Overclock 5%] [Overclock 10%] [Overclock 15%] [Overclock 20%] DRAM Frequency [Auto] Allows you to adjust Memory Over voltage...
... [Manual]. If this item is from 133 to the table below for the correct Front Side Bus and CPU External Frequency settings. CPU Frequency [xxx] Displays the frequency sent by the BIOS. Configuration options: [Overclock 5%] [Overclock 10%] [Overclock 15%] [Overclock 20%] DRAM Frequency [Auto] Allows you to adjust Memory Over voltage...
User Manual
Page 50
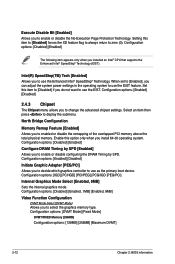
... [256MB] Configuration options: [128MB] [256MB] [Maximum DVMT] 2-12 Chapter 2: BIOS information Setting this item to [Disabled] forces the XD feature flag to always return to display the submenu. Intel(R) SpeedStep(TM) Tech [Enabled] Allows you to use as the primary boot device. Enable this item to [Disabled] if you can adjust...
... [256MB] Configuration options: [128MB] [256MB] [Maximum DVMT] 2-12 Chapter 2: BIOS information Setting this item to [Disabled] forces the XD feature flag to always return to display the submenu. Intel(R) SpeedStep(TM) Tech [Enabled] Allows you to use as the primary boot device. Enable this item to [Disabled] if you can adjust...
User Manual
Page 52
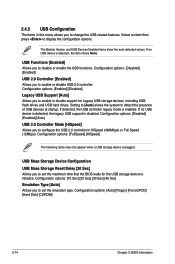
... is detected, the legacy USB support is detected, the item shows None. If no USB device is disabled. Setting to [Auto] allows the system to display the configuration options. Configuration options: [Disabled] [Enabled] USB 2.0 Controller [Enabled] Allows you to enable or disable USB 2.0 controller. USB Mass Storage Device Configuration USB Mass...
... is detected, the legacy USB support is detected, the item shows None. If no USB device is disabled. Setting to [Auto] allows the system to display the configuration options. Configuration options: [Disabled] [Enabled] USB 2.0 Controller [Enabled] Allows you to enable or disable USB 2.0 controller. USB Mass Storage Device Configuration USB Mass...
User Manual
Page 53
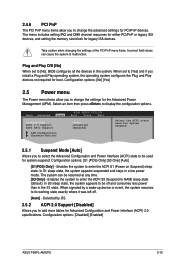
... by a wake-up device or event, the system resumes to [No], BIOS configures all the devices in a low power mode. Configuration options: [Disabled] [Enabled] ASUS P5KPL-AM EPU 2-15 The menu includes setting IRQ and DMA channel resources for either PCI/PnP or legacy ISA devices, and setting the memory size block for... Play operating system, the operating system configures the Plug and Play devices not required for legacy ISA devices. The system can cause the system to display the configuration options.
... by a wake-up device or event, the system resumes to [No], BIOS configures all the devices in a low power mode. Configuration options: [Disabled] [Enabled] ASUS P5KPL-AM EPU 2-15 The menu includes setting IRQ and DMA channel resources for either PCI/PnP or legacy ISA devices, and setting the memory size block for... Play operating system, the operating system configures the Plug and Play devices not required for legacy ISA devices. The system can cause the system to display the configuration options.
User Manual
Page 55
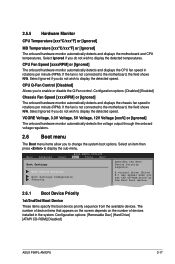
... to enable or disable the Q-Fan control. Configuration options: [Removable Dev.] [Hard Drive] [ATAPI CD-ROM] [Disabled] ASUS P5KPL-AM EPU 2-17 CPU Fan Speed [xxxxRPM] or [Ignored] The onboard hardware monitor automatically detects and displays the CPU fan speed in rotations per minute (RPM). CPU Q-Fan Control [Disabled] Allows you to the motherboard...
... to enable or disable the Q-Fan control. Configuration options: [Removable Dev.] [Hard Drive] [ATAPI CD-ROM] [Disabled] ASUS P5KPL-AM EPU 2-17 CPU Fan Speed [xxxxRPM] or [Ignored] The onboard hardware monitor automatically detects and displays the CPU fan speed in rotations per minute (RPM). CPU Q-Fan Control [Disabled] Allows you to the motherboard...
User Manual
Page 56
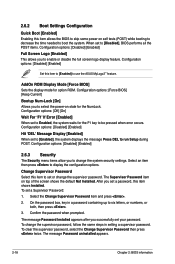
...Password then press twice. Select an item then press to change the system security settings. Change Supervisor Password Select this item to use the ASUS MyLogo2™ feature. The message Password Installed appears after you set a password, this item shows Installed. Configuration options: [Disabled] [...Enabled] Set this item to [Enabled] to set to [Enabled], the system displays the message Press DEL to six letters, or numbers, or both, then press . 3. Configuration options: [Disabled] [Enabled] Hit 'DEL' Message...
...Password then press twice. Select an item then press to change the system security settings. Change Supervisor Password Select this item to use the ASUS MyLogo2™ feature. The message Password Installed appears after you set a password, this item shows Installed. Configuration options: [Disabled] [...Enabled] Set this item to [Enabled] to set to [Enabled], the system displays the message Press DEL to six letters, or numbers, or both, then press . 3. Configuration options: [Disabled] [Enabled] Hit 'DEL' Message...

User Manual
Page 58
...CD-DISC (read only) 3. This utility supports 1. NTFS (read only) 2.7.1 ASUS EZ Flash 2 Allows you to run the utility to select and update BIOS. Use the left/right arrow key to select between [Yes] or [No], then press to display the sub-menu. FAT 12/16/32 (r/w) 2. When you press , a... confirmation message appears. Select an item then press to confirm your choice. Main Advanced Power BIOS SETUP UTILITY Boot Tools Exit ASUS EZ Flash 2 AI NET 2 Press ENTER to run...
...CD-DISC (read only) 3. This utility supports 1. NTFS (read only) 2.7.1 ASUS EZ Flash 2 Allows you to run the utility to select and update BIOS. Use the left/right arrow key to select between [Yes] or [No], then press to display the sub-menu. FAT 12/16/32 (r/w) 2. When you press , a... confirmation message appears. Select an item then press to confirm your choice. Main Advanced Power BIOS SETUP UTILITY Boot Tools Exit ASUS EZ Flash 2 AI NET 2 Press ENTER to run...


