User Manual
Page 15
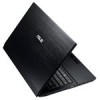
15.6"/16" model 1 4 esc f1 f2 f3 f4 tab caps lock shift ctrl fn alt f5 f6 f7 f8 f9 f10 f11 f12 pause break prt sc sysrq delete insert home pgup pgdn end backspace num lk scr lk enter 7 home 4 89 pgup 56 shift 1 23 end pgdn enter alt ctrl 0 insert delete 3 5 6 7 9 Notebook PC User Manual 15
15.6"/16" model 1 4 esc f1 f2 f3 f4 tab caps lock shift ctrl fn alt f5 f6 f7 f8 f9 f10 f11 f12 pause break prt sc sysrq delete insert home pgup pgdn end backspace num lk scr lk enter 7 home 4 89 pgup 56 shift 1 23 end pgdn enter alt ctrl 0 insert delete 3 5 6 7 9 Notebook PC User Manual 15
User Manual
Page 19
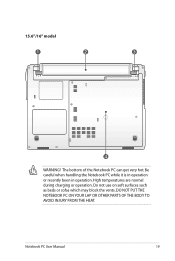
High temperatures are normal during charging or operation. Do not use on soft surfaces such as beds or sofas which may block the vents. Notebook PC User Manual 19 The bottom of the Notebook PC can get very hot. Be careful when handling the Notebook PC while it is in operation or recently been in operation. DO NOT PUT THE NOTEBOOK PC ON YOUR LAP OR OTHER PARTS OF THE BODY TO AVOID INJURY FROM THE HEAT. 15.6"/16" model 1 2 3 4 WARNING!
High temperatures are normal during charging or operation. Do not use on soft surfaces such as beds or sofas which may block the vents. Notebook PC User Manual 19 The bottom of the Notebook PC can get very hot. Be careful when handling the Notebook PC while it is in operation or recently been in operation. DO NOT PUT THE NOTEBOOK PC ON YOUR LAP OR OTHER PARTS OF THE BODY TO AVOID INJURY FROM THE HEAT. 15.6"/16" model 1 2 3 4 WARNING!
User Manual
Page 21
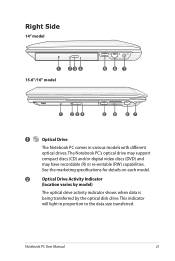
... Indicator (location varies by model) The optical drive activity indicator shows when data is being transferred by the optical disk drive. Right Side 14" model 1 15.6"/16" model 23 4 5 67 1 2 34 1 2 34 58 67 58 67 HDMI 1 Optical Drive The Notebook 9 PC 10 comes 5 in proportion to the data size transferred...
... Indicator (location varies by model) The optical drive activity indicator shows when data is being transferred by the optical disk drive. Right Side 14" model 1 15.6"/16" model 23 4 5 67 1 2 34 1 2 34 58 67 58 67 HDMI 1 Optical Drive The Notebook 9 PC 10 comes 5 in proportion to the data size transferred...

User Manual
Page 24
... D-sub monitor port supports a standard VGA-compatible device such as a monitor or projector to exit the Notebook PC. Left Side 14" model 1 2 15.6"/16" model 1 2 1 2 HDMI 3 4 5 6 HDMI 3 E-SATA 4 3 4 5 76 5 76 1 Kensington® Lock Port The Kensington® lock port allows the Notebook PC to be se2cured u8sing 5Kensington&#...
... D-sub monitor port supports a standard VGA-compatible device such as a monitor or projector to exit the Notebook PC. Left Side 14" model 1 2 15.6"/16" model 1 2 1 2 HDMI 3 4 5 6 HDMI 3 E-SATA 4 3 4 5 76 5 76 1 Kensington® Lock Port The Kensington® lock port allows the Notebook PC to be se2cured u8sing 5Kensington&#...

User Manual
Page 26
Rear Side 1 1 Battery Pack The battery pack is automatically charged when the Notebook PC is connected to an AC power source and maintains power to the Notebook PC when AC power is not connected. Battery time varies by usage and by the specifications for this Notebook PC.The battery pack cannot be disassembled and must be purchased as a single unit. Front Side 14" model 1 15.6"/16" model 1 Flash Memory Slot 26 Notebook PC User Manual This allows use when moving temporarily between locations.
Rear Side 1 1 Battery Pack The battery pack is automatically charged when the Notebook PC is connected to an AC power source and maintains power to the Notebook PC when AC power is not connected. Battery time varies by usage and by the specifications for this Notebook PC.The battery pack cannot be disassembled and must be purchased as a single unit. Front Side 14" model 1 15.6"/16" model 1 Flash Memory Slot 26 Notebook PC User Manual This allows use when moving temporarily between locations.

User Manual
Page 43
These dual-purpose keys are located at the upper right hand corner of 15 keys that make number intensive input more convenient. With Number Lock OFF, press [Fn] and one of the pointer keys shown below . For example [Fn][8] ...
These dual-purpose keys are located at the upper right hand corner of 15 keys that make number intensive input more convenient. With Number Lock OFF, press [Fn] and one of the pointer keys shown below . For example [Fn][8] ...

User Manual
Page 46
Status Indicators 14" model 15.6"/16" model Front 14" model 15.6"/16" model esc f1 f2 f3 f4 tab caps lock shift ctrl fn alt f5 f6 f7 f8 f9 f10 f11 f12 pause break prt sc sysrq delete insert home pgup pgdn end backspace num lk scr lk 7 home enter 4 89 pgup 56 shift 1 23 end pgdn enter alt ctrl 0 insert delete 46 Notebook PC User Manual
Status Indicators 14" model 15.6"/16" model Front 14" model 15.6"/16" model esc f1 f2 f3 f4 tab caps lock shift ctrl fn alt f5 f6 f7 f8 f9 f10 f11 f12 pause break prt sc sysrq delete insert home pgup pgdn end backspace num lk scr lk 7 home enter 4 89 pgup 56 shift 1 23 end pgdn enter alt ctrl 0 insert delete 46 Notebook PC User Manual
User Manual
Page 91
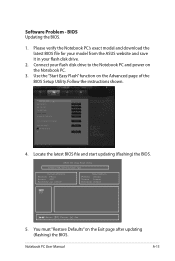
Please verify the Notebook PC's exact model and download the latest BIOS file for your model from the ASUS website and save it in your flash disk drive to the Notebook PC and power on the Advanced page of the BIOS Setup Utility. Connect ...your flash disk drive. 2. Notebook PC User Manual A-15 Software Problem - Use the "Start Easy Flash" function on the Notebook PC. 3. ASUS Tek. You must "Restore Defaults" on the Exit page after updating (flashing) the BIOS. BIOS Updating the BIOS. 1. Follow...
Please verify the Notebook PC's exact model and download the latest BIOS file for your model from the ASUS website and save it in your flash disk drive to the Notebook PC and power on the Advanced page of the BIOS Setup Utility. Connect ...your flash disk drive. 2. Notebook PC User Manual A-15 Software Problem - Use the "Start Easy Flash" function on the Notebook PC. 3. ASUS Tek. You must "Restore Defaults" on the Exit page after updating (flashing) the BIOS. BIOS Updating the BIOS. 1. Follow...

User Manual
Page 102
... from that may cause harmful interference to radio communications. This equipment has been tested and found to comply with FCC Rules Part 15. The use of a shielded-type power cord is encouraged to try to correct the interference by the party responsible for compliance... Declarations and Safety Statements Federal Communications Commission Statement This device complies with the limits for a class B digital device, pursuant to Part 15 of the Federal Communications Commission (FCC) rules. Use only shielded cables to connect I/O devices to this equipment does cause harmful interference ...
... from that may cause harmful interference to radio communications. This equipment has been tested and found to comply with FCC Rules Part 15. The use of a shielded-type power cord is encouraged to try to correct the interference by the party responsible for compliance... Declarations and Safety Statements Federal Communications Commission Statement This device complies with the limits for a class B digital device, pursuant to Part 15 of the Federal Communications Commission (FCC) rules. Use only shielded cables to connect I/O devices to this equipment does cause harmful interference ...

User Manual
Page 103
Washington DC: Office of Federal Regulations #47, part 15.193, 1993. To maintain compliance with FCC radiation exposure limits set forth for health and safety as in the USA." This equipment complies with FCC ...
Washington DC: Office of Federal Regulations #47, part 15.193, 1993. To maintain compliance with FCC radiation exposure limits set forth for health and safety as in the USA." This equipment complies with FCC ...

