
Motherboard DIY Troubleshooting Guide
Page 25
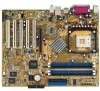
P4S8X-MX PS/2KBMS T: Mouse B: Keyboard COM1 KBPWR Socket 478 CPU_FAN1 Super I/O 4Mb BIOS SEC_IDE PRI_IDE FLOPPY P4S8X-MX DDR DIMM1 (64 bit,184-pin module) DDR DIMM2 (64 bit,184-pin module) PARALLEL PORT VGA USB12 ATXPWR USB34 ... 23 +5V (Default) +5VSB CLRTC1 12 23 Clear CMOS Normal (Default) PLED+ PLED+5V Ground Ground Speaker PANEL PLED SPEAKER IDE_LED+ IDE_LED- Carte mère ASUS Série P4 1-7 PWR Ground Reset Ground IDE_LED RESET PWRSW *Re*qRueiequrtireusnaenaAlTimXepnowtaetriosnupApTlyX.
P4S8X-MX PS/2KBMS T: Mouse B: Keyboard COM1 KBPWR Socket 478 CPU_FAN1 Super I/O 4Mb BIOS SEC_IDE PRI_IDE FLOPPY P4S8X-MX DDR DIMM1 (64 bit,184-pin module) DDR DIMM2 (64 bit,184-pin module) PARALLEL PORT VGA USB12 ATXPWR USB34 ... 23 +5V (Default) +5VSB CLRTC1 12 23 Clear CMOS Normal (Default) PLED+ PLED+5V Ground Ground Speaker PANEL PLED SPEAKER IDE_LED+ IDE_LED- Carte mère ASUS Série P4 1-7 PWR Ground Reset Ground IDE_LED RESET PWRSW *Re*qRueiequrtireusnaenaAlTimXepnowtaetriosnupApTlyX.

Motherboard DIY Troubleshooting Guide
Page 26
P4S800-MX SE PS/2KBMS T: Mouse B: Keyboard COM1 KBPWR Socket 478 CPU_FAN1 Super I/O 4Mb BIOS SEC_IDE PRI_IDE FLOPPY P4S800-MX SE DDR DIMM1 (64 bit,184-pin module) DDR DIMM2 (64 bit,184-pin module) PARALLEL PORT VGA USB1 USB2 ...
P4S800-MX SE PS/2KBMS T: Mouse B: Keyboard COM1 KBPWR Socket 478 CPU_FAN1 Super I/O 4Mb BIOS SEC_IDE PRI_IDE FLOPPY P4S800-MX SE DDR DIMM1 (64 bit,184-pin module) DDR DIMM2 (64 bit,184-pin module) PARALLEL PORT VGA USB1 USB2 ...

P4S800D-X User Manual English Version E1753
Page 3
Features Contents Notices ...v Safety information v About this guide vi P4S800D-X specification summary vii Chapter 1: Product introduction 1.1 Welcome 1-2 1.2 Package contents 1-2 1.3 Special features 1-2 1.4 Before you ...1-15 Chapter 2: BIOS information 2.1 Managing and updating your BIOS 2-2 2.1.1 Creating a bootable floppy disk 2-2 2.1.2 Using AFUDOS to copy the current BIOS 2-3 2.1.3 Using AFUDOS to update the BIOS 2-3 2.1.4 Using ASUS EZ Flash to update the BIOS 2-5 2.1.5 Recovering the BIOS with CrashFree BIOS 2 2-6 2.2 BIOS Setup program 2-8 2.2.1 BIOS menu screen 2-9...
Features Contents Notices ...v Safety information v About this guide vi P4S800D-X specification summary vii Chapter 1: Product introduction 1.1 Welcome 1-2 1.2 Package contents 1-2 1.3 Special features 1-2 1.4 Before you ...1-15 Chapter 2: BIOS information 2.1 Managing and updating your BIOS 2-2 2.1.1 Creating a bootable floppy disk 2-2 2.1.2 Using AFUDOS to copy the current BIOS 2-3 2.1.3 Using AFUDOS to update the BIOS 2-3 2.1.4 Using ASUS EZ Flash to update the BIOS 2-5 2.1.5 Recovering the BIOS with CrashFree BIOS 2 2-6 2.2 BIOS Setup program 2-8 2.2.1 BIOS menu screen 2-9...

P4S800D-X User Manual English Version E1753
Page 8
P4S800D-X specification summary Internal I/O connectors BIOS features Industry standard Manageability Form Factor Support CD contents CPU/Power/Chassis FAN connectors 20-pin ATX power connector 4-pin ATX 12V power... audio in Front panel audio connector 2 x USB 2.0 connector supports additional 4 USB 2.0 ports 2 x Serial ATA ports 4Mb Flash ROM, ASUS JumperFree, AMI BIOS, PnP, DMI2.0, WfM2.0, SM BIOS 2.3, ASUS EZ Flash, ASUS MyLogo2, ASUS CrashFree BIOS2, ASUS C.P.R., ASUS Instant Music Lite PCI 2.2, USB 2.0/1.1 WfM2.0, DMI2.0, WOR, WOL, Chassis intrusion ATX form factor: 12 in x 9.6 in (30.5 ...
P4S800D-X specification summary Internal I/O connectors BIOS features Industry standard Manageability Form Factor Support CD contents CPU/Power/Chassis FAN connectors 20-pin ATX power connector 4-pin ATX 12V power... audio in Front panel audio connector 2 x USB 2.0 connector supports additional 4 USB 2.0 ports 2 x Serial ATA ports 4Mb Flash ROM, ASUS JumperFree, AMI BIOS, PnP, DMI2.0, WfM2.0, SM BIOS 2.3, ASUS EZ Flash, ASUS MyLogo2, ASUS CrashFree BIOS2, ASUS C.P.R., ASUS Instant Music Lite PCI 2.2, USB 2.0/1.1 WfM2.0, DMI2.0, WOR, WOL, Chassis intrusion ATX form factor: 12 in x 9.6 in (30.5 ...

P4S800D-X User Manual English Version E1753
Page 11
Serial ATA solution with legacy Parallel ATA. CrashFree BIOS 2 This feature allows you to personalize and add style to powerful sound systems. ASUS P4S800D-X motherboard 1-3 With a bus of 533Mhz, AGP 8X is the next generation VGA interface specification that turns your system ...SiS® 655FX integrates the latest HyperStreaming Engine which greatly improves computer system performance. See details on USB 2.0. ASUS MyLogo2™ This new feature present in the P4S800D-X motherboard allows you to a fast 480 Mbps on page 2-27. The higher bandwidth of USB 2.0 allows ...
Serial ATA solution with legacy Parallel ATA. CrashFree BIOS 2 This feature allows you to personalize and add style to powerful sound systems. ASUS P4S800D-X motherboard 1-3 With a bus of 533Mhz, AGP 8X is the next generation VGA interface specification that turns your system ...SiS® 655FX integrates the latest HyperStreaming Engine which greatly improves computer system performance. See details on USB 2.0. ASUS MyLogo2™ This new feature present in the P4S800D-X motherboard allows you to a fast 480 Mbps on page 2-27. The higher bandwidth of USB 2.0 allows ...

P4S800D-X User Manual English Version E1753
Page 12
... mode, or in case the system hangs due to use a DOS-based utility or boot from the power supply. ASUS EZ Flash BIOS With the ASUS EZ Flash, you install motherboard components or change any motherboard settings. Simply shut down the system and unplug the power ... overclocking. feature of the onboard LED. ® P4S800D-X P4S800D-X Onboard LED SB_PWR1 ON Standby Power OFF Powered Off 1-4 Chapter 1: Product introduction When lit, the green LED indicates that you should shut down and reboot the system, and BIOS automatically restores the CPU's previous setting for each parameter...
... mode, or in case the system hangs due to use a DOS-based utility or boot from the power supply. ASUS EZ Flash BIOS With the ASUS EZ Flash, you install motherboard components or change any motherboard settings. Simply shut down the system and unplug the power ... overclocking. feature of the onboard LED. ® P4S800D-X P4S800D-X Onboard LED SB_PWR1 ON Standby Power OFF Powered Off 1-4 Chapter 1: Product introduction When lit, the green LED indicates that you should shut down and reboot the system, and BIOS automatically restores the CPU's previous setting for each parameter...

P4S800D-X User Manual English Version E1753
Page 18
...C D E PCI slot 1 shared - - - - F used - - - When using PCI cards on the system and change the necessary BIOS settings, if any. Turn on shared slots, ensure that the drivers support "Share IRQ" or that came with the chassis. 2. Install the drivers... Numeric Data Processor 14* 9 Primary IDE Channel 15* 10 Secondary IDE Channel * These IRQs are usually available for ISA or PCI devices. 1.8.2 IRQ assignments for BIOS information. 3. PCI slot 3 - - Onboard RAID - - AGP slot shared - - - - shared - - Assign an IRQ to the tables next page. ...
...C D E PCI slot 1 shared - - - - F used - - - When using PCI cards on the system and change the necessary BIOS settings, if any. Turn on shared slots, ensure that the drivers support "Share IRQ" or that came with the chassis. 2. Install the drivers... Numeric Data Processor 14* 9 Primary IDE Channel 15* 10 Secondary IDE Channel * These IRQs are usually available for ISA or PCI devices. 1.8.2 IRQ assignments for BIOS information. 3. PCI slot 3 - - Onboard RAID - - AGP slot shared - - - - shared - - Assign an IRQ to the tables next page. ...

P4S800D-X User Manual English Version E1753
Page 20
... the RTC RAM, never remove the cap on pins 2-3 for about 5~10 seconds, then move the cap back to pins 2-3. CLRTC1 ® P4S800D-X 12 Normal (Default) 23 Clear CMOS P4S800D-X Clear RTC RAM setting You do not need to clear the RTC when the system hangs due to overclocking, use the C.P.R. (CPU... Parameter Recall) feature. Shut down the key during the boot process and enter BIOS setup to re-enter data. The RAM data in CMOS...
... the RTC RAM, never remove the cap on pins 2-3 for about 5~10 seconds, then move the cap back to pins 2-3. CLRTC1 ® P4S800D-X 12 Normal (Default) 23 Clear CMOS P4S800D-X Clear RTC RAM setting You do not need to clear the RTC when the system hangs due to overclocking, use the C.P.R. (CPU... Parameter Recall) feature. Shut down the key during the boot process and enter BIOS setup to re-enter data. The RAM data in CMOS...

P4S800D-X User Manual English Version E1753
Page 28
...2-pin PWRSW) This connector connects a switch that controls the system power. PLED SPEAKER PLED+ PLED+5V Ground Ground Speaker PANEL1 ® P4S800D-X IDE_LED P4S800D-X System panel connector IDE_LED+ IDE_LED- Pressing the power switch while in sleep mode. • System Warning Speaker Lead (Orange 4-pin SPEAKER)... This 4-pin connector connects to the case-mounted speaker and allows you to light up when you turn on the BIOS or...
...2-pin PWRSW) This connector connects a switch that controls the system power. PLED SPEAKER PLED+ PLED+5V Ground Ground Speaker PANEL1 ® P4S800D-X IDE_LED P4S800D-X System panel connector IDE_LED+ IDE_LED- Pressing the power switch while in sleep mode. • System Warning Speaker Lead (Orange 4-pin SPEAKER)... This 4-pin connector connects to the case-mounted speaker and allows you to light up when you turn on the BIOS or...

P4S800D-X User Manual English Version E1753
Page 29
Detailed descriptions of the BIOS parameters are also provided. BIOS information Chapter 2 This chapter tells how to change system settings through the BIOS Setup menus.
Detailed descriptions of the BIOS parameters are also provided. BIOS information Chapter 2 This chapter tells how to change system settings through the BIOS Setup menus.

P4S800D-X User Manual English Version E1753
Page 30
... from the format options field, then click Start. ASUS Update (Updates the BIOS in a floppy disk. • Visit the ASUS website and download the latest BIOS file for each utility. 2.1 Managing and updating your BIOS The following to restore the BIOS in case you need to create a bootable floppy ... 1. Use this file only when you do not have a copy of boot disks for this motherboard using the AFUDOS or the ASUS Update utilities. • A working BIOS file for Windows® 2000: a. Windows® XP environment a. Click Start from the Windows® desktop, then select My...
... from the format options field, then click Start. ASUS Update (Updates the BIOS in a floppy disk. • Visit the ASUS website and download the latest BIOS file for each utility. 2.1 Managing and updating your BIOS The following to restore the BIOS in case you need to create a bootable floppy ... 1. Use this file only when you do not have a copy of boot disks for this motherboard using the AFUDOS or the ASUS Update utilities. • A working BIOS file for Windows® 2000: a. Windows® XP environment a. Click Start from the Windows® desktop, then select My...

P4S800D-X User Manual English Version E1753
Page 31
... write-protected and have enough space (at least 600KB) to the DOS prompt. done A:\> When the BIOS copy process is for the extension name. The utility will copy the current system BIOS by default to continue. 2. ASUS P4S800D-X motherboard 2-3 e. Version 1.10 Copyright (C) 2002 American Megatrends, Inc. Version 1.10 Copyright (C) 2002 American Megatrends, Inc. Press...
... write-protected and have enough space (at least 600KB) to the DOS prompt. done A:\> When the BIOS copy process is for the extension name. The utility will copy the current system BIOS by default to continue. 2. ASUS P4S800D-X motherboard 2-3 e. Version 1.10 Copyright (C) 2002 American Megatrends, Inc. Version 1.10 Copyright (C) 2002 American Megatrends, Inc. Press...

P4S800D-X User Manual English Version E1753
Page 32
... the exact BIOS file name at the prompt. 2. Doing so may not be exactly the same as shown. Reading file ..... done Erasing flash .... At the DOS prompt, type the command line: afudos /i where "filename.rom" means the latest (or original) BIOS file that contains the BIOS file. 3. Visit the ASUS website (www.asus.com) to...
... the exact BIOS file name at the prompt. 2. Doing so may not be exactly the same as shown. Reading file ..... done Erasing flash .... At the DOS prompt, type the command line: afudos /i where "filename.rom" means the latest (or original) BIOS file that contains the BIOS file. 3. Visit the ASUS website (www.asus.com) to...

P4S800D-X User Manual English Version E1753
Page 33
... no floppy disk found in the floppy disk, the error message "P4S800DX.ROM not found !" Starting BIOS recovery... Floppy found in the BIOS LPC chip so it to P4S800DX.ROM. To update the BIOS using a DOS-based utility. ASUS P4S800D-X motherboard 2-5 The EZ Flash is accessible by simply pressing + during POST to display the following...
... no floppy disk found in the floppy disk, the error message "P4S800DX.ROM not found !" Starting BIOS recovery... Floppy found in the BIOS LPC chip so it to P4S800DX.ROM. To update the BIOS using a DOS-based utility. ASUS P4S800D-X motherboard 2-5 The EZ Flash is accessible by simply pressing + during POST to display the following...

P4S800D-X User Manual English Version E1753
Page 34
To recover the BIOS from the ASUS website has a different filename (e.g. Starting BIOS recovery... Checking for this disk to restore the BIOS. Bad BIOS checksum. Doing so may also use this motherboard (P4S800DX.ROM). Insert a floppy disk that contains the motherboard BIOS (P4S800DX.ROM) before proceeding with CrashFree BIOS 2 The CrashFree BIOS 2 auto recovery tool allows you may cause...
To recover the BIOS from the ASUS website has a different filename (e.g. Starting BIOS recovery... Checking for this disk to restore the BIOS. Bad BIOS checksum. Doing so may also use this motherboard (P4S800DX.ROM). Insert a floppy disk that contains the motherboard BIOS (P4S800DX.ROM) before proceeding with CrashFree BIOS 2 The CrashFree BIOS 2 auto recovery tool allows you may cause...

P4S800D-X User Manual English Version E1753
Page 35
... or reset the system while updating the BIOS! Floppy not found . When a corrupted BIOS is detected, the following screen message appears. ASUS P4S800D-X motherboard 2-7 To recover the BIOS from the support CD: 1. Bad BIOS checksum. Boot the system. 2. Reading file "P4S800DX.ROM". The recovered BIOS may cause system boot failure! 4. Bad BIOS checksum. Place the support CD in...
... or reset the system while updating the BIOS! Floppy not found . When a corrupted BIOS is detected, the following screen message appears. ASUS P4S800D-X motherboard 2-7 To recover the BIOS from the support CD: 1. Bad BIOS checksum. Boot the system. 2. Reading file "P4S800DX.ROM". The recovered BIOS may cause system boot failure! 4. Bad BIOS checksum. Place the support CD in...

P4S800D-X User Manual English Version E1753
Page 36
...POST continues with the opportunity to run this program. You can also restart by pressing the reset button on your screen. 2-8 Chapter 2: BIOS information It is a menudriven program, which means you can scroll through the various sub-menus and make changes to enable the security password feature... the system by pressing ++, or by turning the system off and then back on the motherboard stores the Setup utility. Because the BIOS software is designed to make it as easy to configure your computer in section "2.1 Managing and updating your selections among the predetermined choices...
...POST continues with the opportunity to run this program. You can also restart by pressing the reset button on your screen. 2-8 Chapter 2: BIOS information It is a menudriven program, which means you can scroll through the various sub-menus and make changes to enable the security password feature... the system by pressing ++, or by turning the system off and then back on the motherboard stores the Setup utility. Because the BIOS software is designed to make it as easy to configure your computer in section "2.1 Managing and updating your selections among the predetermined choices...

P4S800D-X User Manual English Version E1753
Page 37
ASUS P4S800D-X motherboard 2-9 Some of a menu screen are the navigation keys for that particular menu. Use the navigation keys to configure system time. Use [+] or [-] to select items in ] :[ST320413A] :[ASUS CD-S340] :[Not Detected] :[Not Detected] :[Raid Mode] Use [ENTER], [TAB] or [SHIFT-TAB] ...At the bottom right corner of the navigation keys differ from one screen to select a field. Select Screen Select Item +- 2.2.1 BIOS menu screen Menu items Menu bar Configuration fields General help System Time System Date Legacy Diskette A Primary IDE Master Primary IDE Slave ...
ASUS P4S800D-X motherboard 2-9 Some of a menu screen are the navigation keys for that particular menu. Use the navigation keys to configure system time. Use [+] or [-] to select items in ] :[ST320413A] :[ASUS CD-S340] :[Not Detected] :[Not Detected] :[Raid Mode] Use [ENTER], [TAB] or [SHIFT-TAB] ...At the bottom right corner of the navigation keys differ from one screen to select a field. Select Screen Select Item +- 2.2.1 BIOS menu screen Menu items Menu bar Configuration fields General help System Time System Date Legacy Diskette A Primary IDE Master Primary IDE Slave ...
P4S800D-X User Manual English Version E1753
Page 38
... fields These fields show the values for that is user- You can not select an item that menu. A configurable field is enclosed in ] :[ST320413A] :[ASUS CD-S340] :[Not Detected] :[Not Detected] :[Raid Mode] The other items on the screen. Refer to "2.2.7 Pop-up window." 2.2.7 Pop-up window Select... a menu item then press Enter to display a pop-up window Scroll bar 2-10 Chapter 2: BIOS information configurable, you may change the value of a field, select it then press Enter to select a field. To change the value of the menu...
... fields These fields show the values for that is user- You can not select an item that menu. A configurable field is enclosed in ] :[ST320413A] :[ASUS CD-S340] :[Not Detected] :[Not Detected] :[Raid Mode] The other items on the screen. Refer to "2.2.7 Pop-up window." 2.2.7 Pop-up window Select... a menu item then press Enter to display a pop-up window Scroll bar 2-10 Chapter 2: BIOS information configurable, you may change the value of a field, select it then press Enter to select a field. To change the value of the menu...

P4S800D-X User Manual English Version E1753
Page 39
.... Configuration options: [Disabled] [360K, 5.25 in.] [1.2M , 5.25 in.] [720K , 3.5 in.] [1.44M, 3.5 in.] [2.88M, 3.5 in ] :[ST320413A] :[ASUS CD-S340] :[Not Detected] :[Not Detected] :[Raid Mode] Use [ENTER], [TAB] or [SHIFT-TAB] to navigate through them. 2.3 Main menu When you enter the...BIOS menu screen" for information on the menu screen items and how to select a field. System Time System Date Legacy Diskette A Primary IDE Master Primary IDE Slave Secondary IDE Master Secondary IDE Slave OnChip SATA Controller System Information [11:10:19] [Thu 03/27/2003] [1.44M, 3.5 in .] ASUS P4S800D...
.... Configuration options: [Disabled] [360K, 5.25 in.] [1.2M , 5.25 in.] [720K , 3.5 in.] [1.44M, 3.5 in.] [2.88M, 3.5 in ] :[ST320413A] :[ASUS CD-S340] :[Not Detected] :[Not Detected] :[Raid Mode] Use [ENTER], [TAB] or [SHIFT-TAB] to navigate through them. 2.3 Main menu When you enter the...BIOS menu screen" for information on the menu screen items and how to select a field. System Time System Date Legacy Diskette A Primary IDE Master Primary IDE Slave Secondary IDE Master Secondary IDE Slave OnChip SATA Controller System Information [11:10:19] [Thu 03/27/2003] [1.44M, 3.5 in .] ASUS P4S800D...


