
User Manual
Page 26
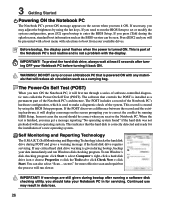
...in for more effective scan and repair but the process will reduce air circulation such as a carrying bag. This record is given during the splash screen, standard boot information such as a permanent part of the Notebook PC's architecture. Before bootup, the display panel flashes when the power is powered...your available drives. WARNING! DO NOT carry or cover a Notebook PC that controls the POST is finished, you will display a message on the screen when you need to run the BIOS Setup to set or modify the system configuration, press [F2] upon bootup to boot from your Notebook ...
...in for more effective scan and repair but the process will reduce air circulation such as a carrying bag. This record is given during the splash screen, standard boot information such as a permanent part of the Notebook PC's architecture. Before bootup, the display panel flashes when the power is powered...your available drives. WARNING! DO NOT carry or cover a Notebook PC that controls the POST is finished, you will display a message on the screen when you need to run the BIOS Setup to set or modify the system configuration, press [F2] upon bootup to boot from your Notebook ...
User Manual
Page 27
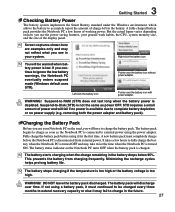
... the Notebook PC is turned ON. It takes a few hours of power and will have to complete battery depletion or no power is depleted. WARNING! Screen captures shown here are examples only and may not reflect what you see in the future. 27 A new battery pack must continued to be warned...
... the Notebook PC is turned ON. It takes a few hours of power and will have to complete battery depletion or no power is depleted. WARNING! Screen captures shown here are examples only and may not reflect what you see in the future. 27 A new battery pack must continued to be warned...
User Manual
Page 30
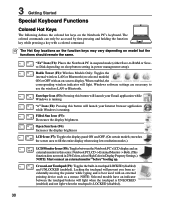
... should remain the same. The colored commands can only be accessed by first pressing and holding the function key while pressing a key with an on-screen-display. The Hot Key locations on the function keys may vary depending on sleep button setting in touchpad LOCKED (disabled) and UNLOCKED (enabled). 3 Getting Started... when using low resolution modes.) LCD/Monitor Icons (F8): Toggles between the touchpad buttons will launch your Email application while Windows is running . stretches the screen area to use the wireless LAN or Bluetooth. Locking the touchpad will light.
... should remain the same. The colored commands can only be accessed by first pressing and holding the function key while pressing a key with an on-screen-display. The Hot Key locations on the function keys may vary depending on sleep button setting in touchpad LOCKED (disabled) and UNLOCKED (enabled). 3 Getting Started... when using low resolution modes.) LCD/Monitor Icons (F8): Toggles between the touchpad buttons will launch your Email application while Windows is running . stretches the screen area to use the wireless LAN or Bluetooth. Locking the touchpad will light.
User Manual
Page 31
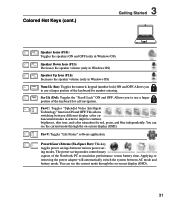
... portion of the keyboard for number entering. This allows switching between AC mode and battery mode. You can see the current mode through the on -screen display (OSD). 31 Fn+C: Toggles "Splendid Video Intelligent Technology" function ON and OFF. Fn+V: Toggles "Life Frame" software application. Colored Hot Keys (...(Fn+Space Bar): This key toggles power savings between various power saving modes. You can see the current mode through the on -screen display (OSD). My Profile hancement modes in Windows OS) Num Lk (Ins): Toggles the numeric keypad (number lock) ON and OFF.
... portion of the keyboard for number entering. This allows switching between AC mode and battery mode. You can see the current mode through the on -screen display (OSD). 31 Fn+C: Toggles "Splendid Video Intelligent Technology" function ON and OFF. Fn+V: Toggles "Life Frame" software application. Colored Hot Keys (...(Fn+Space Bar): This key toggles power savings between various power saving modes. You can see the current mode through the on -screen display (OSD). My Profile hancement modes in Windows OS) Num Lk (Ins): Toggles the numeric keypad (number lock) ON and OFF.
User Manual
Page 33
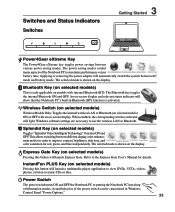
... independently. This allows switching between different display color enhancement modes in Windows Control Panel "Power Options." 33 Express Gate Key (on -screen display and relevant status indicator will launch Express Gate. Power Switch The power switch turns ON and OFF the Notebook PC or putting... view DVDs, VCDs, videos, photos; Windows software settings are necessary to music CDs or files. The selected mode is shown on -screen display. or listen to use the wireless LAN or Bluetooth. InstantFun PLUS Key (on the display. The selected mode is shown on selected...
... independently. This allows switching between different display color enhancement modes in Windows Control Panel "Power Options." 33 Express Gate Key (on -screen display and relevant status indicator will launch Express Gate. Power Switch The power switch turns ON and OFF the Notebook PC or putting... view DVDs, VCDs, videos, photos; Windows software settings are necessary to music CDs or files. The selected mode is shown on -screen display. or listen to use the wireless LAN or Bluetooth. InstantFun PLUS Key (on the display. The selected mode is shown on selected...

User Manual
Page 38
... avoided. The following illustrations demonstrate proper use of your fingers. Scroll Up A software-controlled scrolling function is available after setting up or down on the screen with the tip of your finger to operate the touchpad or else damage may occur to scroll a window up or down. therefore, mechanical failures can...
... avoided. The following illustrations demonstrate proper use of your fingers. Scroll Up A software-controlled scrolling function is available after setting up or down on the screen with the tip of your finger to operate the touchpad or else damage may occur to scroll a window up or down. therefore, mechanical failures can...

User Manual
Page 39
... for launching a program directly from the corresponding icon you wish. With the pointer over an item, press the left button and slide finger on the screen you select.
... for launching a program directly from the corresponding icon you wish. With the pointer over an item, press the left button and slide finger on the screen you select.

User Manual
Page 53
... must be grounded (earthed) in accordance with ANSI/NFPA 70, the National Electrical Code (NEC), in selected regions. Cable distribution system should include bonding the screen of a Coaxial Cable - IMPORTANT! Cable service connection can only receive digital TV signals broadcasted in particular Section 820.93, Grounding of Outer Conductive Shield of...
... must be grounded (earthed) in accordance with ANSI/NFPA 70, the National Electrical Code (NEC), in selected regions. Cable distribution system should include bonding the screen of a Coaxial Cable - IMPORTANT! Cable service connection can only receive digital TV signals broadcasted in particular Section 820.93, Grounding of Outer Conductive Shield of...

User Manual
Page 64
Select Add a Bluetooth Device on the taskbar and select either the Wireless LAN + Bluetooth or just the Bluetooth. 3. Or Launch Bluetooth Devices from this screen. If launched from the Control Panel, click Add from the Windows Control Panel. A-4 4. The bottom sensor should glow red. • Push the "RESET" button on ...
Select Add a Bluetooth Device on the taskbar and select either the Wireless LAN + Bluetooth or just the Bluetooth. 3. Or Launch Bluetooth Devices from this screen. If launched from the Control Panel, click Add from the Windows Control Panel. A-4 4. The bottom sensor should glow red. • Push the "RESET" button on ...

User Manual
Page 67
System BIOS Settings Boot Device A Appendix 1. On the Security screen, select Change Supervisor or Change User Password. Re-type the password and press [Enter]. 1. A-7 Password is then cleared. Select each item and press [Enter] to select a device. To clear the password: 2. Leave the password field blank and press [Enter]. 4. Password is then set. 2. On the Boot screen, select Boot Device Priority. 2. Security Setting 1. Type in a password and press [Enter]. 3.
System BIOS Settings Boot Device A Appendix 1. On the Security screen, select Change Supervisor or Change User Password. Re-type the password and press [Enter]. 1. A-7 Password is then cleared. Select each item and press [Enter] to select a device. To clear the password: 2. Leave the password field blank and press [Enter]. 4. Password is then set. 2. On the Boot screen, select Boot Device Priority. 2. Security Setting 1. Type in a password and press [Enter]. 3.
User Manual
Page 71
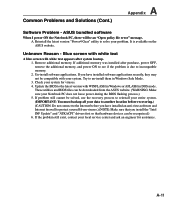
... compatible with your system. A. If additional memory was installed after system bootup. 1. If the problem still exist, contact your problem. ASUS bundled software When I power ON the Notebook PC, there will be recognized.) 6. Unknown Reason - Remove additional memory. A-11 Common Problems... and Solutions (Cont.) A Appendix Software Problem - Blue screen with white text A blue screen with WINFLASH in Windows or AFLASH in Windows Safe Mode. 3. These utilities and BIOS files can be an "Open policy...
... compatible with your system. A. If additional memory was installed after system bootup. 1. If the problem still exist, contact your problem. ASUS bundled software When I power ON the Notebook PC, there will be recognized.) 6. Unknown Reason - Remove additional memory. A-11 Common Problems... and Solutions (Cont.) A Appendix Software Problem - Blue screen with white text A blue screen with WINFLASH in Windows or AFLASH in Windows Safe Mode. 3. These utilities and BIOS files can be an "Open policy...
User Manual
Page 75
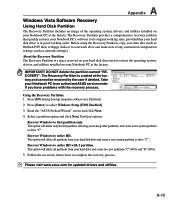
...network drive and make note of the operating system, drivers, and utilities installed on your Notebook PC at the factory. Follow the on-screen instructions to entire HD. IMPORTANT! Press [Enter] to first partition only. A-15 A Appendix Windows Vista Software Recovery Using Hard Disk ...drive and create two new partitions "C" (60%) and "D" (40%). 5. Press [F9] during bootup (requires a Recovery Partition) 2. Please visit www.asus.com for updated drivers and utilities. The Recovery Partition is in good working state, provided that your data files (such as Outlook PST files) to...
...network drive and make note of the operating system, drivers, and utilities installed on your Notebook PC at the factory. Follow the on-screen instructions to entire HD. IMPORTANT! Press [Enter] to first partition only. A-15 A Appendix Windows Vista Software Recovery Using Hard Disk ...drive and create two new partitions "C" (60%) and "D" (40%). 5. Press [F9] during bootup (requires a Recovery Partition) 2. Please visit www.asus.com for updated drivers and utilities. The Recovery Partition is in good working state, provided that your data files (such as Outlook PST files) to...
User Manual
Page 76
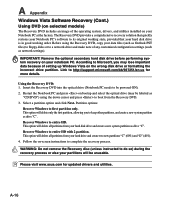
... your data files (such as Outlook PST files) to floppy disks or to a network drive and make note of setting up Windows Vista on -screen instructions to Microsoft, you to do so) during the recovery process or else your hard drive and create two new partitions "C" (60%) and "D"... instructed to keep other partitions, and create a new system partition as network settings). Link to entire HD with 2 partition. Please visit www.asus.com for more details. A-16 This option will delete all partitions from the Recovery DVD. 3. This option will delete only the first partition,...
... your data files (such as Outlook PST files) to floppy disks or to a network drive and make note of setting up Windows Vista on -screen instructions to Microsoft, you to do so) during the recovery process or else your hard drive and create two new partitions "C" (60%) and "D"... instructed to keep other partitions, and create a new system partition as network settings). Link to entire HD with 2 partition. Please visit www.asus.com for more details. A-16 This option will delete all partitions from the Recovery DVD. 3. This option will delete only the first partition,...


