

User Guide
Page 2
... part of this manual may or may be extended if: (1) the product is repaired, modified or altered, unless such repair, modification of the LED monitor 1-4 2.1 Adjusting The Monitor 2-1 3.1 OSD (On-Screen Display) Menu 3-1 3.1.1 How to infringe. or (2) the serial number of the product is ... software described in any form or by any language in it, may not be registered trademarks or copyrights of ASUSTeK COMPUTER INC. ("ASUS"). ASUS ASSUMES NO RESPONSIBILITY OR LIABILITY FOR ANY ERRORS OR INACCURACIES THAT MAY APPEAR IN THIS MANUAL, INCLUDING THE PRODUCTS AND SOFTWARE DESCRIBED IN IT...
... part of this manual may or may be extended if: (1) the product is repaired, modified or altered, unless such repair, modification of the LED monitor 1-4 2.1 Adjusting The Monitor 2-1 3.1 OSD (On-Screen Display) Menu 3-1 3.1.1 How to infringe. or (2) the serial number of the product is ... software described in any form or by any language in it, may not be registered trademarks or copyrights of ASUSTeK COMPUTER INC. ("ASUS"). ASUS ASSUMES NO RESPONSIBILITY OR LIABILITY FOR ANY ERRORS OR INACCURACIES THAT MAY APPEAR IN THIS MANUAL, INCLUDING THE PRODUCTS AND SOFTWARE DESCRIBED IN IT...

User Guide
Page 5
... to yourself when trying to make sure that you MUST follow to the nature of the fluorescent light. The following symptoms are normal with the LED. Use a cleaner intended for use . • When the same image is better to complete a task. Do not repair the screen by the stand or the...
... to yourself when trying to make sure that you MUST follow to the nature of the fluorescent light. The following symptoms are normal with the LED. Use a cleaner intended for use . • When the same image is better to complete a task. Do not repair the screen by the stand or the...

User Guide
Page 7
With these features, you can enjoy the convenience and delightful visual experience that the ML229H Series brings you for the following items: LED monitor Monitor base Quick start guide Power cord VGA cable HDMI to DVI cable Power ...your viewing experience. 1.1 Welcome! The latest widescreen LED monitor from ASUS provides a crisper, broader, and brighter display, plus a host of the above items is damaged or missing, contact your ML229H Series LED package for purchasing the ASUS® ML229H Series LED monitor! ASUS LED Monitor ML229H Series 1-1 Thank you ! 1.2 Package Contents ...
With these features, you can enjoy the convenience and delightful visual experience that the ML229H Series brings you for the following items: LED monitor Monitor base Quick start guide Power cord VGA cable HDMI to DVI cable Power ...your viewing experience. 1.1 Welcome! The latest widescreen LED monitor from ASUS provides a crisper, broader, and brighter display, plus a host of the above items is damaged or missing, contact your ML229H Series LED package for purchasing the ASUS® ML229H Series LED monitor! ASUS LED Monitor ML229H Series 1-1 Thank you ! 1.2 Package Contents ...

User Guide
Page 9
... or go back to the previous menu as the OSD menu is also a hotkey for Brightness adjustment. ASUS LED Monitor ML229H Series 1-3 This is active. 2. • • Button: Press this button to decrease the value of the LED monitor 1. • • • Button: Automatically adjust the image to its optimized position, clock, and phase...
... or go back to the previous menu as the OSD menu is also a hotkey for Brightness adjustment. ASUS LED Monitor ML229H Series 1-3 This is active. 2. • • Button: Press this button to decrease the value of the LED monitor 1. • • • Button: Automatically adjust the image to its optimized position, clock, and phase...

User Guide
Page 10
Status Description White ON White (Blinking) Standby mode OFF OFF 1.4.2 Rear of the LED monitor VGA 11 2 34 5 Rear connectors 1 DC-IN Port: This port connects the power cord. 2 VGA Cable: 3 HDMI Port: 4 Earphone Jack: This 15-pin port ...
Status Description White ON White (Blinking) Standby mode OFF OFF 1.4.2 Rear of the LED monitor VGA 11 2 34 5 Rear connectors 1 DC-IN Port: This port connects the power cord. 2 VGA Cable: 3 HDMI Port: 4 Earphone Jack: This 15-pin port ...
User Guide
Page 11
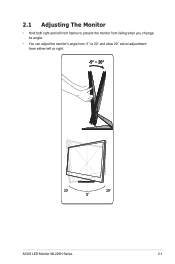
2.1 Adjusting The Monitor • Hold both right and left front frames to prevent the monitor from falling when you change its angle. • You can adjust the monitor's angle from -5° to 20° and allow 20° swivel adjustment from either left or right. -5º ~ 20º 20º 20º 0º ASUS LED Monitor ML229H Series 2-1
2.1 Adjusting The Monitor • Hold both right and left front frames to prevent the monitor from falling when you change its angle. • You can adjust the monitor's angle from -5° to 20° and allow 20° swivel adjustment from either left or right. -5º ~ 20º 20º 20º 0º ASUS LED Monitor ML229H Series 2-1
User Guide
Page 12
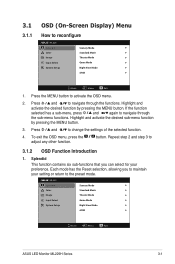
... the functions. ML229 Splendid Color Image Input Select System Setup Scenery Mode Standard Mode Theater Mode Game Mode Night View Mode sRGB Move Menu Exit ASUS LED Monitor ML229H Series 3-1 Press and to the preset mode. Each mode has the Reset selection, allowing you can select for your setting or return to change...
... the functions. ML229 Splendid Color Image Input Select System Setup Scenery Mode Standard Mode Theater Mode Game Mode Night View Mode sRGB Move Menu Exit ASUS LED Monitor ML229H Series 3-1 Press and to the preset mode. Each mode has the Reset selection, allowing you can select for your setting or return to change...
User Guide
Page 15
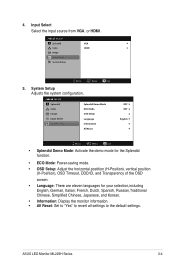
... default settings. ML229 Splendid Color Image Input Select System Setup VGA HDMI Move Menu Exit 5. 4. Input Select Select the input source from VGA, or HDMI . ASUS LED Monitor ML229H Series 3-4
... default settings. ML229 Splendid Color Image Input Select System Setup VGA HDMI Move Menu Exit 5. 4. Input Select Select the input source from VGA, or HDMI . ASUS LED Monitor ML229H Series 3-4
User Guide
Page 16
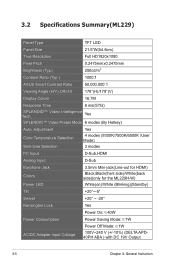
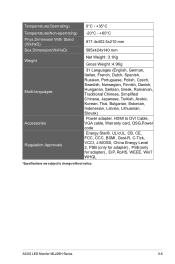
3.2 Specifications Summary(ML229) Panel Type TFT LED Panel Size 21.5"W(54.6cm) True Resolution Full HD1920x1080 Pixel Pitch Brightness (Typ.) 0.2475mmx0.2475mm 250cd/m2 Contrast Ratio (Typ.) 1000:1 ASUS Smart Contrast Ratio 50,000,000:1 Viewing Angle (H/V),CR≥10 178°(H)/178°(V) Display .../User Mode) 3 modes PC Input D-Sub,HDMI Analog Input D-Sub Earphone Jack Colors Power LED 3.5mm Mini-jack(Line-out for HDMI) Black;Black(front side)/White(back side)(only for the ML229H-W) White(on)/White (Blinking)(Standby) Tilt +20°~-5° Swivel +20° ~ ...
3.2 Specifications Summary(ML229) Panel Type TFT LED Panel Size 21.5"W(54.6cm) True Resolution Full HD1920x1080 Pixel Pitch Brightness (Typ.) 0.2475mmx0.2475mm 250cd/m2 Contrast Ratio (Typ.) 1000:1 ASUS Smart Contrast Ratio 50,000,000:1 Viewing Angle (H/V),CR≥10 178°(H)/178°(V) Display .../User Mode) 3 modes PC Input D-Sub,HDMI Analog Input D-Sub Earphone Jack Colors Power LED 3.5mm Mini-jack(Line-out for HDMI) Black;Black(front side)/White(back side)(only for the ML229H-W) White(on)/White (Blinking)(Standby) Tilt +20°~-5° Swivel +20° ~ ...
User Guide
Page 17
..., VCCI, J-MOSS, China Energy Level 2, PSB (only for adapter) , PSE(only for adapter) , ErP, RoHS, WEEE, Win7 WHQL *Specifications are subject to change without notice. ASUS LED Monitor ML229H Series 3-6
..., VCCI, J-MOSS, China Energy Level 2, PSB (only for adapter) , PSE(only for adapter) , ErP, RoHS, WEEE, Win7 WHQL *Specifications are subject to change without notice. ASUS LED Monitor ML229H Series 3-6
User Guide
Page 18
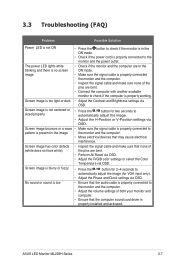
... signal cable and make sure none of both your monitor and computer. • Ensure that the computer sound card driver is properly working. ASUS LED Monitor ML229H Series 3-7 Screen image is not centered or sized properly • Press the button for two seconds to automatically adjust the image (for ... Press the button for VGA input only). • Adjust the Phase and Clock settings via OSD. 3.3 Troubleshooting (FAQ) Problem Possible Solution Power LED is not ON • Press the button to check if the monitor is in the ON mode. • Check if the power cord is...
... signal cable and make sure none of both your monitor and computer. • Ensure that the computer sound card driver is properly working. ASUS LED Monitor ML229H Series 3-7 Screen image is not centered or sized properly • Press the button for two seconds to automatically adjust the image (for ... Press the button for VGA input only). • Adjust the Phase and Clock settings via OSD. 3.3 Troubleshooting (FAQ) Problem Possible Solution Power LED is not ON • Press the button to check if the monitor is in the ON mode. • Check if the power cord is...


