
MAXIMUS VIII IMPACT Users manual English
Page 3
... guide...vii MAXIMUS VIII IMPACT specifications summary ix Package contents...xiii Installation tools and components xiv Chapter 1: Product Introduction 1.1 Special features 1-1 1.1.1 Product highlights 1-1 1.1.2 ROG Gaming Features 1-2 1.1.3 ROG Exclusive Features 1-3 1.1.4 ASUS Special Features... 1-34 1.2.9 ProbeIt 1-41 1.2.10 SupremeFX Impact III audio card 1-42 Chapter 2: Basic Installation 2.1 Building your PC system 2-1 2.1.1 Motherboard installation 2-1 2.1.2 CPU installation 2-4 2.1.3 SupremeFX Impact III audio card installation 2-6 2.1.4 DIMM installation...
... guide...vii MAXIMUS VIII IMPACT specifications summary ix Package contents...xiii Installation tools and components xiv Chapter 1: Product Introduction 1.1 Special features 1-1 1.1.1 Product highlights 1-1 1.1.2 ROG Gaming Features 1-2 1.1.3 ROG Exclusive Features 1-3 1.1.4 ASUS Special Features... 1-34 1.2.9 ProbeIt 1-41 1.2.10 SupremeFX Impact III audio card 1-42 Chapter 2: Basic Installation 2.1 Building your PC system 2-1 2.1.1 Motherboard installation 2-1 2.1.2 CPU installation 2-4 2.1.3 SupremeFX Impact III audio card installation 2-6 2.1.4 DIMM installation...

MAXIMUS VIII IMPACT Users manual English
Page 59
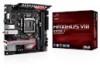
Place the motherboard into the chassis, ensuring that its rear I/O ports are for reference only. The motherboard layout may vary with models. 1. Chapter 2 ASUS MAXIMUS VIII IMPACT 2-1 Install the ASUS Q-Shield to the chassis' rear I/O panel. Chapter 2: Basic Installation Basic Installation 2.1 Building your PC system 2 2.1.1 Motherboard installation The diagrams in this section are aligned to the chassis rear I/O panel. 2.
Place the motherboard into the chassis, ensuring that its rear I/O ports are for reference only. The motherboard layout may vary with models. 1. Chapter 2 ASUS MAXIMUS VIII IMPACT 2-1 Install the ASUS Q-Shield to the chassis' rear I/O panel. Chapter 2: Basic Installation Basic Installation 2.1 Building your PC system 2 2.1.1 Motherboard installation The diagrams in this section are aligned to the chassis rear I/O panel. 2.
