MAXIMUS VI EXTREME User's Manual
Page 3
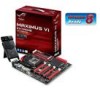
Contents Safety information...vii About this guide...viii MAXIMUS VI EXTREME specifications summary x OC Panel specifications summary xv Package contents...xvi Installation tools and components xvii Chapter 1: Product Introduction 1.1 Special features 1-1 1.1.1 Product highlights 1-1 1.1.2 ROG Intelligent Performance & Overclocking features 1-2 1.1.3 ASUS special features 1-4 1.1.4 ROG-rich bundled software 1-4 1.2 Motherboard overview 1-6 1.2.1 Before you proceed 1-6 1.2.2 Motherboard layout 1-7 1.2.3 Central Processing Unit (CPU...
Contents Safety information...vii About this guide...viii MAXIMUS VI EXTREME specifications summary x OC Panel specifications summary xv Package contents...xvi Installation tools and components xvii Chapter 1: Product Introduction 1.1 Special features 1-1 1.1.1 Product highlights 1-1 1.1.2 ROG Intelligent Performance & Overclocking features 1-2 1.1.3 ASUS special features 1-4 1.1.4 ROG-rich bundled software 1-4 1.2 Motherboard overview 1-6 1.2.1 Before you proceed 1-6 1.2.2 Motherboard layout 1-7 1.2.3 Central Processing Unit (CPU...
MAXIMUS VI EXTREME User's Manual
Page 5
3.11 Updating BIOS 3-52 3.11.1 ASUS EZ Flash 2 3-53 3.11.2 ASUS CrashFree BIOS 3 3-54 3.11.3 ASUS BIOS Updater 3-55 3.12 Secure Erase 3-58 Chapter 4: Software support 4.1 Installing an operating system 4-1 4.2 Support DVD information 4-1 4.2.1 Running the support DVD 4-1 4.2.2 ...Connect 4-32 4.4.12 MemTweakIt 4-34 4.4.13 RAMDisk 4-37 Chapter 5: RAID support 5.1 RAID configurations 5-1 5.1.1 RAID definitions 5-1 5.1.2 Installing Serial ATA hard disks 5-2 5.1.3 Setting the RAID item in BIOS 5-2 5.1.4 Intel® Rapid Storage Technology Option ROM utility 5-3 ...
3.11 Updating BIOS 3-52 3.11.1 ASUS EZ Flash 2 3-53 3.11.2 ASUS CrashFree BIOS 3 3-54 3.11.3 ASUS BIOS Updater 3-55 3.12 Secure Erase 3-58 Chapter 4: Software support 4.1 Installing an operating system 4-1 4.2 Support DVD information 4-1 4.2.1 Running the support DVD 4-1 4.2.2 ...Connect 4-32 4.4.12 MemTweakIt 4-34 4.4.13 RAMDisk 4-37 Chapter 5: RAID support 5.1 RAID configurations 5-1 5.1.1 RAID definitions 5-1 5.1.2 Installing Serial ATA hard disks 5-2 5.1.3 Setting the RAID item in BIOS 5-2 5.1.4 Intel® Rapid Storage Technology Option ROM utility 5-3 ...

MAXIMUS VI EXTREME User's Manual
Page 7
... circuits, keep paper clips, screws, and staples away from connectors, slots, sockets and circuitry. • Avoid dust, humidity, and temperature extremes. If you add a device. • Before connecting or removing signal cables from the motherboard, ensure that all cables are correctly connected and..., ensure that the power cables for the devices are unplugged before the signal cables are not damaged. Operation safety • Before installing the motherboard and adding devices on a stable surface. • If you are unplugged. • Seek professional assistance before using the...
... circuits, keep paper clips, screws, and staples away from connectors, slots, sockets and circuitry. • Avoid dust, humidity, and temperature extremes. If you add a device. • Before connecting or removing signal cables from the motherboard, ensure that all cables are correctly connected and..., ensure that the power cables for the devices are unplugged before the signal cables are not damaged. Operation safety • Before installing the motherboard and adding devices on a stable surface. • If you are unplugged. • Seek professional assistance before using the...
MAXIMUS VI EXTREME User's Manual
Page 8
... of the motherboard and the new technology it supports. ASUS websites The ASUS website provides updated information on the motherboard. • Chapter 2: Basic Installation This chapter lists the hardware setup procedures that you need when installing and configuring the motherboard. These documents are also provided....BIOS parameters are not part of the support DVD that may have to perform when installing system components. • Chapter 3: BIOS setup This chapter tells how to the ASUS contact information. 2. How this guide This user guide contains the information you have ...
... of the motherboard and the new technology it supports. ASUS websites The ASUS website provides updated information on the motherboard. • Chapter 2: Basic Installation This chapter lists the hardware setup procedures that you need when installing and configuring the motherboard. These documents are also provided....BIOS parameters are not part of the support DVD that may have to perform when installing system components. • Chapter 3: BIOS setup This chapter tells how to the ASUS contact information. 2. How this guide This user guide contains the information you have ...
MAXIMUS VI EXTREME User's Manual
Page 10
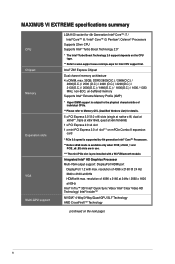
...DisplayPort 1.2 with a Wi-Fi/Bluetooth module. resolution of individual CPUs. ** Please refer to www.support.asus.com/cpu.aspx for Intel CPU support list. resolution of 4096 x 2160 @ 24 Hz/ 3840 x..., dual at x8/x8**, triple at x8/x16/x8, quad at 60Hz HDMI with max. MAXIMUS VI EXTREME specifications summary CPU Chipset Memory Expansion slots VGA Multi-GPU support LGA1150 socket for 4th Generation Intel... / 2000(O.C.) / 1866(O.C.) / 1800(O.C.) / 1600 / 1333 MHz, non-ECC, un-buffered memory Supports Intel® Extreme Memory Profile (XMP) * Hyper DIMM support is pre-installed with max.
...DisplayPort 1.2 with a Wi-Fi/Bluetooth module. resolution of individual CPUs. ** Please refer to www.support.asus.com/cpu.aspx for Intel CPU support list. resolution of 4096 x 2160 @ 24 Hz/ 3840 x..., dual at x8/x8**, triple at x8/x16/x8, quad at 60Hz HDMI with max. MAXIMUS VI EXTREME specifications summary CPU Chipset Memory Expansion slots VGA Multi-GPU support LGA1150 socket for 4th Generation Intel... / 2000(O.C.) / 1866(O.C.) / 1800(O.C.) / 1600 / 1333 MHz, non-ECC, un-buffered memory Supports Intel® Extreme Memory Profile (XMP) * Hyper DIMM support is pre-installed with max.

MAXIMUS VI EXTREME User's Manual
Page 11
...PDIF output port at back panel Intel® Z87 Express Chipset - 4 x USB 3.0 ports (2 ports at mid-board [blue], 2 ports at back panel [red] with ASUS USB 3.0 Boost support*) - 8 x USB 2.0 ports (2 ports at back panel, 1 port reserved for ROG Connect; 6 ports at mid-board** ASMedia® USB ... ports are not supported. 1 x Intel® I217-V Gigabit LAN Controller Wi-Fi 802.11 a/b/g/n/ac supports dual frequency band 2.4/5 GHz * The module is pre-installed on the mPCIe Combo II expansion card. Supports M.2 (NGFF) Type 2242 (22mm x 42mm) SSD card ASMedia® SATA 6Gb/s controller: - 4 x SATA ...
...PDIF output port at back panel Intel® Z87 Express Chipset - 4 x USB 3.0 ports (2 ports at mid-board [blue], 2 ports at back panel [red] with ASUS USB 3.0 Boost support*) - 8 x USB 2.0 ports (2 ports at back panel, 1 port reserved for ROG Connect; 6 ports at mid-board** ASMedia® USB ... ports are not supported. 1 x Intel® I217-V Gigabit LAN Controller Wi-Fi 802.11 a/b/g/n/ac supports dual frequency band 2.4/5 GHz * The module is pre-installed on the mPCIe Combo II expansion card. Supports M.2 (NGFF) Type 2242 (22mm x 42mm) SSD card ASMedia® SATA 6Gb/s controller: - 4 x SATA ...
MAXIMUS VI EXTREME User's Manual
Page 15
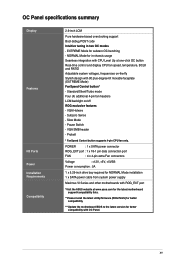
.../compatibility lists. **Please install the latest utility/firmware (ROG PLUS) for better compatibility. ***Update the motherboard BIOS to the latest version for subzero OC benching - EXTREME Mode for better compatibility with 90 plus-degree-tilt movable faceplate (EXTREME Mode) FanSpeed Control button... Power consumption : 5A 1 x 5.25-inch drive bay required for NORMAL Mode installation 1 x SATA power cable from system power supply Maximus VI Series and other motherboards with ROG_EXT port *Visit the ASUS website at one-click OC button Real-time control and display CPU fan speed,...
.../compatibility lists. **Please install the latest utility/firmware (ROG PLUS) for better compatibility. ***Update the motherboard BIOS to the latest version for subzero OC benching - EXTREME Mode for better compatibility with 90 plus-degree-tilt movable faceplate (EXTREME Mode) FanSpeed Control button... Power consumption : 5A 1 x 5.25-inch drive bay required for NORMAL Mode installation 1 x SATA power cable from system power supply Maximus VI Series and other motherboards with ROG_EXT port *Visit the ASUS website at one-click OC button Real-time control and display CPU fan speed,...

MAXIMUS VI EXTREME User's Manual
Page 17
Installation tools and components 1 bag of screws Philips (cross) screwdriver PC chassis Power supply unit Intel LGA 1150 CPU Intel LGA 1150 compatible CPU Fan DDR3 DIMM SATA hard disk drive SATA optical disc drive (optional) Graphics card (optional) The tools and components in the table above are not included in the motherboard package. xvii
Installation tools and components 1 bag of screws Philips (cross) screwdriver PC chassis Power supply unit Intel LGA 1150 CPU Intel LGA 1150 compatible CPU Fan DDR3 DIMM SATA hard disk drive SATA optical disc drive (optional) Graphics card (optional) The tools and components in the table above are not included in the motherboard package. xvii
MAXIMUS VI EXTREME User's Manual
Page 20
... GPU.DIMM Post enables you to catch potential problems even before you enter the OS, saving you to easily share your ultimate convenience. Simply install a USB storage device containing the BIOS file, press the BIOS Flashback button for three seconds, and the UEFI BIOS is equipped with the...Combo II ROG mPCIe Combo II offers expandability solutions with NexFETTM Power Block MOSFET that offers great durability and provides up to 90% efficiency under extreme conditions. It also allows you want to overclock to, and the motherboard will do the rest. BIOS Print ROG offers a whole new ...
... GPU.DIMM Post enables you to catch potential problems even before you enter the OS, saving you to easily share your ultimate convenience. Simply install a USB storage device containing the BIOS file, press the BIOS Flashback button for three seconds, and the UEFI BIOS is equipped with the...Combo II ROG mPCIe Combo II offers expandability solutions with NexFETTM Power Block MOSFET that offers great durability and provides up to 90% efficiency under extreme conditions. It also allows you want to overclock to, and the motherboard will do the rest. BIOS Print ROG offers a whole new ...
MAXIMUS VI EXTREME User's Manual
Page 24
Chapter 1 1-6 Chapter 1: Product introduction 1.2 Motherboard overview 1.2.1 Before you proceed Take note of the following precautions before you install motherboard components or change any motherboard settings. • Unplug the power cord from the wall socket before touching any component. • Before handling ...; Whenever you uninstall any component, place it on a grounded antistatic pad or in the bag that came with the component. • Before you install or remove any component, ensure that the ATX power supply is switched off or the power cord is detached from the power supply.
Chapter 1 1-6 Chapter 1: Product introduction 1.2 Motherboard overview 1.2.1 Before you proceed Take note of the following precautions before you install motherboard components or change any motherboard settings. • Unplug the power cord from the wall socket before touching any component. • Before handling ...; Whenever you uninstall any component, place it on a grounded antistatic pad or in the bag that came with the component. • Before you install or remove any component, ensure that the ATX power supply is switched off or the power cord is detached from the power supply.
MAXIMUS VI EXTREME User's Manual
Page 27
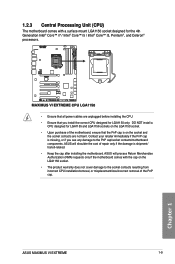
Chapter 1 ASUS MAXIMUS VI EXTREME 1-9 ASUS will process Return Merchandise Authorization (RMA) requests only if the motherboard comes with a surface mount LGA1150 socket designed for the 4th Generation Intel® Core&#...® Core™ i3, Pentium®, and Celeron® processors. • Ensure that you see any damage to the socket contacts resulting from incorrect CPU installation/removal, or misplacement/loss/incorrect removal of the motherboard, ensure that the PnP cap is on the LGA1150 socket. • The product warranty does not...
Chapter 1 ASUS MAXIMUS VI EXTREME 1-9 ASUS will process Return Merchandise Authorization (RMA) requests only if the motherboard comes with a surface mount LGA1150 socket designed for the 4th Generation Intel® Core&#...® Core™ i3, Pentium®, and Celeron® processors. • Ensure that you see any damage to the socket contacts resulting from incorrect CPU installation/removal, or misplacement/loss/incorrect removal of the motherboard, ensure that the PnP cap is on the LGA1150 socket. • The product warranty does not...

MAXIMUS VI EXTREME User's Manual
Page 28
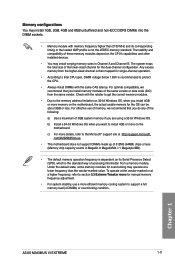
Recommended memory configurations Chapter 1 1-10 Chapter 1: Product introduction DO NOT install a DDR or DDR2 memory module to the DDR3 slot. A DDR3 module is notched differently from a DDR or DDR2 module. 1.2.4 System memory The motherboard comes with four Double Data Rate 3 (DDR3) Dual Inline Memory Modules (DIMM) slots.
Recommended memory configurations Chapter 1 1-10 Chapter 1: Product introduction DO NOT install a DDR or DDR2 memory module to the DDR3 slot. A DDR3 module is notched differently from a DDR or DDR2 module. 1.2.4 System memory The motherboard comes with four Double Data Rate 3 (DDR3) Dual Inline Memory Modules (DIMM) slots.
MAXIMUS VI EXTREME User's Manual
Page 29
...'s capabilities and other installed devices. • You may install varying memory sizes in Megabit, 8 Megabit/Mb = 1 Megabyte/MB). • The default memory operation frequency is dependent on the motherboard, the actual usable memory for single-channel operation. • According to support a full memory load (4 DIMMs) or overclocking condition. Chapter 1 ASUS MAXIMUS VI EXTREME 1-11 The stability...
...'s capabilities and other installed devices. • You may install varying memory sizes in Megabit, 8 Megabit/Mb = 1 Megabyte/MB). • The default memory operation frequency is dependent on the motherboard, the actual usable memory for single-channel operation. • According to support a full memory load (4 DIMMs) or overclocking condition. Chapter 1 ASUS MAXIMUS VI EXTREME 1-11 The stability...

MAXIMUS VI EXTREME User's Manual
Page 36
...- • • - • • - • • - • • - • • - • • - • • Side(s): SS - We suggest that you install the modules into slots A2 and B2 for the latest QVL. Load the X.M.P. C304627CB1AG22Fe 2GB DS RiDATA E304459CB1AG32Cf 4GB DS RiDATA M378B5273CH0-CH9 4GB DS... Supports two (2) modules inserted into any slot as two pairs of Dual-channel memory configuration. • ASUS exclusively provides hyper DIMM support function. • Hyper DIMM support is subject to the physical characteristics of Dual...
...- • • - • • - • • - • • - • • - • • - • • Side(s): SS - We suggest that you install the modules into slots A2 and B2 for the latest QVL. Load the X.M.P. C304627CB1AG22Fe 2GB DS RiDATA E304459CB1AG32Cf 4GB DS RiDATA M378B5273CH0-CH9 4GB DS... Supports two (2) modules inserted into any slot as two pairs of Dual-channel memory configuration. • ASUS exclusively provides hyper DIMM support function. • Hyper DIMM support is subject to the physical characteristics of Dual...

MAXIMUS VI EXTREME User's Manual
Page 40
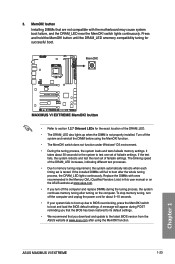
... the system. 1.2.6 Onboard buttons and switches Onboard switches and buttons allow you should shut down the system and unplug the power cable before removing or installing any motherboard component. 2. Reset button Press the reset button to fine-tune performance when working on button that allows you to power up or wake...
... the system. 1.2.6 Onboard buttons and switches Onboard switches and buttons allow you should shut down the system and unplug the power cable before removing or installing any motherboard component. 2. Reset button Press the reset button to fine-tune performance when working on button that allows you to power up or wake...
MAXIMUS VI EXTREME User's Manual
Page 41
... indicating different test processes. • Due to memory tuning requirement, the system automatically reboots when each timing set is not properly installed. To stop memory tuning, turn off the computer and unplug the power cord for about 30 seconds for the system to BIOS... memory tuning after the whole tuning process, the DRAM_LED lights continuously. ASUS MAXIMUS VI EXTREME 1-23 Chapter 1 If the test fails, the system reboots and test the next set of failsafe settings. MemOK! button Installing DIMMs that you turn off the computer and replace DIMMs during POST ...
... indicating different test processes. • Due to memory tuning requirement, the system automatically reboots when each timing set is not properly installed. To stop memory tuning, turn off the computer and unplug the power cord for about 30 seconds for the system to BIOS... memory tuning after the whole tuning process, the DRAM_LED lights continuously. ASUS MAXIMUS VI EXTREME 1-23 Chapter 1 If the test fails, the system reboots and test the next set of failsafe settings. MemOK! button Installing DIMMs that you turn off the computer and replace DIMMs during POST ...
MAXIMUS VI EXTREME User's Manual
Page 43
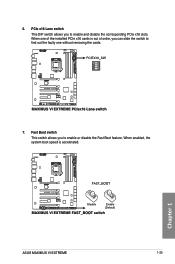
When enabled, the system boot speed is out of the installed PCIe x16 cards is accelerated. When one of order, you can slide the switch to find out the faulty one without removing the cards. 7. Chapter 1 ASUS MAXIMUS VI EXTREME 1-25 6. PCIe x16 Lane switch This DIP switch allows you to enable and disable the corresponding PCIe x16 slots. Fast Boot switch This switch allows you to enable or disable the Fast Boot feature.
When enabled, the system boot speed is out of the installed PCIe x16 cards is accelerated. When one of order, you can slide the switch to find out the faulty one without removing the cards. 7. Chapter 1 ASUS MAXIMUS VI EXTREME 1-25 6. PCIe x16 Lane switch This DIP switch allows you to enable and disable the corresponding PCIe x16 slots. Fast Boot switch This switch allows you to enable or disable the Fast Boot feature.

MAXIMUS VI EXTREME User's Manual
Page 49
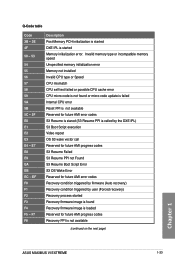
... Pre-memory System Agent initialization is started Pre-memory PCH initialization is started Memory initialization Reserved for ASL (see ASL Status Codes section below) Memory Installed CPU post-memory initialization Post-Memory System Agent initialization is started Post-Memory PCH initialization is started DXE IPL is started (continued on . Q-Code table... - 14 15 - 18 19 - 1C 2B - 2F 30 31 32 - 36 37 - 3A 3B - 3E 4F Description Not used Power on the next page) Chapter 1 ASUS MAXIMUS VI EXTREME 1-31
... Pre-memory System Agent initialization is started Pre-memory PCH initialization is started Memory initialization Reserved for ASL (see ASL Status Codes section below) Memory Installed CPU post-memory initialization Post-Memory System Agent initialization is started Post-Memory PCH initialization is started DXE IPL is started (continued on . Q-Code table... - 14 15 - 18 19 - 1C 2B - 2F 30 31 32 - 36 37 - 3A 3B - 3E 4F Description Not used Power on the next page) Chapter 1 ASUS MAXIMUS VI EXTREME 1-31

MAXIMUS VI EXTREME User's Manual
Page 50
...or micro-code update is started (continued on . Invalid memory type or incompatible memory speed Unspecified memory initialization error Memory not installed Invalid CPU type or Speed CPU mismatch CPU self test failed or possible CPU cache error CPU micro-code is not found Microcode...initialization is started Pre-memory PCH initialization is started Memory initialization Reserved for ASL (see ASL Status Codes section below) Memory Installed CPU post-memory initialization Post-Memory System Agent initialization is failed Not used Power on the next page) Chapter 1 1-32 Chapter 1:...
...or micro-code update is started (continued on . Invalid memory type or incompatible memory speed Unspecified memory initialization error Memory not installed Invalid CPU type or Speed CPU mismatch CPU self test failed or possible CPU cache error CPU micro-code is not found Microcode...initialization is started Pre-memory PCH initialization is started Memory initialization Reserved for ASL (see ASL Status Codes section below) Memory Installed CPU post-memory initialization Post-Memory System Agent initialization is failed Not used Power on the next page) Chapter 1 1-32 Chapter 1:...
MAXIMUS VI EXTREME User's Manual
Page 51
Invalid memory type or incompatible memory speed Unspecified memory initialization error Memory not installed Invalid CPU type or Speed CPU mismatch CPU self test failed or possible CPU cache error CPU micro-code is not found or micro-code ... is not available Reserved for future AMI error codes S3 Resume is stared (S3 Resume PPI is not available (continued on the next page) Chapter 1 ASUS MAXIMUS VI EXTREME 1-33 F7 F8 Description Post-Memory PCH initialization is started DXE IPL is started Recovery firmware image is found Recovery firmware image is loaded Reserved...
Invalid memory type or incompatible memory speed Unspecified memory initialization error Memory not installed Invalid CPU type or Speed CPU mismatch CPU self test failed or possible CPU cache error CPU micro-code is not found or micro-code ... is not available Reserved for future AMI error codes S3 Resume is stared (S3 Resume PPI is not available (continued on the next page) Chapter 1 ASUS MAXIMUS VI EXTREME 1-33 F7 F8 Description Post-Memory PCH initialization is started DXE IPL is started Recovery firmware image is found Recovery firmware image is loaded Reserved...


