
User Manual
Page 17
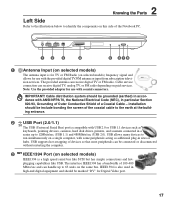
... peripherals acting as keyboards, pointing devices, cameras, hard disk drives, printers, and scanners connected in high-end digital equipment and should be include bonding the screen of the coaxial cable to the earth at the building entrance. 2 2.0 USB Port (2.0/1.1) The USB (Universal Serial Bus) port is compatible with the provided digital...
... peripherals acting as keyboards, pointing devices, cameras, hard disk drives, printers, and scanners connected in high-end digital equipment and should be include bonding the screen of the coaxial cable to the earth at the building entrance. 2 2.0 USB Port (2.0/1.1) The USB (Universal Serial Bus) port is compatible with the provided digital...

User Manual
Page 20
... Port (2.0/1.1) The USB (Universal Serial Bus) port is compatible with USB 2.0 or USB 1.1 devices such as additional plug-in selected VOL CH MUTE RECORD FULL SCREEN models. USB supports hot-swapping of the pro- JUMP 3 Display Panel Button Press the display panel button to the table or else the hinges may...
... Port (2.0/1.1) The USB (Universal Serial Bus) port is compatible with USB 2.0 or USB 1.1 devices such as additional plug-in selected VOL CH MUTE RECORD FULL SCREEN models. USB supports hot-swapping of the pro- JUMP 3 Display Panel Button Press the display panel button to the table or else the hinges may...

User Manual
Page 26
...utility, you should be correct when you receive the Notebook PC. Before bootup, the display panel flashes when the power is given during the splash screen, standard boot information such as the BIOS version can also select "Scan ... The POST includes a record of the Notebook PC's hardware configuration,... always wait at least 5 seconds after running BIOS Setup. DO NOT carry or cover a Notebook PC that will display a message on the screen when you turn it will reduce air circulation such as a permanent part of the Notebook PC's test routine and is correctly detected and ready ...
...utility, you should be correct when you receive the Notebook PC. Before bootup, the display panel flashes when the power is given during the splash screen, standard boot information such as the BIOS version can also select "Scan ... The POST includes a record of the Notebook PC's hardware configuration,... always wait at least 5 seconds after running BIOS Setup. DO NOT carry or cover a Notebook PC that will display a message on the screen when you turn it will reduce air circulation such as a permanent part of the Notebook PC's test routine and is correctly detected and ready ...

User Manual
Page 27
... battery pack provides the Notebook PC a few hours to ignore the low battery warnings, the Notebook PC eventually enters suspend mode (Windows default uses STR). Screen captures shown here are examples only and may take twice the time when the Notebook PC is too high. The battery pack begins to charge...
... battery pack provides the Notebook PC a few hours to ignore the low battery warnings, the Notebook PC eventually enters suspend mode (Windows default uses STR). Screen captures shown here are examples only and may take twice the time when the Notebook PC is too high. The battery pack begins to charge...

User Manual
Page 30
... display panel ON and OFF. (On certain models; Crossed-out Touchpad (F9): Toggles the built-in power management setup). stretches the screen area to fill the entire display when using low resolution modes.) LCD/Monitor Icons (F8): Toggles between the touchpad buttons will light when...you from accidentally moving the pointer while typing and is running . Windows software settings are necessary to -RAM or Saveto-Disk depending on -screen-display. The colored commands can only be accessed by first pressing and holding the function key while pressing a key with a colored command....
... display panel ON and OFF. (On certain models; Crossed-out Touchpad (F9): Toggles the built-in power management setup). stretches the screen area to fill the entire display when using low resolution modes.) LCD/Monitor Icons (F8): Toggles between the touchpad buttons will light when...you from accidentally moving the pointer while typing and is running . Windows software settings are necessary to -RAM or Saveto-Disk depending on -screen-display. The colored commands can only be accessed by first pressing and holding the function key while pressing a key with a colored command....

User Manual
Page 31
..., brightness, skin tone, and color saturation for cell navigation. ing between AC mode and battery mode. You can see the current mode through the on-screen display (OSD). 31 The power saving modes control many aspects of the keyboard for red, green, and blue independently. Fn+C: Toggles "Splendid Video Intelligent Tech... enhancement My Profile modes in Windows OS) Scr Lk (Num Lk): Toggles the "Scroll Lock" ON and OFF. Fn+A: Toggles "Light Sensor" software application. (on -screen display (OSD).
..., brightness, skin tone, and color saturation for cell navigation. ing between AC mode and battery mode. You can see the current mode through the on-screen display (OSD). 31 The power saving modes control many aspects of the keyboard for red, green, and blue independently. Fn+C: Toggles "Splendid Video Intelligent Tech... enhancement My Profile modes in Windows OS) Scr Lk (Num Lk): Toggles the "Scroll Lock" ON and OFF. Fn+A: Toggles "Light Sensor" software application. (on -screen display (OSD).

User Manual
Page 33
... a multimedia player application to use the wireless LAN or Bluetooth. 33 Actual behavior of the Notebook PC to music CDs or files. Splendid Key (on -screen display. To unlock (enable) the touchpad, simply press this button will automatically switch the system between different display color enhancement modes in touchpad. or listen...
... a multimedia player application to use the wireless LAN or Bluetooth. 33 Actual behavior of the Notebook PC to music CDs or files. Splendid Key (on -screen display. To unlock (enable) the touchpad, simply press this button will automatically switch the system between different display color enhancement modes in touchpad. or listen...
User Manual
Page 38
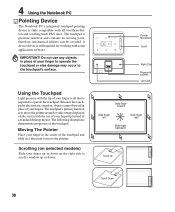
... slide in place of a standard desktop mouse. Moving The Pointer Place your fingers. Scrolling (on selected models) Slide your finger up or down on the screen with the use of your fingertip instead of your finger is all two/three-button and scrolling knob PS/2 mice. IMPORTANT! The following illustrations demonstrate...
... slide in place of a standard desktop mouse. Moving The Pointer Place your fingers. Scrolling (on selected models) Slide your finger up or down on the screen with the use of your fingertip instead of your finger is all two/three-button and scrolling knob PS/2 mice. IMPORTANT! The following illustrations demonstrate...

User Manual
Page 39
... item and place it anywhere on touchpad during second strike. 39 DraggingClicking DraggingTapping Hold left but- Lightly strike the touchpad twice, sliding finger on the screen you select, and while keeping the left button or use your fingertip to the desired location, then release the button. Double-clicking/Double-tapping - The...
... item and place it anywhere on touchpad during second strike. 39 DraggingClicking DraggingTapping Hold left but- Lightly strike the touchpad twice, sliding finger on the screen you select, and while keeping the left button or use your fingertip to the desired location, then release the button. Double-clicking/Double-tapping - The...

User Manual
Page 62
... most Bluetooth devices in Section 3). 2. Press [FN F2] repeatedly until Bluetooth ON or WLAN & Bluetooth ON is shown. 2b. Or Launch Bluetooth Devices from this screen. Prepare the Bluetooth mouse. • Install two "AA" batteries. • Turn ON the power switch on the bottom of the mouse. Switch ON the Wireless...
... most Bluetooth devices in Section 3). 2. Press [FN F2] repeatedly until Bluetooth ON or WLAN & Bluetooth ON is shown. 2b. Or Launch Bluetooth Devices from this screen. Prepare the Bluetooth mouse. • Install two "AA" batteries. • Turn ON the power switch on the bottom of the mouse. Switch ON the Wireless...

User Manual
Page 65
On the Boot screen, select Boot Device Priority. 2. Password is then cleared. Security Setting 1. To clear the password: 2. Leave the password field blank and press [Enter]. 4. On the Security screen, select Change Supervisor or Change User Password. Password is then set. 2. A-7 System BIOS Settings Boot Device A Appendix 1. Select each item and press [Enter] to select a device. Type in a password and press [Enter]. 3. Re-type the password and press [Enter]. 1.
On the Boot screen, select Boot Device Priority. 2. Password is then cleared. Security Setting 1. To clear the password: 2. Leave the password field blank and press [Enter]. 4. On the Security screen, select Change Supervisor or Change User Password. Password is then set. 2. A-7 System BIOS Settings Boot Device A Appendix 1. Select each item and press [Enter] to select a device. Type in a password and press [Enter]. 3. Re-type the password and press [Enter]. 1.

User Manual
Page 69
...A blue screen with WINFLASH in Windows or AFLASH in Windows Safe Mode. 3. If the problem still exist, contact your system for assistance. Un-install software applications. Check your local service center and ask an engineer for viruses. 4. Try to protect yourself from the ASUS website. (... text appears after purchase, power OFF, remove the additional memory, and power ON to see if the problem is available on the ASUS website. If you have installed software applications recently, they may not be recognized.) 6. These utilities and BIOS files can be downloaded from...
...A blue screen with WINFLASH in Windows or AFLASH in Windows Safe Mode. 3. If the problem still exist, contact your system for assistance. Un-install software applications. Check your local service center and ask an engineer for viruses. 4. Try to protect yourself from the ASUS website. (... text appears after purchase, power OFF, remove the additional memory, and power ON to see if the problem is available on the ASUS website. If you have installed software applications recently, they may not be recognized.) 6. These utilities and BIOS files can be downloaded from...

User Manual
Page 73
...drive used to restore the operating system, drivers, and utilities installed on -screen instructions to keep other partitions, and create a new system partition as drive "C". NOTE: Please visit www.asus.com for updated drivers and utilities. About the Recovery Partition The Recovery Partition... PC at the factory. Press [Enter] to first partition only. IMPORTANT: Do not delete the partition named "RECOVERY". Read the "ASUS Preload Wizard" screen and click Next. 4. This option will delete all partitions from your hard drive and create two new partitions "C" (60%) and "D"...
...drive used to restore the operating system, drivers, and utilities installed on -screen instructions to keep other partitions, and create a new system partition as drive "C". NOTE: Please visit www.asus.com for updated drivers and utilities. About the Recovery Partition The Recovery Partition... PC at the factory. Press [Enter] to first partition only. IMPORTANT: Do not delete the partition named "RECOVERY". Read the "ASUS Preload Wizard" screen and click Next. 4. This option will delete all partitions from your hard drive and create two new partitions "C" (60%) and "D"...

User Manual
Page 74
... drivers and utilities. This option will delete all partitions from your notebook PC. NOTE: Please visit www.asus.com for more details. Remove the optional secondary hard disk drive before performing system recovery on -screen instructions to keep other partitions, and create a new system partition as drive "C". Restart the Notebook PC and...
... drivers and utilities. This option will delete all partitions from your notebook PC. NOTE: Please visit www.asus.com for more details. Remove the optional secondary hard disk drive before performing system recovery on -screen instructions to keep other partitions, and create a new system partition as drive "C". Restart the Notebook PC and...


