User Manual
Page 4
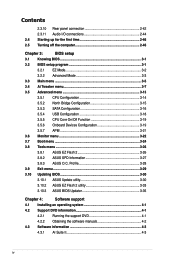
Profile 3-28 3.9 Exit menu 3-29 3.10 Updating BIOS 3-30 3.10.1 ASUS Update utility 3-30 3.10.2 ASUS EZ Flash 2 utility 3-33 3.10.3 ASUS BIOS Updater 3-35 Chapter 4: Software support 4.1 Installing an operating system 4-1 4.2 Support DVD information 4-1 4.2.1 Running the support DVD 4-1 4.2.2 Obtaining the software manuals 4-2 4.3 Software information 4-3 4.3.1 AI Suite II 4-3 ...
Profile 3-28 3.9 Exit menu 3-29 3.10 Updating BIOS 3-30 3.10.1 ASUS Update utility 3-30 3.10.2 ASUS EZ Flash 2 utility 3-33 3.10.3 ASUS BIOS Updater 3-35 Chapter 4: Software support 4.1 Installing an operating system 4-1 4.2 Support DVD information 4-1 4.2.1 Running the support DVD 4-1 4.2.2 Obtaining the software manuals 4-2 4.3 Software information 4-3 4.3.1 AI Suite II 4-3 ...
User Manual
Page 5
Contents 4.3.2 DIGI+ VRM 4-4 4.3.3 TurboV EVO 4-5 4.3.4 EPU 4-9 4.3.5 FAN Xpert 4-10 4.3.6 Probe II 4-11 4.3.7 Sensor Recorder 4-12 4.3.8 Ai Charger 4-13 4.3.9 Monitor 4-14 4.3.10 System Information 4-15 4.3.11 Audio configurations 4-16 4.4 RAID configurations 4-17 4.4.1 RAID definitions 4-17 4.4.2 Installing Serial ATA hard disks 4-18 4.4.3 Setting the RAID item in BIOS 4-18 4.4.4 AMD® Option ROM Utility 4-19...
Contents 4.3.2 DIGI+ VRM 4-4 4.3.3 TurboV EVO 4-5 4.3.4 EPU 4-9 4.3.5 FAN Xpert 4-10 4.3.6 Probe II 4-11 4.3.7 Sensor Recorder 4-12 4.3.8 Ai Charger 4-13 4.3.9 Monitor 4-14 4.3.10 System Information 4-15 4.3.11 Audio configurations 4-16 4.4 RAID configurations 4-17 4.4.1 RAID definitions 4-17 4.4.2 Installing Serial ATA hard disks 4-18 4.4.3 Setting the RAID item in BIOS 4-18 4.4.4 AMD® Option ROM Utility 4-19...
User Manual
Page 8
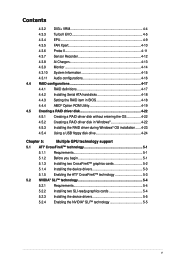
Detailed descriptions of the BIOS parameters are not part of the switches, jumpers, and connectors on ASUS hardware and software products. It includes description of the standard package. Refer to install and configure multiple ATI® CrossFireX...graphics cards. How this guide This user guide contains the information you have been added by your dealer. ASUS websites The ASUS website provides updated information on the motherboard. • Chapter 3: BIOS setup This chapter tells how to perform when installing system components. These documents are also provided. •...
Detailed descriptions of the BIOS parameters are not part of the switches, jumpers, and connectors on ASUS hardware and software products. It includes description of the standard package. Refer to install and configure multiple ATI® CrossFireX...graphics cards. How this guide This user guide contains the information you have been added by your dealer. ASUS websites The ASUS website provides updated information on the motherboard. • Chapter 3: BIOS setup This chapter tells how to perform when installing system components. These documents are also provided. •...
User Manual
Page 11
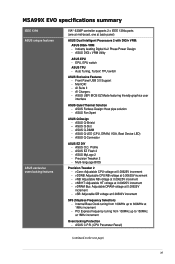
M5A99X EVO specifications summary IEEE 1394 ASUS unique features ASUS exclusive overclocking features VIA® 6308P controller supports 2 x IEEE 1394a ports (one at mid-board, one at 0.00625V increment - MemOK! - ASUS MyLogo 2 - vDRAM Bus: Adjustable DRAM voltage at back panel) ASUS Dual Intelligent Processors 2 with DIGI+ VRM: ASUS DIGI+ VRM - Industry leading Digital 6+2 Phase Power Design - ASUS DIGI+ VRM...
M5A99X EVO specifications summary IEEE 1394 ASUS unique features ASUS exclusive overclocking features VIA® 6308P controller supports 2 x IEEE 1394a ports (one at mid-board, one at 0.00625V increment - MemOK! - ASUS MyLogo 2 - vDRAM Bus: Adjustable DRAM voltage at back panel) ASUS Dual Intelligent Processors 2 with DIGI+ VRM: ASUS DIGI+ VRM - Industry leading Digital 6+2 Phase Power Design - ASUS DIGI+ VRM...

User Manual
Page 12
xii x 9.6 in . M5A99X EVO specifications summary Back panel I/O ports Internal I/O connectors BIOS features Manageability Support DVD contents Form factor 1 x PS/2 keyboard/mouse combo port 1 x Optical S/PDIF Out port 1 x LAN (RJ-45) port 1 x IEEE 1394a port ...(Q-Connector) 1 x MemOK! button 1 x EPU switch 1 x TPU switch 32 Mb Flash ROM, UEFI BIOS, PnP, DMI 2.0, WfM2.0, SM BIOS 2.6, ACPI 2.0a, Multi-language BIOS, ASUS EZ Flash 2, WfM 2.0, DMI 2.0, WOL by PME, WOR by PME, PXE Drivers ASUS Utilities ASUS Update Anti-virus software (OEM version) ATX form factor: 12 in . (30.5 cm x 24.4 cm...
xii x 9.6 in . M5A99X EVO specifications summary Back panel I/O ports Internal I/O connectors BIOS features Manageability Support DVD contents Form factor 1 x PS/2 keyboard/mouse combo port 1 x Optical S/PDIF Out port 1 x LAN (RJ-45) port 1 x IEEE 1394a port ...(Q-Connector) 1 x MemOK! button 1 x EPU switch 1 x TPU switch 32 Mb Flash ROM, UEFI BIOS, PnP, DMI 2.0, WfM2.0, SM BIOS 2.6, ACPI 2.0a, Multi-language BIOS, ASUS EZ Flash 2, WfM 2.0, DMI 2.0, WOL by PME, WOR by PME, PXE Drivers ASUS Utilities ASUS Update Anti-virus software (OEM version) ATX form factor: 12 in . (30.5 cm x 24.4 cm...
User Manual
Page 15
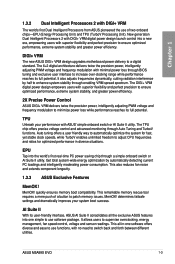
...optimized performance in -one simple to a digital standard. This also reduces fan noise and extends component longevity. 1.3.3 ASUS Exclusive Features MemOK! ASUS M5A99X EVO 1-3 It also adjusts frequencies dynamically, cutting radiation interference by automatically detecting current PC loadings and intelligently moderating power ... and ratios for fast, yet stable clock speeds, while TurboV enables unlimited freedom to enhance system stability through BIOS tuning and exclusive user interface to supervise overclocking, energy management, fan speed control, voltage and sensor readings. ...
...optimized performance in -one simple to a digital standard. This also reduces fan noise and extends component longevity. 1.3.3 ASUS Exclusive Features MemOK! ASUS M5A99X EVO 1-3 It also adjusts frequencies dynamically, cutting radiation interference by automatically detecting current PC loadings and intelligently moderating power ... and ratios for fast, yet stable clock speeds, while TurboV enables unlimited freedom to enhance system stability through BIOS tuning and exclusive user interface to supervise overclocking, energy management, fan speed control, voltage and sensor readings. ...
User Manual
Page 16
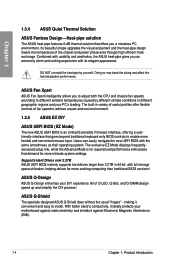
... according to achieve a quiet and cool environment. 1.3.5 ASUS EZ DIY ASUS UEFI BIOS (EZ Mode) The new ASUS UEFI BIOS is for experienced performance enthusiasts that demand far more intricate system settings. ASUS Fan Xpert ASUS Fan Xpert intelligently allows you an extremely silent and cooling... with the same smoothness as their operating system. ASUS Q-Shield The specially designed ASUS Q-Shield does without the usual "fingers" - Supports Hard Drives over 2.2TB ASUS UEFI BIOS natively supports hard drives larger than traditional BIOS versions! All of the chipset and power phase...
... according to achieve a quiet and cool environment. 1.3.5 ASUS EZ DIY ASUS UEFI BIOS (EZ Mode) The new ASUS UEFI BIOS is for experienced performance enthusiasts that demand far more intricate system settings. ASUS Fan Xpert ASUS Fan Xpert intelligently allows you an extremely silent and cooling... with the same smoothness as their operating system. ASUS Q-Shield The specially designed ASUS Q-Shield does without the usual "fingers" - Supports Hard Drives over 2.2TB ASUS UEFI BIOS natively supports hard drives larger than traditional BIOS versions! All of the chipset and power phase...

User Manual
Page 17
...BIOS without the need of the product and thus mitigate environmental impacts. With these technologies, you to easily connect or disconnect the chassis front panel cables to energy consumptions. This is European Union's Energy-related Products (ErP) ready, and ErP requires products to meet certain energy efficiency requirement in line with ASUS... 5V power for the external SATA device. ASUS M5A99X EVO 1-5 Chapter 1 ASUS Q-Connector ASUS Q-Connector allows you may experience a better home-theater audio with ease. ASUS EZ-Flash 2 ASUS EZ Flash 2 is purchased separately. The...
...BIOS without the need of the product and thus mitigate environmental impacts. With these technologies, you to easily connect or disconnect the chassis front panel cables to energy consumptions. This is European Union's Energy-related Products (ErP) ready, and ErP requires products to meet certain energy efficiency requirement in line with ASUS... 5V power for the external SATA device. ASUS M5A99X EVO 1-5 Chapter 1 ASUS Q-Connector ASUS Q-Connector allows you may experience a better home-theater audio with ease. ASUS EZ-Flash 2 ASUS EZ Flash 2 is purchased separately. The...
User Manual
Page 33
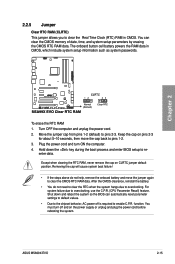
...(default) to overclocking, use the C.P.R. (CPU Parameter Recall) feature. You must turn ON the computer. 4. Hold down and reboot the system so the BIOS can clear the CMOS memory of date, time, and system setup parameters by erasing the CMOS RTC RAM data. You can automatically reset parameter settings...then move the jumper again to re- enter data. Except when clearing the RTC RAM, never remove the cap on CLRTC jumper default position. ASUS M5A99X EVO 2-15 Removing the cap will cause system boot failure! • If the steps above do not need to clear the RTC when the system...
...(default) to overclocking, use the C.P.R. (CPU Parameter Recall) feature. You must turn ON the computer. 4. Hold down and reboot the system so the BIOS can clear the CMOS memory of date, time, and system setup parameters by erasing the CMOS RTC RAM data. You can automatically reset parameter settings...then move the jumper again to re- enter data. Except when clearing the RTC RAM, never remove the cap on CLRTC jumper default position. ASUS M5A99X EVO 2-15 Removing the cap will cause system boot failure! • If the steps above do not need to clear the RTC when the system...
User Manual
Page 34
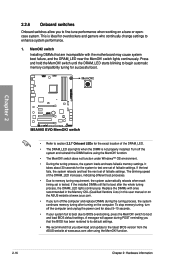
...system reboots and test the next set of the DRAM_LED increases, indicating different test processes. • Due to the latest BIOS version from the ASUS website at www.asus.com. • If you turn off the system and reinstall the DIMM before using the MemOK! function. • ...or opencase system. switch until the DRAM_LED starts blinking to begin automatic memory compatibility tuning for overclockers and gamers who continually change settings to BIOS overclocking, press the MemOK! MemOK! Press and hold the MemOK! It takes about 5-10 seconds. • If your system fail ...
...system reboots and test the next set of the DRAM_LED increases, indicating different test processes. • Due to the latest BIOS version from the ASUS website at www.asus.com. • If you turn off the system and reinstall the DIMM before using the MemOK! function. • ...or opencase system. switch until the DRAM_LED starts blinking to begin automatic memory compatibility tuning for overclockers and gamers who continually change settings to BIOS overclocking, press the MemOK! MemOK! Press and hold the MemOK! It takes about 5-10 seconds. • If your system fail ...
User Manual
Page 35
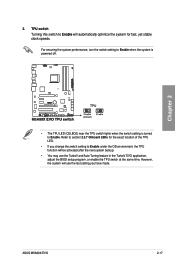
... the switch setting is turned to Enable will automatically optimize the system for the exact location of the TPU LED. • If you have made. ASUS M5A99X EVO 2-17 However, the system will be activated after the next system bootup. • You may use the last setting you change the switch setting to..., yet stable clock speeds. Refer to Enable under the OS environment, the TPU function will use the TurboV and Auto Tuning feature in the TurboV EVO application, adjust the BIOS setup program, or enable the TPU switch at the same time.
... the switch setting is turned to Enable will automatically optimize the system for the exact location of the TPU LED. • If you have made. ASUS M5A99X EVO 2-17 However, the system will be activated after the next system bootup. • You may use the last setting you change the switch setting to..., yet stable clock speeds. Refer to Enable under the OS environment, the TPU function will use the TurboV and Auto Tuning feature in the TurboV EVO application, adjust the BIOS setup program, or enable the TPU switch at the same time.

User Manual
Page 36
Refer to section 2.2.7 Onboard LEDs for the exact location of the EPU LED. • If you change the EPU settings in the software application or BIOS setup program, and enable the EPU function at the same time. However, the system will be activated after the next system bootup. • You may ...
Refer to section 2.2.7 Onboard LEDs for the exact location of the EPU LED. • If you change the EPU settings in the software application or BIOS setup program, and enable the EPU function at the same time. However, the system will be activated after the next system bootup. • You may ...
User Manual
Page 39
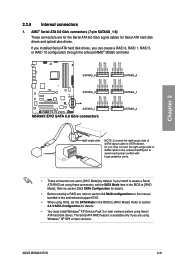
...8226; You must install Windows® XP Service Pack 3 or later versions before using NCQ, set the SATA Mode in the BIOS to [AHCI Mode]. ASUS M5A99X EVO 2-21 AMD® Serial ATA 6.0 Gb/s connectors (7-pin SATA6G_1-6) These connectors are using these connectors, set to section 3.5.3 SATA...5, or RAID 10 configuration through the onboard AMD® SB950 controller. Chapter 2 • These connectors are set the SATA Mode item in the BIOS to [RAID Mode]. Refer to [AHCI Mode] by default. 2.2.8 Internal connectors 1. If you installed Serial ATA hard disk drives, you intend to...
...8226; You must install Windows® XP Service Pack 3 or later versions before using NCQ, set the SATA Mode in the BIOS to [AHCI Mode]. ASUS M5A99X EVO 2-21 AMD® Serial ATA 6.0 Gb/s connectors (7-pin SATA6G_1-6) These connectors are using these connectors, set to section 3.5.3 SATA...5, or RAID 10 configuration through the onboard AMD® SB950 controller. Chapter 2 • These connectors are set the SATA Mode item in the BIOS to [RAID Mode]. Refer to [AHCI Mode] by default. 2.2.8 Internal connectors 1. If you installed Serial ATA hard disk drives, you intend to...

User Manual
Page 40
..., refer to section 4.4 RAID configurations or the manual bundled in the motherboard support DVD. • When using these connectors, set the SATA Mode in the BIOS to Serial ATA 3.0 Gb/s hard disk drives and optical disc drives via Serial ATA 3.0 Gb/s signal cables. • These connectors are using Serial ATA ... ATA RAID feature is available only if you intend to create a Serial ATA RAID set using NCQ, set the SATA Mode item in the BIOS to [AHCI Mode]. JMicron® JMB362 Serial ATA 3.0 Gb/s connectors (7-pin SATA3G_E1/E2 [black]) These connectors connect to [RAID Mode].
..., refer to section 4.4 RAID configurations or the manual bundled in the motherboard support DVD. • When using these connectors, set the SATA Mode in the BIOS to Serial ATA 3.0 Gb/s hard disk drives and optical disc drives via Serial ATA 3.0 Gb/s signal cables. • These connectors are using Serial ATA ... ATA RAID feature is available only if you intend to create a Serial ATA RAID set using NCQ, set the SATA Mode item in the BIOS to [AHCI Mode]. JMicron® JMB362 Serial ATA 3.0 Gb/s connectors (7-pin SATA3G_E1/E2 [black]) These connectors connect to [RAID Mode].
User Manual
Page 45
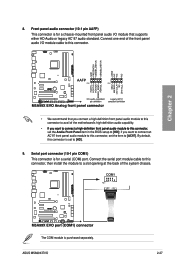
...;n�e�l�a�u��d�i�o�m��o��d�u�l�e�t�o��t�h�is purchased separately. ASUS M5A99X EVO 2-27 if you connect a high-definition front panel audio module to this connector, set the Azalia Front Panel item in the...
...;n�e�l�a�u��d�i�o�m��o��d�u�l�e�t�o��t�h�is purchased separately. ASUS M5A99X EVO 2-27 if you connect a high-definition front panel audio module to this connector, set the Azalia Front Panel item in the...
User Manual
Page 47
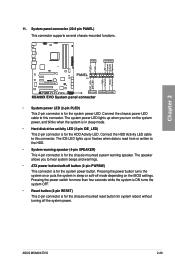
... mode. • Hard disk drive activity LED (2-pin IDE_LED) This 2-pin connector is for the system power button. The speaker allows you turn on the BIOS settings. Connect the chassis power LED cable to this connector. Connect the HDD Activity LED cable to this connector. The system power LED lights up... blinks when the system is in sleep or soft-off button (2-pin PWRSW) This connector is for system reboot without turning off the system power. ASUS M5A99X EVO 2-29
... mode. • Hard disk drive activity LED (2-pin IDE_LED) This 2-pin connector is for the system power button. The speaker allows you turn on the BIOS settings. Connect the chassis power LED cable to this connector. Connect the HDD Activity LED cable to this connector. The system power LED lights up... blinks when the system is in sleep or soft-off button (2-pin PWRSW) This connector is for system reboot without turning off the system power. ASUS M5A99X EVO 2-29
User Manual
Page 61
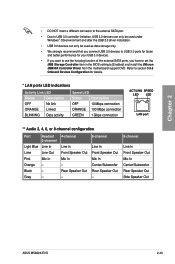
... If you want to use the hot-plug function of the external SATA ports, you have to set the JMB Storage Controller item in the BIOS setting to section 3.5.6 Onboard Devices Configuration for details. * LAN ports LED indications Activity Link LED Status Description OFF No link Speed LED Status Description...Orange - - Rear Speaker Out Rear Speaker Out Gray - - - 8-channel Line In Front Speaker Out Mic In Center/Subwoofer Rear Speaker Out Side Speaker Out ASUS M5A99X EVO 2-43 Refer to [Enabled] and install the JMicron JMB36X Controller Driver from the motherboard support DVD.
... If you want to use the hot-plug function of the external SATA ports, you have to set the JMB Storage Controller item in the BIOS setting to section 3.5.6 Onboard Devices Configuration for details. * LAN ports LED indications Activity Link LED Status Description OFF No link Speed LED Status Description...Orange - - Rear Speaker Out Rear Speaker Out Gray - - - 8-channel Line In Front Speaker Out Mic In Center/Subwoofer Rear Speaker Out Side Speaker Out ASUS M5A99X EVO 2-43 Refer to [Enabled] and install the JMicron JMB36X Controller Driver from the motherboard support DVD.
User Manual
Page 64
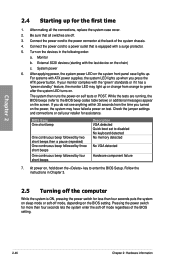
... Turn on the devices in Chapter 3. 2.5 Turning off the computer While the system is equipped with the last device on the BIOS setting. System power 6. BIOS Beep One short beep One continuous beep followed by two short beeps then a pause (repeated) One continuous beep followed by three short... beeps One continuous beep followed by four short beeps Description VGA detected Quick boot set to the power connector at the back of the BIOS setting. 2-46 Chapter 2: Hardware information Chapter 2 2.4 Starting up for assistance. Be sure that is ON, pressing the power switch for...
... Turn on the devices in Chapter 3. 2.5 Turning off the computer While the system is equipped with the last device on the BIOS setting. System power 6. BIOS Beep One short beep One continuous beep followed by two short beeps then a pause (repeated) One continuous beep followed by three short... beeps One continuous beep followed by four short beeps Description VGA detected Quick boot set to the power connector at the back of the BIOS setting. 2-46 Chapter 2: Hardware information Chapter 2 2.4 Starting up for assistance. Be sure that is ON, pressing the power switch for...
User Manual
Page 65
... flexible and convenient mouse input. You can easily navigate the new UEFI BIOS with its test routines. Select the Load Optimized Defaults item under two modes: EZ Mode and Advanced Mode. Chapter 3 ASUS M5A99X EVO 3-1 Otherwise, POST continues with the same smoothness as easy to use... the mouse to control the BIOS setup program. • If the system becomes unstable after changing any BIOS setting, load the default settings to ensure system ...
... flexible and convenient mouse input. You can easily navigate the new UEFI BIOS with its test routines. Select the Load Optimized Defaults item under two modes: EZ Mode and Advanced Mode. Chapter 3 ASUS M5A99X EVO 3-1 Otherwise, POST continues with the same smoothness as easy to use... the mouse to control the BIOS setup program. • If the system becomes unstable after changing any BIOS setting, load the default settings to ensure system ...

User Manual
Page 66
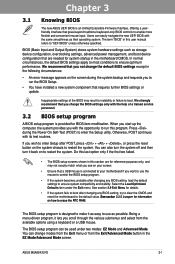
The default screen for details. Selects the display language of the selected mode on the right hand side Normal mode ASUS Optimal mode Selects the boot device priority • The boot device options vary depending on the devices you installed to the system. • The... program without saving the changes, saves the changes and resets the system, or enters the Advanced Mode UEFI BIOS Utility - Refer to decide the boot priority. EZ Mode Monday [4/11/2011] M5A99X EVO BIOS Version : 0133 CPU Type : AMD Phenom(tm) II X4 965 Processor Total Memory : 4096 MB Exit/Advanced Mode ...
The default screen for details. Selects the display language of the selected mode on the right hand side Normal mode ASUS Optimal mode Selects the boot device priority • The boot device options vary depending on the devices you installed to the system. • The... program without saving the changes, saves the changes and resets the system, or enters the Advanced Mode UEFI BIOS Utility - Refer to decide the boot priority. EZ Mode Monday [4/11/2011] M5A99X EVO BIOS Version : 0133 CPU Type : AMD Phenom(tm) II X4 965 Processor Total Memory : 4096 MB Exit/Advanced Mode ...


