
User Manual
Page 6
... by turning the equipment off and on a circuit different from digital apparatus set out in our products at ASUS REACH website at http://csr.asus.com/english/REACH.htm. This equipment has been tested and found to which can radiate radio frequency energy and, if not installed and used in municipal waste. Canadian...
... by turning the equipment off and on a circuit different from digital apparatus set out in our products at ASUS REACH website at http://csr.asus.com/english/REACH.htm. This equipment has been tested and found to which can radiate radio frequency energy and, if not installed and used in municipal waste. Canadian...
User Manual
Page 35
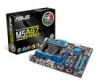
... settings. This is ideal for successful boot. function. • The MemOK! switch to fine-tune performance when working on the computer. ASUS M5A97 PRO 2-17 switch Installing DIMMs that you turn off the computer and unplug the power cord for about 30 seconds for the exact location of ...DIMM before using the MemOK! switch does not function under Windows™ OS environment. • During the tuning process, the system loads and tests failsafe memory settings. It takes about 5-10 seconds. • If your system fail to boot due to memory tuning requirement, the system ...
... settings. This is ideal for successful boot. function. • The MemOK! switch to fine-tune performance when working on the computer. ASUS M5A97 PRO 2-17 switch Installing DIMMs that you turn off the computer and unplug the power cord for about 30 seconds for the exact location of ...DIMM before using the MemOK! switch does not function under Windows™ OS environment. • During the tuning process, the system loads and tests failsafe memory settings. It takes about 5-10 seconds. • If your system fail to boot due to memory tuning requirement, the system ...

User Manual
Page 36
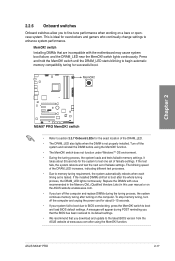
... system is solved. The illustration below shows the location of CPU, DRAM, VGA card, and HDD indicate key components status during POST (Power-on Self Test). If an error is found , the LED next to the error device will continue lighting until the problem is ON, in sleep mode, or in...
... system is solved. The illustration below shows the location of CPU, DRAM, VGA card, and HDD indicate key components status during POST (Power-on Self Test). If an error is found , the LED next to the error device will continue lighting until the problem is ON, in sleep mode, or in...

User Manual
Page 59
... monitor LED may have failed a power-on the chain) c. Check the jumper settings and connections or call your monitor complies with the last device on test. For systems with a surge protector. 5. Connect the power cord to green after the system LED turns on the system front panel case lights up for... beep followed by three short beeps One continuous beep followed by four short beeps Description VGA detected Quick boot set to enter the BIOS Setup. ASUS M5A97 PRO 2-41 After applying power, the system power LED on . Chapter 2 2.4 Starting up . At power on self...
... monitor LED may have failed a power-on the chain) c. Check the jumper settings and connections or call your monitor complies with the last device on test. For systems with a surge protector. 5. Connect the power cord to green after the system LED turns on the system front panel case lights up for... beep followed by three short beeps One continuous beep followed by four short beeps Description VGA detected Quick boot set to enter the BIOS Setup. ASUS M5A97 PRO 2-41 After applying power, the system power LED on . Chapter 2 2.4 Starting up . At power on self...

User Manual
Page 61
...possible. The BIOS setup program can change modes from the Exit menu or from the available options using a keyboard or a USB mouse. Chapter 3 ASUS M5A97 PRO 3-1 The term "BIOS" in this section are needed for system startup in the following circumstances: • An error message appears on how to ...Defaults item under two modes: EZ Mode and Advanced Mode. See section 3.9 Exit Menu for information on the screen during the Power-On Self-Test (POST) to "UEFI BIOS" unless otherwise specified. The BIOS setup program is designed to make it lets you to ensure optimum performance. ...
...possible. The BIOS setup program can change modes from the Exit menu or from the available options using a keyboard or a USB mouse. Chapter 3 ASUS M5A97 PRO 3-1 The term "BIOS" in this section are needed for system startup in the following circumstances: • An error message appears on how to ...Defaults item under two modes: EZ Mode and Advanced Mode. See section 3.9 Exit Menu for information on the screen during the Power-On Self-Test (POST) to "UEFI BIOS" unless otherwise specified. The BIOS setup program is designed to make it lets you to ensure optimum performance. ...

User Manual
Page 90
... screen, select Update BIOS from Internet, and then click Next. 2. Select the ASUS FTP site nearest you want to avoid network traffic. Click Next. Follow the onscreen instructions to change the boot logo or No to enable the ...BIOS downgradable function and auto BIOS backup function, check the checkboxs before the two items on screen during the Power‑On Self-Tests (POST). Select the BIOS version that you to download. Chapter 3 4. Click Yes if you want to change the BIOS boot logo, which is the image...
... screen, select Update BIOS from Internet, and then click Next. 2. Select the ASUS FTP site nearest you want to avoid network traffic. Click Next. Follow the onscreen instructions to change the boot logo or No to enable the ...BIOS downgradable function and auto BIOS backup function, check the checkboxs before the two items on screen during the Power‑On Self-Tests (POST). Select the BIOS version that you to download. Chapter 3 4. Click Yes if you want to change the BIOS boot logo, which is the image...

User Manual
Page 104
... keep the result, click Stop. 4. Click Stop if you did not click Stop in the previous step, TurboV automatically starts further system overclocking and stability test. Click OK to cancel the Overclocking process. 5. TurboV automatically overclocks the CPU and memory and restarts the system. An animation appears indicating the overclocking process...
... keep the result, click Stop. 4. Click Stop if you did not click Stop in the previous step, TurboV automatically starts further system overclocking and stability test. Click OK to cancel the Overclocking process. 5. TurboV automatically overclocks the CPU and memory and restarts the system. An animation appears indicating the overclocking process...

