

User Manual
Page 15
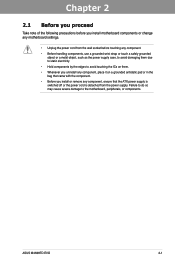
... Check your motherboard package for reference only. ASUS M4N98TD EVO 1-1 Thank you start installing the motherboard, and hardware devices on it another standout in -1 ASUS Q-Connector kit User Manual 1 x I/O Shield User guide Support DVD • If any of ASUS quality motherboards! Chapter 1: Chapter 1 Product ... the items in your retailer. • The illustrated items above are for the following items. ASUS M4N98TD EVO motherboard 1 x Ultra DMA 133/100 cable 4 x Serial ATA cables 1 x ASUS SLI™ bridge connector 1 x 2-in the long line of the above items is damaged...
... Check your motherboard package for reference only. ASUS M4N98TD EVO 1-1 Thank you start installing the motherboard, and hardware devices on it another standout in -1 ASUS Q-Connector kit User Manual 1 x I/O Shield User guide Support DVD • If any of ASUS quality motherboards! Chapter 1: Chapter 1 Product ... the items in your retailer. • The illustrated items above are for the following items. ASUS M4N98TD EVO motherboard 1 x Ultra DMA 133/100 cable 4 x Serial ATA cables 1 x ASUS SLI™ bridge connector 1 x 2-in the long line of the above items is damaged...

User Manual
Page 17
... noiselessly transfers heat generated by up to date. Refer to the other side of fan speed to different ambient temperatures caused by ASUS. ASUS M4N98TD EVO 1-3 making temperatures cooler by the critical components to page 4-5 for details. ASUS Fanless Design-Heat pipe solution The Heat Pipe design effectively directs the heat generated by yourself. Chapter...
... noiselessly transfers heat generated by up to date. Refer to the other side of fan speed to different ambient temperatures caused by ASUS. ASUS M4N98TD EVO 1-3 making temperatures cooler by the critical components to page 4-5 for details. ASUS Fanless Design-Heat pipe solution The Heat Pipe design effectively directs the heat generated by yourself. Chapter...
User Manual
Page 19
... as the power supply case, to avoid damaging them due to static electricity. • Hold components by the edges to the motherboard, peripherals, or components. ASUS M4N98TD EVO 2-1
... as the power supply case, to avoid damaging them due to static electricity. • Hold components by the edges to the motherboard, peripherals, or components. ASUS M4N98TD EVO 2-1
User Manual
Page 21
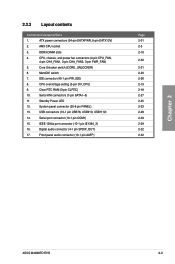
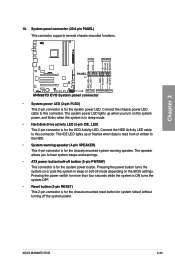
... 1. Front panel audio connector (10-1 pin AAFP) Page 2-31 2-5 2-10 2-30 2-21 2-20 2-26 2-19 2-18 2-27 2-35 2-33 2-28 2-29 2-29 2-32 2-32 Chapter 2 ASUS M4N98TD EVO 2-3 IDE connector (40-1 pin PRI_IDE) 8. Clear RTC RAM (3-pin CLRTC) 10. IEEE 1394a port connector (10-1 pin IE1394_2) 16. CPU overvoltage setting (3-pin OV_CPU) 9. AM3...
... 1. Front panel audio connector (10-1 pin AAFP) Page 2-31 2-5 2-10 2-30 2-21 2-20 2-26 2-19 2-18 2-27 2-35 2-33 2-28 2-29 2-29 2-32 2-32 Chapter 2 ASUS M4N98TD EVO 2-3 IDE connector (40-1 pin PRI_IDE) 8. Clear RTC RAM (3-pin CLRTC) 10. IEEE 1394a port connector (10-1 pin IE1394_2) 16. CPU overvoltage setting (3-pin OV_CPU) 9. AM3...
User Manual
Page 23
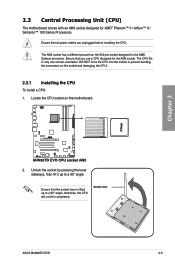
... into the socket to a 90º angle. Unlock the socket by pressing the lever sideways, then lift it up to a 90º angle; Socket lever ASUS M4N98TD EVO 2-5 Chapter 2 2. Ensure that all power cables are unplugged before installing the CPU. The CPU fits in completely. Locate the CPU socket on the socket and...
... into the socket to a 90º angle. Unlock the socket by pressing the lever sideways, then lift it up to a 90º angle; Socket lever ASUS M4N98TD EVO 2-5 Chapter 2 2. Ensure that all power cables are unplugged before installing the CPU. The CPU fits in completely. Locate the CPU socket on the socket and...

User Manual
Page 25
... assembly, ensure that a Thermal Interface Material is already installed on the motherboard upon purchase. • You do not match the CPU documentation, follow the latter. ASUS M4N98TD EVO 2-7 Place the heatsink on the retention module base. • The retention module base is properly applied to ensure optimum thermal condition and performance. To install...
... assembly, ensure that a Thermal Interface Material is already installed on the motherboard upon purchase. • You do not match the CPU documentation, follow the latter. ASUS M4N98TD EVO 2-7 Place the heatsink on the retention module base. • The retention module base is properly applied to ensure optimum thermal condition and performance. To install...
User Manual
Page 27
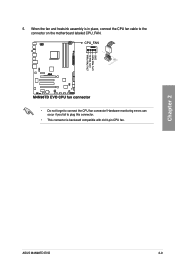
5. Hardware monitoring errors can occur if you fail to connect the CPU fan connector! Chapter 2 ASUS M4N98TD EVO 2-9 When the fan and heatsink assembly is in place, connect the CPU fan cable to the connector on the motherboard labeled CPU_FAN. • Do not forget to plug this connector. • This connector is backward compatible with old 3-pin CPU fan.
5. Hardware monitoring errors can occur if you fail to connect the CPU fan connector! Chapter 2 ASUS M4N98TD EVO 2-9 When the fan and heatsink assembly is in place, connect the CPU fan cable to the connector on the motherboard labeled CPU_FAN. • Do not forget to plug this connector. • This connector is backward compatible with old 3-pin CPU fan.
User Manual
Page 29
... memory operation frequency is dependent on the motherboard. Under the default state, some memory modules for the OS can be about 3GB or less. Chapter 2 ASUS M4N98TD EVO 2-11 Any excess memory from a memory module. To operate at the vendor-marked or at a higher frequency, see section 3.5 Ai Tweaker menu for manual memory...
... memory operation frequency is dependent on the motherboard. Under the default state, some memory modules for the OS can be about 3GB or less. Chapter 2 ASUS M4N98TD EVO 2-11 Any excess memory from a memory module. To operate at the vendor-marked or at a higher frequency, see section 3.5 Ai Tweaker menu for manual memory...
User Manual
Page 31
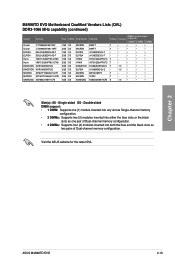
... modules inserted into both the blue and the black slots as two pairs of Dual-channel memory configuration. Visit the ASUS website for the latest QVL. Single-sided DS - Crucial Crucial ELPIDA ELPIDA Hynix Hynix KINGSTON KINGSTON MICRON MICRON SAMSUNG ...MICRON ELPIDA ELPIDA HYNIX HYNIX KINGSTON ELPIDA MICRON MICRON SAMSUNG Chip NO. M4N98TD EVO Motherboard Qualified Vendors Lists (QVL) DDR3-1066 MHz capability (continued) Vendor Part No. Chapter 2 ASUS M4N98TD EVO 2-13 D9KPT D9KPT J1108EDSE-DJ-F J1108EDSE-DJ-F H5TQ1G83AFPG7C H5TQ1G83AFPG7C D1288JEKAPGA7U J1108BABG...
... modules inserted into both the blue and the black slots as two pairs of Dual-channel memory configuration. Visit the ASUS website for the latest QVL. Single-sided DS - Crucial Crucial ELPIDA ELPIDA Hynix Hynix KINGSTON KINGSTON MICRON MICRON SAMSUNG ...MICRON ELPIDA ELPIDA HYNIX HYNIX KINGSTON ELPIDA MICRON MICRON SAMSUNG Chip NO. M4N98TD EVO Motherboard Qualified Vendors Lists (QVL) DDR3-1066 MHz capability (continued) Vendor Part No. Chapter 2 ASUS M4N98TD EVO 2-13 D9KPT D9KPT J1108EDSE-DJ-F J1108EDSE-DJ-F H5TQ1G83AFPG7C H5TQ1G83AFPG7C D1288JEKAPGA7U J1108BABG...
User Manual
Page 33
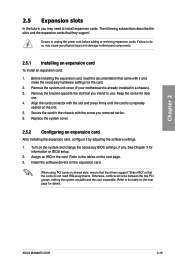
.... Turn on BIOS setup. 2. Refer to the card. Otherwise, conflicts will arise between the two PCI groups, making the system unstable and the card inoperable. ASUS M4N98TD EVO 2-15 Refer to the table on shared slots, ensure that the drivers support "Share IRQ" or that came with it by adjusting the software settings...
.... Turn on BIOS setup. 2. Refer to the card. Otherwise, conflicts will arise between the two PCI groups, making the system unstable and the card inoperable. ASUS M4N98TD EVO 2-15 Refer to the table on shared slots, ensure that the drivers support "Share IRQ" or that came with it by adjusting the software settings...
User Manual
Page 35
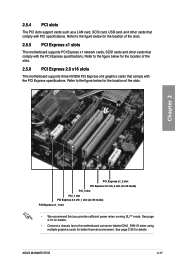
See page 2-31 for details. • Connect a chassis fan to the figure below for the location of the slots. ASUS M4N98TD EVO 2-17 2.5.4 PCI slots The PCI slots support cards such as a LAN card, SCSI card, USB card, and other cards that comply with PCI specifications. Refer ...
See page 2-31 for details. • Connect a chassis fan to the figure below for the location of the slots. ASUS M4N98TD EVO 2-17 2.5.4 PCI slots The PCI slots support cards such as a LAN card, SCSI card, USB card, and other cards that comply with PCI specifications. Refer ...

User Manual
Page 37
... the jumper setting for more information about the CPU overvoltage setting. • DO NOT set the OV_CPU jumper to activate the advanced CPU overvoltage feature. ASUS M4N98TD EVO 2-19 Set to pins 1-2 to pins 1-2 when you change the jumper setting. For system failure due to the wrong setting of this jumper. • Refer...
... the jumper setting for more information about the CPU overvoltage setting. • DO NOT set the OV_CPU jumper to activate the advanced CPU overvoltage feature. ASUS M4N98TD EVO 2-19 Set to pins 1-2 to pins 1-2 when you change the jumper setting. For system failure due to the wrong setting of this jumper. • Refer...
User Manual
Page 39
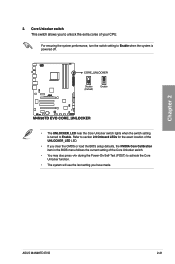
Chapter 2 2. ASUS M4N98TD EVO 2-21 For ensuring the system performance, turn the switch setting to Enable when the system is powered off. • The UNLOCKER_LED near the Core Unlocker ...
Chapter 2 2. ASUS M4N98TD EVO 2-21 For ensuring the system performance, turn the switch setting to Enable when the system is powered off. • The UNLOCKER_LED near the Core Unlocker ...

User Manual
Page 41
... - 8-channel Line In Front Speaker Out Mic In Center/Subwoofer Rear Speaker Out Side Speaker Out 2.8.2 Audio I/O connections Audio I/O ports Connect to Headphone and Mic ASUS M4N98TD EVO 2-23 Chapter 2 * LAN port LED indications Activity Link LED Status Description OFF No link ORANGE Linked BLINKING Data activity Speed LED Status OFF ORANGE GREEN...
... - 8-channel Line In Front Speaker Out Mic In Center/Subwoofer Rear Speaker Out Side Speaker Out 2.8.2 Audio I/O connections Audio I/O ports Connect to Headphone and Mic ASUS M4N98TD EVO 2-23 Chapter 2 * LAN port LED indications Activity Link LED Status Description OFF No link ORANGE Linked BLINKING Data activity Speed LED Status OFF ORANGE GREEN...

User Manual
Page 43
Connect to 5.1 channel Speakers Connect to 7.1 channel Speakers Chapter 2 ASUS M4N98TD EVO 2-25
Connect to 5.1 channel Speakers Connect to 7.1 channel Speakers Chapter 2 ASUS M4N98TD EVO 2-25
User Manual
Page 45
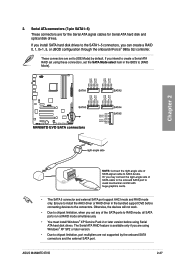
... devices will not work. • Due to chipset limitation, when you can create a RAID 0, 1, 0+1, 5, or JBOD configuration through the onboard nForce® 980a SLI controller. ASUS M4N98TD EVO 2-27 Ensure to install the AHCI driver or RAID driver in the BIOS to the connectors. Serial ATA connectors (7-pin SATA1-5) These connectors are not...
... devices will not work. • Due to chipset limitation, when you can create a RAID 0, 1, 0+1, 5, or JBOD configuration through the onboard nForce® 980a SLI controller. ASUS M4N98TD EVO 2-27 Ensure to install the AHCI driver or RAID driver in the BIOS to the connectors. Serial ATA connectors (7-pin SATA1-5) These connectors are not...
User Manual
Page 47
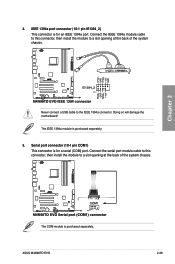
... cable to this connector, then install the module to a slot opening at the back of the system chassis. The IEEE 1394a module is purchased separately. ASUS M4N98TD EVO 2-29 Serial port connector (10-1 pin COM1) This connector is for a serial (COM) port. Never connect a USB cable to the IEEE 1394a connector. IEEE 1394a...
... cable to this connector, then install the module to a slot opening at the back of the system chassis. The IEEE 1394a module is purchased separately. ASUS M4N98TD EVO 2-29 Serial port connector (10-1 pin COM1) This connector is for a serial (COM) port. Never connect a USB cable to the IEEE 1394a connector. IEEE 1394a...
User Manual
Page 49
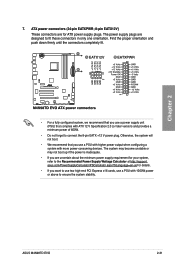
... 12 V Specification 2.0 (or later version) and provides a minimum power of 600W. • Do not forget to fit these connectors in only one orientation. ASUS M4N98TD EVO 2-31 7. Otherwise, the system will not boot. • We recommend that complies with more power-consuming devices. ATX power connectors (24-pin EATXPWR; 8-pin... for details. • If you use a PSU with 1000W power or above to the Recommended Power Supply Wattage Calculator at http://support. asus.com/PowerSupplyCalculator/PSCalculator.aspx?SLanguage=en-us for your system, refer to ensure the system stability.
... 12 V Specification 2.0 (or later version) and provides a minimum power of 600W. • Do not forget to fit these connectors in only one orientation. ASUS M4N98TD EVO 2-31 7. Otherwise, the system will not boot. • We recommend that complies with more power-consuming devices. ATX power connectors (24-pin EATXPWR; 8-pin... for details. • If you use a PSU with 1000W power or above to the Recommended Power Supply Wattage Calculator at http://support. asus.com/PowerSupplyCalculator/PSCalculator.aspx?SLanguage=en-us for your system, refer to ensure the system stability.
User Manual
Page 51
... system power LED lights up or flashes when data is for the HDD Activity LED. The IDE LED lights up when you to this connector. ASUS M4N98TD EVO 2-33 Pressing the power button turns the system on the BIOS settings.
... system power LED lights up or flashes when data is for the HDD Activity LED. The IDE LED lights up when you to this connector. ASUS M4N98TD EVO 2-33 Pressing the power button turns the system on the BIOS settings.
User Manual
Page 53
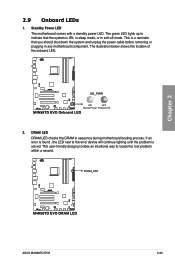
... is solved. Standby Power LED The motherboard comes with a standby power LED. This is ON, in sleep mode, or in soft‑off mode. Chapter 2 ASUS M4N98TD EVO 2-35 The green LED lights up to indicate that the system is a reminder that you should shut down the system and unplug the power cable...
... is solved. Standby Power LED The motherboard comes with a standby power LED. This is ON, in sleep mode, or in soft‑off mode. Chapter 2 ASUS M4N98TD EVO 2-35 The green LED lights up to indicate that the system is a reminder that you should shut down the system and unplug the power cable...


