
User Manual
Page 3
Contents Notices...v Safety information vi About this guide vi M4N78-AM V2 specifications summary viii Chapter 1: Product introduction 1.1 Before you proceed 1-1 1.2 Motherboard overview 1-2 ...1-9 1.8 Software support 1-15 1.8.1 Installing an operating system 1-15 1.8.2 Support DVD information 1-15 Chapter 2: BIOS information 2.1 Managing and updating your BIOS 2-1 2.1.1 ASUS Update utility 2-1 2.1.2 ASUS EZ Flash 2 utility 2-2 2.1.3 ASUS CrashFree BIOS 3 utility 2-3 2.2 BIOS setup program 2-4 2.3 Main menu 2-4 2.3.1 System Time 2-4 2.3.2 System Date 2-4 2.3.3 Primary IDE Master...
Contents Notices...v Safety information vi About this guide vi M4N78-AM V2 specifications summary viii Chapter 1: Product introduction 1.1 Before you proceed 1-1 1.2 Motherboard overview 1-2 ...1-9 1.8 Software support 1-15 1.8.1 Installing an operating system 1-15 1.8.2 Support DVD information 1-15 Chapter 2: BIOS information 2.1 Managing and updating your BIOS 2-1 2.1.1 ASUS Update utility 2-1 2.1.2 ASUS EZ Flash 2 utility 2-2 2.1.3 ASUS CrashFree BIOS 3 utility 2-3 2.2 BIOS setup program 2-4 2.3 Main menu 2-4 2.3.1 System Time 2-4 2.3.2 System Date 2-4 2.3.3 Primary IDE Master...

User Manual
Page 6
... Do not place the product in your retailer. Detailed descriptions of the electrical outlet you are not sure about the voltage of the BIOS parameters are unplugged before you encounter technical problems with the package. • Before using , contact your local power company. •...This chapter describes the features of the motherboard and the new technology it supports. • Chapter 2: BIOS information This chapter tells how to change system settings through the BIOS setup menus. If you are using the product, ensure that the power cables for the devices are ...
... Do not place the product in your retailer. Detailed descriptions of the electrical outlet you are not sure about the voltage of the BIOS parameters are unplugged before you encounter technical problems with the package. • Before using , contact your local power company. •...This chapter describes the features of the motherboard and the new technology it supports. • Chapter 2: BIOS information This chapter tells how to change system settings through the BIOS setup menus. If you are using the product, ensure that the power cables for the devices are ...

User Manual
Page 9
... M4N78-AM V2 specifications summary USB LAN ASUS special features ASUS overclocking features Back panel I/O ports Internal I /O shield 1 x User Manual MicroATX form factor: 9.6 in x 8.0 in connector 1 x Internal speaker connector 1 x Front panel audio connector 1 x CPU fan connector 1 x S/PDIF_OUT connector 1 x 24-pin EATX power connector 1 x 4-pin ATX 12V power connector 8Mb Flash ROM, AMI BIOS, PnP, DMI v2...
... M4N78-AM V2 specifications summary USB LAN ASUS special features ASUS overclocking features Back panel I/O ports Internal I /O shield 1 x User Manual MicroATX form factor: 9.6 in x 8.0 in connector 1 x Internal speaker connector 1 x Front panel audio connector 1 x CPU fan connector 1 x S/PDIF_OUT connector 1 x 24-pin EATX power connector 1 x 4-pin ATX 12V power connector 8Mb Flash ROM, AMI BIOS, PnP, DMI v2...

User Manual
Page 16
...do not help, remove the onboard battery and move the cap back to pins 2-3. Shut down the key during the boot process and enter BIOS setup to wake up the computer from S1 sleep mode (CPU stopped, DRAM refreshed, system running in CMOS, which include system setup information ...(C.P.R.) feature. To erase the RTC RAM: 1. Plug the power cord and turn ON the computer. 4. Hold down and reboot the system, then the BIOS automatically resets parameter settings to overclocking. USB device wake-up the compurer from pins 1-2 (default) to pins 1-2. 3. You can clear the CMOS memory of...
...do not help, remove the onboard battery and move the cap back to pins 2-3. Shut down the key during the boot process and enter BIOS setup to wake up the computer from S1 sleep mode (CPU stopped, DRAM refreshed, system running in CMOS, which include system setup information ...(C.P.R.) feature. To erase the RTC RAM: 1. Plug the power cord and turn ON the computer. 4. Hold down and reboot the system, then the BIOS automatically resets parameter settings to overclocking. USB device wake-up the compurer from pins 1-2 (default) to pins 1-2. 3. You can clear the CMOS memory of...
User Manual
Page 17
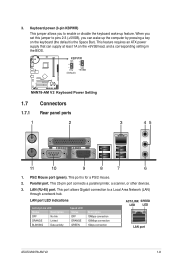
... ORANGE Linked BLINKING Data activity Speed LED Status OFF ORANGE GREEN Description 10Mbps connection 100Mbps connection 1Gbps connection ACT/LINK SPEED LED LED LAN port ASUS M4N78-AM V2 1-8 When you set this jumper to pins 2-3 (+5VSB), you to a Local Area Network (LAN) through a network hub. PS/2 Mouse port (green). Parallel port. This... allows Gigabit connection to enable or disable the keyboard wake-up the computer by pressing a key on the +5VSB lead, and a corresponding setting in the BIOS. 1.7 1.7.1 1 Connectors Rear panel ports 2 3 45 11 10 9 8 7 6 1.
... ORANGE Linked BLINKING Data activity Speed LED Status OFF ORANGE GREEN Description 10Mbps connection 100Mbps connection 1Gbps connection ACT/LINK SPEED LED LED LAN port ASUS M4N78-AM V2 1-8 When you set this jumper to pins 2-3 (+5VSB), you to a Local Area Network (LAN) through a network hub. PS/2 Mouse port (green). Parallel port. This... allows Gigabit connection to enable or disable the keyboard wake-up the computer by pressing a key on the +5VSB lead, and a corresponding setting in the BIOS. 1.7 1.7.1 1 Connectors Rear panel ports 2 3 45 11 10 9 8 7 6 1.

User Manual
Page 19
... that you want to connect a high-definition front panel audio module to the RAID/AHCI Supplementary Guide included in the folder named Manual in the BIOS is backward compatible with Serial ATA 1.5Gb/s specification. We recommend that of the motherboard high-definition audio capability. See page 2.4.3 Chipset for Serial ATA 3Gb... when installing Windows® XP operating system on RAID/AHCI, refer to this connector, ensure that the Front Panel Select item in the support DVD. 3. ASUS M4N78-AM V2 1-10
... that you want to connect a high-definition front panel audio module to the RAID/AHCI Supplementary Guide included in the folder named Manual in the BIOS is backward compatible with Serial ATA 1.5Gb/s specification. We recommend that of the motherboard high-definition audio capability. See page 2.4.3 Chipset for Serial ATA 3Gb... when installing Windows® XP operating system on RAID/AHCI, refer to this connector, ensure that the Front Panel Select item in the support DVD. 3. ASUS M4N78-AM V2 1-10
User Manual
Page 23
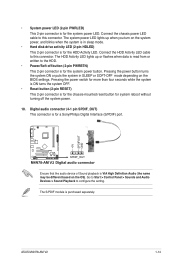
...is for system reboot without turning off button (2-pin PWRBTN) This 2-pin connector is in SLEEP or SOFT-OFF mode depending on the OS). ASUS M4N78-AM V2 1-14 Pressing the power switch for more than four seconds while the system is ON turns the system OFF. • Reset button (2-pin.... • Hard disk drive activity LED (2-pin HDLED) This 2-pin connector is VIA High Definition Audio (the name may be different based on the BIOS settings. Ensure that the audio device of Sound playback is for a Sony/Philips Digital Interface (S/PDIF) port. Go to Start > Control Panel > Sounds...
...is for system reboot without turning off button (2-pin PWRBTN) This 2-pin connector is in SLEEP or SOFT-OFF mode depending on the OS). ASUS M4N78-AM V2 1-14 Pressing the power switch for more than four seconds while the system is ON turns the system OFF. • Reset button (2-pin.... • Hard disk drive activity LED (2-pin HDLED) This 2-pin connector is VIA High Definition Audio (the name may be different based on the BIOS settings. Ensure that the audio device of Sound playback is for a Sony/Philips Digital Interface (S/PDIF) port. Go to Start > Control Panel > Sounds...

User Manual
Page 25
... Updating from the Internet, then click Next. Installing ASUS Update: 1. Select the ASUS FTP site nearest you to restore the BIOS in the future. Chapter 2 BIOS information 2.1 Managing and updating your BIOS Save a copy of the original motherboard BIOS file to a USB flash disk in case you ...network traffic, or click Auto Select then click Next. Updating the BIOS: To update the BIOS: 1. From the FTP site, select the BIOS version you update the BIOS using the ASUS Update utility. 2.1.1 ASUS Update utility The ASUS Update is available in the Support DVD that comes with the ...
... Updating from the Internet, then click Next. Installing ASUS Update: 1. Select the ASUS FTP site nearest you to restore the BIOS in the future. Chapter 2 BIOS information 2.1 Managing and updating your BIOS Save a copy of the original motherboard BIOS file to a USB flash disk in case you ...network traffic, or click Auto Select then click Next. Updating the BIOS: To update the BIOS: 1. From the FTP site, select the BIOS version you update the BIOS using the ASUS Update utility. 2.1.1 ASUS Update utility The ASUS Update is available in the Support DVD that comes with the ...

User Manual
Page 26
Press to prevent system boot failure! 2-2 ASUS M4N78-AM V2 Press . Locate the BIOS file from the ASUS website at www.asus.com. Download the latest BIOS file from the Open window, then click Open. 3. EZ Flash 2 performs the BIOS updating process and automatically reboots the system when done. • ...in either of these two ways: • Press + during POST to display the following: ASUSTek EZ Flash 2 BIOS ROM Utility V3.36 FLASH TYPE: MXIC 25L8005 Current ROM BOARD: M4N78-AM-V2 VER: 0302 (H:00 B:08) DATE: 03/03/2009 Update ROM BOARD: Unknown VER: Unknown DATE: Unknown PATH...
Press to prevent system boot failure! 2-2 ASUS M4N78-AM V2 Press . Locate the BIOS file from the ASUS website at www.asus.com. Download the latest BIOS file from the Open window, then click Open. 3. EZ Flash 2 performs the BIOS updating process and automatically reboots the system when done. • ...in either of these two ways: • Press + during POST to display the following: ASUSTek EZ Flash 2 BIOS ROM Utility V3.36 FLASH TYPE: MXIC 25L8005 Current ROM BOARD: M4N78-AM-V2 VER: 0302 (H:00 B:08) DATE: 03/03/2009 Update ROM BOARD: Unknown VER: Unknown DATE: Unknown PATH...

User Manual
Page 27
... not be smaller than 8GB. • DO NOT shut down or reset the system while updating the BIOS! 2.1.3 ASUS CrashFree BIOS 3 utility The ASUS CrashFree BIOS 3 is found ! CD-ROM found , the utility reads it fails or gets corrupted during the updating process. Restart the system after ... updating process. • Only the USB flash disk with FAT 32/16 format and single partition supports ASUS CrashFree BIOS 3. You can cause system boot failure! Doing so can update a corrupted BIOS file using the motherboard Support DVD or a USB flash disk that allows you to the SATA1/2/3/4 connector;...
... not be smaller than 8GB. • DO NOT shut down or reset the system while updating the BIOS! 2.1.3 ASUS CrashFree BIOS 3 utility The ASUS CrashFree BIOS 3 is found ! CD-ROM found , the utility reads it fails or gets corrupted during the updating process. Restart the system after ... updating process. • Only the USB flash disk with FAT 32/16 format and single partition supports ASUS CrashFree BIOS 3. You can cause system boot failure! Doing so can update a corrupted BIOS file using the motherboard Support DVD or a USB flash disk that allows you to the SATA1/2/3/4 connector;...

User Manual
Page 28
...reset from the operating system. • The default BIOS settings for this motherboard. 2.3 Main menu When you enter the BIOS Setup program, the Main menu screen appears, giving you to your screen. • Visit the ASUS website at www.asus.com to turn the system off then back on ...the system by doing any BIOS settings, load the default settings to select a field. This section explains how to configure your system using the OS standard shut-down the system properly from a running operating system can cause damage to set the system date. 2-4 ASUS M4N78-AM V2 Use [+] or [-] to...
...reset from the operating system. • The default BIOS settings for this motherboard. 2.3 Main menu When you enter the BIOS Setup program, the Main menu screen appears, giving you to your screen. • Visit the ASUS website at www.asus.com to turn the system off then back on ...the system by doing any BIOS settings, load the default settings to select a field. This section explains how to configure your system using the OS standard shut-down the system properly from a running operating system can cause damage to set the system date. 2-4 ASUS M4N78-AM V2 Use [+] or [-] to...

User Manual
Page 29
2.3.3 Primary IDE Master/Slave, SATA 1/2/3/4 While entering Setup, the BIOS automatically detects the presence of the appropriate IDE device type. The BIOS automatically detects the values opposite the dimmed items (Device, Vendor, Size, LBA Mode, Block Mode, PIO Mode, Async DMA, Ultra DMA, and SMART monitoring). These ... drive. Configuration options: [Disabled] [Auto] PIO Mode [Auto] Selects the PIO mode. Setting to display the IDE/SATA device information. Configuration options: [Disabled] [Enabled] Chapter 2: BIOS information 2-5
2.3.3 Primary IDE Master/Slave, SATA 1/2/3/4 While entering Setup, the BIOS automatically detects the presence of the appropriate IDE device type. The BIOS automatically detects the values opposite the dimmed items (Device, Vendor, Size, LBA Mode, Block Mode, PIO Mode, Async DMA, Ultra DMA, and SMART monitoring). These ... drive. Configuration options: [Disabled] [Auto] PIO Mode [Auto] Selects the PIO mode. Setting to display the IDE/SATA device information. Configuration options: [Disabled] [Enabled] Chapter 2: BIOS information 2-5

User Manual
Page 30
... system. v02.61 (C)Copyright 1985-2008, American Megatrends, Inc. 2-6 ASUS M4N78-AM V2 Take caution when changing the settings of the general system specifications. Main Advanced Power BIOS SETUP UTILITY Boot Tools Exit JumperFree Configuration CPU Configuration Chipset Onboard Devices Configuration...] [RAID Mode] [AHCI Mode] 2.3.5 System Information This menu gives you want to configure the item. BIOS Information Displays the auto-detected BIOS information Processor Displays the auto-detected CPU specification System Memory Displays the auto-detected system memory 2.4 Advanced menu ...
... system. v02.61 (C)Copyright 1985-2008, American Megatrends, Inc. 2-6 ASUS M4N78-AM V2 Take caution when changing the settings of the general system specifications. Main Advanced Power BIOS SETUP UTILITY Boot Tools Exit JumperFree Configuration CPU Configuration Chipset Onboard Devices Configuration...] [RAID Mode] [AHCI Mode] 2.3.5 System Information This menu gives you want to configure the item. BIOS Information Displays the auto-detected BIOS information Processor Displays the auto-detected CPU specification System Memory Displays the auto-detected system memory 2.4 Advanced menu ...

User Manual
Page 31
... options: [Auto] [Manual] The following item appears only when the CPU Overclocking item is set the shader frequency. Configuration options: [Min.=100], [Max.=150] Chapter 2: BIOS information 2-7 2.4.1 JumperFree Configuration The items in this menu may vary depending on the AMD CPU type. CPU Overclocking [Auto] Selects the CPU overclocking options to...
... options: [Auto] [Manual] The following item appears only when the CPU Overclocking item is set the shader frequency. Configuration options: [Min.=100], [Max.=150] Chapter 2: BIOS information 2-7 2.4.1 JumperFree Configuration The items in this menu may vary depending on the AMD CPU type. CPU Overclocking [Auto] Selects the CPU overclocking options to...

User Manual
Page 33
... Prefetching [Enabled] Enables or disables the CPU prefetching. Use the / keys to 2.24375V with a 0.00625V increment. Configuration options: [Enabled] [Disabled] Chapter 2: BIOS information 2-9 Configuration options: [Disabled] [Enabled] Cool 'n' Quiet [Enabled] Allows you to enable or disable the microcode updation. The value ranges from 1.85000V to adjust... options: [Auto] [+50mv] [+100mv] [+150mv] 2.4.2 CPU Configuration The items in this menu show the CPU-related information that the BIOS automatically detects. The driver developer may enable it for the normal operation.
... Prefetching [Enabled] Enables or disables the CPU prefetching. Use the / keys to 2.24375V with a 0.00625V increment. Configuration options: [Enabled] [Disabled] Chapter 2: BIOS information 2-9 Configuration options: [Disabled] [Enabled] Cool 'n' Quiet [Enabled] Allows you to enable or disable the microcode updation. The value ranges from 1.85000V to adjust... options: [Auto] [+50mv] [+100mv] [+150mv] 2.4.2 CPU Configuration The items in this menu show the CPU-related information that the BIOS automatically detects. The driver developer may enable it for the normal operation.

User Manual
Page 35
.../PnP or legacy ISA devices, and setting the memory size block for PCI/PnP devices. Configuration options: [No] [Yes] Chapter 2: BIOS information 2-11 PCIE 2.0 Support [Auto] Configures the PCIE 2.0 support. Configuration options: [AC97] [HD Audio] Onboard LAN [Enabled]...Port1 base address. Configuration options: [Disabled] [Enabled] 2.4.4 Onboard Devices Configuration Serial Port1 Address [3F8/IRQ4] Allows you to [No], BIOS configures all the devices in the system. Configuration options: [Disabled] [Enabled] Front Panel Select [HD Audio] Allows you to malfunction. Plug...
.../PnP or legacy ISA devices, and setting the memory size block for PCI/PnP devices. Configuration options: [No] [Yes] Chapter 2: BIOS information 2-11 PCIE 2.0 Support [Auto] Configures the PCIE 2.0 support. Configuration options: [AC97] [HD Audio] Onboard LAN [Enabled]...Port1 base address. Configuration options: [Disabled] [Enabled] 2.4.4 Onboard Devices Configuration Serial Port1 Address [3F8/IRQ4] Allows you to [No], BIOS configures all the devices in the system. Configuration options: [Disabled] [Enabled] Front Panel Select [HD Audio] Allows you to malfunction. Plug...

User Manual
Page 36
.... Configuration options: [10 Sec] [20 Sec] [30 Sec] [40 Sec] Emulation Type [Auto] Allows you to set the maximum time that the BIOS waits for System Suspend. 2-12 ASUS M4N78-AM V2 Suspend Mode ACPI 2.0 Support ACPI APIC Support APM Configuration Hardware Monitor [Auto] [Disabled] [Enabled] Select the ACPI state used for the USB...
.... Configuration options: [10 Sec] [20 Sec] [30 Sec] [40 Sec] Emulation Type [Auto] Allows you to set the maximum time that the BIOS waits for System Suspend. 2-12 ASUS M4N78-AM V2 Suspend Mode ACPI 2.0 Support ACPI APIC Support APM Configuration Hardware Monitor [Auto] [Disabled] [Enabled] Select the ACPI state used for the USB...

User Manual
Page 37
... [Disabled] Allows you to be used for system suspend. The system can be off state after an AC power loss. Configuration options: [Disabled] [Enabled] Chapter 2: BIOS information 2-13 Configuration options: [Disabled] [Enabled] 2.5.3 ACPI APIC Support [Enabled] Allows you to generate a wake event. Configuration options: [Disabled] [Enabled] Power On By PS/2 KB...
... [Disabled] Allows you to be used for system suspend. The system can be off state after an AC power loss. Configuration options: [Disabled] [Enabled] Chapter 2: BIOS information 2-13 Configuration options: [Disabled] [Enabled] 2.5.3 ACPI APIC Support [Enabled] Allows you to generate a wake event. Configuration options: [Disabled] [Enabled] Power On By PS/2 KB...
User Manual
Page 38
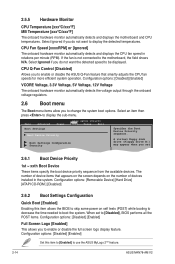
...Configuration options: [Disabled] [Enabled] Set this item allows the BIOS to skip some power on the number of devices installed in rotations per minute (RPM). Select Ignored if you to enable or disable the ASUS Q-Fan feature that appears on the screen depends on self tests ... detects and displays the motherboard and CPU temperatures. Select an item then press to use the ASUS MyLogo 2™ feature. 2-14 ASUS M4N78-AM V2 CPU Q-Fan Control [Disabled] Allows you set to [Disabled], BIOS performs all the POST items. Configuration options: [Disabled] [Enabled] Full Screen Logo [Enabled]...
...Configuration options: [Disabled] [Enabled] Set this item allows the BIOS to skip some power on the number of devices installed in rotations per minute (RPM). Select Ignored if you to enable or disable the ASUS Q-Fan feature that appears on the screen depends on self tests ... detects and displays the motherboard and CPU temperatures. Select an item then press to use the ASUS MyLogo 2™ feature. 2-14 ASUS M4N78-AM V2 CPU Q-Fan Control [Disabled] Allows you set to [Disabled], BIOS performs all the POST items. Configuration options: [Disabled] [Enabled] Full Screen Logo [Enabled]...

User Manual
Page 39
...the password box, key in a password composed of the screen shows the default Not Installed. Confirm the password when prompted. Chapter 2: BIOS information 2-15 Configuration options: [Disabled] [Enabled] 2.6.3 Security The Security menu items allow you successfully set to Enabled, the system displays...After you have set a Supervisor Password: 1. allows access but does not allow you to change the supervisor password. Configuration options: [Force BIOS] [Keep Current] Bootup Num-Lock [On] Allows you to select the power-on state for option ROM. The Supervisor Password item on...
...the password box, key in a password composed of the screen shows the default Not Installed. Confirm the password when prompted. Chapter 2: BIOS information 2-15 Configuration options: [Disabled] [Enabled] 2.6.3 Security The Security menu items allow you successfully set to Enabled, the system displays...After you have set a Supervisor Password: 1. allows access but does not allow you to change the supervisor password. Configuration options: [Force BIOS] [Keep Current] Bootup Num-Lock [On] Allows you to select the power-on state for option ROM. The Supervisor Password item on...


