User Manual
Page 7
... unplugged. • Seek professional assistance before using , contact your local power company. • If the power supply is set to fix it supports. • Chapter 2: BIOS setup This chapter tells how to or from the system, ensure that your power supply is broken, do not try to... disconnect the power cable from the electrical outlet before relocating the system. • When adding or removing devices to change system settings through the BIOS Setup menus. Do not place the product in your retailer. Detailed descriptions of the motherboard and the new technology it by yourself.
... unplugged. • Seek professional assistance before using , contact your local power company. • If the power supply is set to fix it supports. • Chapter 2: BIOS setup This chapter tells how to or from the system, ensure that your power supply is broken, do not try to... disconnect the power cable from the electrical outlet before relocating the system. • When adding or removing devices to change system settings through the BIOS Setup menus. Do not place the product in your retailer. Detailed descriptions of the motherboard and the new technology it by yourself.
User Manual
Page 14
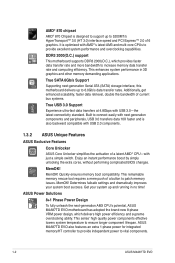
...failsafe settings and dramatically improves your system up and running in 3D graphics and other memory demanding applications. Get your system boot success. ASUS Power Solutions 8+1 Phase Power Design To fully unleash the next-generation AM3 CPU's potential, ASUS M4A87TD EVO ... and PCI Express™ 2.0 x16 graphics. Enjoy an instant performance boost by simply unlocking the extra cores, without performing complicated BIOS changes. Quickly ensures memory boot compatibility. This enhances system performance in no time! MemOK! MemOK! This remarkable memory rescue tool ...
...failsafe settings and dramatically improves your system up and running in 3D graphics and other memory demanding applications. Get your system boot success. ASUS Power Solutions 8+1 Phase Power Design To fully unleash the next-generation AM3 CPU's potential, ASUS M4A87TD EVO ... and PCI Express™ 2.0 x16 graphics. Enjoy an instant performance boost by simply unlocking the extra cores, without performing complicated BIOS changes. Quickly ensures memory boot compatibility. This enhances system performance in no time! MemOK! MemOK! This remarkable memory rescue tool ...
User Manual
Page 29
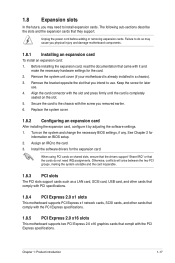
... expansion card, read the documentation that complt with it by adjusting the software settings. 1. Keep the screw for information on the system and change the necessary BIOS settings, if any. Turn on BIOS setup. 2. Assign an IRQ to the chassis with the slot and press ... expansion cards. Replace the system cover. 1.8.2 Configuring an expansion card After installing the expansion card, configure it and make the necessary hardware settings for the expansion card. Failure to use . 4. Install the software drivers for the card. 2. Chapter 1: Product introduction 1-17 Remove...
... expansion card, read the documentation that complt with it by adjusting the software settings. 1. Keep the screw for information on the system and change the necessary BIOS settings, if any. Turn on BIOS setup. 2. Assign an IRQ to the chassis with the slot and press ... expansion cards. Replace the system cover. 1.8.2 Configuring an expansion card After installing the expansion card, configure it and make the necessary hardware settings for the expansion card. Failure to use . 4. Install the software drivers for the card. 2. Chapter 1: Product introduction 1-17 Remove...
User Manual
Page 30
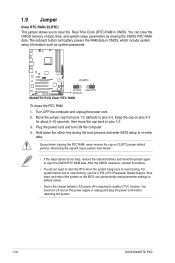
...CMOS, which include system setup information such as system passwords. Shut down the key during the boot process and enter BIOS setup to enable C.P.R. function. You can automatically reset parameter settings to default values. • Due to the chipset behavior, AC power off and on CLRTC jumper default position.... the RTC RAM, never remove the cap on the power supply or unplug and plug the power cord before rebooting the system. 1-18 ASUS M4A87TD EVO Removing the cap will cause system boot failure! • If the steps above do not need to clear the RTC when the system ...
...CMOS, which include system setup information such as system passwords. Shut down the key during the boot process and enter BIOS setup to enable C.P.R. function. You can automatically reset parameter settings to default values. • Due to the chipset behavior, AC power off and on CLRTC jumper default position.... the RTC RAM, never remove the cap on the power supply or unplug and plug the power cord before rebooting the system. 1-18 ASUS M4A87TD EVO Removing the cap will cause system boot failure! • If the steps above do not need to clear the RTC when the system ...
User Manual
Page 31
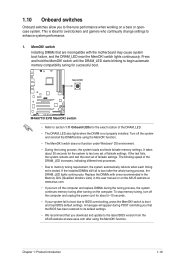
... seconds. • If your system fail to boot due to BIOS overclocking, press the MemOK! Replace the DIMMs with ones recommended in the Memory QVL (Qualified Vendors Lists) in this user manual or on the ASUS website at www.asus.com. • If you turn off the system and reinstall the.... • The MemOK! To stop memory tuning, turn off the computer and replace DIMMs during POST reminding you that the BIOS has been restored to its default settings. • We recommend that are incompatible with the motherboard may cause system boot failure, and the DRAM_LED near the MemOK! switch ...
... seconds. • If your system fail to boot due to BIOS overclocking, press the MemOK! Replace the DIMMs with ones recommended in the Memory QVL (Qualified Vendors Lists) in this user manual or on the ASUS website at www.asus.com. • If you turn off the system and reinstall the.... • The MemOK! To stop memory tuning, turn off the computer and replace DIMMs during POST reminding you that the BIOS has been restored to its default settings. • We recommend that are incompatible with the motherboard may cause system boot failure, and the DRAM_LED near the MemOK! switch ...
User Manual
Page 32
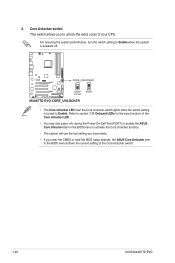
... clear the CMOS or load the BIOS setup defaults, the ASUS Core Unlocker item in the BIOS menu to activate the Core Unlocker function. • The system will use the last setting you have made. • If you to unlock the extra cores of the Core Unlocker switch. 1-20 ASUS M4A87TD EVO For ensuring the system performance...
... clear the CMOS or load the BIOS setup defaults, the ASUS Core Unlocker item in the BIOS menu to activate the Core Unlocker function. • The system will use the last setting you have made. • If you to unlock the extra cores of the Core Unlocker switch. 1-20 ASUS M4A87TD EVO For ensuring the system performance...

User Manual
Page 33
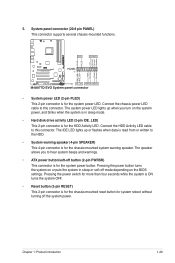
...ON, in sleep mode, or in soft‑off mode. Core Unlocker LED The Core Unlocker LED lights when the Core Unclocker switch is set to Enable. The illustration below shows the location of the onboard LED. 2. Chapter 1: Product introduction 1-21 1.11 Onboard LEDs 1. The Core... Unlocker LED keeps on lighting even though the ASUS Core Unlocker item in any motherboard component. Standby Power LED The motherboard comes with a standby power LED. The green LED lights up to ...
...ON, in sleep mode, or in soft‑off mode. Core Unlocker LED The Core Unlocker LED lights when the Core Unclocker switch is set to Enable. The illustration below shows the location of the onboard LED. 2. Chapter 1: Product introduction 1-21 1.11 Onboard LEDs 1. The Core... Unlocker LED keeps on lighting even though the ASUS Core Unlocker item in any motherboard component. Standby Power LED The motherboard comes with a standby power LED. The green LED lights up to ...
User Manual
Page 39
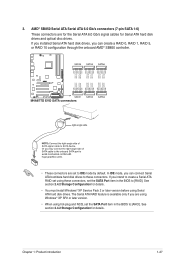
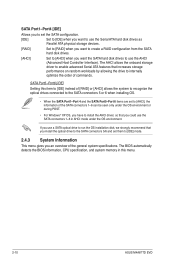
... create a RAID 0, RAID 1, RAID 5, or RAID 10 configuration through the onboard AMD® SB850 controller. • These connectors are set the SATA Port item in the BIOS to [RAID]. AMD® SB850 Serial ATA Serial ATA 6.0 Gb/s connectors (7-pin SATA 1-6) These connectors are using Windows® XP ...for details. The Serial ATA RAID feature is available only if you can connect Serial ATA boot/data hard disk drives to these connectors, set to IDE mode by default. See section 2.4.2 Storage Configuration for Serial ATA hard disk drives and optical disc drives. See section 2.4.2 ...
... create a RAID 0, RAID 1, RAID 5, or RAID 10 configuration through the onboard AMD® SB850 controller. • These connectors are set the SATA Port item in the BIOS to [RAID]. AMD® SB850 Serial ATA Serial ATA 6.0 Gb/s connectors (7-pin SATA 1-6) These connectors are using Windows® XP ...for details. The Serial ATA RAID feature is available only if you can connect Serial ATA boot/data hard disk drives to these connectors, set to IDE mode by default. See section 2.4.2 Storage Configuration for Serial ATA hard disk drives and optical disc drives. See section 2.4.2 ...
User Manual
Page 41
... drive activity LED (2-pin IDE_LED) This 2-pin connector is for the chassis-mounted system warning speaker. Pressing the power button turns the system on the BIOS settings.
... drive activity LED (2-pin IDE_LED) This 2-pin connector is for the chassis-mounted system warning speaker. Pressing the power button turns the system on the BIOS settings.
User Manual
Page 43
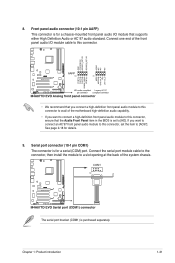
... (COM) port. Serial port connector (10-1 pin COM1) The connector is set the item to avail of the system chassis. Chapter 1: Product introduction 1-31 Connect one end of the front panel audio I /O module that the Azalia Front Panel item in the BIOS is for details. 9. The serial port bracket (COM1) is for... at the back of the motherboard high-definition audio capability. • If you want to connect a high-definition front panel audio module to this connector, set to this connector, ensure that supports either High Definition Audio or AC`97 audio standard. 8.
... (COM) port. Serial port connector (10-1 pin COM1) The connector is set the item to avail of the system chassis. Chapter 1: Product introduction 1-31 Connect one end of the front panel audio I /O module that the Azalia Front Panel item in the BIOS is for details. 9. The serial port bracket (COM1) is for... at the back of the motherboard high-definition audio capability. • If you want to connect a high-definition front panel audio module to this connector, set to this connector, ensure that supports either High Definition Audio or AC`97 audio standard. 8.
User Manual
Page 47
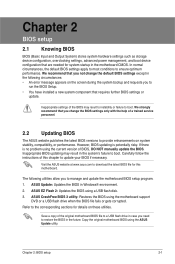
... normal circumstances, the default BIOS settings apply to most conditions to the corresponding sections for system startup in Windows® environment. 2. We strongly recommend that you to update your BIOS if necessary. ASUS EZ Flash 2: Updates the BIOS using the current version of this motherboard. ASUS CrashFree BIOS 3 utility: Restores the BIOS using the ASUS Update utility. Refer to...
... normal circumstances, the default BIOS settings apply to most conditions to the corresponding sections for system startup in Windows® environment. 2. We strongly recommend that you to update your BIOS if necessary. ASUS EZ Flash 2: Updates the BIOS using the current version of this motherboard. ASUS CrashFree BIOS 3 utility: Restores the BIOS using the ASUS Update utility. Refer to...
User Manual
Page 49
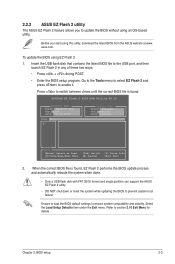
...BIOS default settings to enable it. To update the BIOS using an OS-based utility. Press to switch between drives until the correct BIOS file is found . Go to the Tools menu to select EZ Flash 2 and press to ensure system compatibility and stability. ASUSTeK EZ Flash 2 BIOS ROM Utility V4.14 Current ROM BOARD: M4A87TD EVO...Chapter 2: BIOS setup 2-3 2.2.2 ASUS EZ Flash 2 utility The ASUS EZ Flash 2 feature allows you start using this utility, download the latest BIOS from the ASUS website at www. When the correct BIOS file is found , EZ Flash 2 performs the BIOS update process ...
...BIOS default settings to enable it. To update the BIOS using an OS-based utility. Press to switch between drives until the correct BIOS file is found . Go to the Tools menu to select EZ Flash 2 and press to ensure system compatibility and stability. ASUSTeK EZ Flash 2 BIOS ROM Utility V4.14 Current ROM BOARD: M4A87TD EVO...Chapter 2: BIOS setup 2-3 2.2.2 ASUS EZ Flash 2 utility The ASUS EZ Flash 2 feature allows you start using this utility, download the latest BIOS from the ASUS website at www. When the correct BIOS file is found , EZ Flash 2 performs the BIOS update process ...
User Manual
Page 50
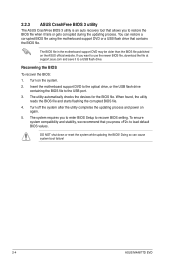
...USB flash drive containing the BIOS file to recover BIOS setting. When found, the utility reads the BIOS file and starts flashing the corrupted BIOS file. 4. Recovering the BIOS To recover the BIOS: 1. The utility automatically checks the devices for the BIOS file. DO NOT shut ...down or reset the system while updating the BIOS! The system requires you press to load default BIOS values. To ensure system compatibility and stability, we recommend that you to enter BIOS Setup to the USB port. 3. You can cause system boot failure! 2-4 ASUS M4A87TD EVO...
...USB flash drive containing the BIOS file to recover BIOS setting. When found, the utility reads the BIOS file and starts flashing the corrupted BIOS file. 4. Recovering the BIOS To recover the BIOS: 1. The utility automatically checks the devices for the BIOS file. DO NOT shut ...down or reset the system while updating the BIOS! The system requires you press to load default BIOS values. To ensure system compatibility and stability, we recommend that you to enter BIOS Setup to the USB port. 3. You can cause system boot failure! 2-4 ASUS M4A87TD EVO...
User Manual
Page 51
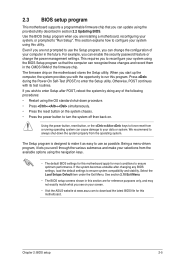
... make it lets you can update using the navigation keys. • The default BIOS settings for reference purposes only, and may not exactly match what you are installing a motherboard, reconfiguring your screen. • Visit the ASUS website at www.asus.com to turn the system off then back on your system, or prompted to...
... make it lets you can update using the navigation keys. • The default BIOS settings for reference purposes only, and may not exactly match what you are installing a motherboard, reconfiguring your screen. • Visit the ASUS website at www.asus.com to turn the system off then back on your system, or prompted to...
User Manual
Page 52
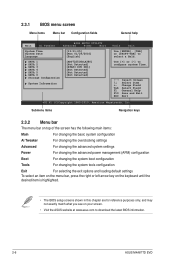
Use [+] or [-] to download the latest BIOS information. 2-6 ASUS M4A87TD EVO Submenu items Navigation keys 2.3.2 Menu bar The menu bar on top of the screen has the following main items: Main For changing the basic system configuration Ai Tweaker For changing the overclocking settings Advanced For changing the advanced system settings Power For changing the advanced power...
Use [+] or [-] to download the latest BIOS information. 2-6 ASUS M4A87TD EVO Submenu items Navigation keys 2.3.2 Menu bar The menu bar on top of the screen has the following main items: Main For changing the basic system configuration Ai Tweaker For changing the overclocking settings Advanced For changing the advanced system settings Power For changing the advanced power...
User Manual
Page 53
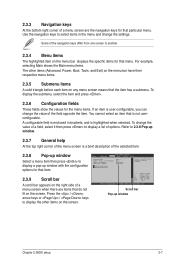
To change the settings. Main Advanced BIOS SETUP UTILITY Power Boot Tools Exit Suspend Mode Repost Video on the screen. Refer to 2.3.8 Pop-up window. 2.3.7 General help At the top right corner ... Megatrends, Inc. A configurable field is enclosed in the menu and change the value of a field, select it then press to display a pop-up window Chapter 2: BIOS setup 2-7
To change the settings. Main Advanced BIOS SETUP UTILITY Power Boot Tools Exit Suspend Mode Repost Video on the screen. Refer to 2.3.8 Pop-up window. 2.3.7 General help At the top right corner ... Megatrends, Inc. A configurable field is enclosed in the menu and change the value of a field, select it then press to display a pop-up window Chapter 2: BIOS setup 2-7
User Manual
Page 55
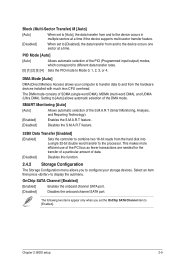
... Analysis, and Reporting Technology). [Enabled] Enables the S.M.A.R.T feature. [Disabled] Disables the S.M.A.R.T feature. 32Bit Data Transfer [Enabled] [Enabled] Sets the controller to combine two 16-bit reads from the hard disk into a single 32-bit double word transfer to display the submenu. Select... an item then press to the processor. Chapter 2: BIOS setup 2-9 PIO Mode [Auto] [Auto] Allows automatic selection of data. [Disabled] Disables this function. 2.4.2 Storage Configuration The Storage Configuration menu allows you set to [Disabled], the data transfer from and to [...
... Analysis, and Reporting Technology). [Enabled] Enables the S.M.A.R.T feature. [Disabled] Disables the S.M.A.R.T feature. 32Bit Data Transfer [Enabled] [Enabled] Sets the controller to combine two 16-bit reads from the hard disk into a single 32-bit double word transfer to display the submenu. Select... an item then press to the processor. Chapter 2: BIOS setup 2-9 PIO Mode [Auto] [Auto] Allows automatic selection of data. [Disabled] Disables this function. 2.4.2 Storage Configuration The Storage Configuration menu allows you set to [Disabled], the data transfer from and to [...
User Manual
Page 56
...BIOS automatically detects the BIOS information, CPU specification, and system memory in this item to [IDE] instead of [RAID] or [AHCI] allows the system to recognize the optical drives connected to the SATA connectors 5 or 6 when installing OS. • When the SATA Port1-Port 4 and the SATA Port5-Port 6 items are set... SATA hard disk drives to use the SATA connectors 1-6 in AHCI mode under the OS environment. SATA Port5-Port6 [IDE] Setting this menu. 2-10 ASUS M4A87TD EVO If you use a SATA optical drive to run the OS installation disk, we strongly recommend that you could use the AHCI ...
...BIOS automatically detects the BIOS information, CPU specification, and system memory in this item to [IDE] instead of [RAID] or [AHCI] allows the system to recognize the optical drives connected to the SATA connectors 5 or 6 when installing OS. • When the SATA Port1-Port 4 and the SATA Port5-Port 6 items are set... SATA hard disk drives to use the SATA connectors 1-6 in AHCI mode under the OS environment. SATA Port5-Port6 [IDE] Setting this menu. 2-10 ASUS M4A87TD EVO If you use a SATA optical drive to run the OS installation disk, we strongly recommend that you could use the AHCI ...

User Manual
Page 69
... options: [Disabled] [Enabled] Chapter 2: BIOS setup 2-23 Configuration options: [1st FLOPPY DRIVE] [Hard Drive] [ATAPI CD-ROM] [Disabled] 2.8.2 Boot Settings Configuration Quick Boot [Enabled] Enabling this item to [Enabled] to use the ASUS MyLogo 2™ feature. Configuration options: [...Off] [On] Wait for 'F1' If Error [Enabled] When set to [Disabled], BIOS performs all the POST items. Configuration ...
... options: [Disabled] [Enabled] Chapter 2: BIOS setup 2-23 Configuration options: [1st FLOPPY DRIVE] [Hard Drive] [ATAPI CD-ROM] [Disabled] 2.8.2 Boot Settings Configuration Quick Boot [Enabled] Enabling this item to [Enabled] to use the ASUS MyLogo 2™ feature. Configuration options: [...Off] [On] Wait for 'F1' If Error [Enabled] When set to [Disabled], BIOS performs all the POST items. Configuration ...
User Manual
Page 72
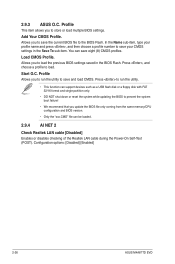
...name and press , and then choose a profile number to store or load multiple BIOS settings. Allows you to save the current BIOS file to the BIOS Flash. In the Name sub-item, type your CMOS settings in the BIOS Flash. 2.9.3 ASUS O.C. You can support devices such as a USB flash disk or a floppy ... • This function can save and load CMOS. Allows you to load. Start O.C. Press , and choose a profile to load the previous BIOS settings saved in the Save To sub-item. Add Your CMOS Profile. Load CMOS Profile. Configuration options: [Disabled] [Enabled] 2-26 ASUS M4A87TD EVO
...name and press , and then choose a profile number to store or load multiple BIOS settings. Allows you to save the current BIOS file to the BIOS Flash. In the Name sub-item, type your CMOS settings in the BIOS Flash. 2.9.3 ASUS O.C. You can support devices such as a USB flash disk or a floppy ... • This function can save and load CMOS. Allows you to load. Start O.C. Press , and choose a profile to load the previous BIOS settings saved in the Save To sub-item. Add Your CMOS Profile. Load CMOS Profile. Configuration options: [Disabled] [Enabled] 2-26 ASUS M4A87TD EVO


