
User Manual
Page 2
... below to enable or disable Turbo Unlocker at any time. Install ASUS TurboV EVO from the support DVD that came with the motherboard package. 2. The Turbo Unlocker monitor on system load. 6. In the ASUS TurboV EVO window, click More Settings, and then click CPU Ratio. 3. Turbo ...Unlocker instruction Specially-designed for AMD® 6-core and Black Edition processors, the ASUS exclusive Turbo Unlocker allows dynamic and automatic CPU core adjustments...
... below to enable or disable Turbo Unlocker at any time. Install ASUS TurboV EVO from the support DVD that came with the motherboard package. 2. The Turbo Unlocker monitor on system load. 6. In the ASUS TurboV EVO window, click More Settings, and then click CPU Ratio. 3. Turbo ...Unlocker instruction Specially-designed for AMD® 6-core and Black Edition processors, the ASUS exclusive Turbo Unlocker allows dynamic and automatic CPU core adjustments...
User Manual
Page 4
... utility 2-2 2.2.2 ASUS EZ Flash 2 utility 2-3 2.2.3 ASUS CrashFree BIOS 3 utility 2-4 2.3 BIOS setup program 2-5 2.3.1 BIOS menu screen 2-6 2.3.2 Menu bar 2-6 2.3.3 Navigation keys 2-7 2.3.4 Menu items 2-7 2.3.5 Submenu items 2-7 2.3.6 Configuration fields 2-7 2.3.7 General help 2-7 2.3.8 Pop-up window 2-7 2.3.9 Scroll bar 2-7 2.4 Main menu 2-8 2.4.1 SATA 1-6 2-8 2.4.2 Storage Configuration 2-9 2.4.3 System Information 2-10 2.5 Ai Tweaker menu 2-11 2.5.1 CPU Level UP 2-11 2.5.2 OC Tuner Utility 2-11 2.5.3 Ai...
... utility 2-2 2.2.2 ASUS EZ Flash 2 utility 2-3 2.2.3 ASUS CrashFree BIOS 3 utility 2-4 2.3 BIOS setup program 2-5 2.3.1 BIOS menu screen 2-6 2.3.2 Menu bar 2-6 2.3.3 Navigation keys 2-7 2.3.4 Menu items 2-7 2.3.5 Submenu items 2-7 2.3.6 Configuration fields 2-7 2.3.7 General help 2-7 2.3.8 Pop-up window 2-7 2.3.9 Scroll bar 2-7 2.4 Main menu 2-8 2.4.1 SATA 1-6 2-8 2.4.2 Storage Configuration 2-9 2.4.3 System Information 2-10 2.5 Ai Tweaker menu 2-11 2.5.1 CPU Level UP 2-11 2.5.2 OC Tuner Utility 2-11 2.5.3 Ai...

User Manual
Page 9
M4A87TD EVO specifications summary CPU Chipset System bus Memory Multi-... CPUs support up to 5200 MT/s; Install a 64-bit Windows® OS when you want to install 4GB or more , Windows® 32-bit operating system may only recognize less than 3GB. ASUS Noise Filter VIA® VT6308P controller supports 2 x IEEE...6Gb/s supporting RAID 0, 1, 5, and 10 JMicron® JMB361 SATA & PATA controllers: - 1 x UltraDMA 133/100 for up to www.asus.com or this user manual for AMD® Phenom™ II / Athlon™ II / ��S��e�m�p�r�o&#...
M4A87TD EVO specifications summary CPU Chipset System bus Memory Multi-... CPUs support up to 5200 MT/s; Install a 64-bit Windows® OS when you want to install 4GB or more , Windows® 32-bit operating system may only recognize less than 3GB. ASUS Noise Filter VIA® VT6308P controller supports 2 x IEEE...6Gb/s supporting RAID 0, 1, 5, and 10 JMicron® JMB361 SATA & PATA controllers: - 1 x UltraDMA 133/100 for up to www.asus.com or this user manual for AMD® Phenom™ II / Athlon™ II / ��S��e�m�p�r�o&#...
User Manual
Page 15
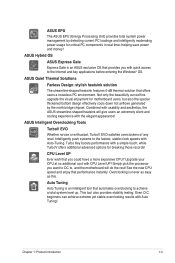
...achieve extreme yet stable overclocking results with the elegant appearance! ASUS Hybrid OS ASUS Express Gate Express Gate is an ASUS exclusive OS that you want to OC to achieve a total system level up. ASUS Quiet Thermal Solutions Fanless Design: stylish heatsink solution The ...usability and aesthetics, the ASUS streamline-shaped heatsink will do the rest! ASUS Intelligent Overclocking Tools TurboV EVO Whether novice or enthusiast, TurboV EVO satisfies overclockers of any level. Intelligently push systems to the Internet and key applications before entering the Windows® OS. Upgrade ...
...achieve extreme yet stable overclocking results with the elegant appearance! ASUS Hybrid OS ASUS Express Gate Express Gate is an ASUS exclusive OS that you want to OC to achieve a total system level up. ASUS Quiet Thermal Solutions Fanless Design: stylish heatsink solution The ...usability and aesthetics, the ASUS streamline-shaped heatsink will do the rest! ASUS Intelligent Overclocking Tools TurboV EVO Whether novice or enthusiast, TurboV EVO satisfies overclockers of any level. Intelligently push systems to the Internet and key applications before entering the Windows® OS. Upgrade ...
User Manual
Page 21
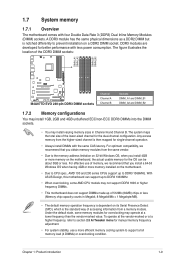
...-marked value. DDR3 modules are developed for better performance with four Double Data Rate 3 (DDR3) Dual Inline Memory Modules (DIMM) sockets. With ASUS Design, this motherboard can be about 3GB or less. A DDR3 module has the same physical dimensions as a DDR2 DIMM but is then mapped ...For system stability, use of accessing information from the same vendor. • Due to the memory address limitation on 32-bit Windows OS, when you install a 64-bit Windows OS when having 4GB or more memory installed on a DDR2 DIMM socket. Any excess memory from the higher-sized channel is...
...-marked value. DDR3 modules are developed for better performance with four Double Data Rate 3 (DDR3) Dual Inline Memory Modules (DIMM) sockets. With ASUS Design, this motherboard can be about 3GB or less. A DDR3 module has the same physical dimensions as a DDR2 DIMM but is then mapped ...For system stability, use of accessing information from the same vendor. • Due to the memory address limitation on 32-bit Windows OS, when you install a 64-bit Windows OS when having 4GB or more memory installed on a DDR2 DIMM socket. Any excess memory from the higher-sized channel is...
User Manual
Page 31
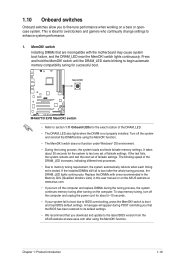
Replace the DIMMs with the motherboard may cause system boot failure, and the DRAM_LED near the MemOK! switch does not function under Windows® OS environment. • During the tuning process, the system loads and tests failsafe memory settings. If the installed DIMMs still fail to boot ... switch to boot and load BIOS default settings. switch Installing DIMMs that you download and update to the latest BIOS version from the ASUS website at www.asus.com. • If you turn off the computer and replace DIMMs during POST reminding you that the BIOS has been restored to its...
Replace the DIMMs with the motherboard may cause system boot failure, and the DRAM_LED near the MemOK! switch does not function under Windows® OS environment. • During the tuning process, the system loads and tests failsafe memory settings. If the installed DIMMs still fail to boot ... switch to boot and load BIOS default settings. switch Installing DIMMs that you download and update to the latest BIOS version from the ASUS website at www.asus.com. • If you turn off the computer and replace DIMMs during POST reminding you that the BIOS has been restored to its...
User Manual
Page 39
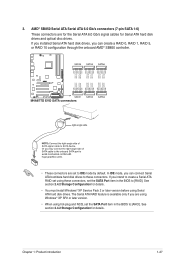
...; XP Service Pack 2 or later version before using Serial ATA hard disk drives. If you installed Serial ATA hard disk drives, you are using Windows® XP SP2 or later version. • When using these connectors. See section 2.4.2 Storage Configuration for details. AMD® SB850 Serial ATA Serial ATA 6.0 Gb/s ...
...; XP Service Pack 2 or later version before using Serial ATA hard disk drives. If you installed Serial ATA hard disk drives, you are using Windows® XP SP2 or later version. • When using these connectors. See section 2.4.2 Storage Configuration for details. AMD® SB850 Serial ATA Serial ATA 6.0 Gb/s ...
User Manual
Page 45
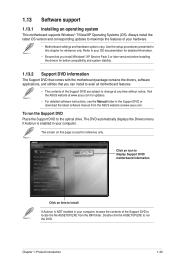
... 1-33 Click an icon to display Support DVD/ motherboard information Click an item to change at www.asus.com. 1.13 Software support 1.13.1 Installing an operating system This motherboard supports Windows® 7/Vista/XP Operating Systems (OS). Refer to locate the file ASSETUP.EXE from the... ASUS website at any time without notice. The screen on this chapter for reference only. Use the ...
... 1-33 Click an icon to display Support DVD/ motherboard information Click an item to change at www.asus.com. 1.13 Software support 1.13.1 Installing an operating system This motherboard supports Windows® 7/Vista/XP Operating Systems (OS). Refer to locate the file ASSETUP.EXE from the... ASUS website at any time without notice. The screen on this chapter for reference only. Use the ...
User Manual
Page 47
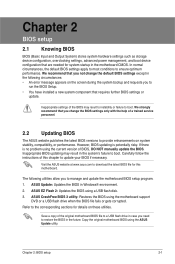
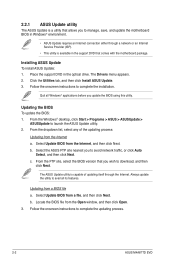
... to a USB flash drive in case you change the default BIOS settings except in the following utilities allow you to restore the BIOS in Windows® environment. 2. Chapter 2: BIOS setup 2-1 If there is potentially risky. Refer to boot. Inappropriate settings of this motherboard. Inappropriate BIOS...normal circumstances, the default BIOS settings apply to most conditions to boot. However, BIOS updating is no problem using a USB flash disk. 3. ASUS Update: Updates the BIOS in the future. We recommend that you need to run the BIOS Setup. • You have installed a new ...
... to a USB flash drive in case you change the default BIOS settings except in the following utilities allow you to restore the BIOS in Windows® environment. 2. Chapter 2: BIOS setup 2-1 If there is potentially risky. Refer to boot. Inappropriate settings of this motherboard. Inappropriate BIOS...normal circumstances, the default BIOS settings apply to most conditions to boot. However, BIOS updating is no problem using a USB flash disk. 3. ASUS Update: Updates the BIOS in the future. We recommend that you need to run the BIOS Setup. • You have installed a new ...
User Manual
Page 48
... nearest you wish to complete the installation. Select Update BIOS from a BIOS file a. From the Windows® desktop, click Start > Programs > ASUS > ASUSUpdate > ASUSUpdate to complete the updating process. 2-2 ASUS M4A87TD EVO b. Click the Utilities tab, and then click Install ASUS Update. 3. Follow the onscreen instructions to download, and then click Next. c. Updating from a file, and...
... nearest you wish to complete the installation. Select Update BIOS from a BIOS file a. From the Windows® desktop, click Start > Programs > ASUS > ASUSUpdate > ASUSUpdate to complete the updating process. 2-2 ASUS M4A87TD EVO b. Click the Utilities tab, and then click Install ASUS Update. 3. Follow the onscreen instructions to download, and then click Next. c. Updating from a file, and...
User Manual
Page 53
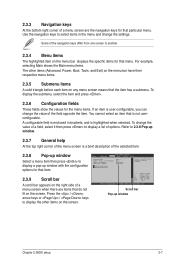
... Item Change Field General Help Save and Exit Exit v02.61 (C)Copyright 1985-2010, American Megatrends, Inc. To change the settings. Scroll bar Pop-up window with the configuration options for that menu. Some of the navigation keys differ from one screen to display a pop-up... Monitor [Auto] [No] [Disabled] [Enabled] Select the ACPI state used for the menu items. If an item is highlighted when selected. Refer to 2.3.8 Pop-up window. 2.3.7 General help At the top right corner of the menu screen is not userconfigurable. 2.3.3 Navigation keys At the bottom right corner of a menu screen are...
... Item Change Field General Help Save and Exit Exit v02.61 (C)Copyright 1985-2010, American Megatrends, Inc. To change the settings. Scroll bar Pop-up window with the configuration options for that menu. Some of the navigation keys differ from one screen to display a pop-up... Monitor [Auto] [No] [Disabled] [Enabled] Select the ACPI state used for the menu items. If an item is highlighted when selected. Refer to 2.3.8 Pop-up window. 2.3.7 General help At the top right corner of the menu screen is not userconfigurable. 2.3.3 Navigation keys At the bottom right corner of a menu screen are...
User Manual
Page 56
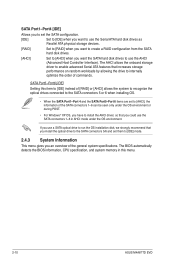
.... 2.4.3 System Information This menu gives you an overview of the SATA connectors 1-6 can be seen only under the OS environment or during POST. • For Windows® XP OS, you could use the AHCI (Advanced Host Controller Interface). SATA Port5-Port6 [IDE] Setting this item to [IDE] instead of [RAID] or... you want the SATA hard disk drives to install the AHCI driver, so that you have to use the SATA connectors 1-6 in this menu. 2-10 ASUS M4A87TD EVO
.... 2.4.3 System Information This menu gives you an overview of the SATA connectors 1-6 can be seen only under the OS environment or during POST. • For Windows® XP OS, you could use the AHCI (Advanced Host Controller Interface). SATA Port5-Port6 [IDE] Setting this item to [IDE] instead of [RAID] or... you want the SATA hard disk drives to install the AHCI driver, so that you have to use the SATA connectors 1-6 in this menu. 2-10 ASUS M4A87TD EVO
User Manual
Page 71
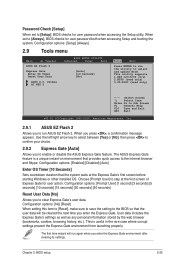
... Select Item Enter Go to Sub Screen F1 General Help F10 Save and Exit ESC Exit v02.61 (C)Copyright 1985-2010, American Megatrends, Inc. 2.9.1 ASUS EZ Flash 2 Allows you press , a confirmation message appears. Configuration options: [Enabled] [Disabled] [Auto] Enter OS Timer [10 Seconds] Sets ...password both when accessing Setup and booting the system. Choose [Prompt User] to stay at the Express Gate's first screen before starting Windows or other installed OS. User data includes the Express Gate's settings as well as any personal information stored by the web browser (bookmarks...
... Select Item Enter Go to Sub Screen F1 General Help F10 Save and Exit ESC Exit v02.61 (C)Copyright 1985-2010, American Megatrends, Inc. 2.9.1 ASUS EZ Flash 2 Allows you press , a confirmation message appears. Configuration options: [Enabled] [Disabled] [Auto] Enter OS Timer [10 Seconds] Sets ...password both when accessing Setup and booting the system. Choose [Prompt User] to stay at the Express Gate's first screen before starting Windows or other installed OS. User data includes the Express Gate's settings as well as any personal information stored by the web browser (bookmarks...

User Manual
Page 73
...menu to ensure the values you to load the default values for the BIOS items, and save your selections, choose this option, a confirmation window appears. Select one of the parameters on even when the PC is turned off. When you made and restore the previously saved values. Pressing...option only if you do not want to save or discard your changes, the program prompts you with a message asking if you press , a confirmation window appears. An onboard backup battery sustains the CMOS RAM so it stays on the Setup menus. Exit & Discard Changes Select this operation. ←→...
...menu to ensure the values you to load the default values for the BIOS items, and save your selections, choose this option, a confirmation window appears. Select one of the parameters on even when the PC is turned off. When you made and restore the previously saved values. Pressing...option only if you do not want to save or discard your changes, the program prompts you with a message asking if you press , a confirmation window appears. An onboard backup battery sustains the CMOS RAM so it stays on the Setup menus. Exit & Discard Changes Select this operation. ←→...


