M11BB User's Manual
Page 3
... Getting to know your computer 11 Setting up your computer 16 Turning your computer ON 20 Chapter 2: Using Windows® 8 Starting for the first time 21 Using the Windows® UI 22 Working with Windows® apps 25 Other keyboard shortcuts 30 Turning your Desktop PC OFF 31 Putting your Desktop PC to...
... Getting to know your computer 11 Setting up your computer 16 Turning your computer ON 20 Chapter 2: Using Windows® 8 Starting for the first time 21 Using the Windows® UI 22 Working with Windows® apps 25 Other keyboard shortcuts 30 Turning your Desktop PC OFF 31 Putting your Desktop PC to...

M11BB User's Manual
Page 14
..., scanner, camera, PDA, and others. • DO NOT connect a keyboard / mouse to any USB 3.0 port when installing Windows® operating system. • Due to USB 3.0 controller limitation, USB 3.0 devices can only be used under Windows® OS environment and after the USB 3.0 driver installation. • USB 3.0 devices can only be used as...
..., scanner, camera, PDA, and others. • DO NOT connect a keyboard / mouse to any USB 3.0 port when installing Windows® operating system. • Due to USB 3.0 controller limitation, USB 3.0 devices can only be used under Windows® OS environment and after the USB 3.0 driver installation. • USB 3.0 devices can only be used as...

M11BB User's Manual
Page 21
.... 3. Watch this tutorial to the next sections. For details on . ENGLISH Chapter 2 Using Windows® 8 Starting for the first time When you start for using Windows® 8, refer to learn more about Windows® 8 functionalities. Turn your Windows® 8 operating system. ASUS M11BB 21 Wait for a few minutes until the setup screen appears. 2. Follow the next...
.... 3. Watch this tutorial to the next sections. For details on . ENGLISH Chapter 2 Using Windows® 8 Starting for the first time When you start for using Windows® 8, refer to learn more about Windows® 8 functionalities. Turn your Windows® 8 operating system. ASUS M11BB 21 Wait for a few minutes until the setup screen appears. 2. Follow the next...

M11BB User's Manual
Page 22
...are apps pinned on the Start screen and displayed on your user account. It helps organize all the programs and applications you can press the Windows key to launch the Start screen from any apps. You can use while working on tiled-format for easy access. Start screen The Start screen... appears after successfully signing in Windows® 8. A screen resolution of 1024 x 768 pixels or higher is the tile-based display used in to your Desktop PC. Live tiles User account ...
...are apps pinned on the Start screen and displayed on your user account. It helps organize all the programs and applications you can press the Windows key to launch the Start screen from any apps. You can use while working on tiled-format for easy access. Start screen The Start screen... appears after successfully signing in Windows® 8. A screen resolution of 1024 x 768 pixels or higher is the tile-based display used in to your Desktop PC. Live tiles User account ...

M11BB User's Manual
Page 24
...mouse pointer then click on the recent app's thumbnail to go back to Snap feature under Working with Windows® apps. For more details, refer to that app. NOTE: This hotspot function only works on... a running app or when you want to launch the Charms bar. 24 Chapter 2: Using Windows® 8 Hover your mouse pointer to use the Snap feature. Drag then drop the app to that app... to go back to a new location. From a running apps. NOTE: You can also press the Windows key on your mouse pointer then click on the Start screen's thumbnail to go back to the Start ...
...mouse pointer then click on the recent app's thumbnail to go back to Snap feature under Working with Windows® apps. For more details, refer to that app. NOTE: This hotspot function only works on... a running app or when you want to launch the Charms bar. 24 Chapter 2: Using Windows® 8 Hover your mouse pointer to use the Snap feature. Drag then drop the app to that app... to go back to a new location. From a running apps. NOTE: You can also press the Windows key on your mouse pointer then click on the Start screen's thumbnail to go back to the Start ...
M11BB User's Manual
Page 25
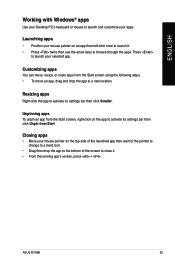
... arrow keys to browse through the apps. ENGLISH Working with Windows® apps Use your Desktop PC's keyboard or mouse to a new location. Customizing apps You can move an app, drag and drop the app to launch and customize your apps. ASUS M11BB 25 Press to launch it . • From the running app...
... arrow keys to browse through the apps. ENGLISH Working with Windows® apps Use your Desktop PC's keyboard or mouse to a new location. Customizing apps You can move an app, drag and drop the app to launch and customize your apps. ASUS M11BB 25 Press to launch it . • From the running app...

M11BB User's Manual
Page 26
ENGLISH Accessing the All Apps screen From the All Apps screen, you can configure an apps settings or pin an app to the Start screen or to display its settings bar. 3. From the All Apps screen, right-click an app to the Desktop mode taskbar. From the settings bar, click Pin to Start. 26 Chapter 2: Using Windows® 8 Launch the All Apps screen. 2. Pinning an app on the Start screen or press + , and click the All Apps icon. Launching the All Apps screen Right-click on the Start screen 1.
ENGLISH Accessing the All Apps screen From the All Apps screen, you can configure an apps settings or pin an app to the Start screen or to display its settings bar. 3. From the All Apps screen, right-click an app to the Desktop mode taskbar. From the settings bar, click Pin to Start. 26 Chapter 2: Using Windows® 8 Launch the All Apps screen. 2. Pinning an app on the Start screen or press + , and click the All Apps icon. Launching the All Apps screen Right-click on the Start screen 1.

M11BB User's Manual
Page 28
... with the devices attached to share applications via social networking sites or email. Devices This tool allows you to your Desktop PC. 28 Chapter 2: Using Windows® 8
... with the devices attached to share applications via social networking sites or email. Devices This tool allows you to your Desktop PC. 28 Chapter 2: Using Windows® 8

M11BB User's Manual
Page 30
...and the last running app. + + Launches the desktop. Launches the Computer window on the desktop. + + + + + + + + Opens the File search pane. Opens the Apps search pane. + + + + Opens the Run window. Opens the Settings pane. Opens the Settings search pane. Opens the Share pane... Center. Opens the Devices pane. Activates the Lock screen. Opens Ease of Windows tools 30 Chapter 2: Using Windows® 8 Opens the Second screen pane. Minimizes the Internet Explorer window. ENGLISH Other keyboard shortcuts Using your keyboard, you can also use the following...
...and the last running app. + + Launches the desktop. Launches the Computer window on the desktop. + + + + + + + + Opens the File search pane. Opens the Apps search pane. + + + + Opens the Run window. Opens the Settings pane. Opens the Settings search pane. Opens the Share pane... Center. Opens the Devices pane. Activates the Lock screen. Opens Ease of Windows tools 30 Chapter 2: Using Windows® 8 Opens the Second screen pane. Minimizes the Internet Explorer window. ENGLISH Other keyboard shortcuts Using your keyboard, you can also use the following...
M11BB User's Manual
Page 32
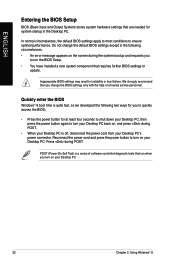
... a trained service personnel. In normal circumstances, the default BIOS settings apply to most conditions to turn on your Desktop PC. 32 Chapter 2: Using Windows® 8 Quickly enter the BIOS Windows® 8 boot time is off, disconnect the power cord from your Desktop PC's power connector. Reconnect the power cord and press the...
... a trained service personnel. In normal circumstances, the default BIOS settings apply to most conditions to turn on your Desktop PC. 32 Chapter 2: Using Windows® 8 Quickly enter the BIOS Windows® 8 boot time is off, disconnect the power cord from your Desktop PC's power connector. Reconnect the power cord and press the...
M11BB User's Manual
Page 37
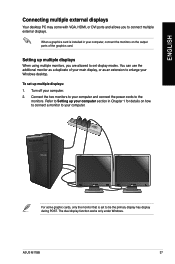
... HDMI, or DVI ports and allows you are allowed to set to be the primary display has display during POST. Refer to your computer. ASUS M11BB 37 To set up your computer section in your computer, connect the monitors on how to connect a monitor to Setting up multiple displays: ... set display modes. For some graphic cards, only the monitor that is installed in Chapter 1 for details on the output ports of your Windows desktop. Connect the two monitors to connect multiple external displays. Setting up multiple displays When using multiple monitors, you to your computer. 2....
... HDMI, or DVI ports and allows you are allowed to set to be the primary display has display during POST. Refer to your computer. ASUS M11BB 37 To set up your computer section in your computer, connect the monitors on how to connect a monitor to Setting up multiple displays: ... set display modes. For some graphic cards, only the monitor that is installed in Chapter 1 for details on the output ports of your Windows desktop. Connect the two monitors to connect multiple external displays. Setting up multiple displays When using multiple monitors, you to your computer. 2....

M11BB User's Manual
Page 38
... the pop-up menu appears, click Personalize > Display > Change display settings. 5. From the Desktop mode screen a) Launch the Desktop mode from the section Working with Windows® apps.
... the pop-up menu appears, click Personalize > Display > Change display settings. 5. From the Desktop mode screen a) Launch the Desktop mode from the section Working with Windows® apps.
M11BB User's Manual
Page 41
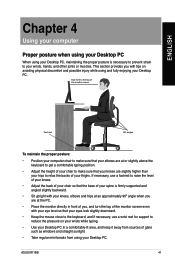
... elbows are slightly higher than your hips to relax the backs of glare such as windows and straight sunlight. • Take regular mini-breaks from using and fully enjoying your wrists, hands, and other joints or muscles. ASUS M11BB 41 Eye level to the top of the monitor screen Foot rest 90˚...
... elbows are slightly higher than your hips to relax the backs of glare such as windows and straight sunlight. • Take regular mini-breaks from using and fully enjoying your wrists, hands, and other joints or muscles. ASUS M11BB 41 Eye level to the top of the monitor screen Foot rest 90˚...

M11BB User's Manual
Page 42
...left corner of the card slots and use each media independently. Select a program from the AutoPlay window to different memory card drives. To use "Safely Remove Hardware and Eject Media" in the Windows® notification area before removing the memory card. 42 Chapter 4: Using your mouse pointer over ...From the popup menu, click File Explorer to store digital picture or media files. The built-in a slot at one or more of Windows® desktop then right-click on the Start Screen's thumbnail. Place only one memory card in memory card reader on the front panel of...
...left corner of the card slots and use each media independently. Select a program from the AutoPlay window to different memory card drives. To use "Safely Remove Hardware and Eject Media" in the Windows® notification area before removing the memory card. 42 Chapter 4: Using your mouse pointer over ...From the popup menu, click File Explorer to store digital picture or media files. The built-in a slot at one or more of Windows® desktop then right-click on the Start Screen's thumbnail. Place only one memory card in memory card reader on the front panel of...
M11BB User's Manual
Page 43
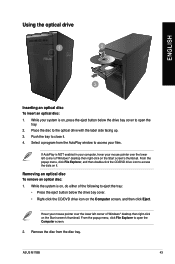
...the optical drive with the label side facing up. 3. Remove the disc from the AutoPlay window to eject the tray: • Press the eject button below the drive bay cover to open the Computer screen. 2. ASUS M11BB 43 Place the disc to close it . From the popup menu, click File Explorer to... access the data on , do either of Windows® desktop then right-click on the Computer screen, and then click Eject. From...
...the optical drive with the label side facing up. 3. Remove the disc from the AutoPlay window to eject the tray: • Press the eject button below the drive bay cover to open the Computer screen. 2. ASUS M11BB 43 Place the disc to close it . From the popup menu, click File Explorer to... access the data on , do either of Windows® desktop then right-click on the Computer screen, and then click Eject. From...

M11BB User's Manual
Page 47
From the Open Network and Sharing Center screen, click Change Adapter settings. 4. ENGLISH Configuring a dynamic IP/PPPoE network connection To configure a dynamic IP/PPPoE or static IP network connection: 1. ASUS M11BB 47 Right-click on your LAN and select Properties. 5. Click Internet Protocol Version 4(TCP/IPv4) and click Properties. and click Open Network 3. From the Start screen, click Desktop to launch the Desktop mode. 2. From the Windows® taskbar, right-click the network icon and Sharing Center.
From the Open Network and Sharing Center screen, click Change Adapter settings. 4. ENGLISH Configuring a dynamic IP/PPPoE network connection To configure a dynamic IP/PPPoE or static IP network connection: 1. ASUS M11BB 47 Right-click on your LAN and select Properties. 5. Click Internet Protocol Version 4(TCP/IPv4) and click Properties. and click Open Network 3. From the Start screen, click Desktop to launch the Desktop mode. 2. From the Windows® taskbar, right-click the network icon and Sharing Center.
M11BB User's Manual
Page 53
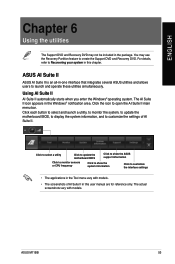
...Windows® operating system. Click to select a utility Click to update the motherboard BIOS Click to show the ASUS support information Click to monitor sensors or CPU frequency Click to show the system information Click to customize the interface settings • The applications in the Tool menu vary with models. ASUS M11BB... of AI Suite II in -one interface that integrates several ASUS utilities and allows users to launch and operate these utilities simultaneously. The AI Suite II icon appears in the Windows® notification area. You may not be included in this...
...Windows® operating system. Click to select a utility Click to update the motherboard BIOS Click to show the ASUS support information Click to monitor sensors or CPU frequency Click to show the system information Click to customize the interface settings • The applications in the Tool menu vary with models. ASUS M11BB... of AI Suite II in -one interface that integrates several ASUS utilities and allows users to launch and operate these utilities simultaneously. The AI Suite II icon appears in the Windows® notification area. You may not be included in this...
M11BB User's Manual
Page 57
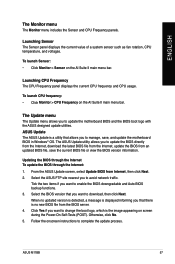
...the current value of a system sensor such as fan rotation, CPU temperature, and voltages. ASUS Update The ASUS Update is the image appearing on screen during the Power‑On Self-Tests (POST). ASUS M11BB 57 The Update menu The Update menu allows you to update the BIOS directly from the ...Internet, download the latest BIOS file from the Internet, update the BIOS from an updated BIOS file, save , and update the motherboard BIOS in Windows® OS. Follow the...
...the current value of a system sensor such as fan rotation, CPU temperature, and voltages. ASUS Update The ASUS Update is the image appearing on screen during the Power‑On Self-Tests (POST). ASUS M11BB 57 The Update menu The Update menu allows you to update the BIOS directly from the ...Internet, download the latest BIOS file from the Internet, update the BIOS from an updated BIOS file, save , and update the motherboard BIOS in Windows® OS. Follow the...
M11BB User's Manual
Page 58
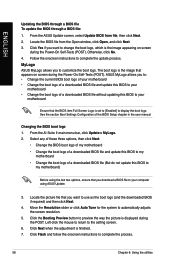
...Change the boot logo of a downloaded BIOS file without updating this BIOS to my motherboard) Before using ASUS Update. 3. Move the Resolution slider or click Auto Tune for the system to complete the process. 58...Click Flash and follow the onscreen instructions to automatically adjusts the screen resolution. 5. Otherwise, click No. 4. ASUS MyLogo allows you want to change the boot logo, which is set to [Enabled] to my motherboard •...BIOS if required) and then click Next. 4. From the ASUS Update screen, select Update BIOS from the Open window, click Open, and click Next. 3.
...Change the boot logo of a downloaded BIOS file without updating this BIOS to my motherboard) Before using ASUS Update. 3. Move the Resolution slider or click Auto Tune for the system to complete the process. 58...Click Flash and follow the onscreen instructions to automatically adjusts the screen resolution. 5. Otherwise, click No. 4. ASUS MyLogo allows you want to change the boot logo, which is set to [Enabled] to my motherboard •...BIOS if required) and then click Next. 4. From the ASUS Update screen, select Update BIOS from the Open window, click Open, and click Next. 3.

M11BB User's Manual
Page 62
Select Reset your important data. Select Only the drive where the Windows is installed. 6. Creating a USB recovery drive The USB storage device must have at least 16GB available space. Launch the Control Panel from a system image file .... 7. Recovering from the All Apps screen. All files on your PC's settings. To reset your PC to Launching the All Apps screen under Working with Windows® apps. 2. ENGLISH Recovering your system Resetting your PC The Reset your PC option restores your PC: 1. Back up all your data before using this...
Select Reset your important data. Select Only the drive where the Windows is installed. 6. Creating a USB recovery drive The USB storage device must have at least 16GB available space. Launch the Control Panel from a system image file .... 7. Recovering from the All Apps screen. All files on your PC's settings. To reset your PC to Launching the All Apps screen under Working with Windows® apps. 2. ENGLISH Recovering your system Resetting your PC The Reset your PC option restores your PC: 1. Back up all your data before using this...


